Making a grid of photographs is simple, due to CSS Grid. However making the grid do fancy issues after the photographs have been positioned will be difficult to tug off.
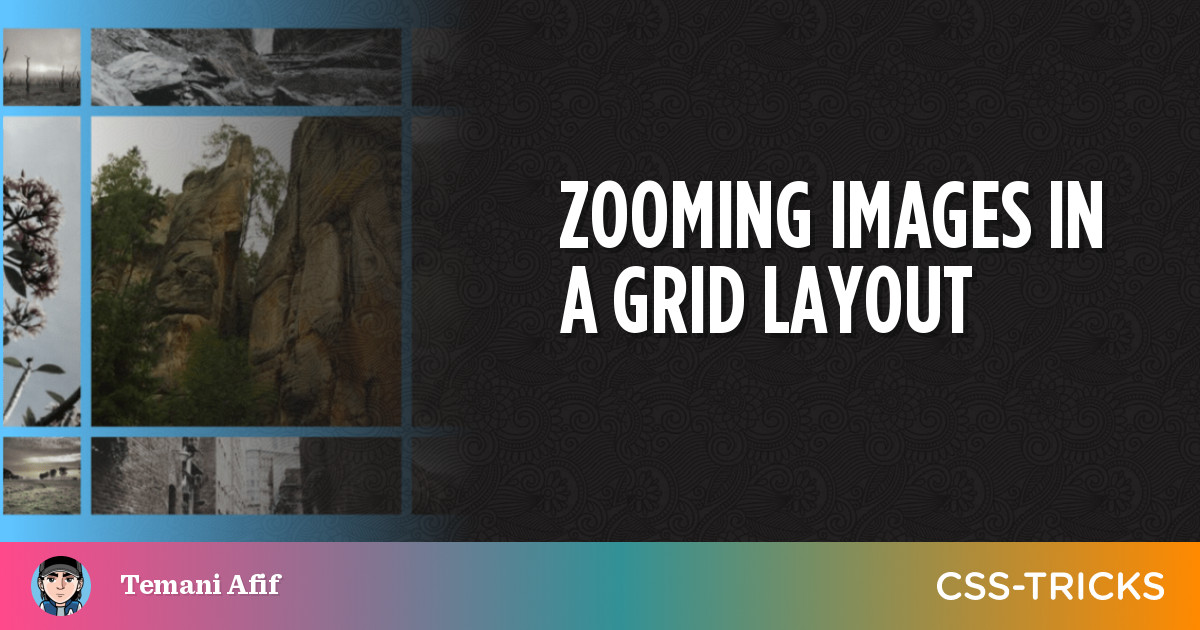
Say you need to add some fancy hover impact to the photographs the place they develop and zoom past the rows and columns the place they sit? We will try this!
Cool, proper? For those who examine the code, you received’t discover any JavaScript, complicated selectors, and even magic numbers. And this is just one instance amongst many we’ll discover!
Constructing the grid
The HTML code to create the grid is so simple as an inventory of photographs inside a container. We don’t want greater than that.
<div class="gallery">
  <img>
  <img>
  <img>
  <!-- and so on. -->
</div>
For the CSS, we first begin by setting the grid utilizing the next:
.gallery {
  --s: 150px; /* controls the dimensions */
  --g: 10px;  /* controls the hole */

  show: grid;
  hole: var(--g);
  width: calc(3*var(--s) + 2*var(--g)); /* 3 instances the dimensions plus 2 instances the hole */
  aspect-ratio: 1;
  grid-template-columns: repeat(3, auto);
}
Briefly, we’ve two variables, one which controls the dimensions of the photographs and one which units the dimensions of the hole between photographs. aspect-ratio helps maintain issues in proportion.
You is likely to be questioning why we’re solely defining three columns however no rows. No, I didn’t neglect the rows — we simply don’t must explicitly set them. CSS Grid is able to robotically putting objects on implicit rows and columns, that means we get as many rows as wanted to any variety of photographs we throw at it. We will explicitly outline the rows as an alternative however we have to add grid-auto-flow: column to ensure the browser will create the wanted columns for us.
Right here is an instance for example each instances. The distinction is that one flows in a row course an the opposite in a column course.
Take a look at this different article I wrote for extra in regards to the implicit grids and the auto-placement algorithm.
Now that we’ve our grid, it’s time to type the photographs:
.gallery > img {
  width: 0;
  top: 0;
  min-height: 100%;
  min-width: 100%;
  object-fit: cowl;
}
The hover impact we’re making depends on this CSS. It in all probability seems to be bizarre to you that we’re making photographs which have each no width or top however have a minimal width and top of 100%. However you will note that it’s a reasonably neat trick for what we are attempting to realize.
What I’m doing right here is telling the browser that the photographs must have 0 width and top but in addition must have a minimal top equal to 100%… however 100% of what? When utilizing percentages, the worth is relative to one thing else. On this case, our picture is positioned inside a grid cell and we have to know that dimension to know what’s 100% is relative to.
The browser will first ignore min-height: 100% to calculate the dimensions of the grid cells, however it’ll use the top: 0 in its calculation. Meaning our photographs won’t contribute to the dimensions of the grid cells… as a result of they technically haven’t any bodily dimension. This may lead to three equal columns and rows which can be based mostly on the dimensions of the grid (which we outlined on the .gallery’s width and aspect-ratio). The peak of every grid cell is nothing however the variable --s we outlined (identical for the width).

Now that we’ve the scale of our grid’s cells, the browser will use it with min-height: 100% (and min-width: 100%) which can power the photographs to fully fill the area of every grid cell. The entire thing might look a bit complicated however the principle concept is to make it possible for the grid defines the dimensions of the photographs reasonably than the opposite means round. I don’t need the picture to outline the dimensions of the grid and you’ll perceive why after including the hover impact.
Creating the hover impact
What we have to do is improve the size of the photographs once they’re hovered. We will try this by adjusting a picture’s width and top on :hover:
.gallery {
  --f: 1.5; /* controls the size issue */
}

.gallery img:hover{
  width:  calc(var(--s) * var(--f));
  top: calc(var(--s) * var(--f));
}
I added a brand new customized variable, --f, to the combo as a scale issue to regulate the dimensions on hover. Discover how I’m multiplying the dimensions variable, --s, by it to calculate the brand new picture dimension.
However you mentioned that the picture dimension must be 0. What’s going on? I’m misplaced…
What I mentioned continues to be true however I’m making an exception for the hovered picture. I’m telling the browser that just one picture could have a dimension that’s not equal to zero — so it’ll contribute to the dimension of the grid — whereas all of the others stay equal to 0.

The left facet reveals the grid in its pure state with none hovered photographs, which is what the precise facet is exhibiting. All of the grid cells on the left facet are equal in dimension since all the photographs haven’t any bodily dimensions.
On the precise facet, the second picture within the first row is hovered, which provides it dimensions that have an effect on the grid cell’s dimension. The browser will make that particular grid cell larger on hover, which contributes to the general dimension. And for the reason that dimension of the entire grid is about (as a result of we set a set width on the .gallery), the opposite grid cells will logically reply by turning into smaller so as to maintain the .gallery‘s general dimension in tact.
That’s our zoom impact in motion! By rising the dimensions of just one picture we have an effect on the entire grid configuration, and we mentioned earlier than that the grid defines the dimensions of the photographs so that every picture stretches inside its grid cell to fill all of the area.
To this, we add a contact of transition and use object-fit to keep away from picture distortion and the phantasm is ideal!
I do know that the logic behind the trick is just not straightforward to understand. Don’t fear for those who don’t absolutely perceive it. A very powerful is to grasp the construction of the code used and how you can modify it to get extra variations. That’s what we’ll do subsequent!
Including extra photographs
We created a 3×3 grid to clarify the principle trick, however you’ve got in all probability guessed that we there’d no must cease there. We will make the variety of columns and rows variables and add as many photographs as we wish.
.gallery {
  --n: 3; /* variety of rows*/
  --m: 4; /* variety of columns */
  --s: 150px; /* management the dimensions */
  --g: 10px;  /* management the hole */
  --f: 1.5;   /* management the size issue */

  show: grid;
  hole: var(--g);
  width:  calc(var(--m)*var(--s) + (var(--m) - 1)*var(--g));
  top: calc(var(--n)*var(--s) + (var(--n) - 1)*var(--g));
  grid-template-columns: repeat(var(--m),auto);
}
Now we have two new variables for the variety of rows and columns. Then we merely outline the width and top of our grid utilizing them. Similar for grid-template-columns which makes use of the --m variable. And similar to earlier than, we don’t must explicitly outline the rows for the reason that CSS Grid’s auto-placement characteristic will do the job for us regardless of what number of picture parts we’re utilizing.
Why not totally different values for the width and top? We will try this:
.gallery {
  --n: 3; /* variety of rows*/
  --m: 4; /* variety of columns */
  --h: 120px; /* management the peak */
  --w: 150px; /* management the width */
  --g: 10px;  /* management the hole */
  --f: 1.5;   /* management the size issue */

  show: grid;
  hole: var(--g);
  width:  calc(var(--m)*var(--w) + (var(--m) - 1)*var(--g));
  top: calc(var(--n)*var(--h) + (var(--n) - 1)*var(--g));
  grid-template-columns: repeat(var(--m),auto);
}

.gallery img:hover{
  width:  calc(var(--w)*var(--f));
  top: calc(var(--h)*var(--f));
}
We exchange --s with two variables, one for the width, --w, and one other one for the peak, --h. Then we modify every part else accordingly.
So, we began with a grid with a set dimension and variety of parts, however then we made a brand new set of variables to get any configuration we wish. All we’ve to do is so as to add as many photographs as we wish and modify the CSS variables accordingly. The mixtures are limitless!
A full-screen gallery of photographs
What a couple of full-screen model? Sure, that’s additionally attainable. All we’d like is to know what values we have to assign to our variables. If we wish N rows of photographs and we wish our grid to be full display screen, we first want to resolve for a top of 100vh:
var(--n) * var(--h) + (var(--n) - 1) * var(--g) = 100vhSimilar logic for the width, however utilizing vw as an alternative of vh:
var(--m) * var(--w) + (var(--m) - 1) * var(--g) = 100vwWe do the mathematics to get:
--w: (100vw - (var(--m) - 1) * var(--g)) / var(--m)
--h: (100vh - (var(--n) - 1) * var(--g)) / var(--n)
Completed!
It’s the identical actual HTML however with some up to date variables that change the grid’s sizing and conduct.
Word that I’ve omitted the components we beforehand set on the .gallery‘s width and top and changed them with 100vw and 100vh, respectively. The components will give us the identical consequence however since we all know what worth we wish, we will ditch all that added complexity.
We will additionally simplify the --h and --w by eradicating the hole from the equation in favor of this:
--h: calc(100vh / var(--n)); /* Viewport top divided by variety of rows */
--w: calc(100vw / var(--m)); /* Viewport width divided by variety of columns */
This may make the hovered picture develop a bit greater than the earlier instance, however it’s no huge deal since we will management the size with the --f variable we’re utilizing as a multiplier.
And for the reason that variables are utilized in one place we will nonetheless simplify the code by eradicating them altogether:
It’s vital to notice this optimization applies solely to the full-screen instance and to not the examples we’ve lined. This instance is a specific case the place we will make the code lighter by eradicating a number of the complicated calculation work we would have liked within the different examples.
We even have every part we have to create the favored sample of increasing panels:
Let’s dig even deeper
Did you discover that our scale issue will be lower than 1? We will outline the dimensions of the hovered picture to be smaller than --h or --w however the picture will get larger on hover.
The preliminary grid cell dimension is the same as --w and --h, so why do a smaller values make the grid cell larger? Shouldn’t the cell get smaller, or a minimum of preserve its preliminary dimension? And what’s the closing dimension of the grid cell?
We have to dig deeper into how the CSS Grid algorithm calculates the dimensions of the grid cells. And that is includes understanding CSS Grid’s default stretch alignment.
Right here’s an instance to grasp the logic.
On the left facet of the demo, I outlined a two-column with auto width. We get the intuitive consequence: two equal columns (and two equal grid cells). However the grid I arrange on the precise facet of the demo, the place I’m updating the alignment utilizing place-content: begin, seems to don’t have anything.
DevTools helps present us what’s actually taking place in each instances:

Within the second grid, we’ve two columns, however their widths equal zero, so we get two grid cells which can be collapsed on the top-left nook of the grid container. That is not a bug however the logical results of the grid’s alignment. After we dimension a column (or row) with auto, it implies that its content material dictates its dimension — however we’ve an empty div with no content material to make room for.
However since stretch is the default alignment and we’ve sufficient area inside our grid, the browser will stretch each grid cells equally to cowl all that space. That’s how the grid on the left winds up with two equal columns.
From the specification:
Word that sure values of
justify-contentandalign-contentmay cause the tracks to be spaced aside (space-around,space-between,space-evenly) or to be resized (stretch).
Word the “to be resized” which is the important thing right here. Within the final instance, I used place-content which is the shorthand for justify-content and align-content
And that is buried someplace in the Grid Sizing algorithm specs:
This step expands tracks which have an auto max observe sizing perform by dividing any remaining optimistic, particular free area equally amongst them. If the free area is indefinite, however the grid container has a particular min-width/top, use that dimension to calculate the free area for this step as an alternative.
“Equally” explains why we wind up with equal grid cells, but it surely applies to “the free area” which is essential.
Let’s take the earlier instance and add content material to one of many divs:
We added a sq. 50px picture. Right here’s an illustration of how every grid in our instance responds to that picture:

Within the first case, we will see that the primary cell (in purple) is larger than the second (in blue). Within the second case, the dimensions of the primary cell modifications to suit the bodily dimension of the picture whereas the second cell stays with no dimensions. The free area is split equally, however the first cell has extra content material inside which makes it larger.
That is the mathematics to determine our free area:
(grid width) - (hole) - (picture width) = (free area)
200px - 5px - 50px = 145px
Divided by two — the variety of columns — we get a width of 72.5px for every column. However we add the dimensions of the picture, 50px, to the primary column which leaves us with one column at 122.5px and the second equal to 72.5px.
The identical logic applies to our grid of photographs. All the photographs have a dimension equal to 0 (no content material) whereas the hovered picture contributes to dimension — even when it’s simply 1px — making its grid cell larger than the others. Because of this, the size issue will be any worth larger than 0 even decimals between 0 and 1.
To get the ultimate width of the grid cells, we do the identical calculation to get the next:
(container width) - (sum of all gaps) - (hovered picture width) = (free area)The width of container is outlined by:
var(--m)*var(--w) + (var(--m) - 1)*var(--g)…and all of the gaps are equal to:
(var(--m) - 1)*var(--g)…and for the hovered picture we’ve:
var(--w)*var(--f)We will calculate all of that with our variables:
var(--m)*var(--w) - var(--w)*var(--f) = var(--w)*(var(--m) - var(--f))The variety of columns is outlined by --m ,so we divide that free area equally to get:
var(--w)*(var(--m) - var(--f))/var(--m)…which provides us the dimensions of the non-hovered photographs. For hovered photographs, we’ve this:
var(--w)*(var(--m) - var(--f))/var(--m) + var(--w)*var(--f)
var(--w)*((var(--m) - var(--f))/var(--m) + var(--f))
If we need to management the ultimate dimension of the hovered picture, we contemplate the above components to get the precise dimension we wish. If, for instance, we wish the picture to be twice as huge:
(var(--m) - var(--f))/var(--m) + var(--f) = 2So, the worth of our scale multiplier, --f, must be equal to:
var(--m)/(var(--m) - 1)For 3 columns we could have 3/2 = 1.5 and that’s the size issue I used within the first demo of this text as a result of I wished to make the picture twice as huge on hover!
The identical logic applies to the peak calculation and in case we need to management each of them independently we might want to contemplate two scale components to ensure we’ve a particular width and top on hover.
.gallery {
  /* identical as earlier than */
   --fw: 1.5; /* controls the size issue for the width */
   --fh: 1.2; /* controls the size issue for the peak */

  /* identical as earlier than */
}

.gallery img:hover{
  width:  calc(var(--w)*var(--fw));
  top: calc(var(--h)*var(--fh));
}
Now, you realize all of the secrets and techniques to create any sort of picture grid with a cool hover impact whereas additionally having management of the sizing you need utilizing the mathematics we simply lined.
Wrapping up
In my final article, we created a complex-looking grid with a number of strains of CSS that put CSS Grid’s implicit grid and auto-placement options to make use of. On this article, we relied on some CSS Grid sizing trickery to create a flowery grid of photographs that zoom on hover and trigger the grid to regulate accordingly. All of this with a simplified code that’s straightforward to regulate utilizing CSS variables!
Within the subsequent article, we’ll play with shapes! We are going to mix CSS grid with masks and clip-path to get fancy grid of photographs.
