
Smartphone batteries don’t final for lengthy, and charging cables, which may break after just a few months of use, will be annoying.
Wi-fi Chargers could be a handy different – you merely set it and neglect it. However how does it work, precisely?
Whereas wi-fi charging might look like a latest invention, its origins date again greater than 100 years to the well-known Serbian-American inventor, Nikola Tesla.
Working Precept
Within the late 1800s, Nikola Tesla efficiently transmitted electrical energy by way of the air. He used a course of referred to as resonant-inductive coupling, which works by making a magnetic discipline between a transmitter (which sends electrical energy) and a receiver (which receives the electrical energy) to energy mild bulbs in his New York Metropolis laboratory.
A couple of years later, he patented the Tesla coil – a tower with a coil on the high that shot bolts of electrical energy. Tesla had a lot grander visions of a wi-fi energy grid, however these desires had been by no means realized.
The identical fundamental precept of inductive charging applies to smartphone wi-fi charging.
Invoice of Materials:
| COMPONENT NAME | QUANTITY | DESCRIPTION | COST IN
APPROX. |
| 0.3 – 0.4mm Enamelled Copper wire | 5 Metres | For Transmitter & Receiver Coils | 250 |
| Resistor 1K | 1 No | For present limiting | 1 |
| Transistor BC-547 | 1 No | For Switching | 10 |
| LED | 1 No | For Half Rectifier | 3 |
| USB Cable | 1 No | For Charging cell | 50 |
| 9V battery with connector | 1 No | For Transmitter energy provide | 20 |
| TOTAL IN RS | 33 |
You need to use Stepdown Transformer (230/5V-1A) with DC rectifier additionally.
Designing Course of:
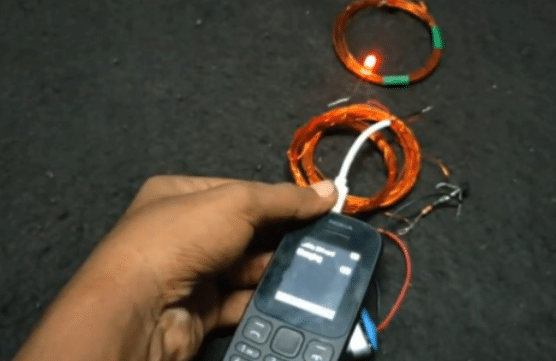
Step 1: Designing Transmitter & Receiving coil
Right here, I’ve taken one plastic bottle (8CM dia) for making a coil. You need to use PVC pipe or some other materials for making coil like shapes. Wound 15Turns Enamelled copper wire over the fabric. After 15 Turns must terminate and once more wound 15 Turns of copper wire (like Centre Tapped Transformer).
For Receiving coil, Equally Wound 15 Turns of enamelled copper wire and make it.

Step 2: Connections
Now prepared for connections, in my circuit I used BC547 NPN transistor for oscillator. You need to use TTC5200 Transistor for higher outcomes.
Join Transistor base by way of 1K resistor for present limitation. The middle tapped coil is related to Constructive terminal of battery and Adverse terminal related to Transistor Emitter terminal. The opposite two finish of transmitter coil are related to Transistor collector terminal and base terminal by way of present limiting resistor.
Receiving coil ends are related to USB cable by way of LED (Right here LED is used for indication and half wave rectifier function).

Circuit Diagram:

Step 3: Precept of Working
The Transmitter coil is related to battery by way of Transistor an DC present is transformed into frequency (Oscillating circuit). The oscillating present contained in the transmitting coil causes the coil to emit 1Mhz magnetic discipline. This oscillating magnetic discipline induces {an electrical} present within the receiving coil. The induced
present is alternating present so it want convert into DC for cell charging functions so I used LED for indication and rectification function.
