
Utilized in many fashionable tasks, webpack is an incredible instrument that optimizes utility sources in order that they work extra effectively and successfully on any machine. webpack helps to compile and bundle modules right into a single file, decreasing HTTP requests and enhancing utility efficiency in consequence.
With webpack, TypeScript code is compiled right into a JavaScript file that’s browser-friendly. With webpack loaders, you can too convert SASS and LESS recordsdata right into a single CSS bundle file.
On this article, we’ll discover ways to use webpack to compile TypeScript to JavaScript, bundle supply code right into a single JavaScript file, and use a supply map for debugging. We’ll additionally discover use webpack plugins.
To observe together with this tutorial, you’ll want the next:
- npm
- Node.js: If you have already got Node.js put in, guarantee it’s ≥v8.x.
- Any code editor of your selection; I’ll use Visible Studio Code
- Fundamental information of TypeScript
Let’s get began!
Desk of contents
webpack loaders
By default, webpack solely understands JavaScript recordsdata, treating each imported file as a module. webpack can not compile or bundle non-JavaScript recordsdata, subsequently, it makes use of a loader.
Loaders inform webpack compile and bundle static belongings. They’re used for compiling TypeScript modules into JavaScript, dealing with utility kinds, and even linting your code with ESLint.
A few webpack loaders embody ts-loader, css-loader, style-loader, and extra; we’ll focus on them later on this tutorial.
Organising webpack and TypeScript
Let’s begin by establishing our challenge. First, you need to have TypeScript put in in your laptop. To put in TypeScript globally, use the command under:
npm set up -g typescript
Putting in TypeScript globally eliminates the necessity to set up TypeScript every time you begin a brand new challenge.
Subsequent, we’ll set up the webpack and ts-loader packages as dependencies in our challenge:
npm init -y
npm set up -D webpack webpack-cli ts-loader
webpack configuration
By default, webpack doesn’t want a configuration file. It’s going to assume that the entry level in your challenge is src/index.js and can output the minified and optimized end in dist/important.js throughout manufacturing.
If you wish to use plugins or loaders, you then’ll want to make use of the webpack configuration file, permitting you to specify how webpack will work along with your challenge, which recordsdata to compile, and the place the output bundle file shall be.
Let’s add the webpack configuration file to our challenge. From the challenge root folder, create a webpack.config.js file with the next configurations:
const path = require('path');

module.exports = {
  entry: './src/index.ts',
  module: {
    guidelines: [
      {
        test: /.ts?$/,
        use: 'ts-loader',
        exclude: /node_modules/,
      },
    ],
  },
  resolve: {
    extensions: ['.tsx', '.ts', '.js'],
  },
  output: {
    filename: 'bundle.js',
    path: path.resolve(__dirname, 'dist'),
  },
  devServer: {
    static: path.be a part of(__dirname, "dist"),
    compress: true,
    port: 4000,
  },
};
Let’s overview a number of the webpack configuration choices. For one, the entry possibility is the place to begin for the appliance, the place webpack begins to construct a dependency graph. webpack will proceed to different modules primarily based on the entry file.
The output possibility tells webpack the place to avoid wasting bundle recordsdata and means that you can title the bundle file. Lastly, the module possibility tells webpack course of modules with particular guidelines utilizing loaders.
TypeScript configuration
The TypeScript configuration file controls how TypeScript shall be compiled to JavaScript and specifies the varied compiler choices required for transpiling TypeScript.
Extra nice articles from LogRocket:
From the challenge root folder, create the tsconfig.json file and add the next configurations:
{
    "compilerOptions": {
        "noImplicitAny": true,
        "goal": "ES5",
        "module": "ES2015"
    }
}
The goal possibility is the model of JavaScript you wish to transpile TypeScript to, whereas module is the format of the import assertion used. You may set the module to CommonJS, ES6, or UMD since webpack will deal with all module programs.
Package deal configuration
Now, we have to add a webpack script that may run the webpack.config.js file for us.
So as to add the webpack script, open the bundle.json file and add the next scripts to the script possibility:
"begin": "webpack-dev-server --mode growth",
"construct" : "webpack --mode manufacturing"
The bundle.json file will now include the next configuration settings:
{
  "title": "webpack-setup",
  "model": "1.0.0",
  "description": "",
  "important": "dist/important.js",
  "dependencies": {},
  "devDependencies": {
    "ts-loader": "^8.0.3",
    "typescript": "^4.0.2",
    "webpack": "^4.44.1",
    "webpack-cli": "^3.3.12"
  },
  "scripts": {
    "develop": "webpack-dev-server --mode growth",
    "construct": "webpack –mode manufacturing"
  }
}
Operating the develop script will begin the app in growth mode:
npm develop
Operating the construct script will run the app in manufacturing mode:
npm run construct
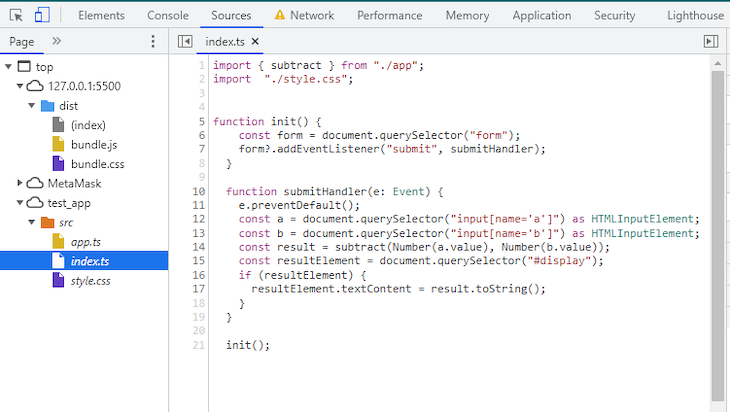
Now, let’s create a easy TypeScript program that may subtract two numbers. Contained in the src folder, create an index.ts file and add the next TypeScript code:
import { subtract } from "./app";

perform init() {
    const type = doc.querySelector("type");
    type?.addEventListener("submit", submitHandler);
  }

  perform submitHandler(e: Occasion) {
    e.preventDefault();
    const num1 = doc.querySelector("enter[name="firstnumber"]") as HTMLInputElement;
    const num2 = doc.querySelector("enter[name="secondnumber"]") as HTMLInputElement;
    const consequence = subtract(Quantity(num1.worth), Quantity(num2.worth));
    const resultElement = doc.querySelector("p");
    if (resultElement) {
      resultElement.textContent = consequence.toString();
    }
  }

  init();
Subsequent, create one other app.ts file and add the next code:
export perform subtract(a: quantity, b: quantity): quantity {
  return a - b;
}
Go forward and run the appliance in manufacturing mode utilizing the code under:
npm run construct
After working the construct command, webpack will transpile the 2 TypeScript recordsdata into JavaScript code and generate a bundle.js file contained in the dist folder.
Creating HTML pages with HtmlWebpackPlugin
The HtmlWebpackPlugin permits webpack to generate an ordinary HTML web page that may serve the generated bundle recordsdata.
When the filename of the bundle modifications or is hashed, HTMLWebpackPlugin updates the filenames on the HTML web page. First, to put in HtmlWebpackPlugin, run the command under:
npm set up --save-dev html-webpack-plugin
Subsequent, we have to import and add HtmlWebpackPlugin to the webpack configuration plugin possibility as follows:
const HtmlWebpackPlugin = require("html-webpack-plugin");
const path = require('path');

module.exports = {
  entry: './src/index.ts',
  module: {
    guidelines: [
      {
        test: /.ts?$/,
        use: 'ts-loader',
        exclude: /node_modules/,
      }
    ],
  },
  resolve: {
    extensions: ['.tsx', '.ts', '.js'],
  },
  output: {
    filename: 'bundle.js',
    path: path.resolve(__dirname, 'dist'),
  },

  plugins: [
    new HtmlWebpackPlugin({
        title: 'our project',
        template: 'src/custom.html' })
   ],

  devServer: {
    static: path.be a part of(__dirname, "dist"),
    compress: true,
    port: 4000,
  },
};
The template is a customized HTML file generated by HtmlWebpackPlugin to be injected into the HTML web page. To create the customized HTML, contained in the src folder, create a customized.html file and add the next HTML code:
<!DOCTYPE html>
<html>
  <head>
    <meta charset="utf-8" />
  </head>
  <physique>
    <div class="cal">
      <middle>
    <type><br>
      <p>Consequence : <span id="show"></span></p>
      <enter kind="quantity" class="enter" placeholder="Enter first quantity" title="a" worth="1" min="1" min="9" /><br>
      <enter kind="quantity" class="enter" placeholder="Enter second quantity" title="b" worth="1" min="1" min="9" /><br><br>
      <button kind="submit" class="button">Subtract</button>

    </type>
  </middle>
  </div>
  </physique>
</html>
You don’t have to incorporate the script or hyperlink tags within the customized HTML; HtmlWebpackPlugin will care for that by linking the bundle file URL with the generated web page.
Operating the app in manufacturing mode will generate the index.html HTML web page contained in the dist folder.
css-loader tells webpack work with the CSS module. It interprets @import and URL() as import/require() and resolves them. css-loader allows webpack to compile all CSS recordsdata and convert them into JavaScript format.
Bundling CSS recordsdata with style-loader makes HTML web page kinds unresponsive till the Bundle.js is totally loaded. The style-loader injects CSS into the DOM, however the bundled JavaScript file has to load fully earlier than the kinds are injected. To unravel this, we will use MiniCssExtractPlugin.
The MiniCssExtractPlugin extracts CSS recordsdata and bundles them right into a single bundle.css file. That is helpful for decreasing the dimensions of your CSS belongings and avoiding pointless HTTP requests to load them.
We will set up css-loader and MiniCssExtractPlugin by working the instructions under within the terminal:
npm set up css-loader --save-dev
npm set up css-minimizer-webpack-plugin --save-dev
Now, let’s add the css-loader and MiniCssExtractPlugin to the webpack.config.js file.
On the prime of the webpack.config.js file, import the MiniCssExtractPlugin module utilizing the code under:
const MiniCssExtractPlugin = require("mini-css-extract-plugin");
Then, we’ll add a brand new rule to the guidelines property as follows:
…
{
        check: /.css$/,
        use: [MiniCssExtractPlugin.loader, "css-loader"]
}
…
When css-loader compiles all of the CSS recordsdata into JavaScript, MiniCssExtractPlugin.loader hundreds the CSS into the CSS bundle file.
Subsequent, we’ll add MiniCssExtractPlugin to the plugin possibility as follows:
plugins: [
    new HtmlWebpackPlugin({
        title: 'our project', // Load a custom template (lodash by default)
        template: 'src/custom.html' }),
    new MiniCssExtractPlugin({
      filename:"bundle.css"})
  ]
Now that we’ve configured css-loader and MiniCssExtractPlugin, let’s create a CSS file and import it into index.ts. Contained in the src folder, create an index.css file and add the next CSS code:
type {
    background-color:pink;
    margin-top:100px;
    border-radius:40px;
}
.cal{
    width:550px;
    peak:300px;
    margin-left:400px;
}

.button{
    border-radius:10px;
    margin-top:20px;
    margin-bottom:20px;
}
.enter{
    border-radius:10px;
    margin-top:40px;
}
Inside index.ts, import the CSS fashion as follows:
import kinds "./index.css"
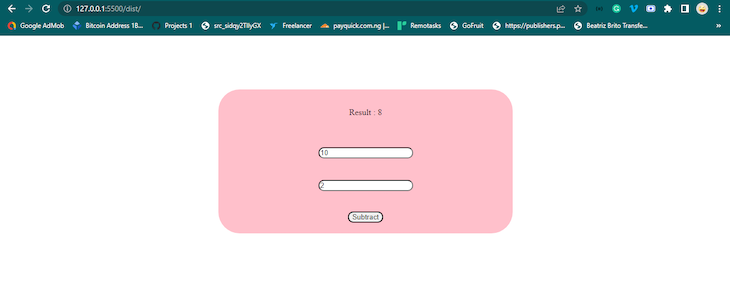
Operating npm run construct will bundle the CSS and apply it to index.html. Once you load index.html on the browser, it ought to appear to be the next picture:
Minifying CSS
We will use the css-minimizer-webpack-plugin to scale back the dimensions of CSS recordsdata by eradicating unused CSS guidelines and protecting solely the mandatory ones.
css-minimizer-webpack-plugin analyzes the compiled CSS file and finds any unused kinds. This plugin will then take away these unused kinds out of your ultimate CSS file, thereby decreasing its measurement.
Run the set up command under to put in css-minimizer-webpack-plugin:
npm set up css-minimizer-webpack-plugin --save-dev
Let’s add css-minimizer-webpack-plugin to the webpack configuration. First, import the plugin as follows:
const CssMinimizerPlugin = require("css-minimizer-webpack-plugin");
Then, we’ll add a brand new optimization property to the webpack configuration as follows:
optimization: {
    minimizer: [
      new CssMinimizerPlugin()
    ],
  }
After we run the construct command, bundle.css shall be minified however bundle.js won’t. The default bundle.js minimizer has been overridden with the minimizer possibility that we set. To unravel this, we have to minify the JavaScript utilizing TerserWebpackPlugin.
Minifying JavaScript
Within the present model of webpack on the time of writing, v5.74.0 and later, you don’t have to put in the TerserWebpackPlugin because it’s included out of the field. First, we’ve got to import TerserWebpackPlugin:
const TerserPlugin = require("terser-webpack-plugin");
Then, add TerserPlugin to the minimizer possibility as follows:
optimization: {
    minimizer: [
      new CssMinimizerPlugin(),
     new TerserPlugin()
    ],
  }
Should you run the construct script and have a look at the bundle recordsdata within the dist folder, you’ll see that each JavaScript and CSS are minified.
Utilizing Copywebpackplugin
We will configure webpack to repeat utility belongings from the event folder into the construct folder dist utilizing CopyWebpackPlugin. This plugin can copy recordsdata like pictures, movies, and different belongings into the dist folder.
Set up CopyWebpackPlugin utilizing the command under:
npm set up copy-webpack-plugin --save-dev
Now, let’s add CopyWebpackPlugin to the webpack configuration. Import the plugin as follows:
const CopyPlugin = require("copy-webpack-plugin");
Subsequent, we’ll add CopyWebpackPlugin to the plugin possibility. The from property is the folder that we’ll copy from, and the to property is the folder in dist listing to repeat all recordsdata to:
...
plugins: [
new HtmlWebpackPlugin({
        title: 'our project', // Load a custom template (lodash by default)
        template: 'src/custom.html' }),
    new MiniCssExtractPlugin({
      filename:"bundle.css"}),
    new CopyPlugin({
      patterns: [
        { from: "src/img", to: "img" }
      ]
    }),
  ]

...
Debugging with a supply map
After we construct to the bundle by compiling TypeScript recordsdata into JavaScript recordsdata, we’d have to debug and check the bundle file utilizing our browser’s DevTool.
Once you’re debugging your code on a browser’s DevTool, you’ll discover that solely the bundle recordsdata seem. At any time when there may be an error in our TypeScript code, it’ll solely be indicated within the bundle file, making it onerous to hint errors again to TypeScript for correction. Nonetheless, with a supply map, we will simply debug TypeScript utilizing our DevTool:
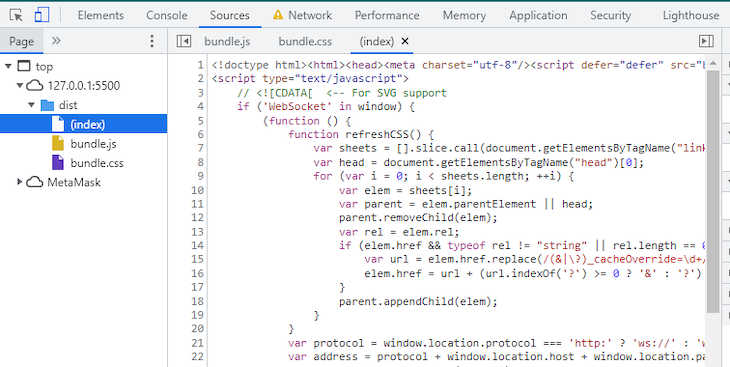
Supply maps show the unique supply file, making it simple for us to debug TypeScript and repair bundles and minified JavaScript code.
Supply map .map recordsdata include particulars of each the unique supply recordsdata and the bundle recordsdata. DevTools makes use of this file to map the unique supply file with the bundle file.
To generate .map recordsdata for the bundle recordsdata, we have to configure each webpack and TypeScript. Within the TypeScript configuration file, add sourceMap to the compiler possibility and set its worth to true:
{
    "compilerOptions": {
        "noImplicitAny": true,
        "goal": "ES5",
        "module": "ES2015",
        "sourceMap": true
    }
}
Subsequent, we’ll add the devtool property to the webpack configuration and set it to true, telling webpack to generate an acceptable supply map for every bundle file:
module.exports = {
  devtool: 'source-map',
   ...
}
Once you run the construct command, you’ll be capable to debug the unique supply code instantly:
Conclusion
As TypeScript’s recognition continues to develop, webpack has develop into an essential possibility for builders seeking to optimize their tasks. With webpack plugins, we will optimize TypeScript utility sources.
On this tutorial, we walked by way of the step-by-step means of establishing webpack with TypeScript. We additionally realized optimize TypeScript functions utilizing webpack plugins, and we explored debugging our TypeScript code with a supply map.
LogRocket proactively surfaces and diagnoses an important points in your TypeScript apps

1000’s of engineering and product groups use LogRocket to scale back the time it takes to know the basis reason behind technical and value points of their TypeScript apps. With LogRocket, you’ll spend much less time on back-and-forth conversations with prospects and take away the infinite troubleshooting course of. LogRocket means that you can spend extra time constructing new issues and fewer time fixing bugs.
Proactively repair your TypeScript apps — strive LogRocket at this time.
