
Offering customers with type area choices to pick from, quite than requiring them to manually enter info, can vastly enhance the usability of your app. An instance is a registration type, the place a person might have to enter their state, nation, or date of beginning.
On this article, we’ll discover utilizing Apple’s UIPickerView to supply customers with a collection of information decisions offered in a wheel format.
We’ll show tips on how to add UIPickerView to a Swift type to supply customers with selection alternatives for every area.
Let’s get began!
Leap forward:
What’s UIPickerView?
UIPickerView is a subclass of UIView. It’s helpful for iOS apps that use a spinning wheel with many decisions for the person.
@MainActor class UIPickerView: UIView
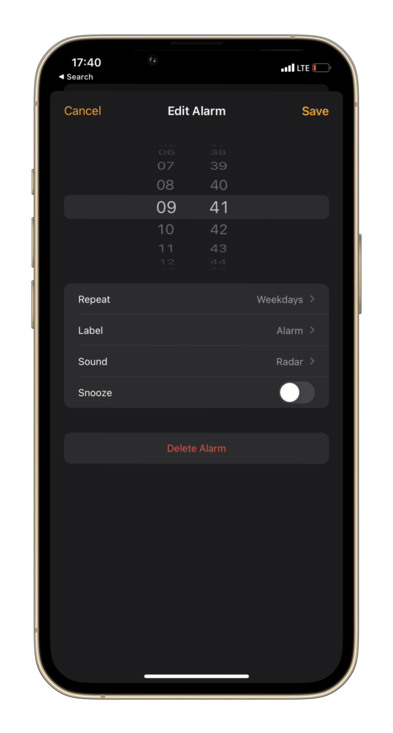
One instance of the sort of app is a slot machine, the place a person spins the wheels to play the sport. One other basic instance is the iOS Clock app, wherein the wheel is used to set the alarm. This app makes use of UIDatePicker, a customized subclass of UIPickerView, to set the alarm time.
What’s the UIPickerViewDataSource protocol?
The UIPickerViewDataSource protocol helps to supply the variety of parts and rows for the picker view. We conform to this protocol to supply the information supply for the picker view just like the variety of parts, and the variety of rows in every element, for displaying the picker view information.
This protocol has two strategies for offering the counts for the picker view. Each strategies are required to be applied for any objects that conform to the UIPickerViewDataSource protocol.
The primary technique units the variety of parts or columns that the picker view ought to show:
Extra nice articles from LogRocket:
func numberOfComponents(in pickerView: UIPickerView) -> Int
Within the case of the alarm display, we’ve got two parts.
The second technique units the variety of rows in every element that the picker view ought to show:
func pickerView(_ pickerView: UIPickerView,
     numberOfRowsInComponent element: Int) -> Int
Let’s take into account the alarm display instance once more. The primary element (hours) has 24 rows, and the second element (minutes) has 60 rows. The desired element is a zero-indexed quantity figuring out a element of UIPickerView. The parts are numbered from left to proper. So, the primary element is 0 and the second element is 1.
Now, let’s take a look at a few of UIPickerView’s most important strategies:
What’s the UIPickerViewDelegate protocol?
The UIPickerViewDelegate protocol is used to supply the counts for the picker view to show. Nevertheless, the UIPickerViewDelegate protocol is used to supply the picker view with the information it might want to assemble itself.
@MainActor protocol UIPickerViewDelegate
The UIPickerViewDataSource protocol’s strategies return:
- Row dimensions: the row top and row width for every element
- Row content material: the title, attributed title, or view for every row
- Row choice: the row chosen by a person in a selected element
Setting the row dimensions
The rowHeightForComponent technique is used to return the row top for every element that the picker view might want to draw the content material on the display:
non-compulsory func pickerView(_ pickerView: UIPickerView,
              rowHeightForComponent element: Int) -> CGFloat
We return a float worth indicating the peak of the row in factors.
Equally, we’ve got one other technique, widthForComponent to set the row width for every element:
non-compulsory func pickerView(_ pickerView: UIPickerView,
              widthForComponent element: Int) -> CGFloat
Setting the row content material
In an effort to present content material for the element’s rows, we should implement both a title, an attributed title, or a view for every row.
The only technique, titleForRow, offers the title as a string for every row, like so:
non-compulsory func pickerView(_ pickerView: UIPickerView,
              titleForRow row: Int,
              forComponent element: Int) -> String?
Right here, we’ve got a brand new parameter row, which is a zero-indexed quantity figuring out a row of a element. Keep in mind that the rows are numbered from prime to backside.
To customise the string for greater than a primary use case, we are able to create an attributed string and use the next attributedTitleForRow technique:
non-compulsory func pickerView(_ pickerView: UIPickerView,
              attributedTitleForRow row: Int,
              forComponent element: Int) -> NSAttributedString?
This returns a styled title for the person rows of the picker view.
N.B. if we implement each of those strategies, the picker view will prioritize the attributed title technique; if it returns a 0 worth, then the picker view will use the traditional title as an alternative
For superior customization, we are able to create and return an entire UIView for every row:
non-compulsory func pickerView(_ pickerView: UIPickerView,
              viewForRow row: Int,
              forComponent element: Int,
              reusing view: UIView?) -> UIView
The UIView known as by the picker view when it wants the view to make use of for a row in a given element. We even have entry to the view object that was beforehand used for a row however is now hidden and cached by the picker view.
We are able to have a UILabel, UIImageView, or perhaps a customized view to make use of within the picker view!
Responding to row choice
When the person makes a variety by clicking on a given row in a given element, the UIPickerViewDelegate calls the next technique:
non-compulsory func pickerView(_ pickerView: UIPickerView,
              didSelectRow row: Int,
              inComponent element: Int)
Primarily based on the row that’s chosen for a given element, we are able to retailer its worth within the app.
Subsequent, let’s take a look at a customized subclass of the UIPickerView for working with a picker that handles date and time.
What’s the UIDatePicker subclass?
The UIDatePicker is a subclass of UIPickerView that’s used to show dates and occasions. As talked about beforehand, this subclass will be seen in motion within the Alarm app in your iPhone.
This subclass has an occasion property, datePickerMode, that we are able to set to have both date, time, time interval, or each date and time. We are able to additionally present minimal and most dates. Not like the delegation sample of UIPickerView, UIDatePicker makes use of a target-action sample for us to get the date or time. iOS14 offers a brand new date picker fashion that provides us an inline picker aside from the wheels picker by setting the preferredDatePickerStyle property.
Lastly, we add a goal on the picker for the valueChanged occasion:
datePicker.addTarget(self, motion: #selector(onDateValueChanged), for: .valueChanged)

@objc func onDateValueChanged(_ datePicker: UIDatePicker) {
/// Use the most recent date to replace the view.
}
We’ve coated the fundamentals of UIPickerView, the delegates that can assist us to set the variety of rows and parts, the size, the views, and the motion for row choice. Now, we are able to transfer ahead and create a pattern type that makes use of a picker view, set the delegates, after which implement the corresponding strategies!
Demo: Making a pattern Swift type with UIPickerView
To grasp a sensible instance, we’ll create a Swift type with a number of picker views which have each single and double parts, with every element having a special variety of rows. Then, we’ll have a couple of labels that show the outcomes when the person manipulates the picker wheel to pick a selected row.
This demo will offer you a radical understanding of tips on how to use UIPickerView in your individual venture.
The view controller may have three picker views: one for choosing the kind of the revenue, a second for the supply, and a 3rd for the date when the revenue is acquired. The second picker may have two parts: one for the supply and a second that signifies if the revenue tax is mounted or variable.
N.B., this app demo is only for demonstration functions, to indicate every little thing we are able to do with pickers; there are different methods to symbolize this sort of information
Setting the information supply
We now have completely different enumerations to symbolize the varied lists of choices {that a} person might select from:
enum Revenue: Int, CaseIterable {
  case supply
  case sort
}

enum IncomeTax: String {
  case mounted
  case variable
}

extension IncomeTax: CustomStringConvertible, CaseIterable {
  var description: String {
    rawValue.capitalized
  }
}

enum IncomeSource: String {
  case wage
  case curiosity
  case dividend
  case capitalGains = "Capital Good points"
  case royalty
  case rental
}

extension IncomeSource: CustomStringConvertible, CaseIterable {
  var description: String {
    rawValue.capitalized
  }
}

enum IncomeType: String {
  case major
  case secondary
  case passive
}

extension IncomeType: CustomStringConvertible, CaseIterable {
  var description: String {
    rawValue.capitalized
  }
}
Because the enumerations conform to CaseIterable protocol, we are able to get all of the instances from it to indicate within the picker type.
Creating the picker views
We now have three picker views (incomeSourcePickerView, incomeTypePickerView, and incomeMonthPickerView) and three labels (incomeSourceLabel, incomeTypeLabel, and incomeDateLabel)that present the chosen information for the actual picker:
class IncomeViewController: UIViewController {
  non-public let incomeSourcePickerView: UIPickerView = {
    let pickerView = UIPickerView()
    pickerView.translatesAutoresizingMaskIntoConstraints = false
    return pickerView
  }()

  non-public let incomeTypePickerView: UIPickerView = {
    let pickerView = UIPickerView()
    pickerView.translatesAutoresizingMaskIntoConstraints = false
    return pickerView
  }()

  non-public let incomeMonthPickerView: UIDatePicker = {
    let datePicker = UIDatePicker()
    datePicker.datePickerMode = .date
    datePicker.preferredDatePickerStyle = .wheels
    datePicker.translatesAutoresizingMaskIntoConstraints = false
    return datePicker
  }()

  non-public let incomeSourceLabel: UILabel = {
    let label = UILabel()
    label.translatesAutoresizingMaskIntoConstraints = false
    return label
  }()

  non-public let incomeTypeLabel: UILabel = {
    let label = UILabel()
    label.translatesAutoresizingMaskIntoConstraints = false
    return label
  }()

  non-public let incomeDateLabel: UILabel = {
    let label = UILabel()
    label.translatesAutoresizingMaskIntoConstraints = false
    return label
  }()
}
Then we’ve got three sorts for outlining the information of the picker views:
non-public let sources = IncomeSource.allCases
non-public let sorts = IncomeType.allCases
non-public let taxes = IncomeTax.allCases
Organising the constraints
Since we’re creating the picker views programmatically, we’ll add the constraints for it manually. The supply picker view is on the highest, adopted by the sort picker, and the date picker is final. We’ll add these views inside a stack view, like so:
non-public func setupStackView() {
  stackView.addArrangedSubview(incomeTypePickerView)
  stackView.addArrangedSubview(incomeTypeLabel)

  stackView.addArrangedSubview(incomeSourcePickerView)
  stackView.addArrangedSubview(incomeSourceLabel)

  stackView.addArrangedSubview(incomeDatePicker)
  stackView.addArrangedSubview(incomeDateLabel)

  view.addSubview(stackView)

  stackView.centerXAnchor.constraint(equalTo: view.centerXAnchor).isActive = true
  stackView.centerYAnchor.constraint(equalTo: view.centerYAnchor).isActive = true
}
With the constraints arrange, let’s add the delegate and information supply for the picker views. UIPickerView makes use of delegates to speak, however UIDatePicker makes use of a goal motion sample, as talked about earlier.
override func viewDidLoad() {
  tremendous.viewDidLoad()

  view.backgroundColor = .white

  incomeTypePickerView.delegate = self
  incomeTypePickerView.dataSource = self

  incomeSourcePickerView.delegate = self
  incomeSourcePickerView.dataSource = self

  setupStackView()

  incomeDatePicker.addTarget(self, motion: #selector(onIncomeDateValueChanged), for: .valueChanged)
}

@objc non-public func onIncomeDateValueChanged(_ datePicker: UIDatePicker) {
  incomeDateLabel.textual content = datePicker.date.formatted(date: .lengthy, time: .omitted)
}
When the date worth is modified, we get the date from the date picker, format it to indicate an extended date, omit the time, and present it in incomeDateLabel.
After setting the delegate and dataSource for each picker views to self, we’ve got to supply the corresponding strategies of each protocols.
Offering the UIPickerViewDataSource strategies
First, we’ll present the UIPickerViewDataSource strategies. We now have to supply the variety of parts and the variety of rows in every element for every picker view:
// MARK: - UIPickerViewDataSource
extension IncomeViewController: UIPickerViewDataSource {
  func numberOfComponents(in pickerView: UIPickerView) -> Int {
    // 1
    let incomePicker = Revenue(rawValue: pickerView.tag)

    // 2
    swap incomePicker {
      case .sort:
        return 1
      case .supply:
        return 2
      default:
        return 0
    }
  }

  func pickerView(_ pickerView: UIPickerView, numberOfRowsInComponent element: Int) -> Int {
    let incomePicker = Revenue(rawValue: pickerView.tag)

    // 3
    swap incomePicker {
      case .sort:
        return sorts.depend
      case .supply:
        // 4
        let sourceComponent = IncomeSourcePicker(rawValue: element)

        // 5
        swap sourceComponent {
          case .sourceName:
            return sources.depend
          case .taxType:
            return taxes.depend
          default:
            return 0
        }
      default:
        return 0
    }
  }
}
Let’s assessment this code.
- First, we create an enumeration of the sort
Revenuefrom the picker view’s tag property. We beforehand set the tag for every picker view; this helps us to uniquely determine the view - Then, based mostly on the kind of picker view, we return the variety of parts. Right here, the revenue
.sort:picker view has1element (column), whereas revenue.supply:picker view has2parts (columns) - Equally, for the variety of rows in every element, we get the kind of the picker view and swap over the values. For the revenue
.sort:picker view, we return the depend of every kind - For the revenue
.supply:picker view, we’ve got an fascinating case because it has two completely different parts. We create an enumeration,IncomeSourcePicker, from the element’s integer worth - Lastly, we return all of the
sourcesandtaxesfor the given instances ofIncomeSourcePicker
Offering the UIPickerViewDelegate strategies
Subsequent, we’ll present the UIPickerViewDelegate strategies. This entails displaying the title for every row and responding to person collection of a row.
// MARK: - UIPickerViewDelegate
extension IncomeViewController: UIPickerViewDelegate {
  func pickerView(_ pickerView: UIPickerView, titleForRow row: Int, forComponent element: Int) -> String? {
    // 1
    let incomePicker = Revenue(rawValue: pickerView.tag)

    swap incomePicker {
      case .sort:
        return sorts[row].description
      case .supply:
        let sourceComponent = IncomeSourcePicker(rawValue: element)

        swap sourceComponent {
          case .sourceName:
            return sources[row].description
          case .taxType:
            return taxes[row].description
          default:
            return nil
        }
      default:
        return nil
    }
  }

  func pickerView(_ pickerView: UIPickerView, didSelectRow row: Int, inComponent element: Int) {
    let incomePicker = Revenue(rawValue: pickerView.tag)

    swap incomePicker {
      case .sort:
        incomeTypeLabel.textual content = "Revenue sort is (sorts[row].description)."
      case .supply:
        let sourceComponent = IncomeSourcePicker(rawValue: element)

        // 2
        swap sourceComponent {
          case .sourceName:
            incomeSourceLabel.textual content = "Revenue supply is (sources[row].description)."
          case .taxType:
            incomeSourceLabel.textual content = "(taxes[row].description) taxes."
          default: ()
        }
      default: ()
    }
  }
}
Once more, let’s assessment the above code:
- Just like our earlier course of, we get the picker view based mostly on its tag. Subsequent, we swap over its values after which present the corresponding description because the title for the row for every element
- When the person selects a row, the
didSelectRowtechnique known as. We use this technique to replace the labels for the actual row and element
We’ve arrange two picker views and one date picker! Now, let’s construct and run the app to see the way it appears when the person manipulates the completely different pickers:
Conclusion
For views that require deciding on from a number of choices, think about using UIPickerView in your iOS app. To supply an choice to your person to pick a date and time, UIDatePicker is the go-to view. With the delegation sample in UIPickerView, you present and deal with the information in your app and use a target-action sample for UIDatePicker.
On this article, we explored working with UIPickerView and h UIDatePicker. in addition to the varied strategies accessible so that you can use. We additionally explored a sensible instance, utilizing UIPickerView in a Swift type, to offer you a strong understanding of working with picker views.
I hope you discover this text useful and can attempt utilizing UIPickerView in your iOS apps!
