
React Native is a well-liked know-how used to develop Android and iOS purposes. Though it’s constructed on React — Fb’s JavaScript toolkit for creating person interfaces — React Native targets cell platforms versus browsers.
With React Native, you get the good thing about with the ability to use the identical applied sciences you’d use in net growth like CSS and JavaScript. React Native additionally offers a ton of components so that you can compose your cell app’s UI.
When constructing out your UI, it may be simple for 2 or extra React Native components to overlap one another. In different phrases, the weather are stacked on each other. When this occurs, chances are you’ll not just like the order through which they seem on the display.
You need to use CSS parameters like place and zIndex in React Native to handle the order through which overlapping parts are stacked. This tutorial will discover these and different strategies and finest practices for stacking components.
We are going to cowl:
To comply with this tutorial, you’ll want fundamental data of React Native, some familiarity with CSS, and a starter app on Expo Snack.
Stacking in React Native with the CSS place property
The CSS place property is used to place a component on a web page both in relation to its regular place or in absolute phrases. In different phrases, it positions the component relative to its nearest positioned ancestor.
After making use of the place attribute to a component, you’ll then use the prime, backside, left, and proper attributes to specify precisely the place you need the component to be positioned.
On this part, we’ll use three <View> components, together with a little bit of CSS, to create three overlapping containers in our app.
By this level, you must have your starter app at Expo Snack already arrange. If that’s the case, change the next App element with the default one discovered contained in the App.js file in your undertaking:
export default operate App() {
  return (
    <View model={types.container} >
      <View model={[styles.square, {backgroundColor: 'green'}]} />
      <View model={[styles.square, {backgroundColor: 'red'}]} />
      <View model={[styles.square, {backgroundColor: 'blue'}]} />
    </View>
  );
}
Right here we’re putting three <View> components with completely different background colours inside a container <View> component.
Subsequent, inside the identical file, change the default types code with the next types:
const types = StyleSheet.create({
  container: {
    margin: 20,
    marginTop: 30,
    flex: 1,
    flexDirection:'row',
    backgroundColor: 'linen',
  },
  sq.: {
    peak: 70,
    width: 70,
  },
});
With the above code, your three nested <View> components are styled into squares and aligned correctly within the dad or mum container. The output is as follows:

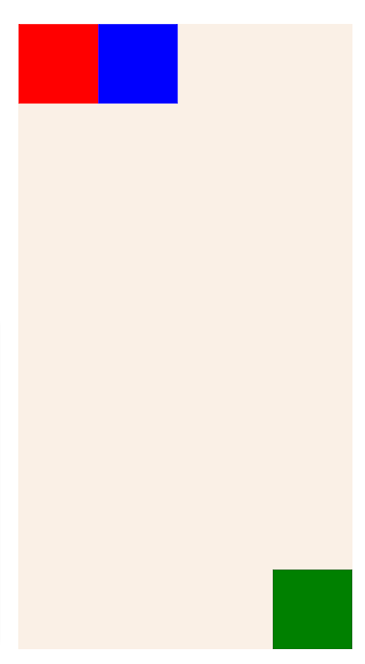
Within the above picture, the weather are aligned horizontally and are clearly separate from one another. However say, for instance, you need the inexperienced container on the backside as a substitute of on the prime. You need to use the CSS place property to reposition the inexperienced container.
Let’s see that in motion. Within the App.js file, add the place: 'absolute' property on the inexperienced container’s <View> component and set each backside and proper properties to 0 because the code beneath reveals:
return (
    <View model={types.container} >
      <View model={
        [
          styles.square,
          {backgroundColor: 'green', position: 'absolute', bottom: 0, right: 0}
        ]
        }
      />
      <View model={[styles.square, {backgroundColor: 'red'}]} />
      <View model={[styles.square, {backgroundColor: 'blue'}]} />
    </View>
  );
With this code, the primary container shall be positioned on the backside proper nook of the display, which we set utilizing backside: 0, proper: 0. This offers us the next output:
Discover how the second container now occupies the place of first, whereas the third container occupies the second place. It is because place: 'absolute' utterly eliminated the component from the conventional stream.
Let’s now make all three containers overlap. Replace the model property on all nested <View > components to the next:
return (
    <View model={types.container} >
      <View model={[styles.square, {backgroundColor: 'green', position: 'absolute', top: 0, left: 0}]}/>
      <View model={[styles.square, {backgroundColor: 'red', position: 'absolute', top: 30, left: 30}]}/>
      <View model={[styles.square, {backgroundColor: 'blue', position: 'absolute', top: 60, left: 60}]} />
    </View>
  );
Right here we’re offsetting the crimson sq. 30px from the highest and 30px from the left, and the third field 60px from the highest and 60px from the left. The result’s proven within the picture beneath:
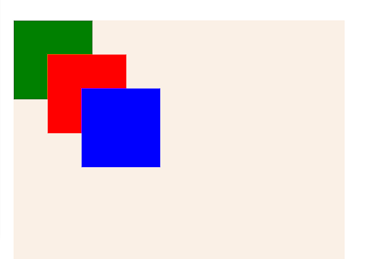
Within the picture above, you possibly can see that every one three containers have overlapped and that the blue field is positioned in entrance of the opposite two, because it has the very best precedence. However what for those who wished to carry the crimson field to the entrance as a substitute?
The reply is to set its zIndex worth.
Utilizing zIndex in React Native to stack and reposition components
When two or extra React Native components overlap, their zIndex values will decide the place they’ll be positioned within the stack. The component with the very best zIndex shall be positioned in entrance, whereas the component with the bottom zIndex shall be positioned on the again.
By default, the zIndex worth in React Native will increase from prime to backside. Going again to the picture of the three overlapping squares, this default conduct makes it apparent that the blue sq. has the very best zIndex worth whereas the inexperienced has the bottom.
To put the crimson sq. in entrance, all you need to do is about its zIndex to an integer worth larger than or equal to 1.
// <View />
<View model={[styles.square, {backgroundColor: 'red', position: 'absolute', top: 30, left: 30, zIndex: 1}]}/>
// <View />
Right here’s the consequence:
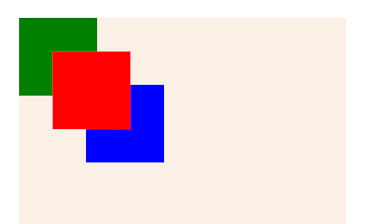
To put one other sq. in entrance of the crimson one, set the next zIndex worth on the model property of that component.
To date now we have demonstrated the right way to stack components utilizing CSS place and zIndex properties in React Native. In React Native, the FlatList component offers a contemporary approach to stack components.
Stacking React Native components with FlatList
React Native offers a FlatList component that means that you can place components on a display utilizing a grid format. On this part, we’ll reveal the right way to stack components utilizing FlatList by enhancing the weather we created within the final part.
Let’s add a easy FlatList component in our App.js file. On the prime of the file, import FlatList from react-native:
import { FlatList, ... } from 'react-native';
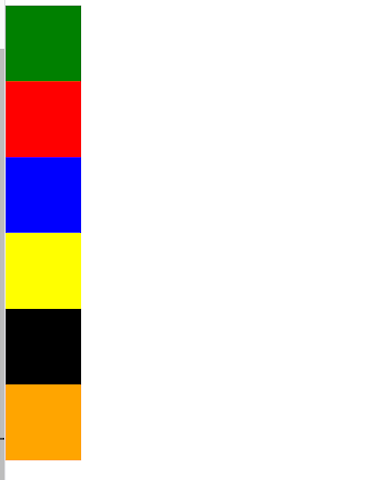
Subsequent, simply above the App element, create a bgColorArr array with a number of colours. Then, create a operate named renderItem and return a <View> component from it:
const bgColorArr = [
  'green',
  'red',
  'blue',
  'yellow',
  'black',
  'orange'
]

operate renderItem({merchandise}) {
  return (
      <View model={[styles.square, {backgroundColor: item}]}/>
  );
}
Subsequent, modify the App element. Change all 4 <View> components contained in the return assertion with a single FlatList:
return (
    <FlatList knowledge={bgColorArr} renderItem={renderItem} />
  );
Right here we handed the next:
bgColorArr: the array of things (background colours) that we need to iterate overrenderItem: the element that we need to render for every merchandise (i.e. for every shade)
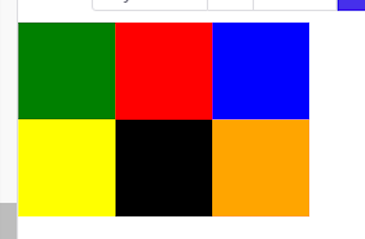
In consequence, the FlatList will render six View components with completely different background colors:
Right here the objects are rendered right into a row, however you possibly can specify columns as properly. Let’s see how.
Rendering objects into columns with FlatList
On this part, we’ll render the objects right into a grid system with three columns.
Extra nice articles from LogRocket:
Modify the App element as soon as once more. Add two attributes — numColumn and key — and set their values to 3:
return (
    <FlatList
      knowledge={bgColorArr}
      renderItem={renderItem}
      numColumns={3}
      key={3}
    />
  );
The output is as follows:
Utilizing React Native’s Dimension API to create responsive columns
To guarantee that the objects are aligned properly throughout completely different display resolutions, use the Dimension API supplied by React Native to get the width and peak relying on the gadget.
Within the App.js file, get the width of the display and divide it by the variety of columns to get the scale of every column. Then, move that worth to the width property of your render merchandise:
const screenWidth = Dimensions.get("home windows").width;
const numColumns = 4
const tileSize = screenWidth / numColumns

operate renderItem({merchandise}) {
  return (
      <View model={[styles.square, {backgroundColor: item, width: tileSize, height: tileSize }]}/>
  );
}
This code ensures that you simply precisely use the obtainable spacing always. Don’t neglect to import Dimension from react-native on the prime of the file for the code to work.
Conclusion
I hope this tutorial helped you perceive stacking higher. It is best to now have the ability to create versatile grid programs in your React Native app utilizing the strategies we coated on this submit — zIndex, place, and Flatlist.
You probably have any questions concerning this subject, depart a remark and I’ll reply as quickly as I get it. Have an awesome week!
LogRocket: Immediately recreate points in your React Native apps.

LogRocket is a React Native monitoring answer that helps you reproduce points immediately, prioritize bugs, and perceive efficiency in your React Native apps.
LogRocket additionally helps you enhance conversion charges and product utilization by exhibiting you precisely how customers are interacting together with your app. LogRocket’s product analytics options floor the the explanation why customers do not full a selected stream or do not undertake a brand new characteristic.
Begin proactively monitoring your React Native apps — strive LogRocket without spending a dime.
