
Frontend builders use HTML, CSS, and JavaScript to construct graphical interfaces for web sites that customers can see and work together with. The target is to construct and design a web site customers can open, use, and work together with simply, particularly when studying important info.
A part of frontend improvement entails how stunning and aesthetically pleasing the web site is, often known as UI. One other facet known as UX entails how straightforward and easy it’s to make use of the web site.
Completely different instruments exist to assist us to realize each nice UI and UX. One of many cool instruments we are able to use within the frontend is React-Toastify.
On this article, we are going to study React-Toastify and the way we are able to use it to create notifications, messages, and pop-ups in our React apps. We’ll cowl:
To comply with together with this tutorial, you want React and Node put in in your laptop. We’ll go over the way to set up the React-Toastify bundle within the subsequent part.
What’s React-Toastify?
React-Toastify is likely one of the high React toast libraries out there. This software permits you to add toast notifications to your utility with ease and may also be used to set notifications and alerts.
Toast or Toastify notifications are pop-up messages that show some info to the person. This info might be successful message, warning, error, and so forth, as proven within the picture beneath:
Use any of the instructions beneath to set up the React-Toastify bundle.
/* NPM */
$ npm set up --save react-toastify

/* YARN */
$ yarn add react-toastify
As soon as set up is completed, you will need to then import the bundle inside your element as demonstrated beneath. React-Toastify comes with a CSS file that should be imported for the software to work.
import { ToastContainer, toast } from 'react-toastify';
import 'react-toastify/dist/ReactToastify.css';
Styling your toast messages with React-Toastify
Allow us to spin up our React app and see how we are able to use the React-Toastify to type our toast messages.
Keep in mind, toast messages are notifications or alerts that we need to present the person at a given time. These messages might be proven on person login success, on login error, when a nasty request happens, when important info is clicked, and so forth.
In your App.js file, import the react-toastify bundle and its CSS file:
import { ToastContainer, toast } from 'react-toastify';
import 'react-toastify/dist/ReactToastify.css';
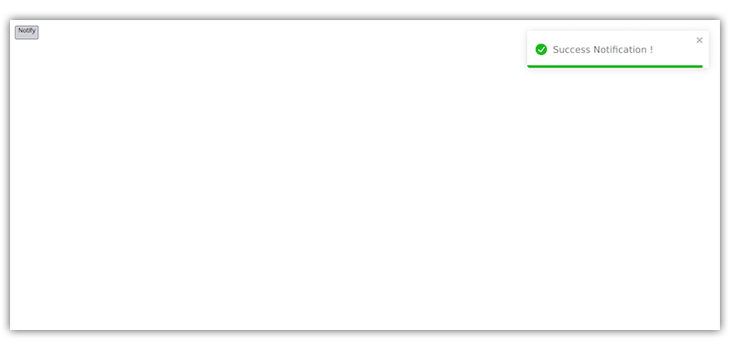
After that, you may name the toast and insert your Success Notification ! message:
import React from 'react';
import { ToastContainer, toast } from 'react-toastify';
import 'react-toastify/dist/ReactToastify.css';

operate App() {
    const showToastMessage = () => {
        toast.success('Success Notification !', {
            place: toast.POSITION.TOP_RIGHT
        });
    };
    return (
        <div>
            <button onClick={showToastMessage}>Notify</button>
            <ToastContainer />
        </div>
    );
}
export default App;
Discover we additionally known as the ToastContainer within the code above. This container homes our toast pop-ups. With out it, our toast pop-ups received’t be displayed.
Rendering this code will give us the beneath end result once we click on on the Notify button:
The right way to change your toast message’s place
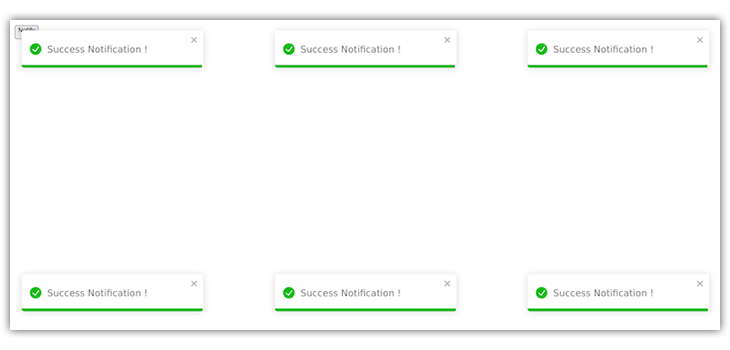
All toasts are positioned on the high proper of your browser by default. This place will be modified by assigning a brand new place to the toast. React-Toastify permits for six positions:
- Prime proper
- Prime middle
- Prime left
- Backside proper
- Backside middle
- Backside left
Relying on the place you need your toast message, you may set a place like so in your App.js file:
toast.success('Success Notification !', {
    place: toast.POSITION.TOP_RIGHT
});
toast.success('Success Notification !', {
    place: toast.POSITION.TOP_CENTER
});
toast.success('Success Notification !', {
    place: toast.POSITION.TOP_LEFT
});
toast.success('Success Notification !', {
    place: toast.POSITION.BOTTOM_RIGHT
});
toast.success('Success Notification !', {
    place: toast.POSITION.BOTTOM_LEFT
});
toast.success('Success Notification !', {
    place: toast.POSITION.BOTTOM_CENTER
});
The right way to differentiate between toast message varieties
Equally to setting your toast message’s place, you may have your toast emitter specify various kinds of toast messages so customers can higher perceive the knowledge being displayed.
Specification is one useful strategy to enhance the person expertise on your React app. This system makes use of completely different colours for every toast message kind to make it simpler for customers to rapidly perceive the knowledge they see.
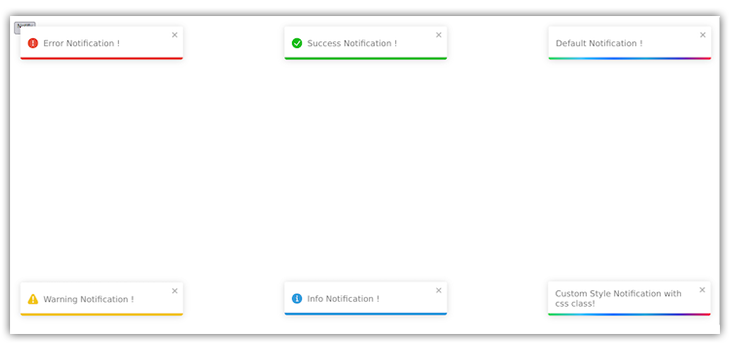
For instance, a red-colored toast message sometimes implies a warning or error message, simply as a green-colored message sometimes implies a profitable response. In essence, you may particularly set a toast variant for error messages, common info, warnings and so forth.
To specify your toast emitter, name your toast in your App.js file with any of the beneath variants:
toast.success('Success Notification !', {
    place: toast.POSITION.TOP_RIGHT
});
toast.error('Error Notification !', {
    place: toast.POSITION.TOP_CENTER
});
toast.warning('Warning Notification !', {
    place: toast.POSITION.TOP_LEFT
});
toast.information('Info Notification !', {
    place: toast.POSITION.BOTTOM_CENTER
});
toast('Default Notification !', {
    place: toast.POSITION.BOTTOM_LEFT
});
toast('Customized Type Notification with css class!', {
     place: toast.POSITION.BOTTOM_RIGHT,
className: 'foo-bar'
});
Doing this can simply inform the person what’s being displayed.
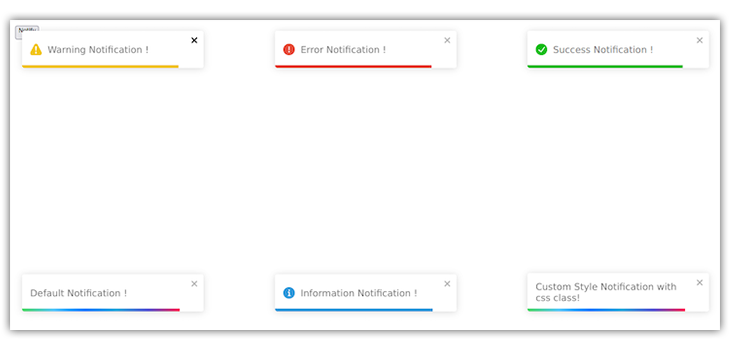
Observe the final toast notification we created, proven on the backside proper of the picture above. We will see that we added a className to it, not like the others. That could be a customized toast. Let’s study extra about customized toasts in React-Toastify.
The right way to type a customized toast message
A customized toast is a notification we are able to type in keeping with our most well-liked styling. This enables us to provide our toast message our most well-liked top, font, font measurement, background, and a lot extra relying on the sort of message we need to show.
For instance, we would need to show a toast that matches our web site or utility styling. A customized toast permits us to take action.
To type your personal toast message in your App.js file, first give it a className as demonstrated beneath:
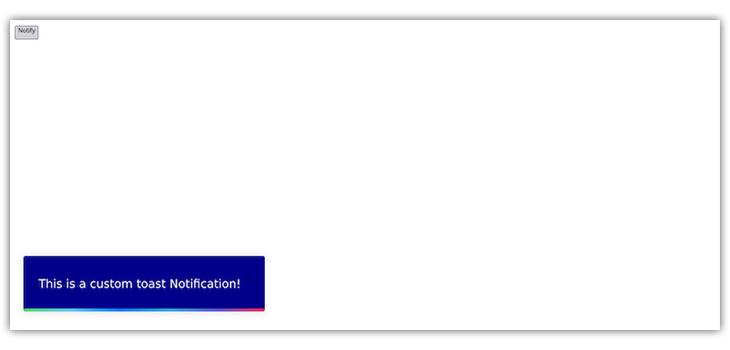
toast('It is a customized toast Notification!', {
    place: toast.POSITION.BOTTOM_LEFT,
    className: 'toast-message'
});
Subsequent, type it in your CSS file utilizing the className in keeping with your preferences:
.toast-message {
    background: darkblue;
    colour: #fff;
    font-size: 20px;
    width: 34vw;
    padding: 30px 20px;
}
With the kinds specified within the code block instance above, you must see the next end result:
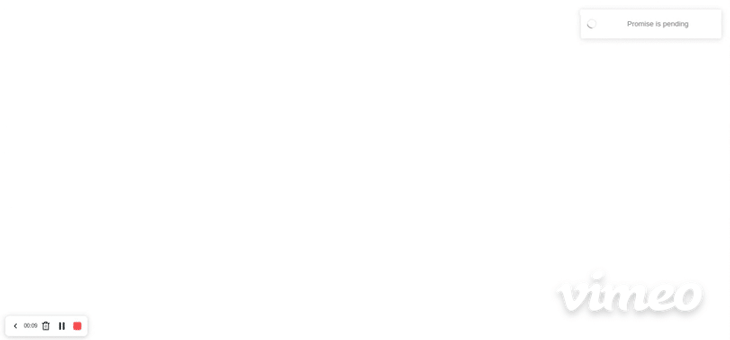
The right way to create promise toasts in React-Toastify
Along with these toast variants, React-Toastify additionally permits us to create and show Promise notifications. These toast notifications present up when any API name is being processed and returns both successful or an error toast message after the decision is full.
To create promise toasts, add the next to your App.js file:
const myPromise = new Promise((resolve) =>
    fetch("https://jsonplaceholder.typicode.com/submit")
      .then((response) => response.json())
      .then((json) => setTimeout(() => resolve(json), 3000))
  );

  useEffect(() => {
    toast.promise(myPromise, {
      pending: "Promise is pending",
      success: "Promise  Loaded",
      error: "error"
    });
  }, []);
In toast.promise, we set pending, success, and error messages. The pending message will show because the fetch executes. Relying on the result, both the success or error message will show afterwards.
Understanding the useNotificationCenter replace in React-Toastify v9
useNotificationCenter is a brand new and main replace that got here with the discharge of React-Toastify v9. It’s a hook that builds your notification middle on high of React-Toastify.
Everytime you name any toast variant — like toast.replace, toast.promise, toast.information, and so forth — the toast notification will get added to the toast middle.
The useNotificationCenter is an array that incorporates all notifications and due to this fact permits us carry out some array capabilities like filtering, sorting, mapping, and so forth on it. Let’s use an instance to grasp this hook higher.
Earlier than utilizing this hook, first import it from react-toastify addons, after which name it earlier than the return assertion in your App.js file:
import { useNotificationCenter } from 'react-toastify/addons/use-notification-center';

const App = () => {
      const { notifications } = useNotificationCenter();
return ()}
The useNotificationCenter hook permits us to make use of quite a few capabilities and values, together with notifications, clear, markAllAsRead, markAsRead, and plenty of others. Let’s go over what a couple of of those imply.
notifications offers us entry to all of the notification gadgets or toast messages that now we have in our middle. Every notificationItem within the notifications array incorporates information akin to its id, learn standing (boolean), theme, isLoading standing (boolean), and different info.
The clear operate removes all of the notifications from the notification middle.
markAllAsRead marks all of the notifications as learn, which suggests it modifications the learn boolean of each notificationItem from false to true. Compared, markAsRead solely modifications one notificationItem boolean to true.
Placing all of your React-Toastify information collectively
Now that we perceive the useNotificationCenter hook together with toast message positions, varieties, and customization, let’s see how we are able to use them collectively in our utility.
First, import the 4 useNotificationCenter capabilities we went over within the earlier part into your App.js file:
import React from 'react';
import { useNotificationCenter } from 'react-toastify/addons/use-notification-center';
import { toast, ToastContainer } from 'react-toastify';
import 'react-toastify/dist/ReactToastify.css';

const App = () => {
const { notifications, clear, markAllAsRead, markAsRead } = useNotificationCenter();
}
As seen above, we additionally imported our toast and ToastContainer with its CSS file so we are able to name our toast. Persevering with within the App.js file, let’s create a operate to name our toast message:
import React from 'react';
import { useNotificationCenter } from 'react-toastify/addons/use-notification-center';
import { toast, ToastContainer } from 'react-toastify';
import 'react-toastify/dist/ReactToastify.css';
const App = () => {
    const { notifications, clear, markAllAsRead, markAsRead } = useNotificationCenter();
    const showToast = () => {
        toast('Good day World', {
            information: {
                title: 'Good day World Once more',
                textual content: 'We're right here once more with one other article'
            }
        });
    };
    return (
        <div>
            <p>{notifications.size}</p>
            <button onClick={showToast}>Click on me</button>
            <ToastContainer />
        </div>
    );
};
export default App;
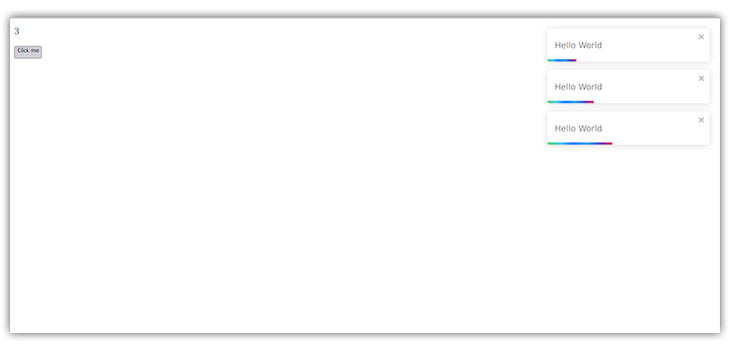
Discover that within the code above, we added a paragraph tag to indicate the variety of toast messages now we have known as or added to our notification middle.
Once we click on our button to name our toast, it robotically enters the notification middle. The quantity above the button will then replace to indicate what number of toast message we’ve added, like so:
Cool, proper? Let’s see what else we are able to do with the hook. As talked about earlier, the useNotificationCenter hook permits us to carry out sorting, mapping, and different actions on the notifications array.
Nonetheless inside your App.js file, copy and paste the code beneath:
import React from 'react';
import { useNotificationCenter } from 'react-toastify/addons/use-notification-center';
import { toast, ToastContainer } from 'react-toastify';
import 'react-toastify/dist/ReactToastify.css';
const Sprint = () => {
    const { notifications, clear, markAllAsRead, markAsRead } = useNotificationCenter();
    const showToast = () => {
        toast('Good day World', {
            information: {
                title: 'Good day World Once more',
                textual content: 'We're right here once more with one other article'
            }
        });
    };
    const showSuccessToast = () => {
        toast.success('Good day World', {
            information: {
                title: 'Success toast',
                textual content: 'It is a success message'
            }
        });
    };
    const showErrorToast = () => {
        toast.error('Good day World', {
            information: {
                title: 'Error toast',
                textual content: 'That is an error message'
            }
        });
    };
    return (
        <div>
            <p>{notifications.size}</p>
            <button onClick={showToast}>Default</button>
            <button onClick={showSuccessToast}>Success</button>
            <button onClick={showErrorToast}>Error</button>
            <br />
            <br />
            <button onClick={clear}>Clear Notifications</button>
            <button onClick={() => markAllAsRead()}>Mark all as learn</button>
            <ul>
                {notifications.map((notification) => (
                    <li
                        onClick={() => markAsRead(notification.id)}
                        key={notification.id}
                        type={
                            notification.learn ? (
                                { background: 'inexperienced', colour: 'silver', padding: '0 20px' }
                            ) : (
                                {
                                    border: '1px strong black',
                                    background: 'navy',
                                    colour: '#fff',
                                    marginBottom: 20,
                                    cursor: 'pointer',
                                    padding: '0 20px'
                                }
                            )
                        }
                    >
                        <span>id: {notification.id}</span>
                        <p>title: {notification.information.title}</p>
                        <p>textual content: {notification.information.textual content}</p>
                    </li>
                ))}
            </ul>
            <ToastContainer />
        </div>
    );
};
export default Sprint;
Let me clarify the code above.
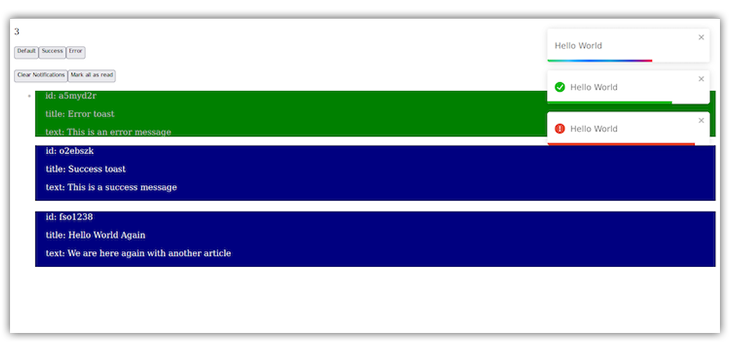
First, we’re mapping by way of our notification middle (which is an array of notification gadgets) and getting the id, title, and textual content of our toast messages.
Then, because of the React onClick occasion handler, when any notification merchandise will get clicked, we are able to use the markAsRead operate to mark the merchandise as learn.
We additionally instructed this system to alter the background colour from blue to inexperienced on learn of a notification merchandise to distinguish between learn and unread notifications.
The “Mark all as learn” button makes use of the markAllAsRead operate to alter the learn standing of all notification gadgets to true. When this button is clicked, all merchandise backgrounds will change colour.
Lastly, the “Clear Notifications” button makes use of the clear operate to delete or take away all gadgets from the notification middle.
Keep in mind, any toast variant you name — whether or not toast.success, toast.error, toast.replace, or some other kind — will likely be added to the notification middle, like so:
Conclusion
On this tutorial, we realized the way to type our toast messages utilizing React-Toastify. We additionally noticed that we are able to create and magnificence our customized toast notifications any approach we need to.
Lastly, we noticed the way to use the useNotificationCenter hook to create a cool notification middle and show all our notifications.
React-Toastify is a helpful React toast library as a result of it’s extremely customizable and offers many toast variants. Different instruments can be found if you happen to want much more performance, akin to implementing animated toasts in React.
Thanks for studying. I hope this text was useful in demonstrating the way to use the React-Toastify software correctly. If in case you have some other questions, let me know within the remark part beneath.
Full visibility into manufacturing React apps
Debugging React purposes will be troublesome, particularly when customers expertise points which are laborious to breed. In the event you’re taken with monitoring and monitoring Redux state, robotically surfacing JavaScript errors, and monitoring sluggish community requests and element load time, attempt LogRocket. 

LogRocket is sort of a DVR for net and cellular apps, recording actually every part that occurs in your React app. As a substitute of guessing why issues occur, you may combination and report on what state your utility was in when a difficulty occurred. LogRocket additionally displays your app’s efficiency, reporting with metrics like consumer CPU load, consumer reminiscence utilization, and extra.
The LogRocket Redux middleware bundle provides an additional layer of visibility into your person periods. LogRocket logs all actions and state out of your Redux shops.
Modernize the way you debug your React apps — begin monitoring at no cost.
