
Headless CMSs are a significant a part of trendy net improvement. They supply rather more energy and adaptability in comparison with conventional CMSs.
A headless CMS works by “chopping” the top — in different phrases, the frontend, which is chargeable for the appear and feel of a site or app — of a standard CMS. The top result’s a system that manages solely content material and knowledge, and permits us to make use of a frontend that greatest meets our wants.
On this tutorial, we’ll discover a highly effective and versatile headless CMS referred to as Payload. We are going to cowl:
What’s Payload CMS?
Payload is a headless CMS and utility framework primarily based totally on configuration, which makes it tremendous straightforward to make use of and customise.
The function-based entry management that Payload CMS gives can deal with any entry management sample you want. Payload additionally gives document- and field-level hooks, permitting for straightforward integrations and most flexibility. Listed here are a few of the different major Payload capabilities:
- 100% TypeScript
- Robotically generates TypeScript interfaces for every knowledge mannequin
- Clear and minimal React admin panel
- Choice to make use of your personal elements
- Generates APIs to your app mechanically
- Constructed-in localization
- Constructed-in authentication
- File add assist
- Highly effective set of fields to deal with any sort of knowledge modeling
- Comes with a Mongo database by default
- Block-based structure constructing appropriate for creating any sort of block editors
Payload achieves the entire nice options listed above by implementing the ideas of configuration, collections, globals, fields, hooks, and entry management. Let’s outline every of those ideas earlier than taking a look at easy methods to get began with Payload CMS.
Payload makes use of config recordsdata, that are chargeable for virtually something the CMS can do. Examples embrace defining knowledge fashions, customized validations, hooks logic, authentication, and extra.
Payload teams content material into collections. Every assortment creates a MongoDB assortment mechanically primarily based on the outlined fields.
Globals are fairly just like collections, the principle distinction being that collections are designed to include many paperwork whereas a worldwide is extra like a single, reusable template. Globals come in useful whenever you wish to outline headers, footers, navigation and menus, app-wide localized strings, and every other “international” knowledge that you simply would possibly want.
Payload makes use of fields as its constructing blocks. Fields are utilized in each collections and globals to outline the sort of the info they retailer. Payload affords a large set of fields starting from easy to complicated.
Moreover, Payload gives many hooks for including customized logic and integrating with third-party instruments and providers.
Lastly, Payload comes with fine-grained entry management that’s highly effective, versatile, and straightforward to implement on the identical time.
Getting began with Payload CMS
Earlier than we get began with Payload, it’s essential to just remember to have put in Mongo and Node in your machine.
Getting began with Payload is as straightforward as working the next command in a listing of your alternative:
npx create-payload-app
This may information you thru creating a brand new Payload app. Right here is the knowledge you’ll be requested for:
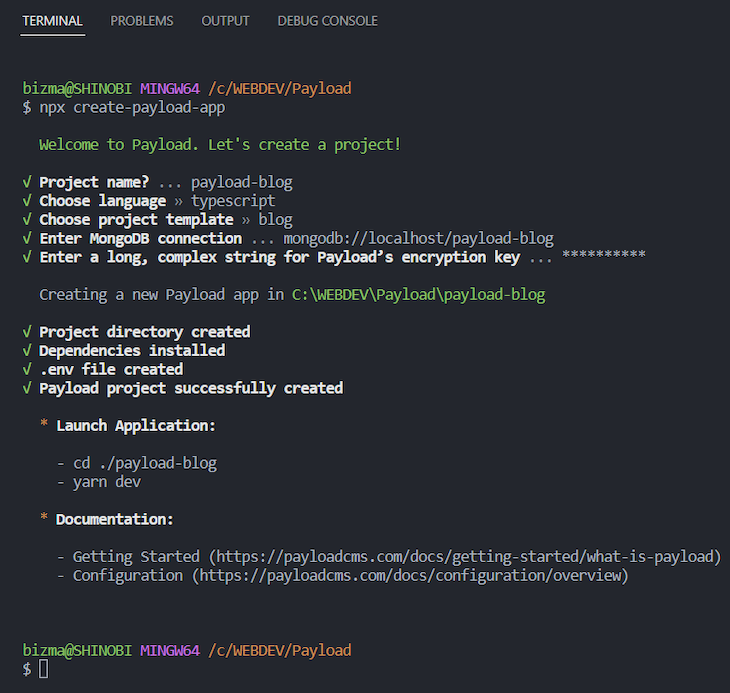
Word that should you run the above command for the primary time, it could ask you to put in create-payload-app earlier than permitting you to proceed.
For the aim of this tutorial, please just remember to’ve chosen weblog because the mission template and typescript because the language.
Remember that the set up itself can take a while.
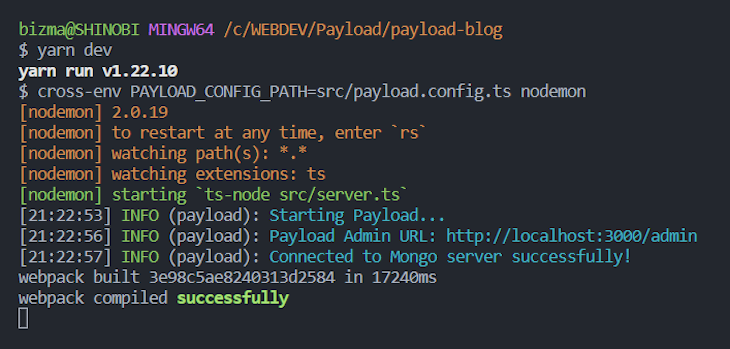
Navigate to the app listing after the set up is full. If you run the yarn dev command, you need to see one thing just like the next:
Now go to http://localhost:3000/admin to create the primary person. If you’re achieved creating the primary person account — which needs to be your personal profile — log into the admin panel. It is best to see the next:
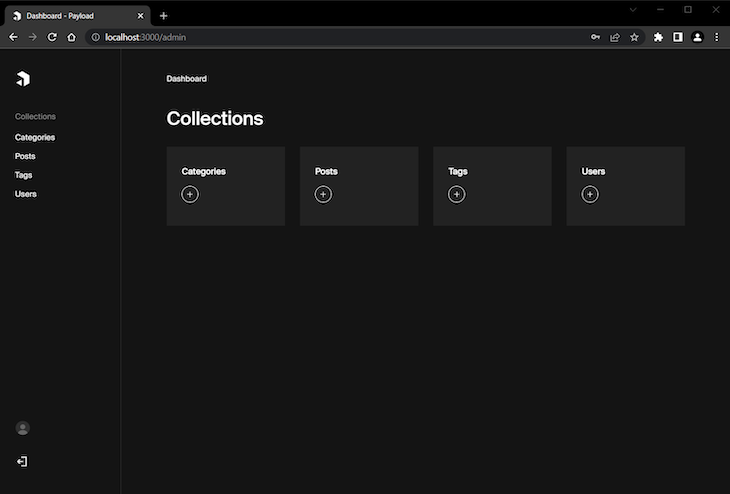
As you possibly can see, there are 4 collections created mechanically for you. These present place to begin for some easy weblog performance.
For those who swap to your person account by hitting the round avatar-like button on the backside left nook, you will note this web page:
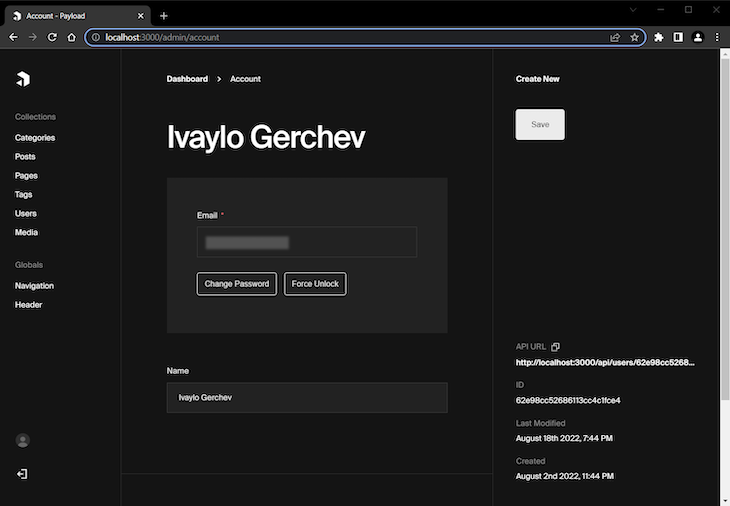
Your person account web page is only a easy web page with the title and e-mail you entered whereas creating your first new person. Now, let’s swap to your code editor and discover the mission construction, which ought to appear like so:
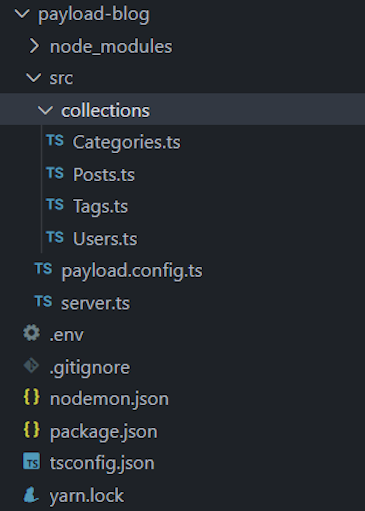
As you possibly can see, there’s a collections listing with 4 recordsdata in it. These 4 recordsdata correspond to the 4 collections within the admin. These are Payload CMS config recordsdata, which we are going to now import in the principle payload.config.ts file, like so:
import { buildConfig } from 'payload/config';
import path from 'path';
import Classes from './collections/Classes';
import Posts from './collections/Posts';
import Tags from './collections/Tags';
import Customers from './collections/Customers';

export default buildConfig({
  serverURL: 'http://localhost:3000',
  admin: {
    person: Customers.slug,
  },
  collections: [
    Categories,
    Posts,
    Tags,
    Users,
  ],
  typescript: {
    outputFile: path.resolve(__dirname, 'payload-types.ts')
  },
  graphQL: {
    schemaOutputFile: path.resolve(__dirname, 'generated-schema.graphql'),
  },
});
Technically, we are able to embrace all of the code for the collections straight within the payload.config.ts file. Nonetheless, to make the issues extra manageable, we cut up them into separate recordsdata. Then, we simply import them and embrace them in a particular collections array.
Let’s now discover the content material of the server.ts file:
import specific from 'specific';
import payload from 'payload';
require('dotenv').config();

const app = specific();
// Redirect root to Admin panel
app.get("https://weblog.logrocket.com/", (_, res) => {
  res.redirect('/admin');
});
// Initialize Payload
payload.init({
  secret: course of.env.PAYLOAD_SECRET,
  mongoURL: course of.env.MONGODB_URI,
  specific: app,
  onInit: () => {
    payload.logger.data(`Payload Admin URL: ${payload.getAdminURL()}`)
  },
})
// Add your personal specific routes right here
app.hear(3000);
Payload requires an Categorical server, which is mechanically created for you. To initialize Payload, the init() methodology is named.
The primary three choices of the init() methodology are required. The primary and second choices are, respectively, the key key and the Mongo database. It is best to have already entered this info within the .env file throughout set up. The third possibility connects the app with the Categorical server.
The final possibility of the init() methodology is a operate referred to as onInit, which means “on initialization,” which takes a Payload occasion as its argument.
Extra nice articles from LogRocket:
You’ll be able to see the remainder of the accessible instructions within the Server part of the Payload CMS docs.
Constructing weblog options with Payload CMS
Right here is the enjoyable half. On this part, we’ll discover easy methods to prolong our weblog with new options and functionalities.
Most trendy blogs require some form of media administration to incorporate photographs within the posts. So, let’s first add some easy media assist to our weblog.
Including media assist
So as to add media assist, create new Media.ts file within the collections listing with the next content material:
import { CollectionConfig } from 'payload/varieties';

const Media: CollectionConfig = {
  slug: 'media',
  admin: {
    useAsTitle: 'title',
  },
  entry: {
    learn: () => true,
  },
  fields: [
    {
      name: "alt",
      type: "text",
    },
  ],
  add: {
    staticURL: "/media",
    staticDir: "media",
    mimeTypes: ["image/*"],
  },
}
export default Media;
Right here, we first imported the CollectionConfig sort and used it to create the media configuration.
Every assortment requires slug and fields properties. The slug property is used to check with this assortment. The fields properties are used to construct the UI blocks that assist us handle the app’s content material.
On this case, we gave our assortment a slug of media and added a easy textual content area used to enter alt textual content for the uploaded picture.
So as to add admin-specific configuration, we used the admin property. In our case, useAsTitle defines which area will likely be used as a main key for the gathering.
The entry property gives entry management capabilities used to outline the precise rights for particular customers. In our case, we approved all customers to learn the media assortment.
Lastly, to make sure our media assist is useful in our app, we used the add property. Every Payload assortment supporting the add characteristic requires staticURL and staticDir properties, which outline the bottom path to app’s media and the folder listing used for media storage. Right here we use additionally mimeTypes property to outline that customers can add solely photographs.
Now now we have accomplished including media assist to our weblog. We’ll see easy methods to use it in different collections within the subsequent part.
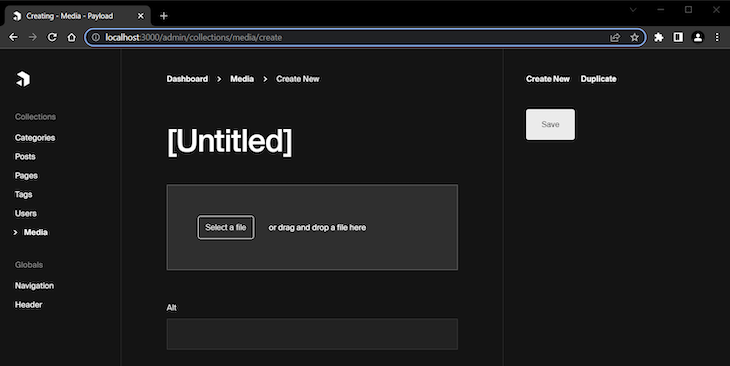
Within the Media web page, we are able to now add new photographs by hitting the Create New button. Then, we are able to choose a file or drag and drop it within the designated space. We will additionally add alt textual content to our media recordsdata. See how these options look beneath:
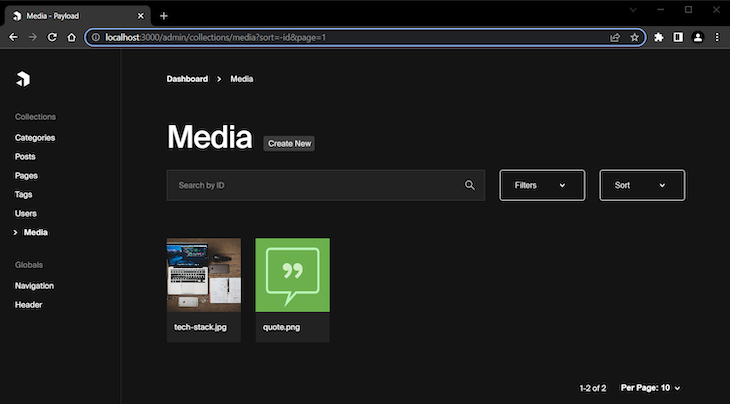
Right here is how this assortment seems to be when now we have some media uploaded:
Creating submit blocks
One of the highly effective fields Payload gives is the Blocks area. You should use this area to create and even mix particular person reusable blocks.
Within the subsequent part, we’ll prolong the Posts assortment by making a easy block editor for weblog posts, beginning by creating three needed blocks: content material, quote, and alert.
To start out, create a brand new blocks listing and add a Content material.ts file with the next content material:
import { Block } from 'payload/varieties';

const Content material: Block = {
  slug: 'content material',
  fields: [
  {
    name: 'content',
    type: 'richText'
  },
  ]
};
export default Content material;
This creates a bare-bones content material block with just one area, which affords a Wealthy Textual content Editor. We use the Block sort right here to outline the config for the Content material block.
For the subsequent block, create a Quote.ts file containing the next content material:
import { Block } from 'payload/varieties';

const Quote: Block = {
  slug: 'quote',
  imageURL: 'http://localhost:3000/media/quote.png',
  imageAltText: 'Quote block',
  fields: [
    {
      name: 'quote',
      type: 'textarea',
    },
    {
      name: 'author',
      type: 'text',
    },
  ]
};
export default Quote;
Right here, we created a quote block with two fields: one Textarea area for the quote itself, and one Textual content area for the quote’s writer.
In the meantime, the imageURL and imageAltText properties outline the thumbnail image to be proven after we choose the block from a popup panel. We’ll see this in motion a bit later.
For the final block, create an Alert.ts file containing the next content material:
import { Block } from 'payload/varieties';

const Alert: Block = {
  slug: 'alert',
  fields: [
    {
      name: 'type',
      type: 'select',
      options: [
        {
          value: 'info',
          label: 'Info',
        },
        {
          value: 'success',
          label: 'Success',
        },
        {
          value: 'warning',
          label: 'Warning',
        },
        {
          value: 'danger',
          label: 'Danger',
        },
      ],
    },
    {
      title: 'message',
      sort: 'textarea',
    },
  ]
};
export default Alert;
Right here, we used a Choose area to outline the completely different alert varieties and a Textarea area for getting into the alert message.
Okay, the blocks are prepared. Let’s now see easy methods to use them.
Including submit options
Now we’re prepared to increase the performance for creating our weblog posts.
Open the Posts.ts file and exchange its content material with the next:
import { CollectionConfig } from 'payload/varieties';
import Quote from '../blocks/Quote';
import Content material from '../blocks/Content material';
import Alert from '../blocks/Alert';

const Posts: CollectionConfig = {
  slug: 'posts',
  admin: {
    defaultColumns: ['title', 'author', 'category', 'tags', 'status'],
    useAsTitle: 'title',
  },
  entry: {
    learn: () => true,
  },
  fields: [
    {
      name: 'postMeta',
      type: 'group',
      fields: [
        {
          name: 'title',
          type: 'text',
          required: true,
          minLength: 20,
          maxLength: 100,
        },
        {
          name: 'description',
          type: 'textarea',
          required: true,
          minLength: 40,
          maxLength: 160,
        },
        {
          name: 'keywords',
          label: 'Keywords',
          type: 'text',
        },
      ],
    },
    {
      title: 'title',
      sort: 'textual content',
      required: true,
    },
    {
      sort: 'tabs',
      tabs: [
        {
          label: 'Post Media',
          fields: [
            {
              name: 'postImage',
              type: 'upload',
              relationTo: 'media',
              required: true,
            },
          ],
        },
        {
          label: 'Submit Format',
          fields: [
            {
              name: 'layout',
              type: 'blocks',
              blocks: [
                Quote,
                Content,
                Alert
              ],
            },
          ]
        }
      ]
    },
// add sidebar fields right here
  ],
}
export default Posts;
Right here, we first imported the blocks we created earlier.
Subsequent, we used the defaultColumns property to outline which columns will likely be seen within the admin panel when the gathering is rendered.
We then used the Group area to create a set of options for the submit’s metadata and added some easy validation utilizing the required, minLength, and maxLength properties. We additionally outlined a area for enhancing the submit title.
Lastly, we created two Tabs — Submit Media and Submit Format.
The Submit Media tab makes use of the Add area, connecting it with the beforehand created media assortment through the use of the relationTo property.
The Submit Format tab makes use of the Blocks area and registers the blocks we’ve created by including them to the blocks array.
All the above configurations set the enhancing fields displayed in the principle space of the submit enhancing web page. So as to add some fields within the sidebar space, add the next code:
{
  title: 'standing',
  sort: 'choose',
  choices: [
    {
      value: 'draft',
      label: 'Draft',
    },
    {
      value: 'published',
      label: 'Published',
    },
  ],
  defaultValue: 'draft',
  admin: {
    place: 'sidebar',
  }
},
{
  title: 'publishedDate',
  sort: 'date',
  admin: {
    place: 'sidebar',
  }
},
{
  title: 'writer',
  sort: 'relationship',
  relationTo: 'customers',
  admin: {
    place: 'sidebar',
  }
},
{
  title: 'class',
  sort: 'relationship',
  relationTo: 'classes',
  admin: {
    place: 'sidebar',
  }
},
{
  title: 'tags',
  sort: 'relationship',
  relationTo: 'tags',
  hasMany: true,
  admin: {
    place: 'sidebar',
  }
},
To maneuver fields within the sidebar space, we used the admin property and set its baby place property to sidebar.
We added a couple of completely different fields right here:
The Choose area permits us to outline the submit’s standing — draft or revealed. We used the defaultValue property to set the default standing for brand spanking new posts.
The Date area permits us to set the submit’s publication date.
We additionally added three Relationship fields to outline submit’s writer, classes, and tags.
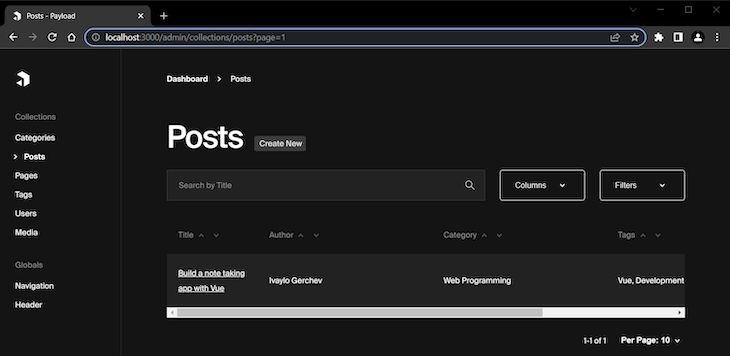
And that’s it. Now let’s discover what we’ve constructed thus far. Go view your Posts assortment:
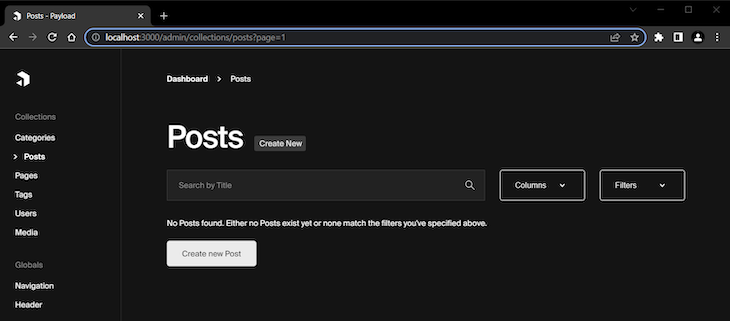
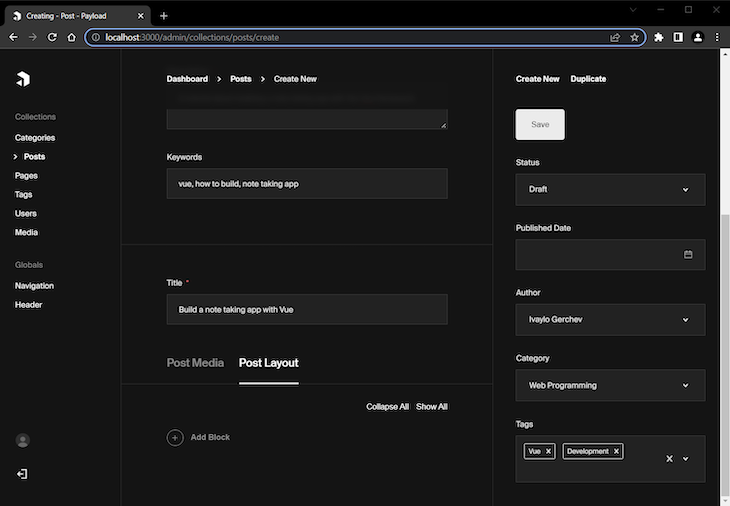
After clicking the Create new Submit button, you’ll see the next:
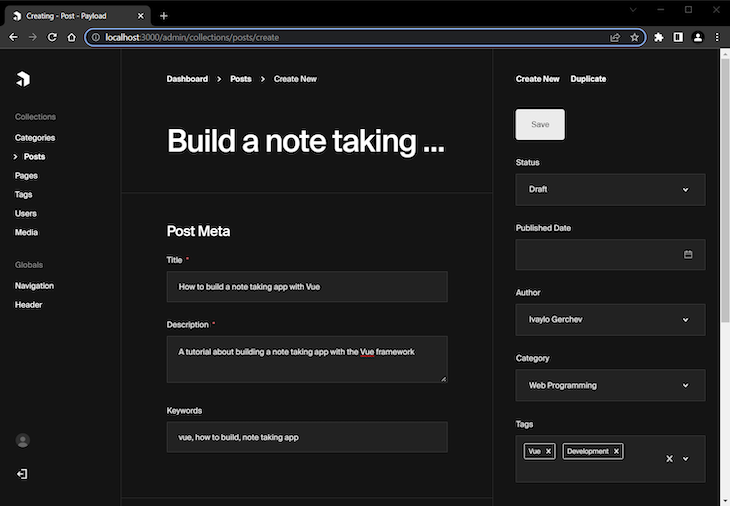
This screenshot reveals the Submit Meta a part of the web page and the sidebar fields. I’ve stuffed a few of them out to show how they might be used.
Word that the Writer area reveals the person’s title right here — on this case, Ivaylo Gerchev. Nonetheless, by default, the person’s e-mail is used on this area. To alter that, open the Customers.ts file and alter the useAsTitle property to title, like so:
admin: {
  useAsTitle: 'title', // modified to call from e-mail
},
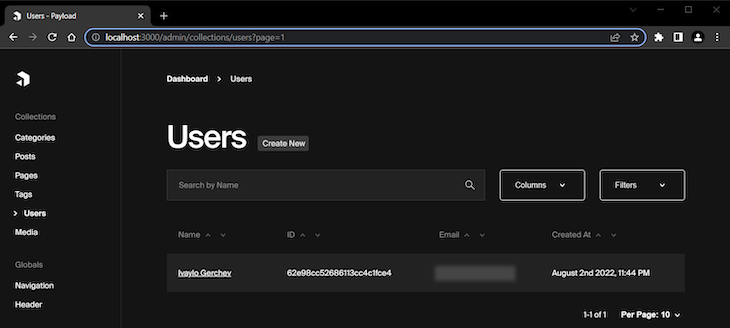
Now whenever you go to the Customers assortment, the first key would be the person’s title, which will likely be used for the Writer area:
Now, let’s return to creating our new submit. After we scroll down, we are able to discover a area for the submit’s title together with the Submit Media and Submit Format tabs we created earlier:
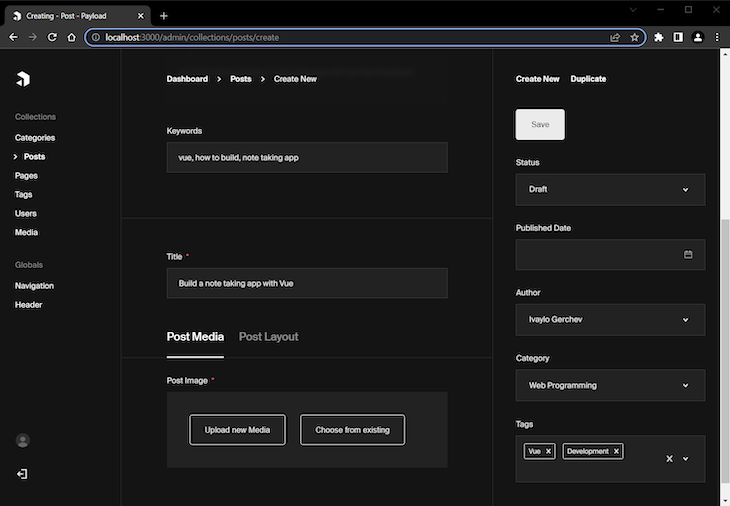
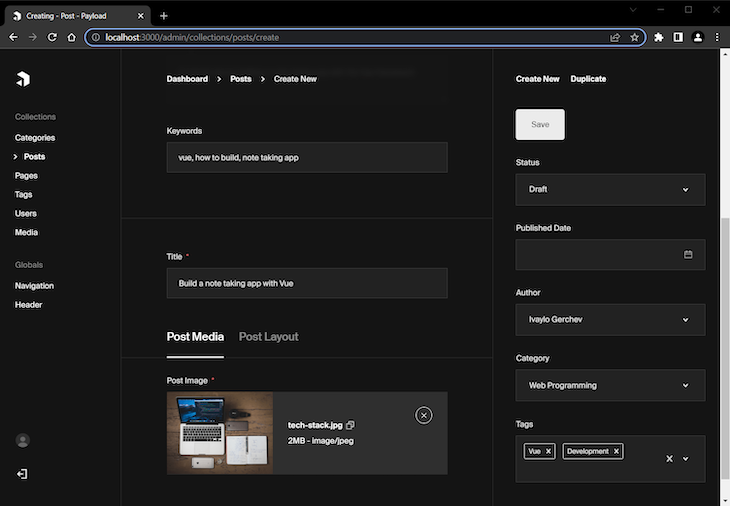
After we add a picture for the submit by way of the Submit Media tab, it will likely be proven like this:
After we swap to the Submit Format tab, we are going to see a plus sign up a circle subsequent to some textual content studying Add Block:
Clicking the Add Block button will present us a popup panel with all of the accessible blocks that we added earlier:
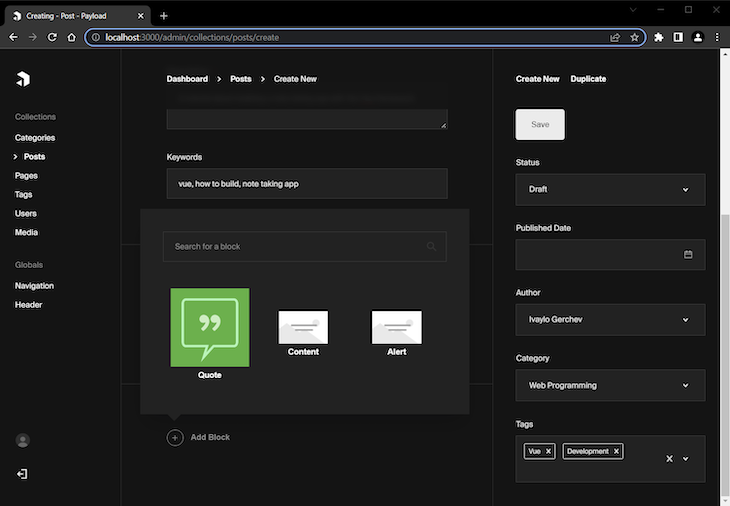
You’ll be able to see that the picture we outlined for the quote block is proven right here. The blocks with out outlined photographs use a default picture. Additionally, you could have the choice to seek for a specific block if in case you have many blocks.
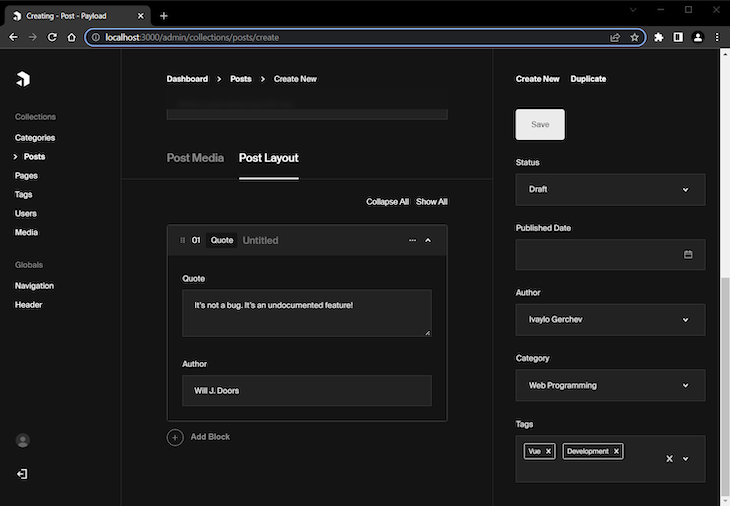
Let’s see these blocks in motion. Within the subsequent screenshot, I’ve added a quote element:
Within the subsequent screenshot I’ve added a content material block after the quote:
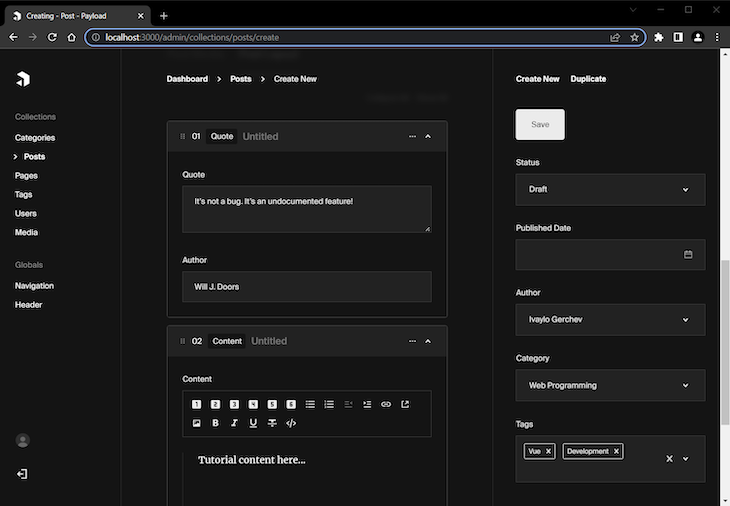
As you possibly can see Payload means that you can construct a customized block editor, which gives nice flexibility for content material structuring with some configuration.
Now whenever you save the submit and go to the Posts assortment, you possibly can see the submit you’ve simply created:
Including assist for creating new pages
Normally, apart from weblog posts, a weblog will even have at the least a few different pages, like a Contact web page, About web page, and so forth. Let’s add web page creation performance to our weblog now.
Within the collections listing, create a Pages.ts file with the next content material:
import { CollectionConfig } from 'payload/varieties'

const Pages: CollectionConfig = {
  slug: 'pages',
  admin: {
    defaultColumns: ['title', 'status'],
    useAsTitle: 'title',
  },
  entry: {
    learn: () => true,
  },
  fields: [
    {
      name: 'pageMeta',
      type: 'group',
      fields: [
        {
          name: 'title',
          type: 'text',
          required: true,
          minLength: 20,
          maxLength: 100,
        },
        {
          name: 'description',
          type: 'textarea',
          required: true,
          minLength: 40,
          maxLength: 160,
        },
        {
          name: 'keywords',
          label: 'Keywords',
          type: 'text',
        },
      ],
    },
    {
      title: 'title',
      sort: 'textual content',
      required: true,
    },
    {
      title: 'content material',
      sort: 'richText',
      required: true,
    },
    {
      title: 'standing',
      sort: 'choose',
      choices: [
        {
          value: 'draft',
          label: 'Draft',
        },
        {
          value: 'published',
          label: 'Published',
        },
      ],
      defaultValue: 'draft',
      admin: {
        place: 'sidebar',
      }
    }
  ],
}
export default Pages;
The above is definitely a simplified model of the posts configuration; we outlined a web page meta part, then Title and Content material fields. Within the admin sidebar, we put solely a Standing area.
Let’s see our assist for including new pages in motion. Right here is the web page meta enhancing part:

Listed here are the title and content material enhancing sections:
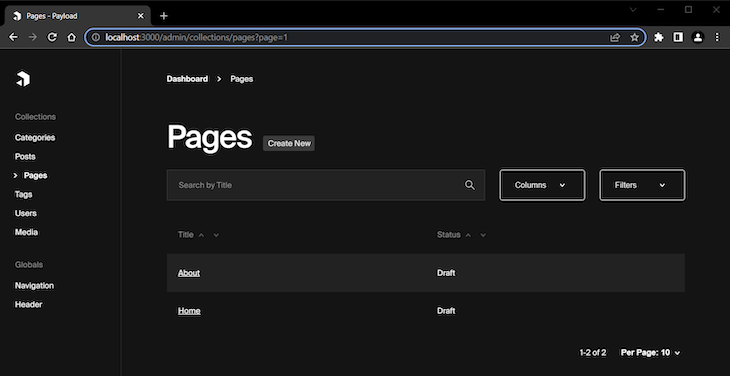
Listed here are the pattern pages I created utilizing this performance:
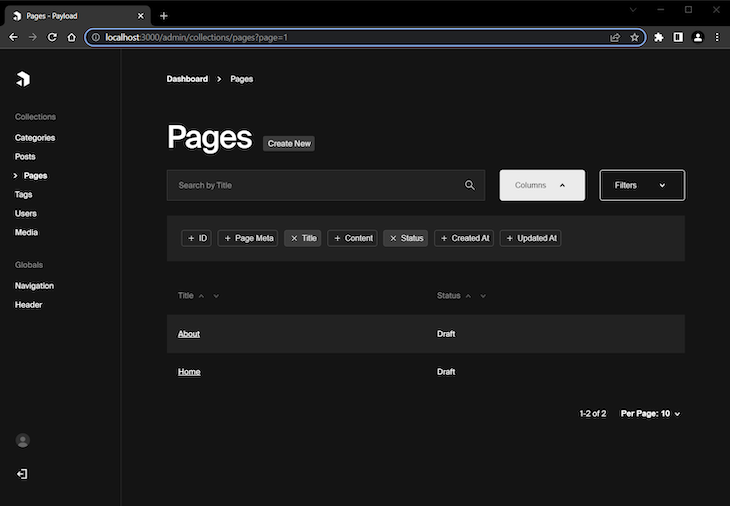
Within the following screenshot, you possibly can see that the columns we outlined as default within the configuration are mechanically chosen and proven within the admin. Click on the Columns button and you’ll see for your self:
Including a navigation international
Up till now, now we have explored the Payload CMS characteristic for creating collections. However as I discussed at first, Payload affords one other nice characteristic for extra particular targets: the power to create globals.
On this part, we’ll discover easy methods to create one of the vital frequent use circumstances for globals: making a website navigation menu. Within the following part, we’ll learn to create a header part for our weblog, one other frequent use case.
To start out, create new globals listing with a Navigation.ts file in it containing the next content material:
import { GlobalConfig } from 'payload/varieties';

const Navigation: GlobalConfig = {
  slug: 'navigation',
  fields: [
    {
      name: 'menuItems',
      type: 'array',
      required: true,
      maxRows: 8,
      fields: [
        {
          name: 'page',
          type: 'relationship',
          relationTo: 'pages',
          required: true,
          unique: true,
        }
      ]
    },
  ]
}
export default Navigation;
Defining a worldwide entity is fairly just like defining a set. Within the code above, we used the GlobalConfig sort as a substitute of the CollectionConfig sort we used beforehand.
We additionally used an Array area so as to add the power to create a listing of menu objects. For these menu objects, we used the Relationship area to get and choose from the prevailing pages.
Right here is how this seems to be like in motion:
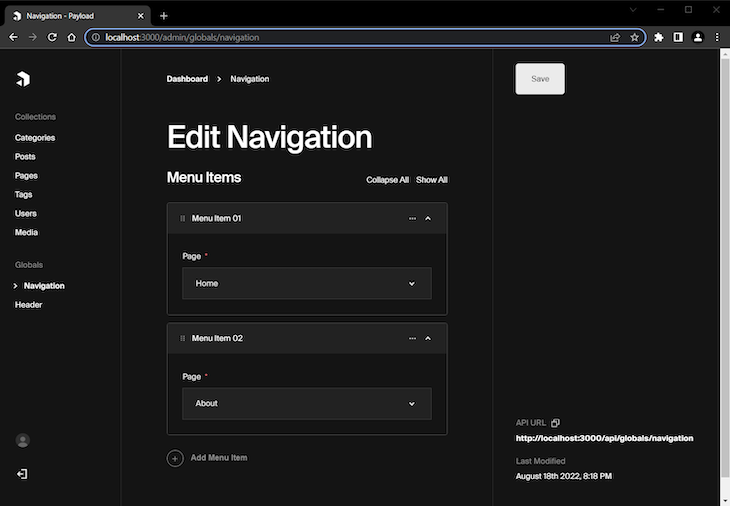
By clicking the Add Menu Merchandise button, you possibly can choose an current web page so as to add to the navigation menu. Right here, I’ve chosen Dwelling and About.
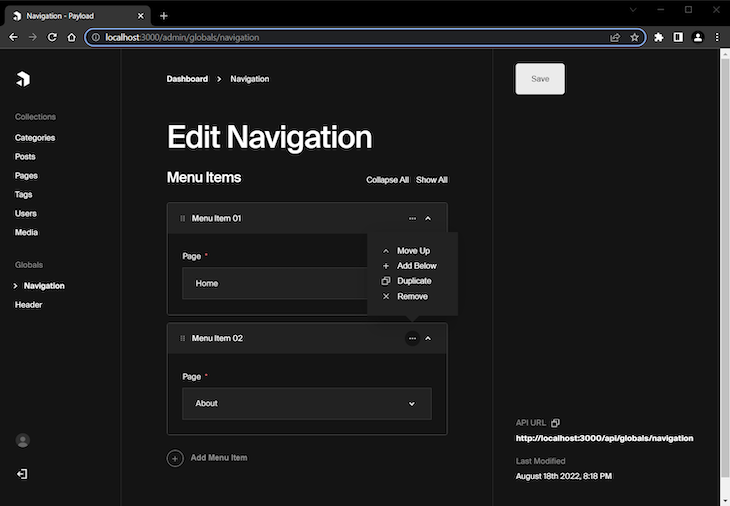
After we use an array enhancing area, now we have some choices to handle the array. These choices can be found after we click on on the ellipsis icon button to the proper of the sphere, as you possibly can see beneath:
For the second international, create a Header.ts file with the next content material:
import { GlobalConfig } from 'payload/varieties';

const Header: GlobalConfig = {
  slug: 'header',
  fields: [
    {
      name: 'styles',
      type: 'array',
      fields: [
        {
          name: 'cssLink',
          type: 'text',
        }
      ]
    },
    {
      title: 'scripts',
      sort: 'array',
      fields: [
        {
          name: 'jsLink',
          type: 'text',
        }
      ]
    },
  ]
}
export default Header;
Within the code above, we used two arrays to create two lists for CSS and JavaScript hyperlinks respectively.
For this to work, it’s essential to add a globals array within the payload.configts file. Put the next code beneath the collections array:
globals: [
  Navigation,
  Header
],
Right here is the way it seems to be in motion:
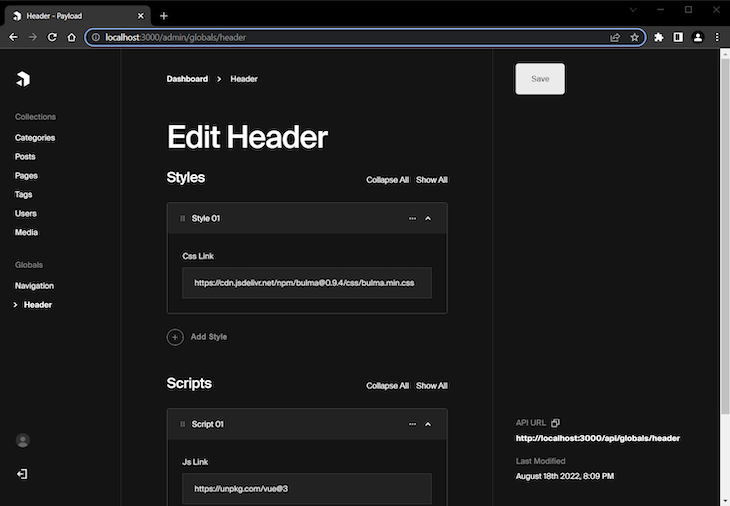
As you possibly can see, now you possibly can add hyperlinks for kinds or scripts, which will likely be globally accessible, equally to CodePen.
Lastly, in spite of everything our enhancing is finished, the admin panel ought to appear like this:
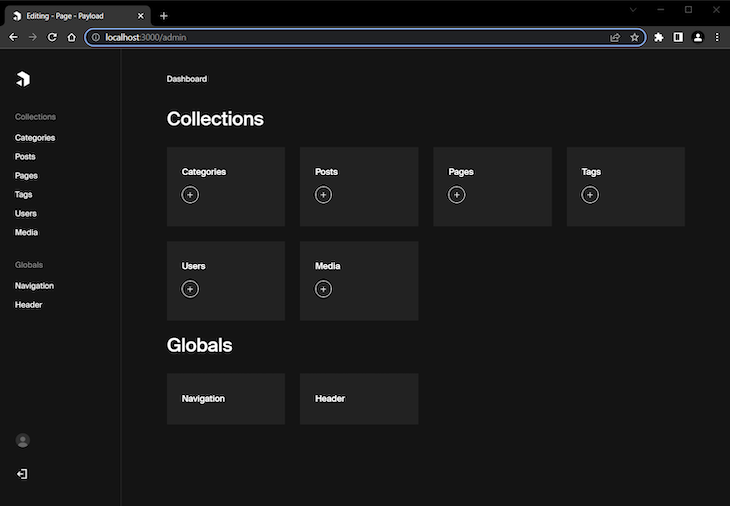
Congrats! You’ve simply created a easy however highly effective weblog content material administration system utilizing Payload CMS.
Exploring the API performance
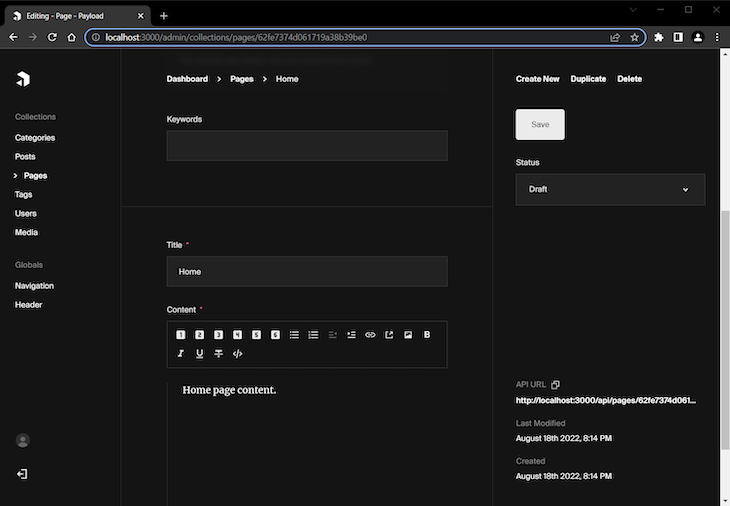
One very last thing I wish to point out is that Payload mechanically gives an API endpoint for every assortment merchandise. For instance, whenever you edit a specific web page, you possibly can click on the API URL hyperlink on the backside proper nook to get JSON knowledge for that web page. See an instance beneath:

Within the picture above, you possibly can see the info for the Dwelling web page we created earlier.
Conclusion
On this introductory tutorial to Payload CMS, we explored lots of Payload’s nice options by constructing a easy weblog administration system. Regardless of its obvious simplicity, Payload could be extraordinarily highly effective and versatile.
For extra complicated instance of Payload, discover the public demo and its code in Github. You can too check out an instance of Payload used with Subsequent.js.
Lastly, examine the official documentation from Payload CMS for extra in-depth info and steerage.
200’s solely  Monitor failed and gradual community requests in manufacturing
Deploying a Node-based net app or web site is the straightforward half. Ensuring your Node occasion continues to serve sources to your app is the place issues get more durable. For those who’re excited about making certain requests to the backend or third social gathering providers are profitable, attempt LogRocket.  https://logrocket.com/signup/
LogRocket is sort of a DVR for net and cellular apps, recording actually all the pieces that occurs whereas a person interacts together with your app. As a substitute of guessing why issues occur, you possibly can combination and report on problematic community requests to shortly perceive the basis trigger.
LogRocket devices your app to file baseline efficiency timings similar to web page load time, time to first byte, gradual community requests, and likewise logs Redux, NgRx, and Vuex actions/state. Begin monitoring free of charge.
