
Writing CSS-in-JS is standard when constructing component-based functions like React. This method lets us construct functions with out navigating between parts and stylesheets. It additionally supplies a method to improve our app’s CSS by capitalizing on the JavaScript atmosphere.
Many libraries can be found to simplify how we write CSS-in-JS. They supply further advantages, together with computerized vendor prefixes, acquainted CSS syntax, CSS element scoping, nesting, and so forth.
On this article, we are going to discover use a zero-runtime CSS-in-JS library referred to as Linaria in React functions. We’ll cowl:
To observe alongside, guarantee you’ve got a fundamental understanding of React.
What’s Linaria?
Some standard libraries, referred to as runtime libraries, embrace styled-components and Emotion. This implies they are going to parse the CSS-in-JS, generate the precise CSS, and inject it into the venture throughout runtime — i.e., when the web page hundreds within the browser.
These operations introduce further runtime overhead and will subsequently trigger efficiency bottlenecks.
Linaria is a build-time CSS-in-JS library. It lets us write CSS inside JavaScript just like the runtime libraries talked about earlier. However relatively than bundling the CSS with JS — which will increase the bundle measurement — it extracts the kinds right into a static CSS file at construct time, eliminating the additional workload within the runtime.
With this implementation, CSS and JavaScript assets can load in parallel, offering an extra efficiency enhance and, in the long run, bettering the load time.
What makes Linaria onerous to arrange in React apps?
Including Linaria in React is usually a daunting activity. Not like most CSS-in-JS libraries that require minimal setup, Linaria requires us to customise a bundler like webpack. We will then embrace a webpack loader to extract CSS from JS at construct time.
React initiatives created with the create-react-app CLI have webpack preconfigured already. However this setup doesn’t assist customizing webpack out of the field except we run the eject script, which isn’t advisable.
Nevertheless, we will use exterior libraries like customize-cra with react-app-rewired to tweak the webpack configuration.
Within the subsequent part, we are going to cowl add Linaria to a React venture with out the create-react-app CLI. Later on this lesson, we are going to cowl Linaria integration in a create-react-app setup.
Establishing Linaria with out Create React App
Let’s begin by downloading a React starter venture that I’ve created with out the create-react-app CLI. The command under will clone the venture from the GitHub repository:
git clone https://github.com/Ibaslogic/react-without-cra-starter
Like each React growth atmosphere, the venture incorporates Babel and webpack installations. We’ll use the webpack config file within the venture root to incorporate the webpack loader that Linaria requires.
Let’s run npm set up from the venture listing after which begin the venture utilizing the npm begin command.
Putting in the Linaria library
Run the next command to put in the Linaria core library and its dependencies:
npm set up @linaria/core @linaria/react @linaria/babel-preset @linaria/webpack-loader
Subsequent, find the webpack.config.js file within the venture root and add the @linaria/webpack-loader after the babel-loader within the module.guidelines:
Extra nice articles from LogRocket:
{
  take a look at: /.(js|jsx)$/,
  exclude: /node_modules/,
  use: [
    { loader: 'babel-loader' },
    {
      loader: '@linaria/webpack-loader',
      options: {
        sourceMap: process.env.NODE_ENV !== 'production',
      },
    },
  ],
},
Within the rule under, we’re telling webpack to make use of babel-loader to transpile JavaScript information utilizing the Babel presets that we’ve added within the .babelrc Babel config file:
{
  "presets": [
    "@babel/preset-env",
    ["@babel/preset-react", {
      "runtime" : "automatic"
    }]
  ]
}
Within the webpack config file, you might discover that we included css-loader and MiniCssExtractPlugin. Linaria is dependent upon them to extract the kinds:
{
  take a look at: /.css$/,
  use: [MiniCssExtractPlugin.loader, 'css-loader'],
},
The code above is equal to the next:
{
  take a look at: /.css$/,
  use: [
    {
      loader: MiniCssExtractPlugin.loader,
    },
    {
      loader: 'css-loader',
    },
  ],
},
We may additionally allow the non-obligatory SourceMap in growth mode, which lets us see the supply of sophistication names from the browser’s dev instruments for debugging functions:
{
  take a look at: /.css$/,
  use: [
    {
      loader: MiniCssExtractPlugin.loader,
    },
    {
      loader: 'css-loader',
      options: {
        sourceMap: process.env.NODE_ENV !== 'production',
      },
    },
  ],
},
Save all information. Restart your utility and guarantee it nonetheless works.
Linaria syntax and utilization
Linaria supplies entry to APIs like css tagged template literals, the styled tag, and cx helper features. So, let’s apply them in our venture.
css tagged template literals
A css tagged template literal is a JavaScript perform containing fashion declarations in common CSS syntax. To use it in our venture, open the src/parts/App.js file, import the css string tag from the core library, and use it like so:
import React from 'react';
import { css } from '@linaria/core';

const App = () => {
  return <h1 className={eleStyle}>Hi there React</h1>;
};

export default App;

const eleStyle = css`
  shade: crimson;
  font-size: 3rem;
`;
If we save the file, our utility ought to seem like so:
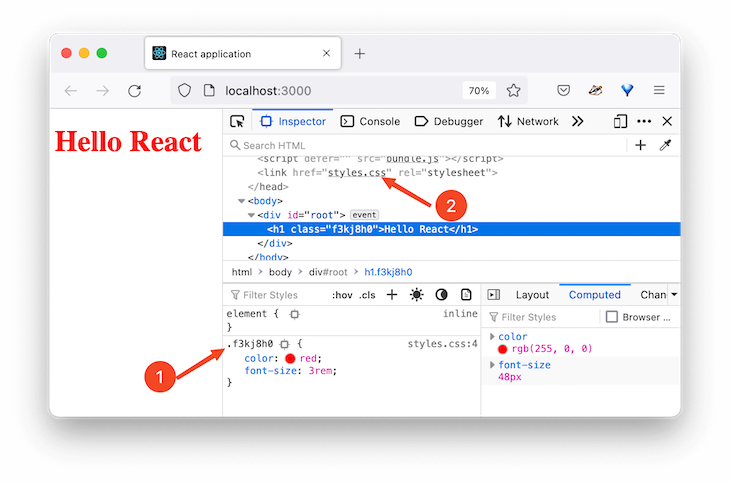
The css string tag evaluates to a singular class title whose fashion guidelines are extracted right into a kinds.css file. This file title is outlined within the webpack config.
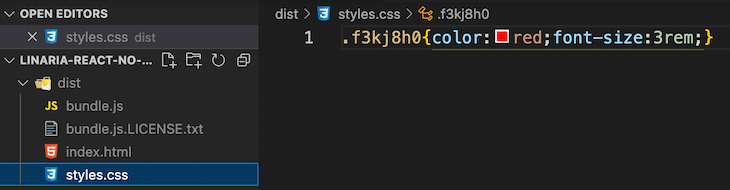
If we run a construct command with npm run construct, we are going to generate a construct folder referred to as dist within the venture root containing production-ready information, which incorporates the static kinds.css file.
Object interpolations
Linaria permits object fashion interpolations in order that we will work with libraries that output object-based kinds.
const objStyle = {
  paddingTop: '3rem',
};

const eleStyle = css`
  shade: crimson;
  font-size: 3rem;

  ${objStyle}
`;
The article fashion is evaluated to a CSS string at construct time earlier than being inserted into the stylesheet. The equal appears like so:
const eleStyle = css`
  shade: crimson;
  font-size: 3rem;

  padding-top: 3rem;
`;
Nesting
Just like Sass and different CSS-in-JS libraries, Linaria additionally helps CSS nesting:
const App = () => {
  return (
    <h1 className={eleStyle}>
      Hi there React <span>world!</span>
    </h1>
  );
};

export default App;

const eleStyle = css`

  /* ... */

  span {
    shade: inexperienced;
  }

  @media (min-width: 768px) {
    shade: violet;
  }
  &:hover {
    background-color: black;
  }
`;
cx helper perform
The cx helper lets us move an inventory of sophistication names to fashion a component. Just like the css tagged template, we can even import the cx from the core:
import { css, cx } from '@linaria/core';

const App = () => {
  return (
    <>
      {/* ... */}
      <p className={cx(class1, class2)}>
        Utilizing the cx helper perform
      </p>
    </>
  );
};

export default App;

const class1 = css`
  text-transform: capitalize;
  background-color: blue;
`;
const class2 = css`
  shade: white;
  background-color: inexperienced;
`;
The output now appears like so:
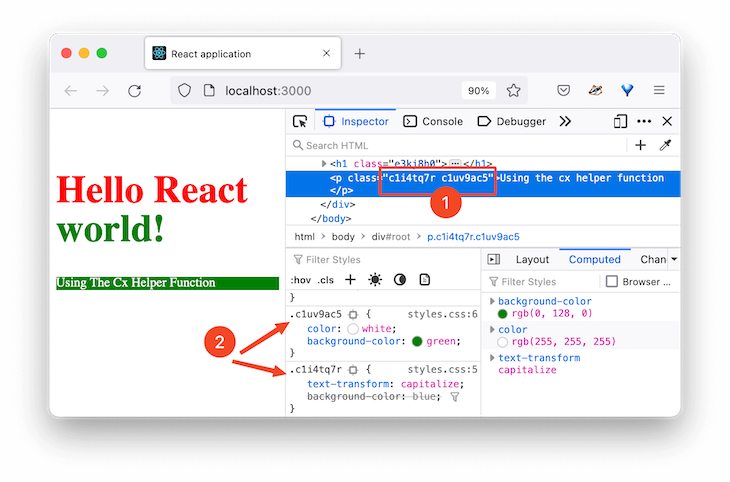
As you may see within the picture above, the category listing handed to the cx helper evaluates to separate class names.
styled tag
This syntax helps the identical options because the css tagged template, however with the addition of prop-based styling. The styled tag lets us write element kinds much like the styled-components library.
Let’s import the styled tag from the @linaria/react module and use it like so:
import { styled } from '@linaria/react';

const App = () => {
  return (
    <>
      {/* ... */}

      <Button>click on me</Button>
    </>
  );
};

export default App;

const Button = styled.button`
  background-color: blue;
  border: none;
  shade: white;
  padding: 8px 12px;
  border-radius: 4px;
  margin-right: 3px;
  cursor: pointer;
`;
Within the code above, we created a Button fashion element utilizing the styled tag adopted by the button HTML tag and its fashion guidelines.
Override or inherit fashion guidelines in Linaria
We will prolong the styled tag to inherit fashion guidelines. Within the following code, we are going to render a FancyButton fashion element that inherits fashion guidelines from a Button element. We’ll do that utilizing the styled(...) tag:
const App = () => {
  return (
    <>
      {/* ... */}

      <Button>click on me</Button>
      <FancyButton>One other button</FancyButton>
    </>
  );
};

export default App;

const Button = styled.button`
  /* ... */
`;

const FancyButton = styled(Button)`
  background-color: black;
  text-decoration: underline;
`;
The outcome appears like so:
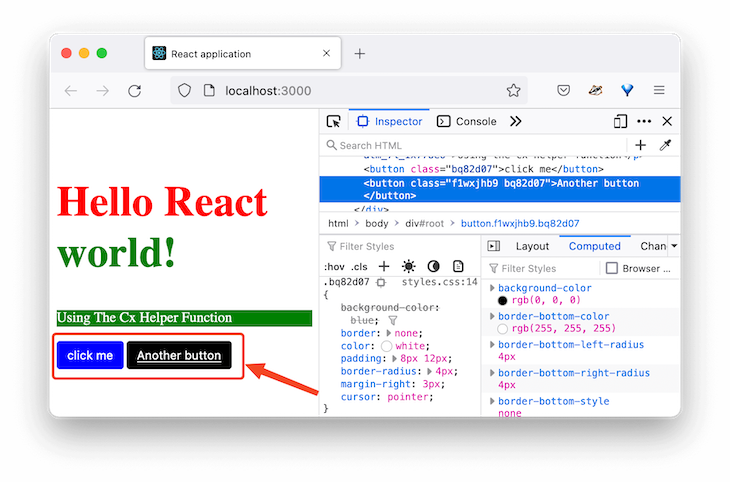
As you may see within the picture above, the button labeled click on me makes use of the default button fashion with a blue background. Nevertheless, by extending the styled tag, we will even have a flowery button labeled One other button with a black background and underlined textual content.
Prop-based kinds
The styled tag assist dynamic styling the place we fashion parts primarily based on their props. The code under renders styled parts that take main and success props:
import { styled } from '@linaria/react';

const App = () => {
  return (
    <>
      {/* ... */}

      <Button main>click on me</Button>
      <FancyButton>One other button</FancyButton>
      <FancyButton success>Success</FancyButton>
    </>
  );
};

export default App;

const Button = styled.button`
  /* background-color: blue; */
  border: none;
  shade: white;
  padding: 8px 12px;
  border-radius: 4px;
  margin-right: 3px;
  cursor: pointer;
  background-color: ${(props) =>
    props.main ? 'blue' : props.success ? 'inexperienced' : 'crimson'};
`;

const FancyButton = styled(Button)`
  /* background-color: black; */
  text-decoration: underline;
`;
We now have entry to the element’s props as a perform argument within the perform interpolation. Utilizing the ternary operator, we checked whether or not the prop obtained is main or success or none after which fashion accordingly. The dynamic perform interpolation will compile all the way down to CSS variables at construct time.
See the outcome:
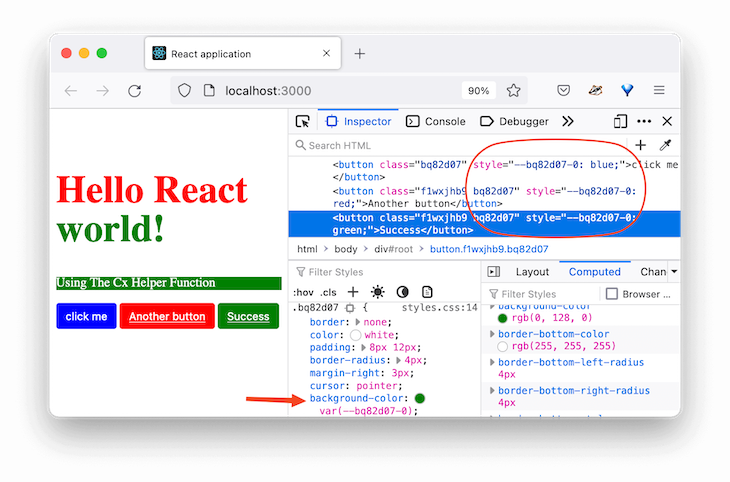
As you may see within the picture above, the perform interpolation is compiled to a CSS variable and dynamically up to date at runtime.
Utilizing Atomic CSS with Linaria
Linaria additionally helps Atomic kinds so that each class selector can solely produce one fashion rule.
Within the picture above, we will see that the inexperienced background shade overrules the blue shade. That was anticipated as a result of the rule declared final takes priority because of the cascade precept.
Nevertheless, we will inform Linaria to take a look at the declaration and filter duplicates, thereby leading to smaller bundle measurement.
So as to add Atomic CSS assist, let’s set up @linaria/atomic with the next command:
npm set up @linaria/atomic
To make use of it, we should be certain that the css tagged template is imported from the Atomic module as an alternative of the core:
// import { css, cx } from '@linaria/core';
import { cx } from '@linaria/core';
import { css } from '@linaria/atomic';

const App = () => {
  return (
    <>
      {/* ... */}

      <p className={cx(class1, class2)}>
        Utilizing the cx helper perform
      </p>
    </>
  );
};
If we save the file, the outcome ought to now seem like so:
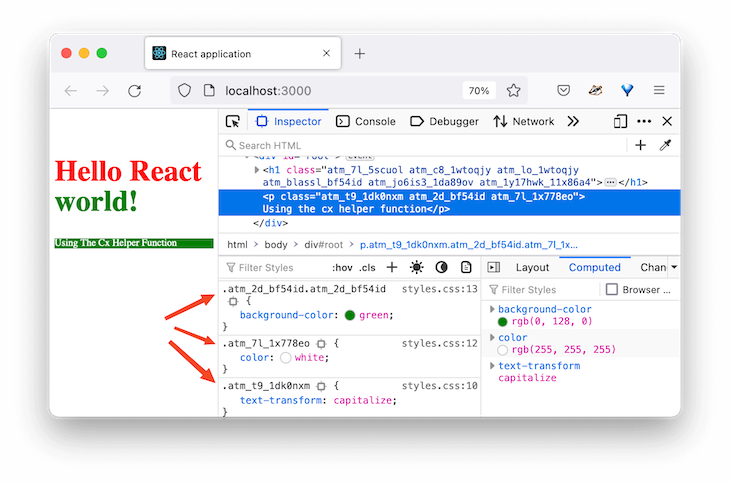
As seen above, each class selector now produces just one fashion rule.
Notice that utilizing the cx helper perform — as demonstrated beforehand — is required to keep away from duplication.
Writing international kinds in Linaria
Till now, we’ve created fashion guidelines which might be both scoped to the category names utilizing the css string or scoped to particular parts utilizing the styled tag.
Now, let’s see write international kinds to outline international guidelines just like the browser resets. Within the src folder, let’s create a kinds/international.js file and add the next international kinds:
import { css } from '@linaria/core';

export const globals = css`
  :international() {
    html {
      box-sizing: border-box;
    }

    *,
    *:earlier than,
    *:after {
      box-sizing: inherit;
    }

    physique {
      background-color: #cecece;
    }
  }
`;
Then import the file within the src/index.js file like so:
import './kinds/globals';
Save and make sure the international kinds are utilized. The :international() operator used within the code declares the fashion guidelines within the international scope.
At this level, it is best to be capable to use Linaria in a recent React venture. Right here is the supply code for our venture.
Subsequent, we are going to discover combine Linaria into the Create React App CLI venture.
Utilizing Linaria with Create React App
In case your utility is arrange with the CRA CLI, you will want to switch the webpack.config.js file.
As talked about earlier, the default setup doesn’t expose this file for us to make use of. With out ejecting CRA, we will set up customize-cra and react-app-rewired, which supplies utilities to customise CRA and tweak the webpack config.
So, let’s begin by putting in these libraries:
npm set up --save-dev customize-cra react-app-rewired
After that, create a config-overrides.js within the root listing so as to add a rule to webpack. Contained in the file, add the next code:
const {
  useBabelRc,
  override,
  addWebpackModuleRule,
} = require('customize-cra');

module.exports = override(
  useBabelRc(),
  addWebpackModuleRule({
    // do stuff with webpack
  })
);
The override perform lets us use plugins to switch the config objects. As an illustration, the useBabelRc() causes the Babel config file for use. Let’s rapidly create the .babelrc file within the root listing and add the next presets:
{
  "presets": [
    "@babel/preset-env",
    ["@babel/preset-react", {
      "runtime" : "automatic"
    }]
  ]
}
The addWebpackModuleRule lets us add a rule to the webpack config’s module.guidelines array. Just like what we did earlier, let’s replace the config-overrides.js file as follows:
module.exports = override(
  useBabelRc(),
  addWebpackModuleRule({
    take a look at: /.(js|jsx)$/,
    exclude: /node_modules/,
    use: [
      { loader: 'babel-loader' },
      {
        loader: '@linaria/webpack-loader',
        options: {
          sourceMap: process.env.NODE_ENV !== 'production',
        },
      },
    ],
  })
);
Discover we added a Linaria loader. Let’s set up it alongside different Linaria dependencies:
npm set up @linaria/core @linaria/react @linaria/babel-preset @linaria/atomic @linaria/webpack-loader
Subsequent, open the package deal.json file and replace the scripts instructions apart from the eject:
"scripts": {
  "begin": "react-app-rewired begin",
  "construct": "react-app-rewired construct",
  "take a look at": "react-app-rewired take a look at",
  "eject": "react-scripts eject"
},
Save all information and run npm begin to begin the event server.
Including Linaria kinds to our Create React App venture
Let’s copy the App.js code from the final venture to switch src/App.js in our new venture. Save and take a look at your venture. It ought to work!
Subsequent, for international kinds, create a kinds/globals.js within the src listing. Copy the worldwide kinds from the final venture and paste them into the newly created file. Save and make sure you import the worldwide fashion within the src/index.js file:
// import './index.css';
import './kinds/globals';
Save the file and see the worldwide kinds utilized on the webpage.
In a growth atmosphere, CRA doesn’t use MiniCSSExtractPlugin, which permits Linaria to extract kinds to a static file. It makes use of a mode loader, which permits sizzling enhancing, for fashion extraction within the <fashion> tags:
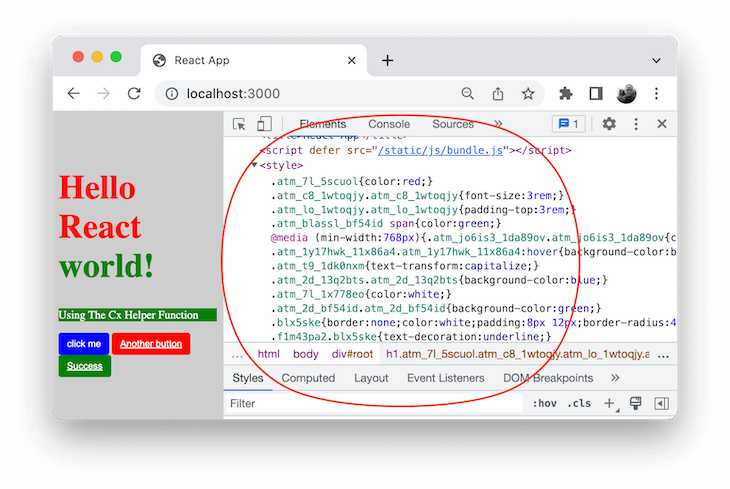
Nevertheless, for manufacturing builds, Linaria will capitalize on the presence of MiniCSSExtractPlugin to extract kinds to a file.
If we cease the dev server after which run the npm run construct command, we are going to generate a construct folder containing production-ready information, which incorporates the static CSS file:

Discover the supply code within the GitHub repository.
Conclusion
Linaria is turning into standard in fashionable growth because of its zero runtime capabilities. It’s a wholesome venture with a very good quantity of group involvement.
Although Linaria could also be tough to configure and daunting when including to Create React App initiatives, utilizing it to fashion parts is so simple as writing vanilla CSS with nesting capabilities.
I hope you discover this information useful. In case you have questions or contributions, share your ideas within the remark part.
Full visibility into manufacturing React apps
Debugging React functions may be troublesome, particularly when customers expertise points which might be onerous to breed. In case you’re curious about monitoring and monitoring Redux state, routinely surfacing JavaScript errors, and monitoring gradual community requests and element load time, strive LogRocket. 

LogRocket is sort of a DVR for internet and cellular apps, recording actually every part that occurs in your React app. As an alternative of guessing why issues occur, you may mixture and report on what state your utility was in when a problem occurred. LogRocket additionally screens your app’s efficiency, reporting with metrics like shopper CPU load, shopper reminiscence utilization, and extra.
The LogRocket Redux middleware package deal provides an additional layer of visibility into your person periods. LogRocket logs all actions and state out of your Redux shops.
Modernize the way you debug your React apps — begin monitoring free of charge.
