
Google presents tons of APIs for accessing its map providers, one in every of which is the Locations API. The Locations API primarily provides you details about locations utilizing HTTP requests. You may get all the knowledge you want a few native tackle, city, metropolis, district, restaurant, or some other place, together with its coordinates.
The Locations API contains tons of options equivalent to returning an inventory of locations associated to a search string, offering photographs of a spot, and plenty of others. One in all its mostly wanted and used options is the autocomplete service.
Utilizing the autocomplete service, Google can robotically fill within the tackle or identify of a spot being searched by the API. So, for instance, as your consumer sorts within the identify of a restaurant they need to order from, you may present them with recommendations primarily based on what they sort.
On this article, we are going to take a look at how we are able to use the autocomplete service in React Native. Nonetheless, we don’t must straight work with the Locations API as a result of a React Native bundle referred to as react-native-google-places-autocomplete can deal with this for us.
So, let’s take a look at how we are able to use the react-native-google-places-autocomplete bundle in a React Native mission, in addition to a few of its key functionalities and the way we are able to customise it to suit our mission. We’ll cowl:
Organising the Google Locations API
The react-native-google-places-autocomplete bundle is barely a medium by which to entry the Locations API. It won’t operate with out first establishing a Google Cloud mission to make use of the Locations API. So let me present how you are able to do that in 4 steps:
- Making a mission
- Enabling billing
- Enabling required APIs
- Creating an API key
Let’s begin by making a Google Cloud mission.
Making a Google Cloud mission
With no Google Cloud mission, we are able to’t use any of Google API providers. Head over to the Google Cloud Console and enroll in case you haven’t already.
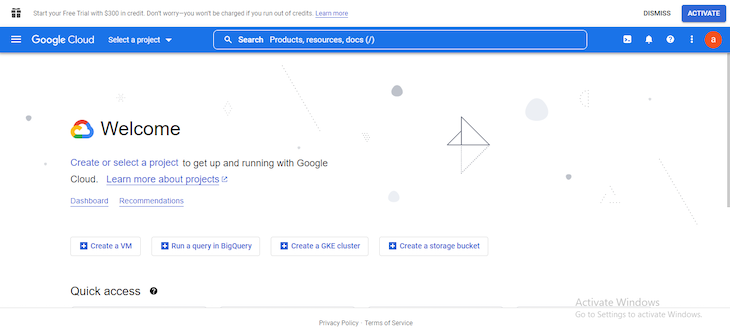
You’ll land on the web page proven within the picture above. Should you haven’t created a mission earlier than, click on the “Create or Choose Undertaking” button. A modal will pop up instantly. Click on “New mission” on the prime proper.
A brand new web page will load that requires you to enter the identify of the mission and the placement — “location” which means to which group the mission ought to belong. You’ll be able to go away the placement as “No group” and simply enter a reputation in your mission.
Lastly, click on “Create” to create the mission. You’ll be able to then choose the mission or go to the mission web page to see your listing of tasks.
Enabling billing for the Google Locations API
The Google Locations API will not be free ceaselessly. Google makes use of a pay-as-you-go pricing mannequin. However the first couple of requests you make will probably be free each month.
Google makes it obligatory so that you can allow billing in your mission earlier than you should utilize the Locations API.
Head as much as the billing web page, and choose the mission you need to allow billing for. A modal will pop up, merely click on “Create billing account” in case you haven’t already.
Observe this official information by Google to create a billing account.
Enabling required APIs
You solely have to allow the Locations API and Geocoding API to make use of the react-native-google-places-autocomplete bundle. Let’s try this subsequent.
Extra nice articles from LogRocket:
Head as much as your mission dashboard, which ought to appear to be this:
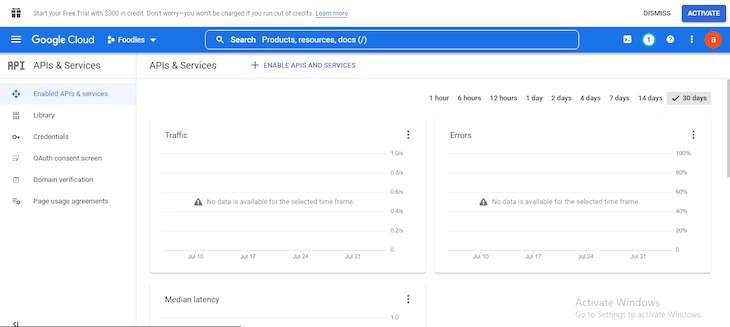
If it doesn’t appear to be the picture above, be sure that the “Allow APIs & Providers” on the sidebar is chosen. Subsequent click on “Allow APIs and Providers” on the navbar. It is going to take you to the API library web page:
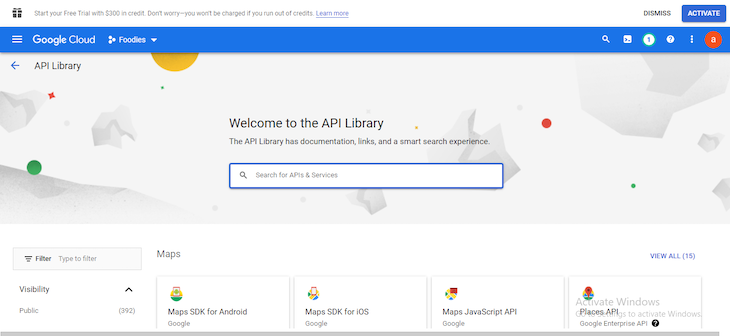
Seek for “Locations API” and click on the consequence. The subsequent web page comprises details about the Locations API, together with pricing data and a button to allow the API in your mission. Click on the “Allow” button, and that will probably be it.
Should you haven’t enabled billing in your mission, you may be prompted to take action whenever you attempt to allow the Locations API.
Afterwards, head again to the API library web page and allow the Geocoding API as properly.
Creating an API key
That is the final step we have now to take earlier than we are able to use the bundle. Go to your APIs dashboard. On the left sidebar, choose the “Credentials” possibility.
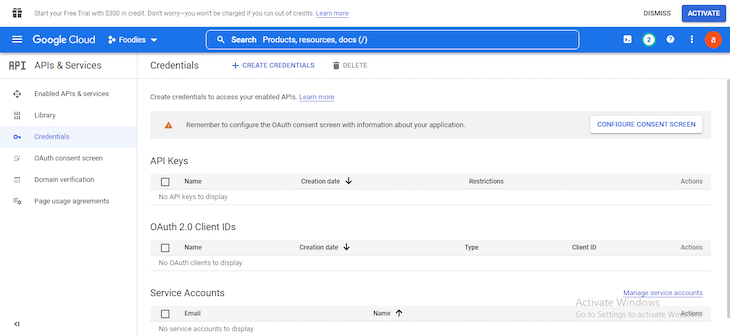
Click on “Create Credentials” on the prime navbar and choose “API key.” It will create an API key in your mission. With this API key, you solely have entry to the APIs you’ve enabled. Copy the API key and retailer it someplace secure.
You might discover a warning icon by the aspect of your API key. It is necessary you take note of it. Google recommends you limit your API keys to your apps solely. In any other case, in case you fail to maintain your API key a secret, the API key will probably be ineffective for some other apps or web site.
That is principally helpful for manufacturing functions. Since we’re solely going to be testing the options of the react-native-google-places-autocomplete bundle, there is no such thing as a want to limit the important thing.
Utilizing react-native-google-places-autocomplete
The react-native-google-places-autocomplete npm bundle gives a customizable part for utilizing the Google Locations autocomplete providers.
It additionally makes use of the Locations Particulars providers to offer extra particulars a few searched place, together with consumer opinions and coordinates, and the Geocoding API for changing readable addresses into geometric coordinates and vice versa.
To comply with together with this text and see this bundle at work, arrange a React Native mission.
Organising a React Native mission
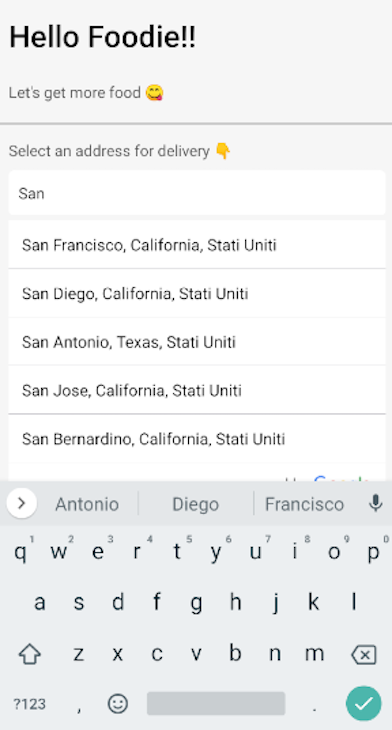
For our instance React Native mission, we are going to create an app for foodies to lookup locations to eat. We received’t undergo each step of constructing the app, because the essential focus of this text is to indicate some examples of find out how to use the react-native-google-places-autocomplete bundle.
Head over to your terminal and run the next:
npx react-native init Foodies
Should you’re having a TypeError: cli.init will not be a operate problem when making a React Native mission with the command above, uninstall each the worldwide react-native-cli and react-native. Now reinstall solely the worldwide react-native.
Now let’s set up the dependencies. We solely want one dependency for now: the react-native-google-places-autocomplete bundle.
npm set up react-native-google-places-autocomplete
The bundle gives a part with the whole lot we have to use and customise the Locations API in our app. Let’s see a primary instance:
import {GooglePlacesAutocomplete} from 'react-native-google-places-autocomplete';
import {apiKey} from './config'; // your google cloud api key

const App = () => {
  return (
    <SafeAreaView>
      <GooglePlacesAutocomplete
        placeholder="Kind a spot"
        question={{key: apiKey}}
      />
    </SafeAreaView>
  );
};
Let’s go over some vital elements of the instance above.
GooglePlacesAutocomplete is the textual content enter kind the place customers sort within the identify of a spot. Because the consumer sorts in, a modal of instructed locations primarily based on what the consumer sorts in will seem as a dropdown.
The question prop is the one required prop; with out its key property, the autocomplete bundle will be unable to make use of the Locations API. You should import your API key and use it right here. Additionally, don’t neglect to allow billing in your Cloud mission to make use of the Locations and Geocoding APIs.
It isn’t a secure observe to retailer delicate data inside your React Native mission. Let’s talk about how one can safe your API key.
Securing your API key
It’s crucial you don’t retailer your API key inside your React Native mission. Anybody along with your app bundle can entry your API key, so this isn’t a safe storage technique.
You’ll be able to resolve this through the use of a server to retailer your API key. Such that when the app is opened by the consumer, you merely make a request to your server to fetch the API key.
There are additionally measures to safe the API key within the server. Brad Traversy’s video on securing API keys demonstrates how to do that.
Dealing with responses from the Google Locations API
The primary set of responses from the Google Locations API are the autocomplete recommendations. The react-native-google-places-autocomplete bundle handles this set of responses, so we don’t have to fret about them.
Nonetheless, there are different responses that will probably be triggered by consumer occasions. For instance, when a instructed tackle is pressed, the consumer’s enter doesn’t return any extra recommendations (i.e place not discovered). These responses should be dealt with by us.
Once more, the autocomplete bundle has performed the tough half for us by offering occasion props for dealing with these responses. Let’s check out an instance:
const App = () => {
  return (
    <SafeAreaView>
      <GooglePlacesAutocomplete
        placeholder="Kind a spot"
        question={{key: apiKey}}
        fetchDetails={true}
        onPress={(information, particulars = null) => console.log(information, particulars)}
        onFail={error => console.log(error)}
        onNotFound={() => console.log('no outcomes')}
      />
    </SafeAreaView>
  );
};
These new props launched — onPress, onFail, and onNotFound — are important. When utilizing a bundle for the Locations API like this, you should utilize these props to reply questions like:
- What occurs when a consumer faucets a suggestion?
- What occurs when there is no such thing as a consequence for a search string?
- What occurs when fetching information from the API fails?
The autocomplete bundle gives methods to reply these questions with props. It’s as much as us to deal with the responses with customized capabilities. Alright, let’s deal with these questions one after the opposite.
What occurs when a consumer faucets a suggestion?
When the consumer faucets a suggestion, details about the chosen place will probably be returned as a parameter handed into the operate that’s then handed into the onPress prop. The 2 parameters from the instance above — information and particulars — each make up the details about the place.
The information parameter returns an object of primary details about the place like the outline or tackle identify, nation, metropolis, and different particulars.
The particulars parameter will return the identical object as the information object if the fetchDetails prop is false.
The fetchDetails prop is ready to false by default, however when set to true, the particulars parameter provides extra detailed details about the place together with the geometry. Google gives an instance of a full Place Particulars response of their docs.
What occurs when there is no such thing as a consequence for a search string?
It’s fairly probably {that a} consumer might generally sort a search string and obtain no outcomes. With the onNotFound prop, we are able to create consciousness everywhere in the mission that there have been no outcomes. Then, inside your app, you may deal with the way it ought to be displayed or what ought to or shouldn’t occur primarily based on this response.
For instance, we may deactivate all different options (like continuing to the subsequent step for ordering meals) and show a customized message indicating no outcomes.
Alternatively, if you wish to solely alert the consumer and never do something particular in regards to the lack of outcomes elsewhere in your app, you should utilize the FlatList listEmptyComponent prop to alert the customers when no outcomes are discovered.
You are able to do this by passing in both a part or a component, like so:
const App = () => {
  return (
    <SafeAreaView>
      <GooglePlacesAutocomplete
        placeholder="Kind a spot"
        onPress={(information, particulars = null) => console.log(information, particulars)}
        question={{key: apiKey}}
        fetchDetails={true}
        onFail={error => console.log(error)}
        onNotFound={() => console.log('no outcomes')}
        listEmptyComponent={() => (
          <View fashion={{flex: 1}}>
            <Textual content>No outcomes have been discovered</Textual content>
          </View>
        )}
      />
    </SafeAreaView>
  );
};
On account of the code above, if the consumer sorts in one thing for which there aren’t any outcomes, the textual content “No outcomes have been discovered” will show below the search bar.
What occurs when fetching information from the API fails?
It’s also fairly probably that fetching information from the Locations API might generally result in an error. For instance, the Locations API might throw its personal error as a result of there’s a configuration problem along with your Google Cloud mission or billing tackle.
The onFail prop returns an error when there’s an error from the API, whether or not whereas utilizing the Locations API or the Geocoding API.
A quite common problem you would run into right here is when billing will not be enabled in your mission or another problem with making vital billings.
Looking with predefined locations
You should utilize your customers’ favourite or most-visited locations as predefined locations for the GooglePlacesAutocomplete part.
A predefined place comprises an tackle with details about the place. You’ll be able to select to show the tackle or any identify you need to the consumer.
Should you use predefined locations, when the consumer focuses on the textual content enter to seek for an tackle, the predefined choices will pop up as autocomplete recommendations.
Right here’s find out how to set two places — Dominos Pizza and Hen Republic — as favourite sorts of predefined locations:
const App = () => {
  return (
    <SafeAreaView>
      <GooglePlacesAutocomplete
        placeholder="Kind a spot"
        onPress={(information, particulars = null) => console.log(information, particulars)}
        question={{key: apiKey}}
        fetchDetails={true}
        onFail={error => console.log(error)}
        onNotFound={() => console.log('no outcomes')}
        predefinedPlaces={[
          {
            type: 'favorite',
            description: 'Dominos Pizza',
            geometry: {location: {lat: 48.8152937, lng: 2.4597668}},
          },
          {
            type: 'favorite',
            description: 'Chicken Republic',
            geometry: {location: {lat: 48.8496818, lng: 2.2940881}},
          },
        ]}
      />
    </SafeAreaView>
  );
};
Within the code above, the outline is the identify that will probably be exhibited to the consumer. When any predefined possibility is chosen, the item you created for the place will probably be returned with the information and particulars parameters of that place.
The thing isn’t restricted to simply sort, description, and geometry. You’ll be able to add extra details about the place.
On account of the code above, it’s best to see these favourite predefined locations seem as recommendations even earlier than the consumer begins typing. See the end result beneath:
Utilizing a customized textual content enter part
By default, the react-native-google-places-autocomplete bundle makes use of React Native’s TextInput part for the textual content enter. Nonetheless, you’re not caught with the bundle’s alternative
With the textInputProps prop, you should utilize any customized part of your alternative, equivalent to Enter from React Native Components.
import {GooglePlacesAutocomplete} from 'react-native-google-places-autocomplete';
import {apiKey} from './config'; // your google cloud api key
import {Enter} from '@rneui/themed';

const App = () => {
  return (
    <SafeAreaView>
      <GooglePlacesAutocomplete
        placeholder="Kind a spot"
        onPress={(information, particulars = null) => console.log(information, particulars)}
        question={{key: apiKey}}
        fetchDetails={true}
        onFail={error => console.log(error)}
        onNotFound={() => console.log('no outcomes')}
        textInputProps={{
          InputComp: Enter,
        }}
      />
    </SafeAreaView>
  );
};
textInputProps is an object of all of the props of the textual content enter part. So in case you’re utilizing React Native’s TextInput, you should utilize props particular to it right here. For instance:
const App = () => {
  return (
    <SafeAreaView>
      <GooglePlacesAutocomplete
        placeholder="Kind a spot"
        onPress={(information, particulars = null) => console.log(information, particulars)}
        question={{key: apiKey}}
        fetchDetails={true}
        onFail={error => console.log(error)}
        onNotFound={() => console.log('no outcomes')}
        textInputProps={{
          autoFocus: true,
          blurOnSubmit: false,
        }}
      />
    </SafeAreaView>
  );
};;
The props used above in textInputProps are all particular to React Native’s TextInput. The identical factor occurs whenever you use a third-party library.
Styling your GooglePlacesAutocomplete part
The default kinds of the GooglePlacesAutocomplete part are well-styled, so they might be sufficient in your app.
Nonetheless, you may add to the default kinds to make them suit your app. You can even utterly eliminate the default kinds and utterly customise the fashion from scratch.
The GooglePlacesAutocomplete part has a kinds prop for styling all of the elements, from the textual content enter to the dropdown. Let’s see it in motion:
const App = () => {
  return (
    <SafeAreaView>
      <GooglePlacesAutocomplete
        placeholder="Kind a spot"
        onPress={(information, particulars = null) => console.log(information, particulars)}
        question={{key: apiKey}}
        fetchDetails={true}
        onFail={error => console.log(error)}
        onNotFound={() => console.log('no outcomes')}
        kinds={{
          container: {
            flex: 0,
          },
          description: {
            shade: '#000',
            fontSize: 16,
          },
          predefinedPlacesDescription: {
            shade: '#3caf50',
          },
        }}
      />
    </SafeAreaView>
  );
};
The kinds prop is an object that makes use of React Native’s normal fashion properties and values. With the kinds prop, you may fashion the completely different sections that make up the GooglePlacesAutocomplete part.
These sections — such because the textual content enter, dropdown container, every dropdown factor, and others — are the kid components of the GooglePlacesAutocomplete part. For instance, styling the textual content enter could be performed like so:
kinds={
  textInput: {
   borderColor: 'orange',
   fontSize: 20
 }
}
It is best to try to fashion every part or property primarily based on its sort. For instance, the part’s container is a View part, subsequently it ought to be styled as a View part. Here’s a listing of all sections/properties and their factor sorts
Limiting outcomes to at least one nation
It’s attainable to restrict the search outcomes proven within the react-native-google-places-autocomplete recommendations to at least one nation. As such, solely locations that match the consumer’s search string in a selected nation will pop up.
Use the part property within the question prop to specify a rustic, like so:
question={{key: apiKey, elements: 'nation:us'}}
The nation:us worth merely means america. It’s the abbreviation of the nation identify that’s used fairly than the entire identify. Here’s a listing of supported international locations.
With the question prop, you too can present leads to a special language. The default language is English, however with the language property, you may specify a special language in its ISO 639-1 code.
question={{key: apiKey, elements: 'nation:us', language: 'it'}}
Within the code above, we set the language property to it. It will present leads to Italian. If you wish to present your search leads to different languages, check out the listing of supported languages and their codes.
Now, if the consumer begins looking out, the search outcomes will seem in Italian and solely present choices inside america.
Fetching enter worth
One of many strategies supplied by the react-native-google-places-autocomplete bundle is getAddressText. This technique returns the worth of the consumer’s textual content enter.
There are lots of use instances for this technique. Examples embrace displaying the consumer’s enter in a particular manner when an unknown place is searched or reusing the consumer’s final enter if an error happens whereas looking out.
To make use of any strategies supplied by the bundle, we first must make a reference to the GooglePlacesAutocomplete part utilizing React refs, like so:
const App = () => {
  const placesRef = useRef();

  const getAddress = () => {
    console.log(placesRef.present?.getAddressText());
  };

  return (
    <SafeAreaView>
      <GooglePlacesAutocomplete
        placeholder="Kind a spot"
        onPress={(information, particulars = null) => console.log(information, particulars)}
        question={{key: apiKey}}
        fetchDetails={true}
        onFail={error => console.log(error)}
        onNotFound={() => console.log('no outcomes')}
        ref={placesRef}
      />
    </SafeAreaView>
  );
};
Different strategies that may also be helpful are:
setAddressText: adjustments the worth of the textual content enterclear: clears the textual content enterisFocused: returns true if the textual content enter is targeted, returns false if not.getCurrentLocation: makes a question to search out close by locations primarily based on present location.
Let’s discover find out how to use getCurrentLocation subsequent.
Fetching present location
The getCurrentLocation technique makes a question to search out close by locations primarily based on the consumer’s present location. Nonetheless, this isn’t the one location performance this bundle gives; it might probably additionally get the consumer’s present location the identical manner it retrieves details about a spot.
The bundle makes use of geolocation providers to search out the consumer’s location and embrace it as a part of the autocomplete recommendations. When chosen, the small print in regards to the consumer’s present location will probably be returned.
For that to occur, we’d must set the currentLocation prop to true:
const App = () => {
  return (
    <SafeAreaView>
      <GooglePlacesAutocomplete
        placeholder="Kind a spot"
        onPress={(information, particulars = null) => console.log(information, particulars)}
        question={{key: apiKey}}
        fetchDetails={true}
        onFail={error => console.log(error)}
        onNotFound={() => console.log('no outcomes')}
        currentLocation={true}
        currentLocationLabel="Your location!" // add a easy label
      />
    </SafeAreaView>
  );
};
This isn’t all there’s to arrange for a completely functioning app. You’d additionally must set up a geolocation service supplier like react-native-geolocation-service.
As well as, you’d have to ask your customers to grant location permission to make use of any location service with react-native-google-places-autocomplete. Nonetheless, these particular steps transcend the scope of this text, which focuses particularly on the react-native-google-places-autocomplete bundle.
Conclusion
On this article, we checked out find out how to arrange a Google cloud mission for the react-native-google-places-autocomplete bundle. We’ve additionally checked out a ton of functionalities by props and strategies of the bundle.
For instance, we checked out dealing with responses, securing your API key, styling the GooglePlacesAutocomplete part, limiting outcomes to at least one nation, displaying leads to a special language, utilizing strategies like getAddressText, utilizing a customized textual content enter part, and extra.
Now, the bundle will not be restricted to what we have now listed right here. You’ll find extra props and strategies that will assist customise the bundle to suit the way you need the Google Locations API for use in your app.
I hope you had a blast. Let me know what you assume within the remark part. Thanks for studying, and completely satisfied hacking.
LogRocket proactively surfaces and diagnoses an important points in your React Native apps

Hundreds of engineering and product groups use LogRocket to scale back the time it takes to know the basis explanation for technical and value points of their React Native apps. With LogRocket, you will spend much less time on back-and-forth conversations with prospects and take away the countless troubleshooting course of. LogRocket permits you to spend extra time constructing new issues and fewer time fixing bugs.
Proactively repair your React Native apps — strive LogRocket immediately.
