
Flaky exams produce completely different outcomes on completely different runs even when the tactic arguments and supply code (which assertions are written towards) are unchanged. Flakiness might be attributable to a mixture of things, together with randomness, race circumstances, or dependencies similar to exterior providers.
On this article, we’ll check an Categorical.js powered Node.js app with the potential to retailer and browse job listings. We’ll present how one can beat flaky exams utilizing Docker containers. For brevity, we’ll solely cowl related items of code throughout the scope of the subject material. The code is obtainable for exploration within the GitHub repository.
Soar forward:
Why keep away from flaky exams?
Avoiding flaky exams is significant as a result of flaky exams compromise software program integrity. Flaky exams additionally gradual improvement velocity as a result of a number of failures occur in slow-running CI environments.
A check is deterministic when particular assertions return particular outcomes when provided with particular parameters. Pure features in useful programming are written with the identical guidelines as deterministic exams. Software program modules work together with different modules and share state inside utility lifetimes. Poorly written exams generally introduce state inconsistency by way of cross-contamination, the place state from a earlier check run impacts working exams. This may result in check flakiness as testing turns into non-deterministic.
Different causes of flaky conduct embrace async conduct, concurrency points, and community interactions (with flaky methods). To mitigate the chance of a few of these eventualities, we should guarantee exams are correctly remoted, and shared useful resource utilization is minimized.
Why use Docker containers when testing?
Docker containers assist us hold testing environments deterministic. We will isolate an utility’s runtime atmosphere utilizing Docker containers from its host working system. This permits us to isolate the file system, networks, system calls, and useful resource utilization.
Containers are light-weight processes which might be cheap and simple to create and teardown. These qualities make them supreme for remoted testing. Utilizing a container orchestration instrument like Docker Compose, we will outline dependent providers inside a manifest, making it supreme for spinning mock containers for exterior providers.
The following part of this text will exhibit testing with Docker, Docker Compose, Knex.js, and PostgreSQL.
Testing a Node.js utility
Guaranteeing the conduct of functions working in manufacturing is essential. To extend our confidence ranges, we run handbook and automated exams. To realize confidence in our check suites, we’d like check outputs to be predictable and deterministic.
For this text, we’ll check an Categorical.s-powered Node.js app. We’ll use Postgres for persistence, however we’ll use knex to handle migrations, seeds, and construct question objects.
Setup and set up
First, clone the simple-job-board repo and set up the requisite dependencies:
git clone https://github.com/creatrixity/simple-job-board
cd simple-job-board
cp .env.instance .env
npm set up
For the reason that utility has PostgreSQL as a service dependency, we’ll run a Docker container for PostgreSQL:
# We have to create an remoted bridge community to permit us connect with our cases
docker create community simple-job-board --driver bridge
docker pull postgres
docker run --name simple-job-board-postgres -e POSTGRES_USER=postgres -e POSTGRES_PASSWORD=5uperIn5ecurePa55word -e POSTGRES_DB=simple-job-board -p 5432:5432 -d postgres
Within the snippet above, we outlined an remoted bridge community for the applying. We additionally pulled the official postgres picture and handed some configuration choices upon container initialization.
With the PostgreSQL container working and listening for connections, we’ll try to connect with the working occasion. With the psql CLI put in, execute:
psql -h 127.0.0.1 -p 5432 -U postgres -d simple-job-board
We must always get the next immediate beneath, signifying a profitable connection:
# psql (13.3, server 15.0 (Debian 15.0-1.pgdg110+1))
# WARNING: psql main model 13, server main model 15.
#         Some psql options won't work.
# Kind "assist" for assist.

# simple-job-board=#
Defining utility and testing configs
Subsequent, we’ll use dotenv to acquire environmental variables. We’ll additionally arrange a bit of getEnvVariable helper to supply fallbacks for environmental variables. We then outline keys for the server port and database host with localhost because the fallback. The config file is made obtainable at src/config.ts:
import dotenv from "dotenv";
dotenv.config();

operate getEnvVariable(identify: string, fallback: string = ""): string {
  const envVariable = course of.env[name];
  const fallbackProvided = fallback.size;
  if (!envVariable && !fallbackProvided) {
    throw new Error(`Surroundings variable ${identify} has not been set.`);
  }
  return envVariable || fallback;
}

const config = {
  server: {
    port: Quantity(getEnvVariable("PORT")),
  },
  database: {
    host: getEnvVariable("DATABASE_HOST", "localhost"),
  },
};

export default config;
Then, in ./knexfile.ts, outline configuration for the improvement and testing environments. Defining the 2 environments is comparable, aside from the definition of the host parameter in testing:
import kind { Knex } from "knex";
import appConfig from "./src/config";

// Replace together with your config settings.

const config: { [key: string]: Knex.Config } = {
  improvement: {
    consumer: "postgresql",
    connection: {
      person: "postgres",
      password: "5uperIn5ecurePa55word",
      port: 5432,
    },
    pool: {
      min: 2,
      max: 10,
    },
    migrations: {
      tableName: "knex_migrations",
    },
  },

  testing: {
    consumer: "postgresql",
    connection: {
      person: "postgres",
      password: "5uperIn5ecurePa55word",
      host: appConfig.database.host,
      port: 5432,
    },
    pool: {
      min: 2,
      max: 10,
    },
    migrations: {
      tableName: "knex_migrations",
    },
  },
};

module.exports = config;
Bootstrapping our Node.js utility
Subsequent, we’ll bootstrap our utility in src/index.ts. To maintain our Node.js utility bootstrap code reusable, we’ll create the brand new utility occasion inside a manufacturing facility operate referred to as createServer .
The createServer manufacturing facility will settle for a reference to a database connection pool file descriptor and an non-compulsory port quantity to reveal the applying inside.
Fortunately, knex supplies an abstraction over the database connection:
// src/index.ts
import knex from "knex";
import config from "./config";
import { createServer } from "./createServer";
const knexConfig = require("../knexfile");
const knexSetup = knex(knexConfig.improvement);

createServer(knexSetup, config.server.port);
After analyzing the src/createServer.ts file from which the createServer manufacturing facility is exported, we’ll make a duplicate of the database connection reference. That is obtainable for different Categorical modules by storing it inside app.locals.
We additionally conditionally hear on a provided port quantity. We intend on reusing the createServer manufacturing facility inside our check setup, and superagent will bind the applying to a random port if none is provided:
// src/createServer.ts
export operate createServer(dbConnection: Knex, port?: quantity): Categorical {
const app: Categorical = specific();
app.use(bodyParser.json());
// Cache a duplicate of the dbConnection socket
app.locals.dbConnection = dbConnection;
app.use("/jobs", jobsRouter);
app.get("https://weblog.logrocket.com/", (_req: Request, res: Response) => {
res.json({ message: "Hiya  ! Welcome to the easy job board app" });
});
if (port) {
app.hear(port, () => {
console.log(`
! Welcome to the easy job board app" });
});
if (port) {
app.hear(port, () => {
console.log(` Server is working at https://localhost:${port}`);
});
}
return app;
}
Server is working at https://localhost:${port}`);
});
}
return app;
}
Writing the combination exams
We’ll add a few integration exams for the job module. Earlier than every check suite runs, we’ll:
- Assemble a random distinctive identify for the ephemeral check
database - Acquire a
Postgresconnection - Create an ephemeral check
databasewith the generated random distinctive identify - Acquire a brand new
Postgresconnection that references thedatabase - Migrate and seed the newly created
database - Name
createServerto assist create a brand new occasion of the Categorical utility and assign the brand new occasion to the top-levelappvariable:
  // src/modules/job/job.check.ts
  // -------------------------------------------------------------------------
  // Setup up
  // -------------------------------------------------------------------------
  let app: Categorical;
  let knexSetup: Knex;
  let databaseName: string;

  beforeAll(async () => {
    databaseName = uniqueNamesGenerator({
      dictionaries: [colors, adjectives, animals],
    });
    knexSetup = knex(knexConfig.testing);
    await knexSetup.uncooked(`CREATE DATABASE ${databaseName}`);
    knexSetup = knex({
      ...knexConfig.testing,
      database: databaseName,
    });
    await knexSetup.migrate.newest();
    await knexSetup.seed.run();
    app = createServer(knexSetup);
  });
After every check suite is run, we clear up by dropping the ephemeral database and shutting the connection to the database to keep away from pool hunger and hold useful resource utilization at optimum ranges:
  // src/modules/job/job.check.ts
  // -------------------------------------------------------------------------
  // Tear Down
  // -------------------------------------------------------------------------
  afterAll(async () => {
    await knexSetup.uncooked(`DROP DATABASE ${databaseName}`);
    await knexSetup.destroy();
  });
For the check instances, we run assertions on the info returned from querying the listing of jobs seeded into the database within the earlier steps. We create a brand new job file by issuing a POST request through superagent. We additionally assert our new job file that’s returned when querying a listing of jobs obtainable within the database:
// src/modules/job/job.check.ts
import { jobData } from "../../../seeds/jobs";

describe("/jobs", () => {
  // -------------------------------------------------------------------------
  // Take a look at instances
  // -------------------------------------------------------------------------
  check("GET: / ought to return successful standing", async () => {
    await request(app).get("https://weblog.logrocket.com/").count on("Content material-Kind", /json/).count on(200);
  });

  check("GET: /jobs ought to return a listing of jobs", async () => {
    const consequence = await request(app).get("/jobs");
    count on(
      consequence.get("Content material-Kind").consists of("utility/json")
    ).toBeTruthy();
    count on(consequence.statusCode).toEqual(200);
    count on(consequence.physique.outcomes).toEqual(
      count on.arrayContaining(jobData.map((job) => count on.objectContaining(job)))
    );
  });

  check("POST: /jobs ought to create a brand new job", async () => {
    const jobCreationData = {
      function: "Digital Actuality Designer",
      location: "Seattle",
      group: "Microsoft",
      description: "Reimagine digital actuality experiences",
    };

    const jobCreationResponse = await request(app)
      .submit("/jobs")
      .ship(jobCreationData)
      .set("Settle for", "utility/json");

    count on(jobCreationResponse.statusCode).toEqual(201);

    const jobsResponse = await request(app).get("/jobs");
    const jobs = jobsResponse.physique.outcomes;
    count on(jobs[jobs.length - 1]).toMatchObject(jobCreationData);
  });
});
Working npm check ought to give us the output beneath:
PASS  src/modules/job/job.check.ts
  /jobs
    ✓ GET: / ought to return successful standing (267 ms)
    ✓ GET: /jobs ought to return a listing of jobs (64 ms)
    ✓ POST: /jobs ought to create a brand new job (97 ms)

Take a look at Suites: 1 handed, 1 complete
Checks:       3 handed, 3 complete
Snapshots:   0 complete
Time:        3.705 s, estimated 14 s
Ran all check suites.

Watch Utilization: Press w to indicate extra.
We now have efficiently examined our utility inside our native improvement atmosphere. Subsequent, we’ll have our exams run inside a Docker container.
Working exams in Docker containers
First, we’ll begin by creating our Dockerfile with the directions for constructing our utility picture:
FROM node:alpine

WORKDIR /usr/app
COPY ./ /usr/app

RUN npm set up

# Outline the command to run the check
CMD ["npm", "test"]
Subsequent, let’s outline a docker-compose.yml manifest that accommodates two providers: the simple-job-board service that runs the exams for our Categorical utility and the db service, a PostgreSQL database working in a container:
model: "3"
providers:
  simple-job-board:
    construct: .
    atmosphere:
      DATABASE_HOST: db
    hyperlinks:
      - db
  db:
    picture: postgres:11
    atmosphere:
      POSTGRES_USER: postgres
      POSTGRES_PASSWORD: 5uperIn5ecurePa55word
      POSTGRES_DB: simple-job-board
    ports:
      - "5432:5432"
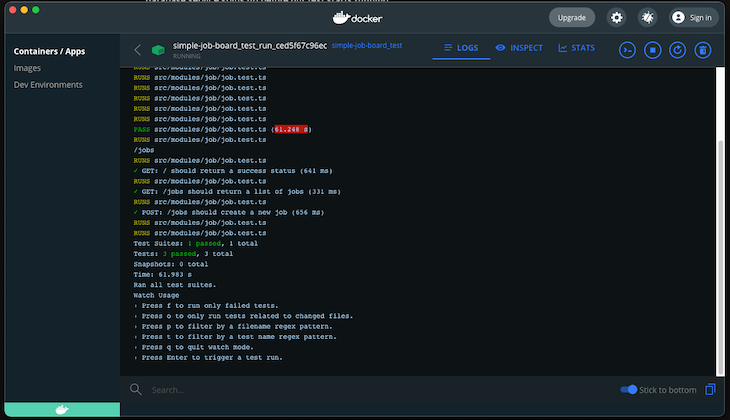
Then, we’ll provoke the check run by working docker-compose run check to make sure our database service spins up earlier than our check begins working:
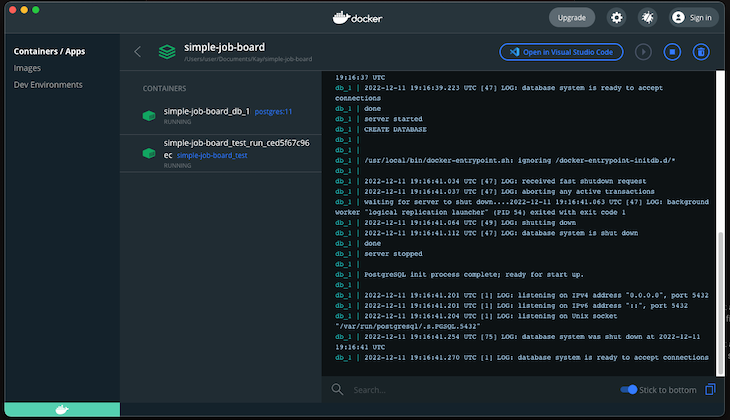
Our check outcomes will cross with inexperienced checkmarks working within the Docker containers. You could discover a slight uptick in ready time earlier than our exams run. That is due to the overhead incurred after we spin up a Docker container:
Conclusion
With Docker containers and check isolation, we enormously cut back the probabilities of encountering flaky exams. On this article, we created new connections and spun up new databases for every check run guaranteeing a clear slate for every run. We additionally eradicated state contamination as a supply of flakiness. Nevertheless, do not forget that there are different sources of flakiness, similar to async conduct, concurrency points, and community interactions. It’s essential to acknowledge that check flakiness is multi-variate in nature.
Be happy to clone the undertaking from this tutorial and provides it a check.
