
There’s a numerous vary of listening to, sight, and cognitive talents amongst those that entry the web. For this reason accessibility has change into a vital a part of how internet functions are constructed.
Builders are tasked with eradicating the communication and interplay limitations that many individuals face within the bodily world. The objective is to design options and instruments that work for everybody no matter their language, location, means, or the {hardware} or software program they use.
Sadly, regardless of its significance, accessibility continues to be a quite difficult facet of internet improvement. So, many builders shrink back from incorporating accessibility into their tasks. As an alternative, they find yourself constructing poorly designed functions that create limitations (as a substitute of eradicating them), unintentionally excluding sure folks from utilizing the net.
On this article, we’ll introduce Ariakit, an open supply, low-level part toolkit for constructing accessible internet functions in React. We’ll display how we will use Ariakit’s elements to construct accessible internet functions simply and effectively.
Soar forward:
Conditions
To comply with together with this tutorial, you’ll want the next:
- Working information of React and its ideas
- The most recent model of Node.js is put in in your machine
What’s Ariakit?
Ariakit gives quite a lot of UI elements, comparable to Kind, Dialog, Tab, Tooltip, and extra, that can be utilized to quickly construct accessibility-driven internet functions, UI libraries, and design techniques.
If accessibility is considered one of your prime priorities, you’ll discover Ariakit helpful; its elements comply with WAI-ARIA suggestions and include inbuilt accessibility.
Putting in and integrating Ariakit
Earlier than we get into how Ariakit works and the way to use it, let’s see how we will set up and combine it right into a React utility.
Step one is to open up your command-line device, cd right into a venture folder, and run the next command to put in Ariakit:
npm i ariakit
In case you don’t have an current venture and wish to comply with together with this tutorial, you possibly can go forward and set up React utilizing the Vite CLI:
npm create [email protected]
This command will immediate you to decide on your choice for the venture. Choose the beneath choices to proceed:
As soon as the set up is accomplished, run the next code to cd into the venture folder, set up the required dependencies, and begin the event server:
  cd ariakit-example
  npm set up
  npm run dev
We’re set; now we will begin importing Ariakit elements into our venture.
Understanding Ariakit’s constructing blocks
Ariakit is a set of elements and hooks. Every part accepts three sorts of props: choices, attribute, and state.
Let’s take a better look.
choices props
choices props are customized properties that have an effect on the interior part’s habits. They translate to precise HTML attributes throughout construct time:
import { Button } from "ariakit";
import "./App.css";

operate App() {
  return (
    <div className="App">
      <div>
        <Button hidden>Click on</Button>
      </div>
    </div>
  );
}

export default App;
Within the instance above, the hidden prop is an choices prop; it can disguise an in any other case seen part from the view. On this case, it can disguise the Button part from the browser.
attribute props
attribute props are precise HTML attributes; you’re probably already accustomed to any such prop. The className prop within the beneath instance is an attribute prop:
<Button hidden className=”btn”>Click on</Button>
state props
The state prop attaches stateful hooks and variables to a part. Ariakit gives inbuilt state hooks; you possibly can both use them or create your personal:
import { Checkbox, useCheckboxState } from "ariakit";
import "./App.css";

operate App() {
  const checked = useCheckboxState({ defaultValue: true });
  return (
    <div className="App">
      <div>
        <h1>whats up</h1>
        <label className="label">
          <Checkbox className="checkbox" state={checked} /> I've learn and
          conform to the phrases and circumstances
        </label>
      </div>
    </div>
  );
}
Within the above instance, the useCheckboxState operate is a state hook and we’re passing it to the Checkbox part by way of the state prop.
We’ll study extra about state hooks later on this article.
as props
Along with choices, attribute, and state props, elements can settle for an as prop. This prop is used to reinforce elements by injecting different elements or tags (e.g., kids) into an current one. In less complicated phrases, it’s used to vary the part sort.
For instance, say you might have a Button part that you simply need to behave like a hyperlink aspect. All it is advisable do is cross an as prop with an a tag worth to the part, like so:
operate App() {
  return (
    <div className="App">
      <div>
        <Button as="a" href="#">
          Click on
        </Button>
      </div>
    </div>
  );
}
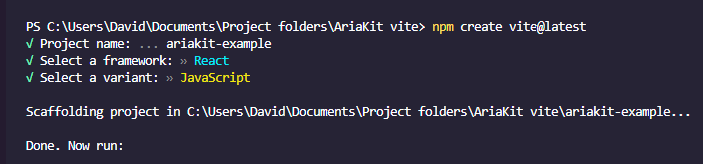
Right here’s the Button part earlier than the as prop was added:
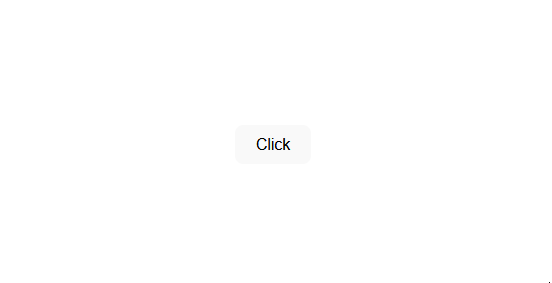
Right here’s the Button part after the as prop was added; it seems to be and behaves like a hyperlink aspect:
state hooks
As talked about beforehand, Ariakit gives quite a lot of state hooks that we will use to handle the state of elements in our functions. These state hooks are tailor-made to the particular use of their respective elements, which means every part is assigned a selected state hook.
For instance, if we need to deal with state logic for a checkbox part, we’d use the useCheckboxState hook. Likewise, we’d use the useFormState hook to deal with state logic for a kind part.
Ariakit state hooks settle for an object as an preliminary worth and return an object with choices that their respective elements will want:
const combobox = useComboboxState({ gutter: 8, sameWidth: true });
Within the instance above, the gutter and sameWidth object properties are the preliminary values of the useComboboxState hook. The combobox part can entry the returned object choices by way of the combobox variable:
<Combobox state={combobox} placeholder="e.g., Apple" className="combobox" />;
As a result of some states require extra complicated logic, Ariakit additionally gives the choice to plug your personal states.
Styling
Ariakit doesn’t depend on any CSS library. In consequence, it doesn’t ship with pre-styled elements by default. Which means that we will use any method for styling the elements. This might embody utilizing inline kinds, modules, styled-components, or exterior UI libraries comparable to Tailwind.
Since every part returns an HTML aspect that accepts attribute props, we will use the model attribute so as to add inline kinds to a part and use the className attribute so as to add courses that may be referenced in an exterior CSS file:
<Button className="button" model={{backgroundColor: "orange"}}>Button</Button>
Now that we perceive the idea of Ariakit and the way its elements work, let’s see how we will use them in our tasks.
Utilizing Ariakit elements
Though Ariakit is a low-level library, its elements are exported by a high-level API. This makes them much less verbose than different low-level libraries and simple to make use of.
Earlier within the article, we demonstrated the way to use easy elements such because the Button or CheckBox. Now, let’s see how we will use complicated elements comparable to kind, tab, choose, and extra.
kind
Ariakit’s kind part doesn’t solely include inbuilt accessibility, it additionally gives some stage of validation, so that you don’t have to fret about losing time on validation.
Extra nice articles from LogRocket:
To make use of Ariakit’s kind part, first import the beneath elements into your venture:
import {
  Kind,
  FormError,
  FormInput,
  FormLabel,
  FormSubmit,
  useFormState,
} from "ariakit";
Right here, we’re importing the Kind part and different elements that we’ll use for the enter fields, labels, submit button, validation error, and a kind state hook.
Subsequent, assign the useFormState hook to a variable and cross a default worth to it, like so:
  const kind = useFormState({
    defaultValues: { identify: "", quantity: 0 },
  });
Now, create the shape with the Kind part, and use the FormLabel and FormInput elements so as to add as many fields as you‘d like. In our case, we are going to add a identify area and a quantity area.
operate App() {
  const kind = useFormState({
    defaultValues: { identify: "", quantity: 0 },
  });
  return (
    <div className="App">
      <Kind state={kind}>
        <div className="area identify">
          <FormLabel identify={kind.names.identify}>Identify</FormLabel>
          <FormInput identify={kind.names.identify} required placeholder="identify" />
          <FormError identify={kind.names.identify} className="error" />
        </div>
        <div className="area quantity">
          <FormLabel identify={kind.names.quantity}>Quantity</FormLabel>
          <FormInput
            identify={kind.names.quantity}
            sort="quantity"
            required
            placeholder="quantity"
          />
          <FormError identify={kind.names.quantity} className="error" />
        </div>
        <FormSubmit>Submit</FormSubmit>
      </Kind>
    </div>
  );
}
As you possibly can see, every enter area and its corresponding elements are encapsulated of their respective div aspect.
We used the identify prop to hyperlink every FormInput part to the useFormState hook. This manner, the hook can have entry to the enter area’s state and values.
We did the identical for the FormError elements, however not like the FormInput elements, the FormError will examine the useFormState hook for errors within the enter area it’s linked to.
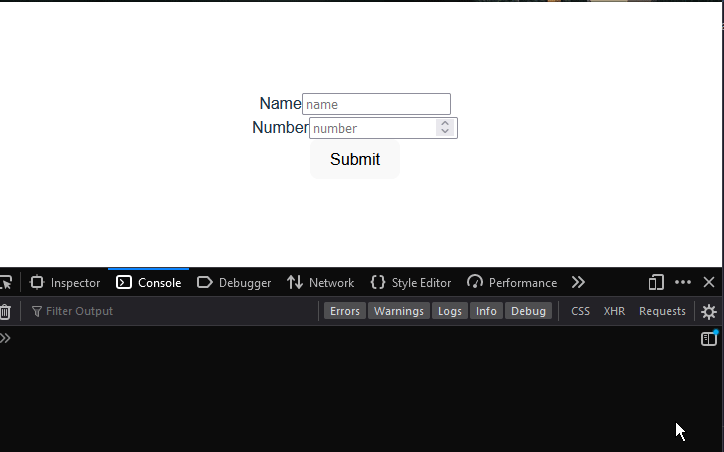
In case you save your modifications at this level, you need to get an error message once you attempt to submit the shape with out populating the enter fields:
Getting the shape information is likewise easy, all we now have to do is chain a values methodology to the kind variable:
kind.values
Ideally, we’d solely want the shape’s information on the time of submission, so we have to create a operate that may hearth when the shape is submitted.
Happily, the useFormState hook gives a useSubmit operate that accepts a callback operate, which will get fired when the shape is submitted.
  kind.useSubmit(() => {
    ...
  });
If we need to log the shape’s information to the console when the shape is submitted, right here’s how we’d go about it:
  kind.useSubmit(() => {
    console.log(kind.values);
  });
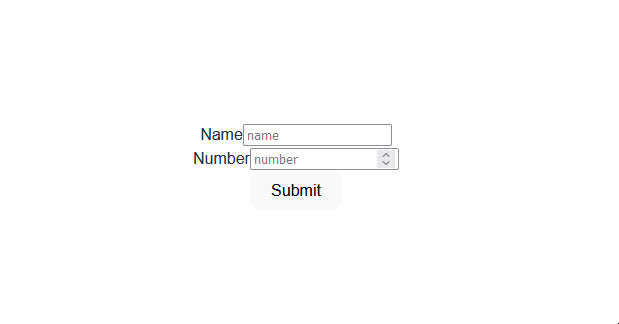
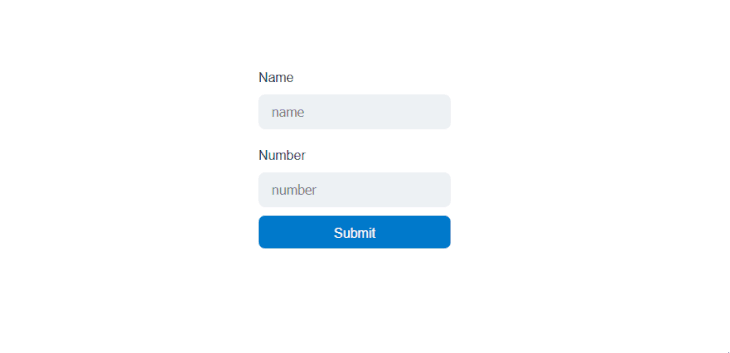
Subsequent, we’ll take a look at the choose part and the way we will add it to our kind. However first, let’s model our kind to look extra interesting.
We’ll deal with this the identical manner we often would with common JSX parts, by including a className attribute to the elements:
<Kind state={kind} className="kind">
        <div className="area">
          <FormLabel identify={kind.names.identify} className="label">
            Identify
          </FormLabel>
          <FormInput
            identify={kind.names.identify}
            required
            placeholder="identify"
            className="identify"
          />
          <FormError identify={kind.names.identify} className="error" />
        </div>
        <div className="area">
          <FormLabel identify={kind.names.quantity} className="label">
            >Quantity
          </FormLabel>
          <FormInput
            identify={kind.names.quantity}
            sort="quantity"
            required
            placeholder="quantity"
            className="quantity"
          />
          <FormError identify={kind.names.quantity} className="error" />
        </div>
        <FormSubmit className="button"
>Submit</FormSubmit>
      </Kind>
Subsequent, we’ll model the elements within the CSS file:
.kind {
  width: 280px;
  min-height: 320px;
  show: flex;
  flex-direction: column;
  hole: 1rem;
  padding-top: 2.5rem;
  padding-bottom: 2.5rem;
}

.area {
  show: flex;
  flex-direction: column;
  hole: 0.5rem;
  align-items: flex-start;
}

.area enter {
  peak: 2.5rem;
  width: 100%;
  border-radius: 0.5rem;
  border-style: none;
  background-color: hsl(204, 20%, 94%);
  padding-left: 1rem;
  padding-right: 1rem;
  font-size: 1rem;
  line-height: 1.5rem;
  coloration: hsl(204, 10%, 10%);
}

.area enter:hover {
  background-color: hsl(204, 20%, 91%);
}

.area enter:focus-visible,
.area enter[data-focus-visible] {
  define: 2px strong hsl(204, 100%, 40%);
}

.area:nth-child(1){
  margin-bottom: 20px;
}

.area:nth-child(2){
  margin-bottom: 10px;
}

.button {
  peak: 2.5rem;
  width: 100%;
  cursor: pointer;
  align-items: middle;
  justify-content: middle;
  hole: 0.25rem;
  white-space: nowrap;
  border-radius: 0.5rem;
  border-style: none;
  background-color: hsl(204, 100%, 40%);
  padding-left: 1rem;
  padding-right: 1rem;
  font-size: 1rem;
  line-height: 1.5rem;
  coloration: hsl(0, 0%, 100%);
}

.error:empty {
  place: absolute;
}

.error:not(:empty) {
  border-radius: 0.5rem;
  border-width: 1px;
  border-color: hsl(357, 56%, 72%);
  background-color: hsl(357, 56%, 90%);
  padding-top: 0.5rem;
  padding-bottom: 0.5rem;
  padding-left: 1rem;
  padding-right: 1rem;
  coloration: hsl(357, 100%, 30%);
}

.quantity {
  -moz-appearance: textfield;
}

.quantity::-webkit-outer-spin-button,
.quantity::-webkit-inner-spin-button {
  -webkit-appearance: none;
  margin: 0;
}
choose
So as to add a choose part to the shape, we’ll first import it and its corresponding elements:
import {
  ...
  Choose,
  SelectItem,
  SelectLabel,
  SelectPopover,
  useSelectState,
} from "ariakit";
We’ll use the Choose, selectItem, and SelectLabel elements to create choose, choices, and label parts, respectively.
Additionally, we’ll use the useSelecteState hook to set the choose aspect’s default values and cross it to the part by way of the state prop. The selectPopover part will function a dropdown for the choose choices.
Subsequent, let’s assign the useSelecteState hook to a variable and cross the default values to it, like so:
const choose = useSelectState({
  defaultValue: "Apple",
  sameWidth: true,
  gutter: 4,
});
As you possibly can see, we’re not solely setting the default worth but additionally the default width and gutter measurement of the choose choices.
Subsequent, go to the shape and add the Choose part and its corresponding elements and cross the state to them:
<div className="choose">
  <SelectLabel state={choose}>Favourite fruit</SelectLabel>
  <Choose state={choose} className="choose" />
  <SelectPopover state={choose} className="popover">
    <SelectItem className="select-item" worth="Apple" />
    <SelectItem className="select-item" worth="Banana" />
    <SelectItem className="select-item" worth="Grape" disabled />
    <SelectItem className="select-item" worth="Orange" />
  </SelectPopover>
</div>
What we’re doing right here is straightforward, we hyperlink the Choose part to the state hook after which nest a number of choices inside it utilizing the SelectItem.
Shifting alongside, open your CSS file and replace it with the next kinds:
.wrapper {
  show: flex;
  flex-direction: column;
  hole: 0.5rem;
  align-items: flex-start;
}

.choose {
  width: 116%;
  show: flex;
  peak: 2.5rem;
  cursor: default;
  align-items: middle;
  justify-content: space-between;
  hole: 0.25rem;
  white-space: nowrap;
  border-radius: 0.5rem;
  background-color: hsl(204, 20%, 94%);
  padding-left: 1rem;
  padding-right: 1rem;
  font-size: 1rem;
  line-height: 1.5rem;
  margin-bottom: 10px;
}

.choose:hover {
  background-color: hsl(204, 20%, 91%);
}

.popover {
  max-height: min(var(--popover-available-height, 300px), 300px);
  z-index: 50;
  show: flex;
  flex-direction: column;
  overflow: auto;
  overscroll-behavior: include;
  border-radius: 0.5rem;
  border-width: 1px;
  border-style: strong;
  border-color: hsl(204, 20%, 88%);
  background-color: hsl(204, 20%, 100%);
  padding: 0.5rem;
  coloration: hsl(204, 10%, 10%);
  filter: drop-shadow(0 4px 6px rgba(0, 0, 0, 15%));
}

.choose:focus-visible,
.choose[data-focus-visible],
.popover:focus-visible,
.popover[data-focus-visible] {
  define: 2px strong hsl(204, 100%, 40%);
}

.select-item {
  define: none !essential;
  show: flex;
  cursor: default;
  scroll-margin: 0.5rem;
  align-items: middle;
  hole: 0.5rem;
  border-radius: 0.25rem;
  padding: 0.5rem;
}
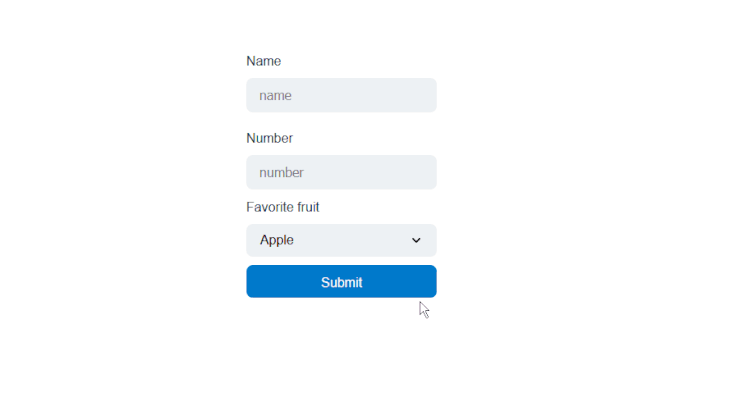
Now, in case you save your progress and return to the browser, you need to see one thing just like this:
Conclusion
This text showcased Ariakit’s button, checkbox, kind, and choose elements and demonstrated how they operate. These are simply a number of the elements that Ariakit gives.
Ariakit has a part to fulfill most necessities for constructing full-fledged internet functions. Ariakit’s documentation is incomplete on the time of this writing, however the web site does present a big assortment of part examples.
Full visibility into manufacturing React apps
Debugging React functions could be tough, particularly when customers expertise points which might be arduous to breed. In case you’re involved in monitoring and monitoring Redux state, robotically surfacing JavaScript errors, and monitoring gradual community requests and part load time, strive LogRocket. 

LogRocket is sort of a DVR for internet and cell apps, recording actually the whole lot that occurs in your React app. As an alternative of guessing why issues occur, you possibly can combination and report on what state your utility was in when a difficulty occurred. LogRocket additionally screens your app’s efficiency, reporting with metrics like shopper CPU load, shopper reminiscence utilization, and extra.
The LogRocket Redux middleware bundle provides an additional layer of visibility into your consumer periods. LogRocket logs all actions and state out of your Redux shops.
Modernize the way you debug your React apps — begin monitoring free of charge.
