Ant Design is an enterprise UI design library for React functions. It consists of many parts and was developed to assist velocity up our dev cycles. Ant Design is an open-source bundle for React; it’s formally supported and stays one of the crucial in style UI kits in the present day.
Subsequent.js is a well-liked ReactJS framework, identified for its efficiency, developer expertise, and out-the-box pre-built configuration. No guide configuration is critical for this.
By combining Subsequent.js with Ant Design, we will construct scalable, environment friendly, and developer-friendly apps with ease. On this article, we will probably be having a look at how builders can combine Ant Design with Subsequent.js — let’s get began!
Right here’s what we will probably be doing in the present day:
Making a NextJS app
First, let’s create a Subsequent.js app utilizing the next command:
There may be additionally a TypeScript model, however right here I’m utilizing the JavaScript model.
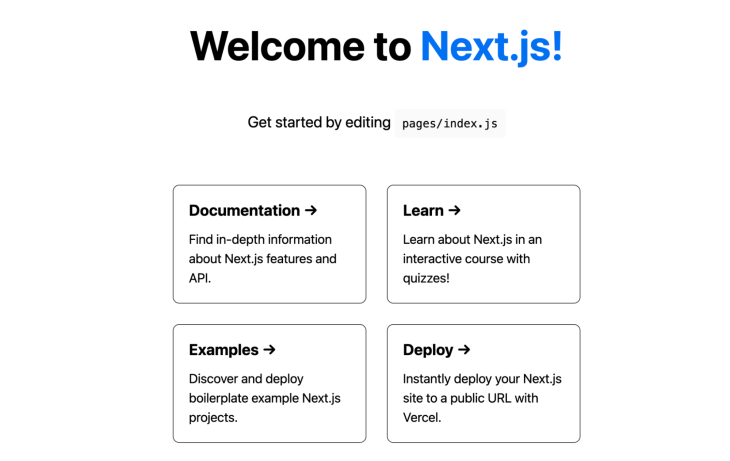
After set up, enter the beneath command and go to localhost:3000 in your browser to see the app.
cd app-name
yarn run dev
You may see the homepage within the browser:
Subsequent, let’s set up Ant Design to make our app extra interactive.
Set up Ant Design
We are able to set up Ant Design to your Subsequent.js app with a single command:
yarn add antd
After set up, we will begin configuring Ant Design within the Subsequent.js app.
Import antd/dist/antd.css within the _app.js file. By doing this, we import the Ant Design element kinds globally and aren’t required to import every element individually. Ant Design additionally helps the Much less model of CSS.
Including Ant Design parts
Now, let’s begin including within the parts that make up the Ant Design system.
Layouts
Take away the present code from index.js and add the beneath code to incorporate the highest bar and sidebar with menus.
//.jsx
import {
  MenuFoldOutlined,
  MenuUnfoldOutlined,
  UploadOutlined,
  UserOutlined,
  VideoCameraOutlined,
} from '@ant-design/icons';
import { Structure, Menu } from 'antd';
import React, { useState } from 'react';
const { Header, Sider, Content material } = Structure;

export default perform Residence() {
  const [collapsed, setCollapsed] = useState(false);
  return (
      <Structure className="format">
        <Sider set off={null} collapsible collapsed={collapsed}>
          <div className="emblem" />
          <Menu
              theme="darkish"
              mode="inline"
              defaultSelectedKeys={['1']}
              gadgets={[
                {
                  key: '1',
                  icon: <UserOutlined />,
                  label: 'nav 1',
                },
                {
                  key: '2',
                  icon: <VideoCameraOutlined />,
                  label: 'nav 2',
                },
                {
                  key: '3',
                  icon: <UploadOutlined />,
                  label: 'nav 3',
                },
              ]}
          />
        </Sider>
        <Structure className="site-layout">
          <Header
              className="site-layout-background"
              type={{
                padding: 0,
              }}
          >
            {React.createElement(collapsed ? MenuUnfoldOutlined : MenuFoldOutlined, {
              className: 'set off',
              onClick: () => setCollapsed(!collapsed),
            })}
          </Header>
          <Content material
              className="site-layout-background"
              type={{
                margin: '24px 16px',
                padding: 24,
              }}
          >
            Content material
          </Content material>
        </Structure>
      </Structure>
  )
}
Within the above code, now we have included the Ant format element with the sidebar. Add the beneath CSS within the globals.css file to make some UI enhancements.
//.css
.set off {
  padding: 0 24px;
  font-size: 18px;
  line-height: 64px;
  cursor: pointer;
  transition: coloration 0.3s;
}

 .set off:hover {
  coloration: #1890ff;
}

 .emblem {
  peak: 32px;
  margin: 16px;
  background: rgba(255, 255, 255, 0.3);
}

.site-layout .site-layout-background {
  background: #fff;
}

.format {
  peak: 100vh;
}
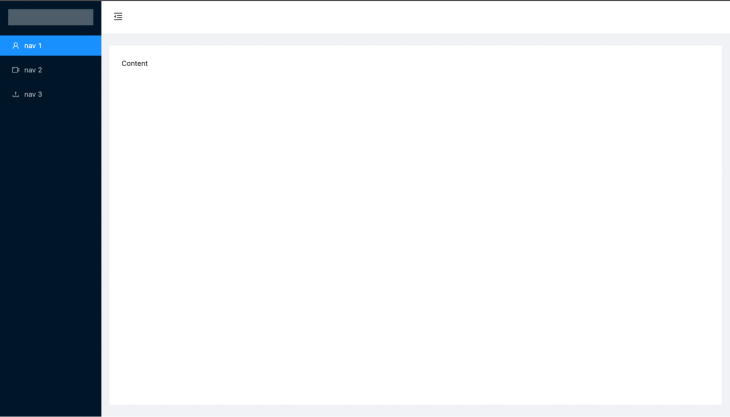
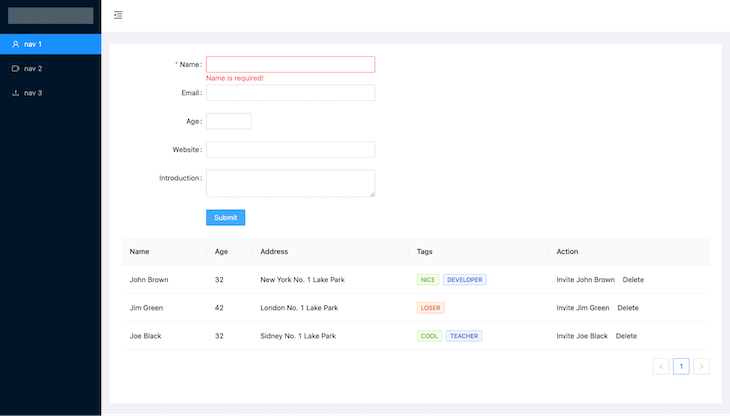
When you add the above CSS, navigate to your browser and you may see the output. As you possibly can see, we accomplished the format with menus in only a few minutes, which is fairly good!
Subsequent, we will add kind parts to get consumer information. You aren’t required to put in a third-party kind bundle for this, as Ant itself already contains kind parts with some highly effective options.
Kinds
Ant design kind comes with pre-defined validation guidelines, default worth choices, and varied inputs. Create a customForm element within the parts folder and add the next code:
//.jsx
import React from 'react';
import { Button, Type, Enter, InputNumber } from 'antd';
const format = {
    labelCol: {
        span: 8,
    },
    wrapperCol: {
        span: 16,
    },
};
/* eslint-disable no-template-curly-in-string */

const validateMessages = {
    required: '${label} is required!',
    sorts: {
        electronic mail: '${label} will not be a sound electronic mail!',
        quantity: '${label} will not be a sound quantity!',
    },
    quantity: {
        vary: '${label} should be between ${min} and ${max}',
    },
};
/* eslint-enable no-template-curly-in-string */

const CustomForm = () => {
    const onFinish = (values) => {
        console.log(values);
    };

    return (
        <Type className="kind" {...format} title="nest-messages" onFinish={onFinish} validateMessages={validateMessages}>
            <Type.Merchandise
                title={['user', 'name']}
                label="Identify"
                guidelines={[
                    {
                        required: true,
                    },
                ]}
            >
                <Enter />
            </Type.Merchandise>
            <Type.Merchandise
                title={['user', 'email']}
                label="E mail"
                guidelines={[
                    {
                        type: 'email',
                    },
                ]}
            >
                <Enter />
            </Type.Merchandise>
            <Type.Merchandise
                title={['user', 'age']}
                label="Age"
                guidelines={[
                    {
                        type: 'number',
                        min: 0,
                        max: 99,
                    },
                ]}
            >
                <InputNumber />
            </Type.Merchandise>
            <Type.Merchandise title={['user', 'website']} label="Web site">
                <Enter />
            </Type.Merchandise>
            <Type.Merchandise title={['user', 'introduction']} label="Introduction">
                <Enter.TextArea />
            </Type.Merchandise>
            <Type.Merchandise wrapperCol={{ ...format.wrapperCol, offset: 8 }}>
                <Button kind="major" htmlType="submit">
                    Submit
                </Button>
            </Type.Merchandise>
        </Type>
    );
};

export default CustomForm;
Embody the CustomForm element in index.js as beneath to make it seen on the homepage.
//.jsx
         <Content material
              className="site-layout-background"
              type={{
                margin: '24px 16px',
                padding: 24,
              }}
          >
            <CustomForm/>
          </Content material>
Validation
Ant types embrace the rule props so as to add validation for every enter with much less work. Within the above kind, now we have validated the e-mail enter utilizing the e-mail kind rule.
//.jsx
guidelines={[
                    {
                        type: 'email',
                    },
                ]}
Generally used validation guidelines
- Enum: Match enum worth
- Len: Quantity or string size
- Max: Most size of string and quantity
- Min: Minimal size of string and quantity
- Sample: RegEx sample
- Whitespace: Validates if the enter has whitespace
- Sort: Validates string, quantity, electronic mail, boolean, and URL
API integration
We are able to use the onFinish perform to submit the shape information to the backend utilizing APIs after validating.
Extra nice articles from LogRocket:
//.jsx
 const onFinish = (values) => {
       fetch('https://instance.com/profile', {
    methodology: 'POST', // or 'PUT'
  headers: {
    'Content material-Sort': 'software/json',
  },
  physique: JSON.stringify(values),
})
  .then((response) => response.json())
  .then((information) => {
    console.log('Success:', information);
  })
  .catch((error) => {
    console.error('Error:', error);
  });
};
Pre-fill information to kind fields
We are able to use setFieldsValue to set values within the kind:
kind.setFieldsValue({ title: 'Jack' });

kind.setFieldsValue({ electronic mail: '[email protected]' });
Navigate to the browser to see our kind in motion:
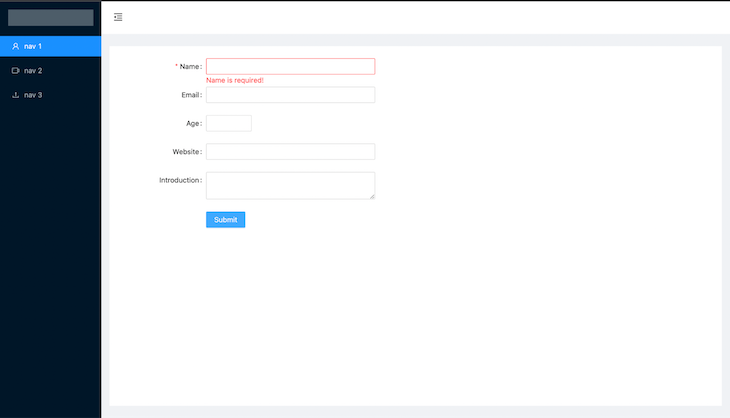
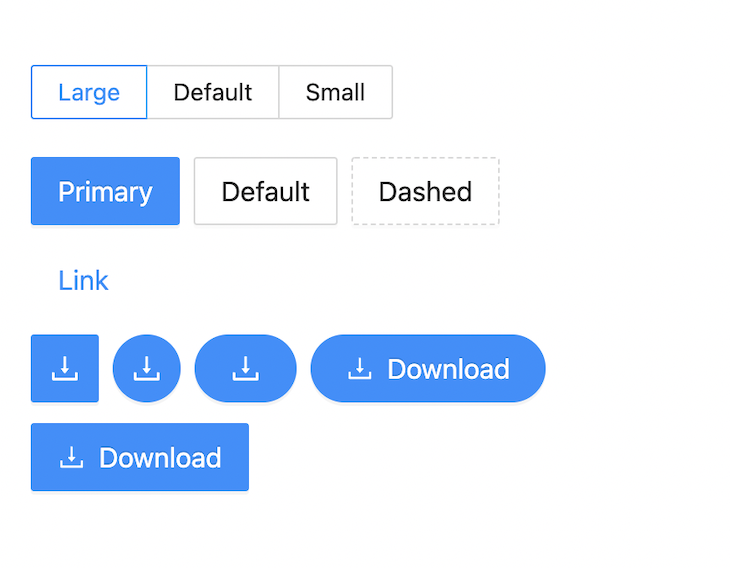
Within the above UI, now we have used the first button element; Ant Design additionally contains different varieties of buttons, like these beneath:
Tables
Subsequent, let’s embrace a desk in our app to checklist some information.
Add the beneath code and add it to the parts/CustomTable.js element.
//.jsx
import { House, Desk, Tag } from 'antd';
import React from 'react';

const columns = [
  {
    title: 'Name',
    dataIndex: 'name',
    key: 'name',
    render: (text) => {text},
  },
  {
    title: 'Age',
    dataIndex: 'age',
    key: 'age',
  },
  {
    title: 'Address',
    dataIndex: 'address',
    key: 'address',
  },
  {
    title: 'Tags',
    key: 'tags',
    dataIndex: 'tags',
    render: (_, { tags }) => (
      <>
        {tags.map((tag) => {
          let color = tag.length > 5 ? 'geekblue' : 'green';

          if (tag === 'loser') {
            color="volcano";
          }

          return (

              {tag.toUpperCase()}

          );
        })}
      </>
    ),
  },
  {
    title: 'Action',
    key: 'action',
    render: (_, record) => (

        Invite {record.name}
        Delete

    ),
  },
];

const information = [
  {
    key: '1',
    name: 'John Brown',
    age: 32,
    address: 'New York No. 1 Lake Park',
    tags: ['nice', 'developer'],
  },
  {
    key: '2',
    title: 'Jim Inexperienced',
    age: 42,
    handle: 'London No. 1 Lake Park',
    tags: ['loser'],
  },
  {
    key: '3',
    title: 'Joe Black',
    age: 32,
    handle: 'Sidney No. 1 Lake Park',
    tags: ['cool', 'teacher'],
  },
];

const CustomTable = ()
; export default CustomTable;
The desk element has two main props; columns and dataSource.
The columns prop is used to cross the desk columns and dataSource is used to cross the info for the desk.
Subsequent, import the desk element within the index.js file. Now, the desk is included on our homepage as beneath:
Generally used desk props
- Pagination: So as to add pagination for the desk
- Loading: To point out loading on API calls
- Columns: Columns of the desk
- dataSource: Knowledge for the desk
- Dimension: Desk dimension
Generally used columns props
- defaultSorter: Default order of the sorted values
- render: Render the desk cells
- sorter: Sorter perform for desk columns
- align: Column alignment
Ant Design’s desk element contains frontend and backend pagination, sorting, filters, checkboxes for choosing rows, nested units, infinite scroll tables, and extra.
ConfigProvider
ConfigProvider is the context API for Ant Design parts to configure the properties globally. You may add ConfigProvider by inserting the next:
//.jsx
import { ConfigProvider } from 'antd';

export default () => (


);
Configure locale
You may merely set native all parts utilizing the config supplier beneath.
//.jsx
import { ConfigProvider } from 'antd';

export default () => (
  <ConfigProvider route="rtl" locale="en">
    <App />
  </ConfigProvider>
);
Part dimension config
//.jsx
import { ConfigProvider } from 'antd';

export default () => (
  <ConfigProvider route="rtl" locale="en" componentSize="medium">
    <App />
  </ConfigProvider>
);
We are able to use configProvide for subtree parts, not solely as international parts.
Icons
To make use of Ant Design icons we have to set up the icons bundle from Ant utilizing this command:
yarn add @ant-design/icons
Ant has three totally different icon sorts:
Import within the parts as beneath:
//.jsx
import {
    HomeOutlined,
    LoadingOutlined,
    SettingFilled,
    SyncOutlined

} from '@ant-design/icons';

const  iconSize = { fontSize: '40px', coloration: '#08c' };

const ShowIcons = () => (
<HomeOutlined  type={iconSize} />
<SettingFilled  type={iconSize} />
<SyncOutlined spin  type={iconSize} />
<LoadingOutlined  type={iconSize} />
);
Icons output
![]()
Ant Design has parts for Checklist, Alerts, Notification, Pickers, Icons and extra — you possibly can discover all of the parts by following this hyperlink.
Points and optimization
The foremost challenge we’d face is the CSS bundle dimension, as we imported your complete CSS file in _app.js as beneath in _app.js, which might import the CSS for all of the Ant Design parts, regardless of their utilization.
import ‘antd/dist/antd.css
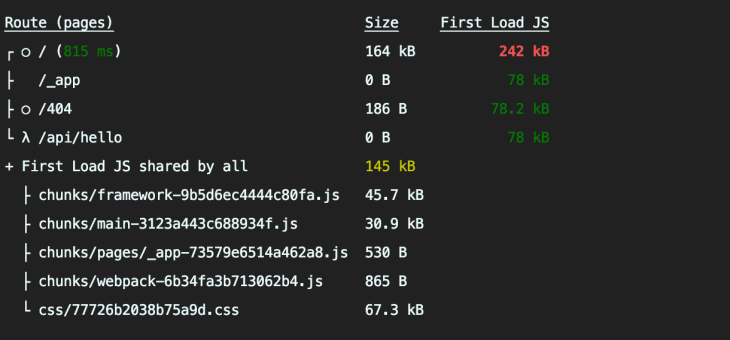
After we construct the app, we’d see the CSS dimension. The whole CSS dimension for our instance app is 67.3KB. Test the picture beneath for extra info.
(Word: Command to construct: yarn construct)
This appears very giant, and it’ll lower the app efficiency and improve the app loading time. To repair this, we will cut back it by importing the CSS just for the used parts.
Part-level CSS import
Utilizing the next-plugin-antd-less and babel-plugin-import packages and including some config, we will obtain this.
Use the next instructions to put in the packages:
yarn add next-plugin-antd-less
yarn add --dev babel-plugin-import
After set up, create .babelrc file within the root folder and add the beneath code.
.json
{
  "presets": ["next/babel"],
  "plugins": [
    [
      "import",
    {
      "libraryName": "antd",
      "style": true
    }
  ]]
}
Subsequent, add the beneath config code within the subsequent.config.js file.
//.js

const withAntdLess = require('next-plugin-antd-less');

module.exports = withAntdLess({
  // modifyVars: { '@primary-color': '#04f' }, // non-compulsory
  lessVarsFilePath: './src/kinds/variables.much less', // non-compulsory
  lessVarsFilePathAppendToEndOfContent: false, // non-compulsory
  // non-compulsory https://github.com/webpack-contrib/css-loader#object
  cssLoaderOptions: {
    // ...
    mode: "native",
    localIdentName: "[hash:base64:8]",however you possibly can rewritten getLocalIdentFn
    exportLocalsConvention: "camelCase",
    exportOnlyLocals: false,
    // ...
    getLocalIdent: (context, localIdentName, localName, choices) => {
      return "whatever_random_class_name";
    },
  },

  // Different Config Right here...

  webpack(config) {
    return config;
  },
});
Take away the imported antd.css file from _app.js.
import 'antd/dist/antd.css
Now construct the instance app:
yarn construct
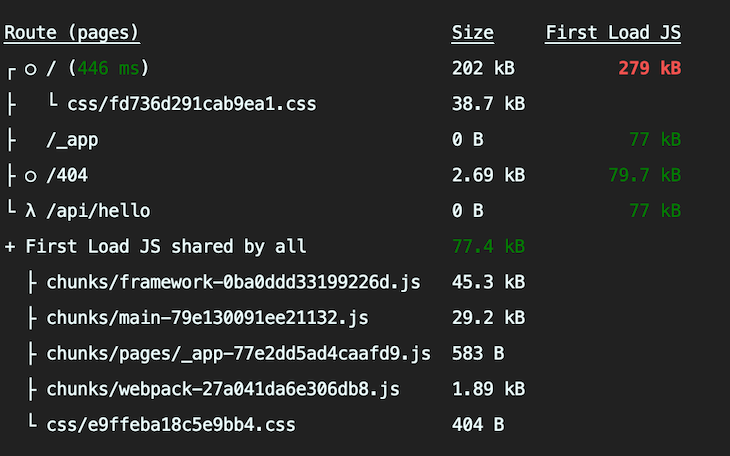
As soon as the construct is accomplished, we will see the CSS bundle dimension has been decreased from 67.3KB to 38.7KB. We have now decreased the scale by round 40% by doing this!
Conclusion
Ant Design helps to construct a wealthy consumer interface with minimal work and fewer time than conventional means. It may be used for every type of apps and its neighborhood is giant and engaged in case you want to get assist. On this article, now we have lined the important parts; go to the Ant Design docs to discover all of the parts and see how you should utilize Ant Design to enhance your mission improvement.
LogRocket: Full visibility into manufacturing Subsequent.js apps
Debugging Subsequent functions might be tough, particularly when customers expertise points which are tough to breed. In the event you’re fascinated by monitoring and monitoring state, robotically surfacing JavaScript errors, and monitoring sluggish community requests and element load time, strive LogRocket. 

LogRocket is sort of a DVR for internet and cell apps, recording actually every thing that occurs in your Subsequent app. As a substitute of guessing why issues occur, you possibly can combination and report on what state your software was in when a problem occurred. LogRocket additionally displays your app’s efficiency, reporting with metrics like shopper CPU load, shopper reminiscence utilization, and extra.
The LogRocket Redux middleware bundle provides an additional layer of visibility into your consumer periods. LogRocket logs all actions and state out of your Redux shops.
Modernize the way you debug your Subsequent.js apps — begin monitoring at no cost.
