
On this article, we’ll cowl the fundamentals of React’s HOC idea, together with introducing you to higher-order elements, instructing you the syntax, and displaying you how one can apply HOCs. We’ll additionally go over some widespread issues you would possibly encounter with higher-order elements.
Listed below are the steps that we’ll take:
Introduction
What are HOCs and when must you use them?
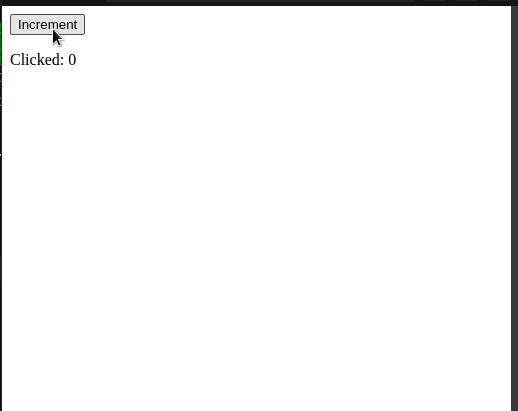
Let’s say that the person desires a element that increments a counter variable on each onClick occasion:
perform ClickCounter() {
  const [count, setCount] = useState(0); //default worth of this state can be 0.
  return (
    <div>
      {/*When clicked, increment the worth of 'depend'*/}
      <button onClick={() => setCount((depend) => depend + 1)}>Increment</button>
      <p>Clicked: {depend}</p> {/*Render the worth of depend*/}
    </div>
  );
}
export default ClickCounter;
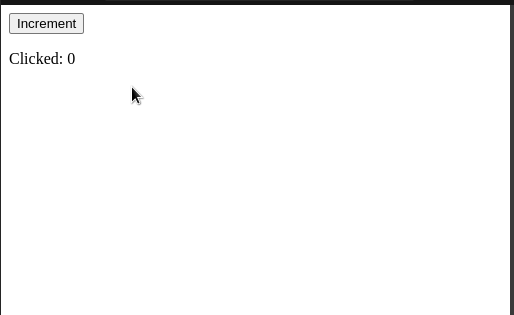
Our code works! Nevertheless, take into account this case: what if the consumer desires one other element that accommodates the identical performance, nevertheless it triggers on an onMouseOver occasion?
To make this potential, we must write the next code:
perform HoverCounter(props) {
  const [count, setCount] = useState(0);
  return (
    <div>
      {/*If the person hovers over this button, then increment 'depend'*/}
      <button onMouseOver={() => setCount((depend) => depend + 1)}>
        Increment
      </button>
      <p>
        Clicked: {depend}
      </p>
    </div>
  );
}
export default HoverCounter;
Regardless that our code samples are legitimate, there’s a main downside: each of the information possess comparable code logic.
Consequently, this breaks the DRY idea. So how will we repair this situation?
That is the place HOCs are available in. Right here, higher-order elements enable builders to reuse code logic of their mission. In consequence, this implies much less repetition and extra optimized, readable code.
Now that we’ve lined its benefit, let’s get began utilizing HOCs!
Syntax
In keeping with React’s documentation, a typical React HOC has the next definition:
The next-order element is a perform that takes in a element and returns a brand new element.
Utilizing code, we are able to rewrite the above assertion like so:
const newComponent = higherFunction(WrappedComponent);
On this line:
newComponent— would be the enhanced elementhigherFunction— because the title suggests, this perform will improveWrappedComponentWrappedComponent— The element whose performance we need to lengthen. In different phrases, this would be the element that we need to improve
Within the subsequent section of the article, we are going to see React’s HOC idea in motion.
Utilizing HOCs
Initializing our repository
Earlier than writing some code, now we have to first create a clean React mission. To take action, begin by writing the next code:
npx create-react-app hoc-tutorial
cd hoc-tutorial #navigate to the mission folder.
cd src #go to codebase
mkdir elements #will maintain all our customized elements
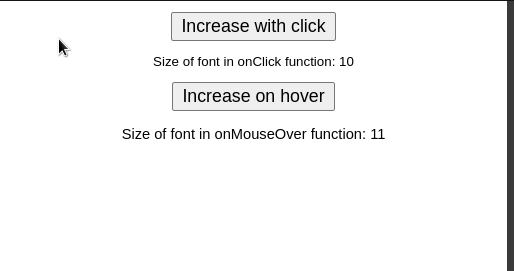
For this text, we are going to construct two customized elements to show HOC utilization:
ClickIncrease.js— This element will render a button and a chunk of textual content. When the person clicks on this button (anonClickoccasion), thefontSizeproperty of the textual content will improveHoverIncrease.js— Might be much like that ofClickIncrease. Nevertheless, not like the previous, this element will take heed toonMouseOveroccasions
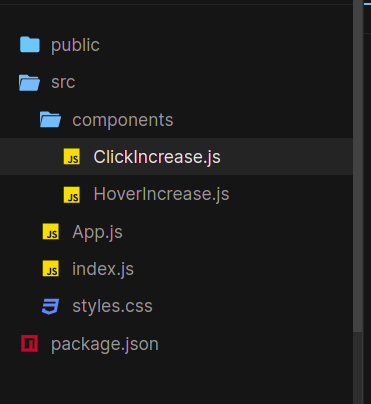
In your mission, navigate to the elements folder. Right here, create these two new information.
When that’s carried out, your file construction ought to appear to be so:
Now that now we have laid out the groundwork for the mission, it’s time to construct our customized elements.
Coding our elements
In ClickIncrease.js, begin by writing the next code:
//file title: elements/ClickIncrease.js
perform ClickIncrease() {
const [fontSize, setFontSize] = useState(10); //set preliminary worth of Hook to 10.
return (
<div>
{/*When clicked, increment the worth of fontSize*/}
<button onClick={() => setFontSize((dimension) => dimension + 1)}>
Enhance with click on
</button>
{/*Set the font dimension of this textual content to the fontSize variable.*/}
{/*Moreover, show its worth as nicely.*/}
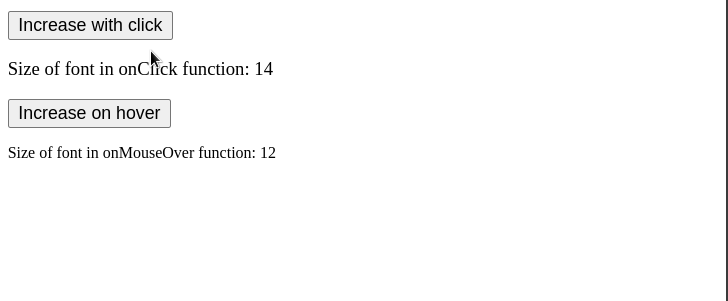
<p model={{ fontSize }}>Measurement of font in onClick perform: {fontSize}</p>
</div>
);
}
export default ClickIncrease;
Subsequent, in your HoverIncrease element, paste these strains of code:
perform HoverIncrease(props) {
  const [fontSize, setFontSize] = useState(10);
  return (
    <div>
      {/*This time, as a substitute of listening to clicks,*/}
      {/*Take heed to hover occasions as a substitute*/}
      <button onMouseOver={() => setFontSize((dimension) => dimension + 1)}>
        Enhance on hover
      </button>
      <p model={{ fontSize }}>
        Measurement of font in onMouseOver perform: {fontSize}
      </p>
    </div>
  );
}
export default HoverIncrease;
Lastly, render these features to the GUI like so:
//import each elements
import ClickIncrease from "./elements/ClickIncrease";
import HoverIncrease from "./elements/HoverIncrease";
export default perform App() {
  return (
    <div className="App">
      {/*Render each of those elements to the UI */}
      <ClickIncrease />
      <HoverIncrease />
    </div>
  );
}
Let’s try it out! This would be the consequence of the code:
Creating and utilizing our HOC perform
Inside the elements folder, create a file referred to as withCounter.js. Right here, begin by writing the next code:
import React from "react";
const UpdatedComponent = (OriginalComponent) => {
  perform NewComponent(props) {
  //render OriginalComponent and cross on its props.
    return <OriginalComponent />;
  }
  return NewComponent;
};
export default UpdatedComponent;
Let’s deconstruct this code piece by piece:
- Within the begin, we created a perform referred to as
UpdatedComponentthat takes in an argument referred to asOriginalComponent. On this case, theOriginalComponentwould be the React ingredient which can be wrapped - In a while, we instructed React to render
OriginalComponentto the UI. We’ll implement enhancement performance later on this article
When that’s carried out, it’s now time to make use of the UpdatedComponent perform in our app.
To take action, first go to the HoverIncrease.js file and write the next strains:
import withCounter from "./withCounter.js" //import the withCounter perform
//..additional code ..
perform HoverIncrease() {
//..additional code
}
//substitute your 'export' assertion with:
export default withCounter(HoverIncrease);
//We now have now transformed HoverIncrease to an HOC perform.
Subsequent, do the identical course of with the ClickIncrease module:
//file title: elements/ClickIncrease.js
import withCounter from "./withCounter";
perform ClickIncrease() {
//...additional code
}
export default withCounter(ClickIncrease);
//ClickIncrease is now a wrapped element of the withCounter methodology.
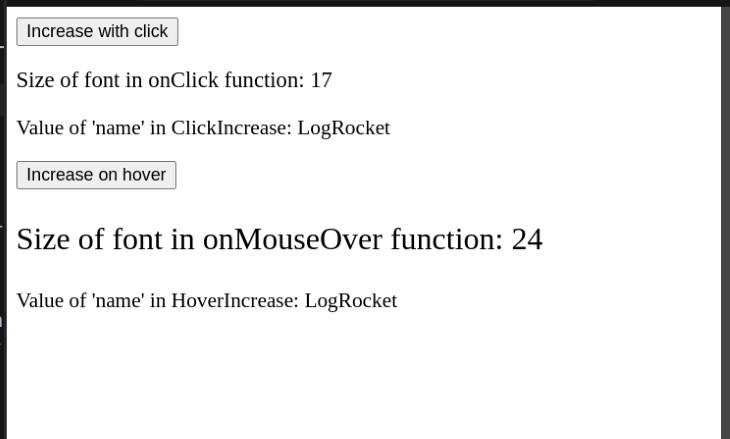
Let’s try it out! This would be the outcome within the code:
Discover that our result’s unchanged. It’s because we haven’t made modifications to our HOC but. Within the subsequent subsection, you’ll discover ways to share props between our elements.
Sharing props
By way of HOCs, React permits customers to share props throughout the mission’s wrapped elements.
As a primary step, create a title prop in withCounter.js like so:
//file title: elements/withCounter.js
const UpdatedComponent = (OriginalComponent) => {
  perform NewComponent(props) {
    //Right here, add a 'title' prop and set its worth of 'LogRocket'.
    return <OriginalComponent title="LogRocket" />;
  }
//..additional code..
That’s it! To learn this knowledge prop, all now we have to do is to make the next modifications to its youngster elements:
//additional code eliminated for brevity.
//In elements/HoverIncrease
perform HoverIncrease(props) {   //get the shared props
  return (
    <div>
      {/* Additional code..*/}
      {/*Now render the worth of the 'title' prop */ }
      <p> Worth of 'title' in HoverIncrease: {props.title}</p>
    </div>
  );
}
//Now In elements/ClickIncrease.js
perform ClickIncrease(props) {
  //settle for incoming props
  return (
    <div>
      {/*Additional code..*/}
      <p>Worth of 'title' in ClickIncrease: {props.title}</p>
    </div>
  );
}
That was simple! As you’ll be able to see, React’s HOC design permits builders to share knowledge between elements with relative ease.
In upcoming sections, you’ll now discover ways to share states by way of HOC features.
Sharing state variables with Hooks
Similar to props, we are able to even share Hooks:
//In elements/withCounter.js
const UpdatedComponent = (OriginalComponent) => {
  perform NewComponent(props) {
    const [counter, setCounter] = useState(10); //create a Hook
    return (
      <OriginalComponent
        counter={counter} //export our counter Hook
        //now create an 'incrementSize' perform
        incrementCounter={() => setCounter((counter) => counter + 1)}
      />
    );
  }
//additional code..
Right here’s a proof of the code:
- First, we created a Hook variable referred to as
counterand set its preliminary worth to10 - Aside from that, we additionally coded an
incrementCounterperform. When invoked, this methodology will increment the worth ofcounter - Lastly, export the
incrementSizemethodology and thedimensionHook as props. In consequence, this enables the wrapped elements ofUpdatedComponentto get entry to those Hooks
Because the final step, we now have to make use of the counter Hook.
To take action, write these strains of code within the HoverIncrease and ClickIncrease module:
//make the next file modifications to elements/HoverIncrease.js and ClickIncrease.js
//extract the counter Hook and incrementCounter perform from our HOC:
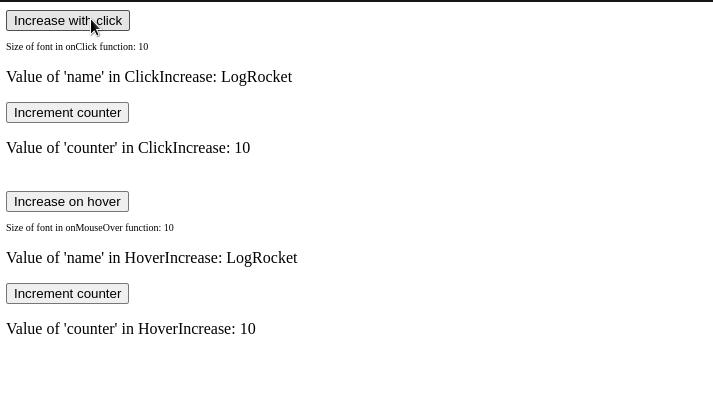
const { counter, incrementCounter } = props;
return (
<div>
{/*Use the incrementCounter methodology to increment the 'counter' state..*/}
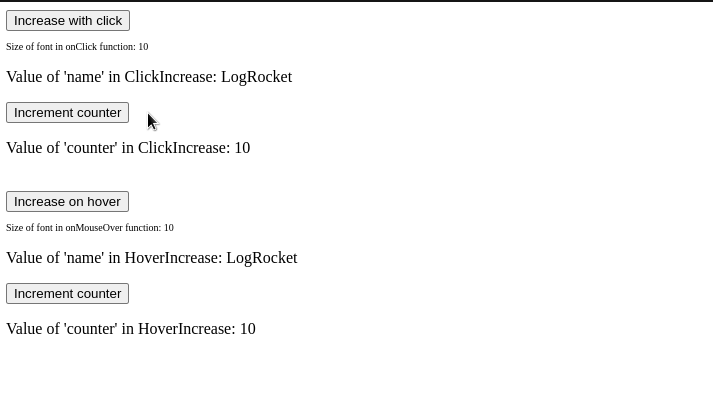
<button onClick={() => incrementCounter()}>Increment counter</button>
{/*Render the worth of our 'counter' variable:*/}
<p> Worth of 'counter' in HoverIncrease/ClickIncrease: {counter}</p>
</div>
);
Right here, one necessary factor to note is that the worth of the counter state isn’t shared between our youngster elements. If you wish to share states between varied React elements, please use React’s Context API, which lets you effortlessly share states and Hooks all through your app.
Passing parameters
Regardless that our code works, take into account the next scenario: what if we need to increment the worth of counter with a customized worth? By way of HOCs, we are able to even inform React to cross particular knowledge to sure youngster elements. That is made potential with parameters.
To allow assist for parameters, write the next code in elements/withCounter.js:
//This perform will now settle for an 'increaseCount' parameter.
const UpdatedComponent = (OriginalComponent, increaseCount) => {
  perform NewComponent(props) {
    return (
      <OriginalComponent
        //this time, increment the 'dimension' variable by 'increaseCount'
        incrementCounter={() => setCounter((dimension) => dimension + increaseCount)}
      />
    );
//additional code..
On this piece of code, we knowledgeable React that our perform will now absorb a further parameter referred to as increaseCount.
All that’s left for us is to make use of this parameter in our wrapped elements. To take action, add this line of code in HoverIncrease.js and ClickIncrease.js:
//In HoverIncrease, change the 'export' assertion:
export default withCounter(HoverIncrease, 10); //worth of increaseCount is 10.
//this can increment the 'counter' Hook by 10.
//In ClickIncrease:
export default withCounter(ClickIncrease, 3); //worth of increaseCount is 3.
//will increment the 'counter' state by 3 steps.
Ultimately, the withCounter.js file ought to appear to be so:
import React from "react";
import { useState } from "react";
const UpdatedComponent = (OriginalComponent, increaseCount) => {
  perform NewComponent(props) {
    const [counter, setCounter] = useState(10);
    return (
      <OriginalComponent
        title="LogRocket"
        counter={counter}
        incrementCounter={() => setCounter((dimension) => dimension + increaseCount)}
      />
    );
  }
  return NewComponent;
};
export default UpdatedComponent;
Furthermore, HoverIncrease.js ought to appear to be so:
import { useState } from "react";
import withCounter from "./withCounter";
perform HoverIncrease(props) {
  const [fontSize, setFontSize] = useState(10);
  const { counter, incrementCounter } = props;
  return (
    <div>
      <button onMouseOver={() => setFontSize((dimension) => dimension + 1)}>
        Enhance on hover
      </button>
      <p model={{ fontSize }}>
        Measurement of font in onMouseOver perform: {fontSize}
      </p>
      <p> Worth of 'title' in HoverIncrease: {props.title}</p>
      <button onClick={() => incrementCounter()}>Increment counter</button>
      <p> Worth of 'counter' in HoverIncrease: {counter}</p>
    </div>
  );
}
export default withCounter(HoverIncrease, 10);
And at last, your ClickIncrease element ought to have the next code:
import { useEffect, useState } from "react";
import withCounter from "./withCounter";
perform ClickIncrease(props) {
  const { counter, incrementCounter } = props;
  const [fontSize, setFontSize] = useState(10);
  return (
    <div>
      <button onClick={() => setFontSize((dimension) => dimension + 1)}>
        Enhance with click on
      </button>
      <p model={{ fontSize }}>Measurement of font in onClick perform: {fontSize}</p>
      <p>Worth of 'title' in ClickIncrease: {props.title}</p>
      <button onClick={() => incrementCounter()}>Increment counter</button>
      <p> Worth of 'counter' in ClickIncrease: {counter}</p>
    </div>
  );
}
export default withCounter(ClickIncrease, 3);
Widespread issues
Passing down props to particular elements
One necessary factor to notice is that the method of passing down props to an HOC’s youngster element is totally different than that of a non-HOC element.
For instance, have a look at the next code:
perform App() {
  return (
    <div>
      {/*Cross in a 'secretWord' prop*/}
      <HoverIncrease secretWord={"pineapple"} />
    </div>
  );
}
perform HoverIncrease(props) {
  //learn prop worth:
  console.log("Worth of secretWord: " + props.secretWord);
  //additional code..
}
In idea, we must always get the message Worth of secretWord: pineapple within the console. Nevertheless, that’s not the case right here:
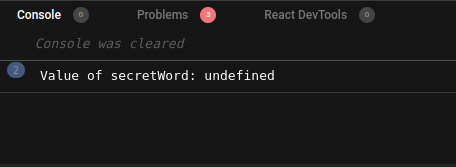
So what’s occurring right here?
On this case, the secretWord prop is definitely being handed to the withCounter perform and to not the HoverIncrease element.
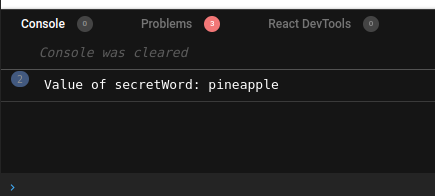
To unravel this situation, now we have to make a easy change to withCounter.js:
const UpdatedComponent = (OriginalComponent, increaseCount) => {
  perform NewComponent(props) {
    return (
      <OriginalComponent
        //Cross down all incoming props to the HOC's youngsters:
        {...props}
      />
    );
  }
  return NewComponent;
};
This minor repair solves our downside:
And we’re carried out!
Conclusion
On this article, you discovered the basics of React’s HOC idea. For those who encountered any difficulties on this article, my suggestion to you is to deconstruct and play with the code samples above. This can provide help to perceive the idea higher.
Thanks a lot for studying! Glad coding!
Full visibility into manufacturing React apps
Debugging React purposes might be troublesome, particularly when customers expertise points which are arduous to breed. For those who’re involved in monitoring and monitoring Redux state, routinely surfacing JavaScript errors, and monitoring gradual community requests and element load time, attempt LogRocket. 

LogRocket is sort of a DVR for internet and cellular apps, recording actually every thing that occurs in your React app. As a substitute of guessing why issues occur, you’ll be able to combination and report on what state your utility was in when a problem occurred. LogRocket additionally screens your app’s efficiency, reporting with metrics like consumer CPU load, consumer reminiscence utilization, and extra.
The LogRocket Redux middleware package deal provides an additional layer of visibility into your person periods. LogRocket logs all actions and state out of your Redux shops.
Modernize the way you debug your React apps — begin monitoring without spending a dime.
