
In case you have ever put in the most recent Home windows 10/11 replace in your pc, then it’s possible you’ll expertise an error message saying that the Home windows replace shopper did not detect with error 0x80244010 has occurred within the Home windows Replace course of and that the system will roll again or restore again to the earlier date and time.
The Home windows Replace error 0x80244010 could be fairly irritating, particularly if you’re utilizing your pc incessantly every day. On this article, we are going to focus on the issue, troubleshooting steps, options and all to ensure that your OS will get up-to-date with the most recent safety patches and varied options/enhancements from Microsoft. So, comply with the straightforward strategies beneath so as to repair issues putting in updates in Home windows 10/11 0x80244010.
What Is the Home windows Replace 0x80244010 Error?
Home windows Updates are an essential a part of conserving your Home windows PC or laptop computer updated, nevertheless it’s not unusual for issues to go incorrect and find yourself with errors resembling 0x80244010.
In accordance with affected Home windows customers, the issue putting in updates Home windows 10/11 0x80244010 error normally happens after putting in a brand new WSUS server within the community.More often than not, they merely couldn’t obtain and set up Home windows updates. Nevertheless, for a few of them, the issue is accompanied by the error 0x80244010 code.
However what causes the error 0x80244010 on Home windows Replace? Listed here are a few of the commonest error 0x80244010 culprits:
- System Glitch – This normally happens on Home windows endpoint machines. And if a system glitch is a perpetrator, the excellent news is that Microsoft has built-in restore options that may be deployed anytime. Customers can simply apply the really useful fixes to resolve the problem.
- Corrupted Recordsdata within the WU Temp Folder – Typically, corrupted information within the WU Temp folder can set off the 0x80244010 error. Recordsdata on this folder could get corrupted after putting in a defective replace or after operating an antivirus scan. To repair this, customers must run a number of instructions to reset WU parts, together with these within the Temp folder.
- Issues with Typical Replace Strategies – At occasions, the WU element itself doesn’t work robotically as a result of the WU perform has been blocked. To resolve this, it’s possible you’ll use the System Replace Readiness device. This lets you set up updates that fail to put in by way of typical strategies.
- Disabled Detection Frequency Coverage – The WSUS server solely permits a sure variety of requests. When your requests exceed the restrict, you may now not set up the Home windows replace. And consequently, you encounter the error message. On this case, it’s possible you’ll use the Native Group Coverage Editor to grant entry to the Automated Replace detection coverage and set a sure international replace interval.
- Corrupted System Recordsdata – Within the occasion that the Home windows Replace troubleshooter can’t resolve the 0x80244010 error robotically, it’s potential that there’s an underlying system file corruption subject. The same old repair for this case is to refresh all Home windows parts by way of a Clear Set up.
- Unstable Web Connection – Home windows updates and system information could get corrupted and trigger the error 0x80244010 due to an unstable web connection. The best method to repair that is simply to attempt putting in the error many times or run a specific command by way of the Command Immediate window.
- Unsynchronized Updates – If updates aren’t synchronized, the error 0x80244010 could floor. To synchronize Home windows updates, it’s possible you’ll set the Home windows Replace detection coverage frequency to automated.
Methods Repair the Home windows Replace 0x80244010 Error Code on Home windows 10/11
If you’re dealing with the error code 0x80244010 in your Home windows pc, then these fixes will assist you to resolve it with out losing anytime.
Repair #1: Restarting Your Pc
Home windows updates are important not solely on your working system but in addition for the safety of your pc. When you’re receiving a 0x80244010 error code, it may be since you’re utilizing a earlier model of Home windows whereas attempting to improve.
To repair this drawback, restart your pc and enter Secure Mode with Networking from the Energy Consumer Menu. As soon as there, kind ms-settings:windowsupdate in Cortana and click on Scan for Updates to finish that course of. Hopefully, this resolves the 0x80244010 error.
Repair #2: Run the Home windows Replace Troubleshooter
This error is just not as mysterious because it appears and might usually be resolved by operating the Home windows Replace Troubleshooter. The troubleshooter might help you restore replace set up issues or different associated errors with the Home windows replace course of.
To run the troubleshooter, comply with these steps:
- Go to Settings, then Apps & options.
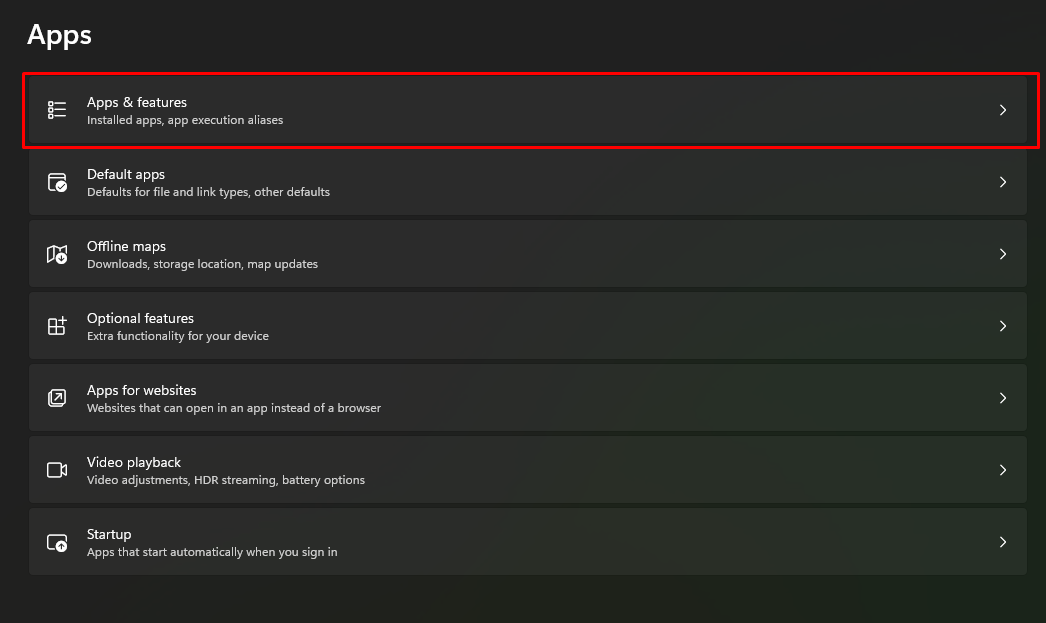
- Choose Handle Optionally available Options.
- Activate Use my sign-in information to robotically end organising your system after a Home windows replace or restart.
- Open Begin Menu and enter Troubleshooting.
- Select Troubleshooting Instruments.
- Choose Home windows Replace.
- When the troubleshooter opens, click on Subsequent.
- Click on Scan Now. If there are any updates that have to be put in, your pc will begin downloading them robotically for you.
Repair #3: Reset the Home windows Replace Parts
If you get the Home windows replace error code 0x80244010, your Home windows Replace parts might not be correctly configured to sync updates.
To repair this drawback, reset your parts to default values. Right here’s how:
- With a view to reset your Home windows Replace parts, first, uninstall the Microsoft Safety Necessities program and every other third-party antivirus software program that you might have put in.
- Subsequent, open an Administrator Command Immediate window as an administrator by typing cmd in Search and urgent Enter or utilizing the keyboard shortcut CTRL+SHIFT+ENTER (right-click and choose Command Immediate (Admin)).
- Sort or copy/paste the next instructions one after the other and press Enter after every command:
- netshwinsock reset catalog
- netsh int ipv4 reset catalog
- netsh int ipv6 reset catalog
- netshwinsock set international mtu=9000 retailer=energetic
These instructions will restore Home windows Replace parts to their default values.
Repair #4: Use the System Replace Readiness Instrument
If you’re operating an previous model of Home windows, attempt utilizing the System Replace Readiness Instrument from Microsoft. The device scans your PC for lacking, broken, or out-of-date system information and gives on-line assist for correcting them. This will remedy your drawback by putting in Home windows Updates that failed beforehand because of a virus or different corruption.
- Launch an elevated Command Immediate window by urgent the Begin menu and typing cmd into the textual content area.
- Proper-click on the top-most outcome and select Command Immediate. Select Run as Administrator.
- If requested for a password, enter it and select Enable.
- Enter this command and hit Enter: DISM.exe /On-line /Cleanup-image /Restorehealth.
Repair #5: Run System File Checker
Working the System File Checker utility generally works to resolve the error. Right here’s methods to use it:
- Press Win+R or maintain down the Home windows key and press R in your keyboard.
- Sort cmd in and press Enter.
- Proper-click on Command Immediate and choose Run as Administrator from the record of choices that seems.
- Within the new window kind sfc /scannow then hit Enter. The device will begin scanning for any corrupted information, let it end its work earlier than shutting down and restarting your PC.
- After the method is accomplished, you must discover a popup window confirming that no errors had been discovered. If the system file checker finds an issue with a file (or set of information), it would ask you if you wish to restore them; this course of could take a while, relying on how a lot area is required to repair every thing. In any other case, simply wait till your pc has absolutely booted up once more, and every thing is again to regular!
Repair #6: Reset TCP/IP Settings
Resetting TCP/IP Settings is a course of through which you’ll change your pc’s IP deal with and default gateway again to their default values. Doing this could enable your pc to attach with Microsoft’s servers and obtain updates as soon as once more. This may be finished by way of Command Immediate or by following these steps:
- Click on on Begin within the backside left-hand nook of your display screen.
- Sort command into the search bar so as to open up a Command Immediate window.
- Enter ipconfig /launch on the immediate.
- Shut out of the Command Immediate window when it says Efficiently launched all reserved native addresses.
- Open up one other Command Immediate Window.
- Enter ipconfig /renew on the immediate.
- Shut out of that Command Immediate Window when it says Efficiently renewed DHCP lease.
- Restart your Home windows 10/11 pc when prompted to take action.
Repair #7: Disable Proxy Server in Web Choices
Disabling your proxy server also can repair the 0x80244010 error.
First, you’ll must open your Web Choices in your Management Panel. To do that, kind Web Choices into your search bar, click on Settings, after which click on the tab that claims Connections.
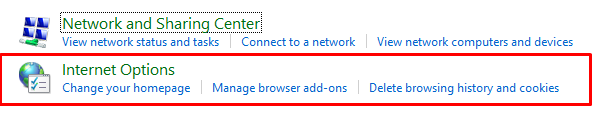
After you’re in Connections, there will probably be a button referred to as LAN Settings which lets you disable Proxy Server for connections that don’t undergo the proxy server first. Be sure it’s unchecked and hit OK. Then restart your Home windows 10/11 pc and check out updating it once more!
Repair #8: Uninstall and Reinstall the Community Adapter Driver
Uninstalling and reinstalling the community adapter driver has labored and resolved the error for some affected customers. Therefore, it’s one thing it’s possible you’ll need to attempt as effectively.
To do that:
- Open System Supervisor (Proper-click This PC, Properties, and choose System Supervisor) and seek for your Community Adapter driver.
- Proper-click the discovered driver and choose Uninstall.
- Restart your pc for those who’re prompted. Look ahead to a minute or two till it has fully restarted and has gone again to regular (on Desktop).
- If the problem persists, right-click This PC once more and select Properties.
- Within the window that pops up, go to Superior System Settings>{Hardware} tab.
- Click on on System Set up Settings.
- Click on the very first setting on this record: No, let me select what’s finest for my pc. You ought to be taken to a listing of drivers put in in your machine; discover all related gadgets related by way of Ethernet and verify any containers earlier than clicking OK.
Repair #9: Use a PC Restore Instrument
You may also obtain a PC restore device to repair your PC as for those who had been an professional! Normally, this error is attributable to third-party purposes or viruses which were partially eliminated out of your pc. With this program, you may scan the complete pc, pinpoint all of the contaminated information, delete them with out worries, after which optimize your PC efficiency once more.
Repair #10: Disable Firewall or Antivirus whereas Updating Home windows OS
The Firewall or Antivirus might be your perpetrator. In case you have one in all these put in, they could be interrupting the set up course of, inflicting you to see the error message.
Strive disabling these quickly whereas updating your system. If you restart your PC once more, it ought to repair any errors associated to beginning up with Firewall or Antivirus put in. You’ll be able to re-enable the safety when all updates are accomplished.
When you nonetheless see a failure with the identical error code after attempting this step, uninstall your antivirus or firewall fully earlier than persevering with.
Repair #11: Carry out a Clear Set up
This implies reinstalling your working system and drivers however conserving your information, apps, and settings. Doing this won’t work for some folks, so it’s all the time a good suggestion to make a backup earlier than making an attempt a restore or reinstallation.
To ensure that this method to work, you’ll want an exterior laborious drive or USB stick that has sufficient free area so you may switch your knowledge from the pc. When you’ve backed up your information, then do the next:
- Go to Settings > Replace & Safety > Restoration and click on Restart Now.
- If prompted with Select an choice, choose Troubleshoot.
- Choose Superior Choices > Startup Settings.
- Press 5 to Enter Secure Mode and press Enter.
- Press F8 whereas in Secure Mode and boot into the Command Immediate.
- Sort chkdsk with out quotes and hit Enter.
- Sort exit with out quotes to exit the Command Immediate, kind exit once more with out quotes, and press Enter yet another time.
- Restart your pc as regular by clicking Restart Now.
Repair #12: Clear the Home windows Replace Non permanent Cache
Lastly, attempt clearing your cache to repair the error. Right here’s how:
Begin by deleting non permanent information manually. Click on on Begin on the backside left of your display screen and kind Disk Cleanup into search. Then click on on the icon that claims Disk Cleanup.
- You will notice a field pop up, saying Disk Cleanup Instrument has discovered over XX gigabytes of junk information that may safely be deleted. Do you need to delete these information now?
- Choose Sure!
- Choose all three containers and hit OK.
- Subsequent, go to C:WindowsSoftwareDistributionDownload the place you will discover a folder referred to as Cache.
- Delete every thing inside this folder.
- Now, return to the Disk Cleanup window the place we simply cleared our cache, however this time choose Non permanent Recordsdata and Cookies (depart the opposite checkboxes unchecked).
- Hit OK.
- Restart your pc to verify every thing will get reset correctly earlier than we transfer on.
In Abstract
If you end up having an issue with downloading and putting in new updates on your pc, there are some things you are able to do to attempt to repair this drawback. This consists of what we now have enumerated above, together with restarting your pc to verify for any new updates, checking your firewall to see if it’s blocking updates, or resetting Home windows replace parts.
Restarting your pc ought to all the time be step one in any replace course of as a result of this clears up bugs and slows which might be occurring within the background. Checking your firewall can be essential as a result of, many occasions, it can block the set up of a downloaded replace because of safety causes. The following factor to do is reset Home windows replace parts which might repair a damaged element in home windows replace, together with program information, home windows providers and extra. If all else fails, you may all the time search steering from a licensed Home windows technician.

Ivan is a tech fanatic who has all the time been fascinated by the most recent devices and gadgets. Rising up, he was all the time the one who volunteered to check out the brand new software program or telephone replace. He cherished discovering methods to make know-how work higher for him and his pals.
Ivan is a self-proclaimed techie and he loves nothing greater than writing in regards to the newest devices, apps, software program, and video games on Software program Examined. He’s all the time up-to-date on the most recent tendencies and he’s obsessed with sharing his information with others. When you’re searching for insights and opinions on the most recent tech merchandise, Ivan is your go-to supply.
Ivan has been writing about know-how for years and he has a wealth of information to share. He has a eager eye for recognizing new services and products which might be price writing about. When you’re searching for an in-depth, opinionated tackle the most recent tech merchandise, ask Ivan is your go-to supply. Whether or not you’re a tech fanatic or simply attempting to maintain up with the most recent tendencies, Ivan’s articles are certain to provide you one thing to consider.
