
Suppose you wish to convert your web site or internet software right into a cell software utilizing React Native, or you might have static HTML code that you just wish to present on any specific web page in your software. What is going to you do? Will you re-write a complete bunch of code?
Actually no want for it. You’ll be able to render HTML instantly into React Native. Woah! That’s wonderful. So, on this article, we are going to discover ways to render HTML to React Native utilizing the react-native-render-html library. Let’s see the way it works.
Bounce forward:
A number of conditions for this tutorial embrace having npm and Node.js put in in your machine together with having a primary understanding of React and React Native.
Establishing our React Native venture
To begin this tutorial, we have to arrange a React Native venture. We are going to achieve this by operating the next command:
npx react-native init MyTestApp
Now let’s transfer forward. After making a venture, we are going to run it as soon as to examine all the pieces is working as anticipated utilizing both of the next instructions:
npm run android
//or
npm run ios
The app will construct and begin operating as per your chosen configuration, whether or not you’re utilizing a digital machine or an Android or iOS machine.
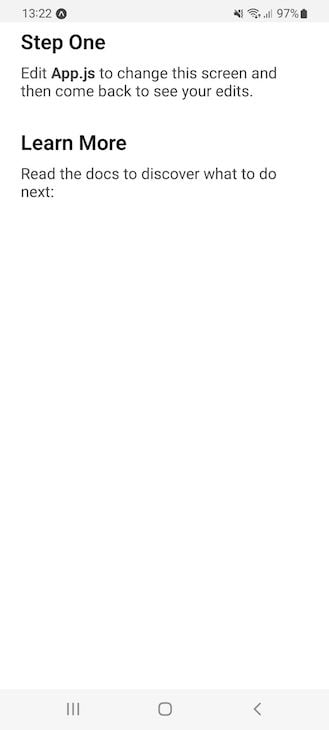
You’ll be able to modify the App.js file to see the modifications in your homepage — the entry web page of your software. I modified a number of strains of code to examine if it’s working superb or not. If all the pieces goes nicely, you’ll be able to see a homepage just like the one proven under:
Utilizing react-native-render-html to render HTML to React Native
On this tutorial, we are going to use the react-native-render-html package deal to render HTML into our React Native software. Maintain some pattern HTML code to make use of later within the React Native app.
The react-native-render-html library is an open supply part with over three thousand GitHub stars and 46 contributors. It takes your HTML and renders 100% native views in your iOS or Android apps.
This library helps all of the textual CSS strategies we sometimes use whereas creating internet functions. Aside from textual content, it additionally helps pictures, anchor tags, and lists.
How react-native-render-html parses HTML into React Native
The react-native-render-html docs use the following information stream diagram to exhibit how this device parses HTML into React Native:
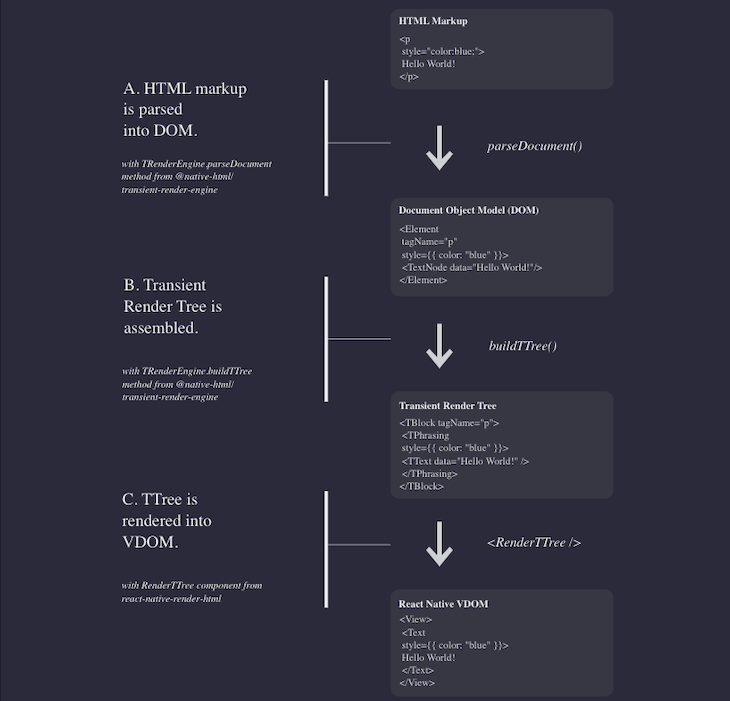
In abstract, first, the HTML markup we handed shall be parsed into the DOM. Then, the Transient Render Tree is assembled primarily based on enter. After that, TTree is rendered into Digital DOM.
To be taught extra about how rendering works, discuss with the docs. In any other case, let’s transfer on to our sensible instance.
Making use of kinds to components
For styling, you need to use an inline model, like so:
<p model= "coloration: purple; font-size: 2rem;">
The above gained’t break your software. It helps 4 props to customise component kinds: base, id model, class model, and tag model.
There’s additionally one other technique to cope with styling, which is by utilizing mixedStyle data. Mainly, mixedStyle is an object that incorporates all of your CSS; the kinds shall be utilized from there. See the instance under:
//JavaScript
const mixedStyle = {
  physique: {
    whiteSpace: 'regular',
    coloration: '#aaa'
  },
  p: {
    coloration: '#fff'
  }
}
To make use of your customized kinds through the HTML render to React Native, the react-native-render-html library helps the tagsStyles attribute. You’ll be able to cross your declared model in that attribute, like so:
//JavaScript
<RenderHtml
  supply={supply}
  tagsStyles={mixedStyle}
/>
Keep in mind, when rendering HTML and customized kinds to a React Native software, React Native kinds shall be ignored at construct time and won’t be utilized or mirrored.
With the react-native-render-html library, you’ll be able to play with the htmlparser2 ecosystem, which is used for DOM tampering. You’ll be able to course of the DOM at any cut-off date. For instance:
import React from 'react';
import { useWindowDimensions } from 'react-native';
import RenderHtml from 'react-native-render-html';
import { removeElement, isTag } from 'domutils';

perform onElement(component) {
  // Take away the primary p from div which has class "parentDiv"
  if (component.attribs['class'] == 'parentDiv') {
    let i = 0;
    for (const p of component.youngsters) {
      if (isTag(p) && i < 1) {
        removeElement(p);
        i++;
      }
    }
  }
}

const supply = {
  html: `
    <div class="parentDiv">
      <p>para-1</p>
      <p>para-2</p>
      <p>para-3</p>
    </div>
  `
};

const domVisitors = {
  onElement: onElement
};

export default perform App() {
  const { width } = useWindowDimensions();
  return (
    <RenderHtml
      contentWidth={width}
      supply={supply}
      domVisitors={domVisitors}
    />
  );
}
Now let’s render HTML code within the software utilizing an exterior library. For that, you might want to modify the App.js file as proven under:
//JavaScript - JSX
import kind {Node} from 'react';
import {
  ScrollView,
  Textual content,
  View,
} from 'react-native';
import RenderHtml from 'react-native-render-html';

const supply = {
  html: `
    <header model="max-width: 1200px;
      overflow: hidden;
      box-sizing: border-box;
      margin: 20px auto;
      text-align: heart;">
      <nav model="padding: 20px 0 0;
          max-width: 400px;
          margin: 0 auto;">
          <a method="show: inline-block;
            coloration: #666666;
            text-decoration: none;
            font-size: 14px;
            cursor: pointer;" href="#section1">Part 1</a>
          <a method="show: inline-block;
            coloration: #666666;
            text-decoration: none;
            font-size: 14px;
            cursor: pointer;" href="#section1" href="#section2">Part 2</a>
      </nav>
    </header>
    <header model="show: none;
      place: fastened;
      width:100%,
      high: 0;
      background: #FFFFFF;
      margin: 0 -15px;
      width: 100%;
      border-bottom: 1px strong #CCCCCC;
      box-sizing: border-box;
      box-shadow: 0px 0px 10px 0 rgba(0, 0, 0, 0.5);
      opacity: 0.9;
      z-index: 100;">
      <div model="max-width: 1200px;
          padding: 15px 30px;
          margin: 0 auto;
          overflow: hidden;
          box-sizing: border-box;">
          <nav model="padding: 5px 0;
            max-width: 400px;
            float: proper;
            text-align: proper;">
            <a method="show: inline-block;
                coloration: #666666;
                text-decoration: none;
                font-size: 14px;
                cursor: pointer;" href="#section1">Part 1</a>
            <a method="show: inline-block;
                coloration: #666666;
                text-decoration: none;
                font-size: 14px;
                cursor: pointer;" href="#section2">Part 2</a>
          </nav>
      </div>
    </header>
    <div model="min-width: 300px;
      margin: 0 auto;
      peak: 1000px;
      place: relative;
    ">
      <div model="min-height: 100px;place: relative; background: #ffd6cd; width=100vw;" id="section1">
          <h1 model="text-align: heart;
            line-height: 500px;
            coloration: #666666;
            margin: 0;">Part 1</h1>
      </div>
      <div model="min-height: 100px;place: relative; background: #ddebfd; width=100vw;" id="section2">
          <h1 model="text-align: heart;
            line-height: 500px;
            coloration: #666666;
            margin: 0;">Part 2</h1>
      </div>
    </div>
    </div>
  `
};
const App: () => Node = () => {
  return (
    <ScrollView contentInsetAdjustmentBehavior="automated">
    <View>
      <Textual content model={{high:"3%", textAlign:"heart"}}>
        Render HTML to React Native demo
      </Textual content>
      <RenderHtml
        supply={supply}
      />
    </View>
    </ScrollView>
  );
};
export default App;
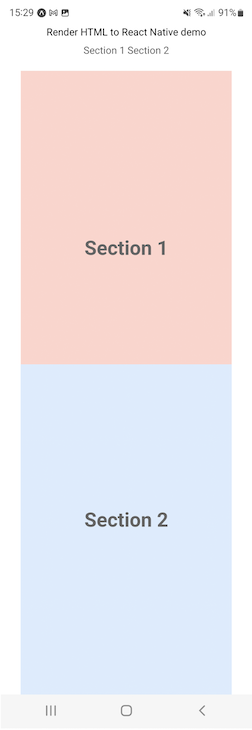
Starting at line quantity 10, within the supply variable, we wrote our HTML code. This code is then rendered by a technique known as RenderHtml at line quantity 94. We have now to offer our HTML as a supply attribute, and the package deal will deal with the remaining.
To exhibit that the rendered HTML from the exterior library will look the identical as code written with React Native, line quantity 91 makes use of the default React Native <Textual content> methodology to indicate the textual content.
Each the textual content rendered by the default methodology and the textual content output from rendering HTML ought to appear like the under:
Exploring an alternative choice to react-native-render-html
Aside from the react-native-render-html library, there’s another choice for rendering internet parts into React Native functions — React Native WebView. This contemporary cross-platform different to the built-in webview has nice help for embedding something from complete internet apps to easy HTML information.
On this library, you could find an analogous sample as above. Try the under instance:
//Javascript - JSX
import React, { Part } from 'react';
import { StyleSheet, Textual content, View } from 'react-native';
import { WebView } from 'react-native-webview';

// ...
class MyWebComponent extends Part {
  render() {
    return <WebView supply={{ uri: 'https://reactnative.dev/' }} />;
  }
}
This library has many helpful options — like importing and downloading information, customized cookies, web page navigations, and plenty of extra. Try this full information to React Native WebView to see if it’s the best answer on your wants.
Conclusion
React Native is in demand because of the reputation of React. In the event you perceive React, it’s simple to make a cell software by way of React utilizing native help for React Native.
As well as, you will have HTML prepared and wish to make a cell software utilizing your current code reasonably than rewriting it to suit your goal platform. It’s doable to natively render HTML to React Native utilizing one of many approaches mentioned above. You don’t must reinvent the wheel to make that work in an Android or an IOS software.
I used to rewrite the code to make it a local software, however I got here to know some fairly wonderful libraries I can use to showcase my HTML. The ensuing view is similar because the native view, so this method doesn’t influence the person expertise.
If you wish to render HTML instantly in your React Native software, ensure you examine to see if the library you wish to use matches your necessities. In case you have any questions, let me know within the feedback under!
LogRocket: Immediately recreate points in your React Native apps.

LogRocket is a React Native monitoring answer that helps you reproduce points immediately, prioritize bugs, and perceive efficiency in your React Native apps.
LogRocket additionally helps you improve conversion charges and product utilization by displaying you precisely how customers are interacting together with your app. LogRocket’s product analytics options floor the the explanation why customers do not full a specific stream or do not undertake a brand new characteristic.
Begin proactively monitoring your React Native apps — attempt LogRocket free of charge.
