PowerPoint is thought for creating displays and for the cool animation results it presents to make your presentation full of life to your viewers. Animation is an impact that provides your eyes an phantasm of a transferring object. Have you ever ever considered making a spinning wheel animation in PowerPoint? Nicely, On this tutorial, we’ll clarify the right way to create a spinning wheel animation in PowerPoint.
The way to create a Spinning Wheel animation in PowerPoint
Observe the steps under to create a Spinning Wheel animation in PowerPoint:
- Inserting the Pie Chart
- Convert the Pie Chart to a Image
- Including Animation to Wheel
Inserting the Pie Chart
Launch Microsoft PowerPoint.
Change the slide format to Clean.
Go to the Insert tab.
Click on Chart within the Illustration group.
An Insert Chart dialog field will open.
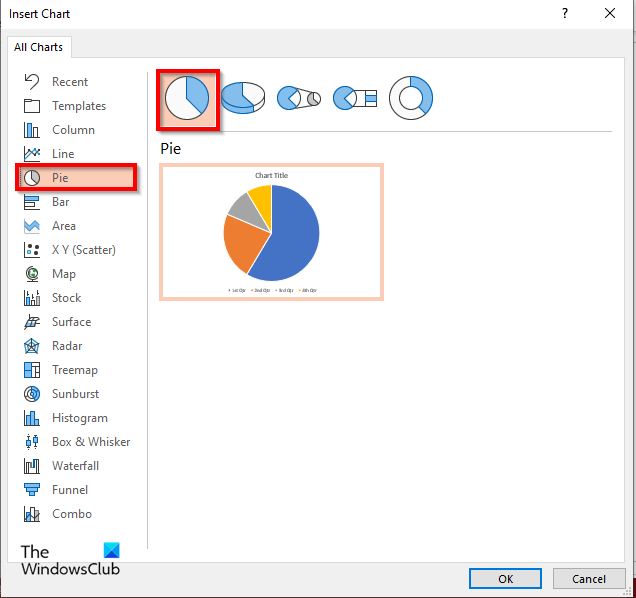
Click on Pie on the left pane and choose the Pie Chart diagram on the proper.
Click on OK.

A Mini Excel window will open (Chart in Microsoft PowerPoint.)
Within the part that states Gross sales, enter 1 for all of the Qtr.
Now we’re going to add some labels to the wheel.
Shut the Mini Excel window.
Proper-click the Pie Chart and choose Add Information Labels.
You’ll discover that each one the slices within the Pie Chart are exhibiting primary because the label.

Proper-click a label within the Pie Chart and choose Format Information Label from the context menu.

On the Label Choices tab, underneath the Label Choices part, you’ll discover that the Worth test field is chosen. Uncheck the Worth test field.
Examine the test field for the choice Worth from a cell.
The Mini Excel window will seem together with a Information Vary dialog field.
Within the Label part on the Excel window spotlight, the labels and the vary of those labels will seem within the Information Vary dialog field.
Then click on Okay and shut the Mini Excel window and the Pane.
You’ll discover that the chart is now exhibiting the proper labels.
Take away the Chart Title and Legend from the chart.
You’ll be able to change the font or font measurement of the label if desired.
Convert the Pie Chart to a Image
Now we’re going to flip the Pie Chart into an image.
Proper-click the chart and choose Minimize from the context menu.

Now right-click once more and choose Paste Image from the menu.
Now the Pie Chart is an image.
Now we’re going to crop the image right into a round form.
Guarantee the image is chosen.

Click on the Image Format tab.
Click on the Crop button, hover the cursor over Crop to Form, and choose the oval form from the menu.

Then click on the Crop button once more, hover the cursor over Side Ratio, and choose Sq. 1:1.

Maintain down the Ctrl + Shift button and place the cursor on the crop angle and drag it right down to type a circle.
Now press the Esc button.
Including Animation to Wheel

Then click on the Animation tab and choose the Spin impact underneath the Emphasis part within the Animation gallery.
The Wheel will spin.

In order for you the Wheel to spin sooner, you go to the Length button within the Timing group and scale back it to 00.50.
Click on the Animation Pane button.
An Animation Pane will seem on the proper.

The place you see the title that represents the image on the Animation pane, click on the drop-down arrow and click on the Impact Choices.

The Spin dialog field will open. Click on the Timing tab.
Within the Repeat part, click on the drop-down menu and choose Till Subsequent Click on.
Then click on OK.
Now we going to create a management for the spinning wheel. Make sure the circle is chosen.

Go to the Insert tab, click on Shapes and choose the oval form and draw it in the course of the spinning wheel.
You’ll be able to change the colour of the circle in the event you desired. On this tutorial, we alter the colour to black.
Now we’re going to insert symbols into the drawn circle.

Go to the Insert tab and click on the Image button. You’ll discover that the image command is disabled.
To allow the image command, click on the Equation command, then click on the Image command.

A Image dialog field will seem.
Click on the Font drop-down arrow and choose Webdings from the context menu.
You will notice all of the symbols for the Webdings search.
Choose the Play image, then choose Insert.
Choose the Pause image, then choose Insert.
Now we’ll add a needle to the animation pointing on the wheel.
Go to the Insert tab, click on Shapes, and choose Arrow: Proper from the menu.
Draw the arrow pointing to the wheel.
Now we’re going to give the image buttons within the middle of the circle a reputation.

Go on the Residence tab and click on the Choose button within the Enhancing group.
Choose the Choice pane from the menu.
A Choice Pane will seem on the left.
Within the Choice Pane, the symbols are named Oval 4. Double-click Oval 4 and rename the symbols as Play Pause.
Then open the Animation Pane once more, click on the drop-down button, and choose Impact Choices.

A dialog field will open, click on the Timing tab and click on the Triggered button.
Choose the Begin Impact on the press of possibility and choose Play/ Pause from the drop-down menu.
Then click on OK.
The Wheel will begin to spin.
Now we would like the wheel to pause when spinning.

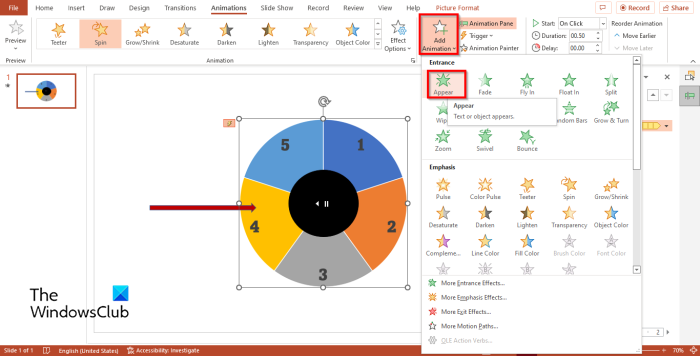
Go to the Animation tab once more and click on the Add Animation button.
Then choose Seem within the Entrance part of the menu.

On the Choice Pane, click on the drop-down arrow for the Seem animation and choose Impact Choices.

When the Seem dialog field opens, click on the Timing tab, then click on the Triggered button.
Choose the Begin Impact on the press of possibility and choose Play Pause from the drop-down menu.
Then click on OK.
Then click on the Slide Present button on the underside of the web page.
")
The Slide Present will open, displaying the spinning wheel. Click on on the circle to play or pause the spinning wheel.
Press the Esc key to exit the slide present.
We hope you perceive the right way to create a Spinning Wheel animation in Microsoft PowerPoint.
Are you able to make one thing Spin in PowerPoint?
Sure, you may make any object that you’ve inserted into your slide spin in PowerPoint. With the intention to make objects spin, you must choose the Spin impact on the animation tab. The Spin impact is an Entrance impact in PowerPoint.
READ: The way to create and add a Movement Path animation in PowerPoint
How do you make a 3d animation in PowerPoint?
Observe the steps under to create a 3d animation in PowerPoint:
- Click on the Insert tab.
- Click on the 3D mannequin button within the Illustration group.
- A dialog field will open, choose a 3D picture and click on Insert.
- Click on the Animation tab and choose an animation from the Animation gallery.
What are the 4 kinds of animation in PowerPoint?
In Microsoft PowerPoint, there are 4 kinds of animation, particularly: Entrance, Emphasis, Exit and Movement Paths. Every kind of kinds of animation comprises varied results that carry your photos and shapes to life.
