Do you need to enable customers to decide on between totally different cost strategies in your WordPress web site or on-line retailer?
While you enable your prospects to decide on their most well-liked cost technique, you’ll construct belief and enhance conversions in your web site.
On this article, we’ll present you how you can enable your customers to decide on a cost technique in your WordPress varieties.

Why Supply A number of Fee Strategies in WordPress?
PayPal and bank cards are two in style methods to pay for on-line purchases. Every has its professionals and cons, and your guests are prone to have already got a choice for one or the opposite.
So, for those who’re promoting services or products in your WordPress web site, or asking for donations, then you will need to enable your guests to make use of their most well-liked cost technique.
You could have already got an entire on-line retailer with a purchasing cart, however you don’t must set one as much as settle for on-line funds. All you want is an easy on-line order type with a selection of cost choices.
This is sensible for those who’re promoting a single product, accepting funds for companies, or elevating cash for a trigger or charity.
Earlier than you possibly can settle for funds in your web site, you’ll must allow HTTPS/SSL in your web site so to settle for funds securely. For extra particulars, you possibly can observe our information on how you can get a free SSL certificates to your WordPress web site.
That being mentioned, let’s take a look at how one can supply a number of cost choices in your web site. We’ll cowl three strategies so you possibly can select the one which most closely fits your wants.
Methodology 1 is the only and doesn’t require a full purchasing cart. You need to use Methodology 2 in case you have a WooCommerce retailer. And Methodology 3 is greatest for those who don’t have a web-based retailer and need to use PayPal or create extra versatile varieties.
- Methodology 1: Providing A number of Fee Strategies Utilizing WP Easy Pay
- Methodology 2: Providing A number of Fee Strategies in WooCommerce
- Methodology 3: Providing A number of Fee Strategies Utilizing WPForms
Methodology 1: Providing A number of Fee Strategies Utilizing WP Easy Pay
WP Easy Pay is a straightforward method to supply a number of cost strategies in your web site. It’s a number one WordPress funds plugin that allows you to obtain funds with out organising a full-featured eCommerce retailer or membership web site.
It makes use of Stripe, a preferred cost gateway, to simply accept funds from bank cards, Apple Pay, Google Pay, ACH financial institution debit, SEPA direct debit, Alipay, Giropay, iDEAL, and extra.
The very first thing you might want to do is set up and activate the WP Easy Pay plugin. For extra particulars, see our step-by-step information on how you can set up a WordPress plugin.
Whereas there’s a free model of the plugin, you want the Professional plugin to create on-site cost varieties, settle for Apple Pay, and extra.
Upon activation, the WP Easy Pay setup wizard will begin mechanically. You merely must click on the ‘Let’s Get Began’ button to proceed.

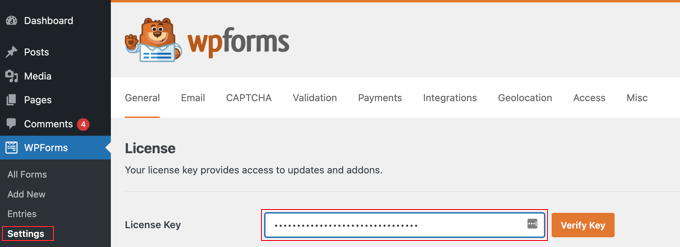
First, you’ll be requested to enter your license key. Yow will discover this data out of your account on the WP Easy Pay web site.
After that, you might want to click on the ‘Activate and Proceed’ button to maneuver on.

Subsequent, you’ll want to attach WP Easy Pay to Stripe.
Begin by clicking the ‘Join with Stripe’ button. From there, you possibly can log in to your Stripe account or create a brand new one. Anybody with a legit enterprise can create a Stripe account and settle for funds on-line.

As we talked about earlier, Stripe would require your web site to be utilizing SSL/HTTPS encryption. If you happen to don’t have already got an SSL certificates to your web site, then please see our step-by-step information on how you can add SSL in WordPress.
When you’ve related to Stripe, you’ll be requested to configure your WP Easy Pay emails.

The choices for cost and bill emails to your prospects have already been enabled for you. So has the choice for sending cost notification emails. You simply must enter the e-mail tackle the place the notifications must be despatched.
When you’ve performed that, you might want to click on the ‘Save and Proceed’ button. This completes your setup of WP Easy Pay.

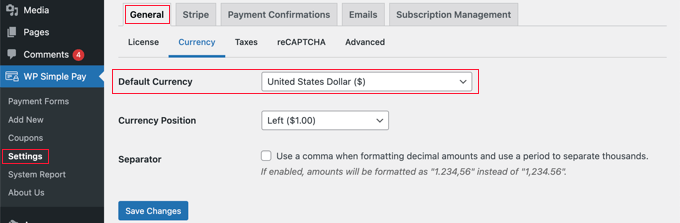
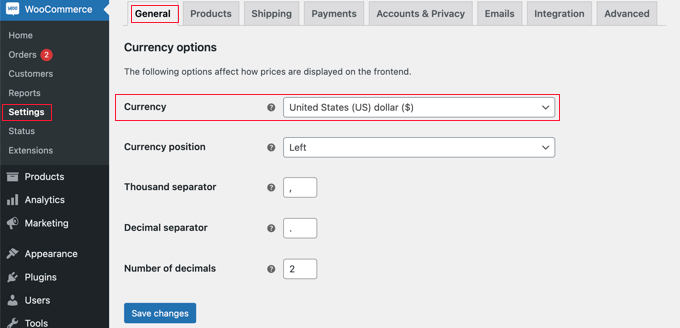
There’s another setting chances are you’ll must configure earlier than we transfer on. Some cost choices will solely work for particular currencies, so if you’re not utilizing USD, then you will want to vary the default foreign money.
Merely go to WP Easy Pay » Settings then click on on ‘Basic’ after which ‘Forex’, then choose the proper foreign money from the drop down menu.
Making a Fee Kind in WordPress
Now it’s time to create your cost type. WP Easy Pay presents loads of methods to customise the shape, however for those who want extra full management over the way in which your type appears, then take a look at WPForms in Methodology 3.
If you happen to didn’t want to vary your foreign money and may nonetheless see the final web page of the setup wizard, merely click on the ‘Create a Fee Kind’ button. In any other case, you need to navigate to the WP Easy Pay » Add New web page.
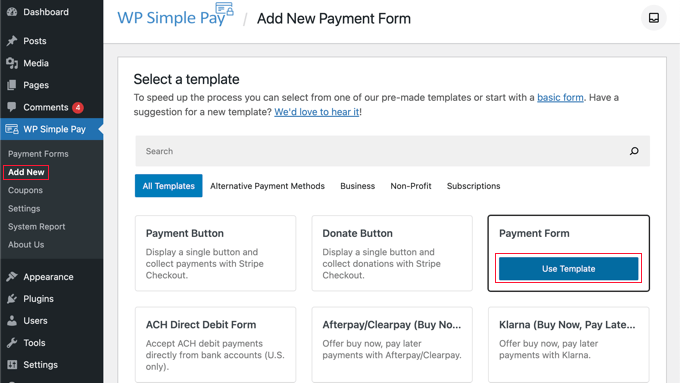
You’ll be proven a listing of cost type templates. You might begin with a generic template corresponding to ‘Fee Kind’ after which add cost strategies. Alternatively, you possibly can search for a extra particular template, corresponding to ‘Afterpay/Clearpay’ or ‘Apple Pay / Google Pay‘.
For this tutorial, we’ll select the ‘Fee Kind’ template. Merely hover over the template you want to use and click on the ‘Use Template’ button when it seems.
It will take you to the cost type editor.
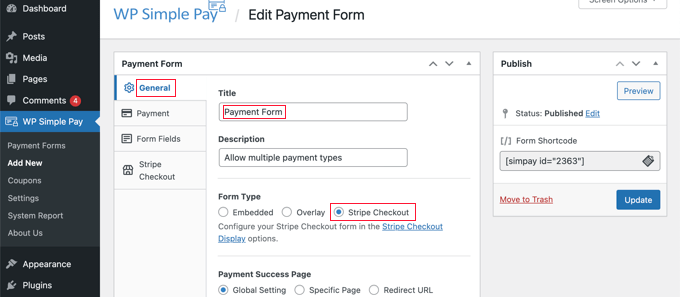
You need to begin by giving the cost type a reputation and outline. After that, you possibly can choose the ‘Stripe Checkout’ choice beneath Kind Kind.
Subsequent, you might want to click on on the ‘Fee’ tab. Right here you possibly can set the cost mode to both dwell or testing. Check mode will allow you to make funds that aren’t truly charged so you may make positive your type is working correctly and emails are being despatched.
Don’t neglect to vary this to ‘Dwell’ whenever you’ve completed testing and are prepared to start out receiving funds out of your prospects.

You can too add the services or products that you just supply, together with their costs and whether or not they’re a one-time cost or a subscription.
Merely click on the ‘Add Value’ button till you’ve added as many costs as you want. Then for every one, you will want so as to add a label and worth. You can too choose different choices, corresponding to if the worth is a subscription, or the consumer can decide the worth, as in a donation.

You’ll be able to present or disguise a worth by clicking the small arrow on the fitting.
Subsequent, we’ll transfer on to the ‘Kind Fields’ tab. The important fields have already been added to the shape, and you’ll add extra if crucial.
Utilizing the ‘Kind Fields’ drop down, you possibly can select further fields and add them by clicking the ‘Add Subject’ button. Choices embody identify, telephone quantity, tackle, and way more.
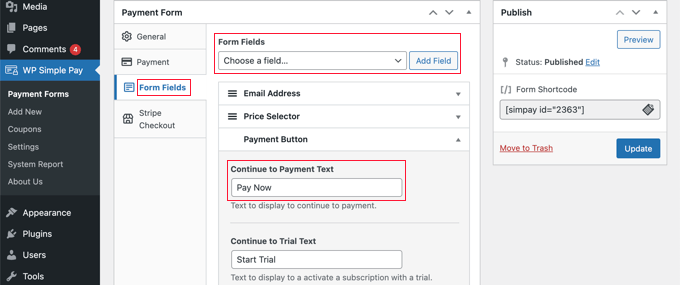
The default textual content on the button is ‘Pay with Card’. Because you’ll be accepting a number of cost varieties, you possibly can change the textual content to one thing extra generic, corresponding to merely ‘Pay Now’. Then your prospects received’t assume that bank cards are the one cost choice.
Lastly, you need to click on the ‘Stripe Checkout’ tab and choose the cost strategies you want to supply. For this tutorial, we’ll simply depart the default settings.
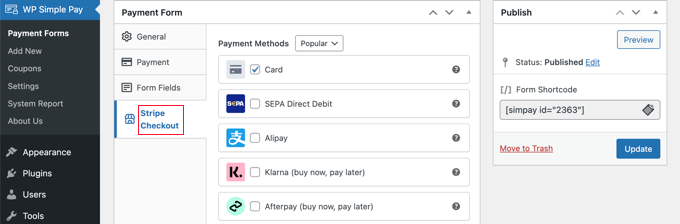
Further cost strategies, corresponding to Apple Pay, shall be mechanically supplied on appropriate units. To study extra, see our information on how you can settle for Apple Pay in WordPress.
Klarna and Afterpay are ‘purchase now, pay later’ companies and supply prospects flexibility as they will buy items and pay in installments over a specified time interval. For extra data, see our information on how you can add ‘purchase now pay later’ cost plans to WordPress.
If you find yourself glad along with your cost type, click on the ‘Publish’ button to retailer your settings and push the shape dwell.
The ultimate step is so as to add the shape to a put up or web page in your web site.
Including the Fee Kind to Your Web site
WP Easy Pay makes it tremendous straightforward so as to add varieties anyplace in your web site.
Merely create a brand new put up or web page, or edit an current one. Then, click on on the plus (+) signal on the high and add a WP Easy Pay block within the WordPress block editor.
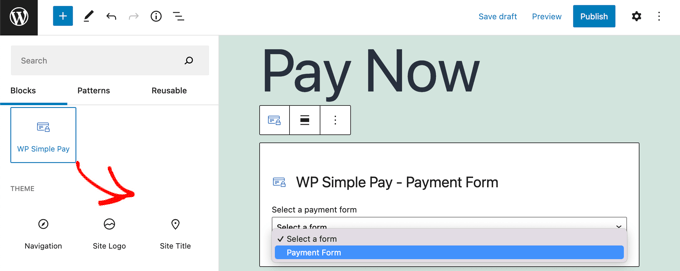
After that, choose your order type from the dropdown menu within the WP Easy Pay block.
When you’re completed, you possibly can replace or publish the put up or web page, after which click on on the preview button to see your type in motion.

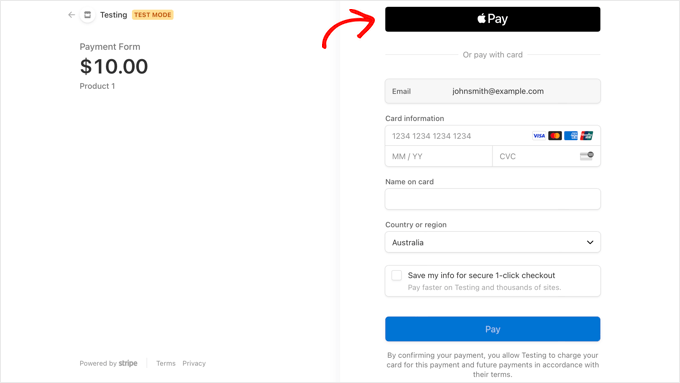
When your customers click on the ‘Pay Now’ button, the Stripe checkout type shall be displayed. It will supply the entire cost choices you checked earlier.
On supported units and browsers, further cost choices corresponding to Apple Pay can even be supplied mechanically.
One further cost technique you possibly can supply your prospects utilizing WP Easy Pay is recurring funds. For extra data, see our information on how you can settle for recurring funds in WordPress.
Methodology 2: Providing A number of Fee Strategies in WooCommerce
If you’re working an on-line retailer utilizing WooCommerce, then you possibly can simply supply further cost strategies through the use of PayPal and the Stripe cost gateway.
For this tutorial, we’ll assume that you have already got WooCommerce put in. If you happen to need assistance setting it up, then see our step-by-step information on WooCommerce.
Including PayPal to Your WooCommerce Retailer
You will have already arrange PayPal when following the WooCommerce setup wizard in that information. When you have, then you possibly can transfer on to the following part and arrange Stripe.
If not, you might want to head over to WooCommerce » Settings after which click on the ‘Funds’ tab on the high of the display.
After that, scroll down the web page till you discover PayPal and click on the ‘Get began’ button.

You have to begin by typing your PayPal e-mail tackle after which deciding on your nation from the drop down menu.
After that, you need to click on the ‘Subsequent’ button to proceed.
If you have already got a PayPal account utilizing that e-mail tackle, then you definately’ll be requested to offer your password and log in. In any other case, you’ll first be requested to offer your private particulars and create a brand new account.

Lastly, you need to click on the ‘Agree and Consent’ button to attach your PayPal account to the web retailer.
When you’ve performed that, you’ll want to verify your e-mail tackle by going to your inbox and following the directions within the e-mail you had been despatched. You’ll be able to then dismiss the popup window by scrolling to the underside and clicking the button.

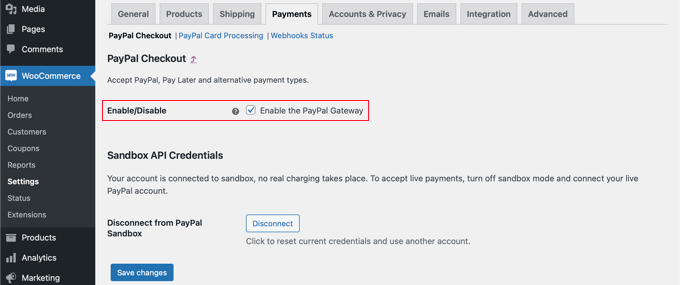
You need to end up again on the WooCommerce funds settings web page. Right here you will want to verify the field to allow the PayPal cost gateway in your on-line retailer.
After that, rigorously scroll down the web page and ensure all of the settings are right. While you’re glad, you possibly can click on the ‘Save adjustments’ button on the backside of the web page.
When testing, your prospects can now pay utilizing PayPal as a cost choice.
Including Stripe to Your WooCommerce Retailer
The very first thing you might want to do is set up and activate WooCommerce Stripe Fee Gateway. For extra particulars, see our step-by-step information on how you can set up a WordPress plugin.
Some cost choices are solely obtainable for sure currencies. If you’re utilizing a foreign money aside from USD, then you need to navigate to WooCommerce » Settings and be sure to are on the ‘Basic’ tab.
Right here you possibly can select the foreign money to your on-line retailer. Be sure you click on the ‘Save’ button to retailer the setting.
After that, you need to click on the ‘Funds’ tab. As soon as there, you need to scroll down till you discover ‘Stripe’ within the ‘Methodology’ column. Discover that there are a number of Stripe cost strategies.
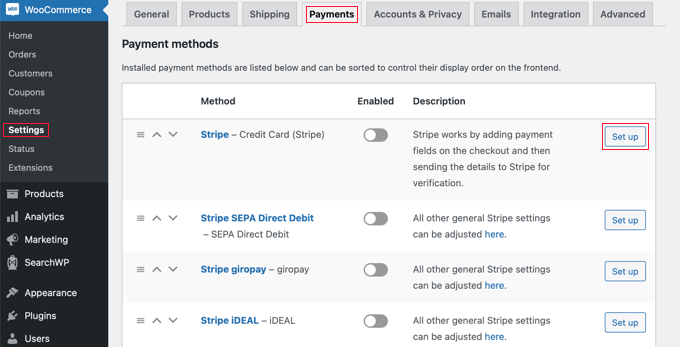
You have to begin by clicking the ‘Arrange’ button subsequent to ‘Stripe – Credit score Card’. It will launch a setup wizard that takes you thru the steps of connecting WooCommerce to Stripe.
On the following display, click on on the ‘Enter account keys’ button.

WooCommerce will now ask to your Stripe account keys. To get this data, you might want to log into your Stripe dashboard in a brand new tab.
Contained in the Stripe dashboard, you need to be sure to’re on the ‘Builders’ tab on the high of the display, after which choose ‘API keys’ from the left-hand menu.

Now you can copy the ‘Publishable key.’
Then, swap again to your WordPress dashboard and paste this key into the ‘Dwell publishable key’ discipline.

Now you might want to do the identical factor with the key key. Merely swap again to your Stripe dashboard and click on on the ‘Reveal dwell key’ button.
It will present your secret key.

You have to copy the important thing after which head again to your WordPress dashboard and paste it into the ‘Dwell secret key’ discipline.
After that, simply click on on the ‘Check connection’ hyperlink.

After a number of moments, you will note a ‘Connection profitable’ message. Which means WooCommerce is now related to your Stripe account.
Now you can go forward and click on on the ‘Save dwell keys’ button.

It will take you to the Stripe ‘Settings’ display.
On this display, you might want to verify the ‘Allow Stripe’ field. If you happen to like, you can too click on the ‘Allow take a look at mode’ field.
Check mode will allow you to make funds that aren’t truly charged to an account. That is helpful when testing a number of cost varieties in your WooCommerce retailer. Don’t neglect to return again and uncheck the setting if you end up prepared to start out taking funds.

Now you possibly can scroll to the very backside of the web page and click on the ‘Save Modifications’ button to retailer your settings.
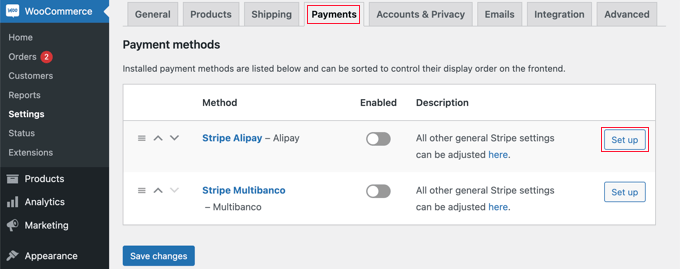
Now that you’ve enabled Stripe bank card funds, you possibly can allow any further Stripe cost strategies you want to supply in your on-line retailer.
Head again to WooCommerce » Settings and click on on the ‘Funds’ tab. As soon as there, you possibly can discover the cost strategies that work along with your retailer’s foreign money.
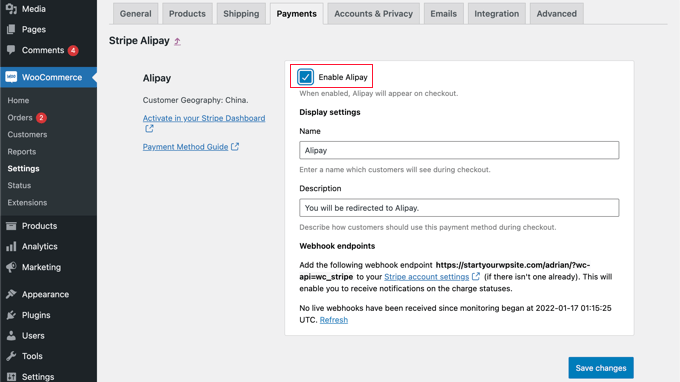
For this tutorial, we’ll allow Alipay. You have to discover ‘Stripe Alipay’ within the checklist of cost strategies after which click on its ‘Arrange’ button.
Right here you possibly can click on the ‘Allow Alipay’ button. It will show Alipay as a cost choice when testing.
Subsequent, you might want to click on the ‘Save adjustments’ button to retailer your settings.
Including Recurring Funds to WooCommerce
One other method to supply versatile cost preparations to your WooCommerce prospects is so as to add recurring funds in order that your prospects are mechanically charged on a weekly, month-to-month, quarterly, or annual foundation.
This automates the billing course of to can prevent time. You received’t must manually ship invoices and recurring funds typically result in fewer cost delays and errors.
To study extra, see Methodology 4 in our information on how you can settle for recurring funds in WordPress.
Now when your prospects take a look at, they are going to have the ability to select their most well-liked cost technique. Right here’s an instance screenshot from our demo WooCommerce retailer.
Our prospects are in a position to make funds utilizing bank cards, PayPal, and Alipay.
Methodology 3: Providing A number of Fee Strategies Utilizing WPForms
The very first thing you might want to do is set up and activate the WPForms plugin. For extra particulars, see our step-by-step information on how you can set up a WordPress plugin.
WPForms is the greatest drag and drop type builder plugin for WordPress. It enables you to create a easy order type or donation type with out the trouble of a full-fledged eCommerce platform or purchasing cart plugin.
Whereas they’ve a Lite model that’s free, you will want their Professional plan to entry the cost addons and order type template. It helps bank cards and PayPal.
Upon activation, you might want to go to the WPForms » Settings web page to enter your license key. Yow will discover this data in your WPForms account space.
Connecting Fee Platforms to WPForms
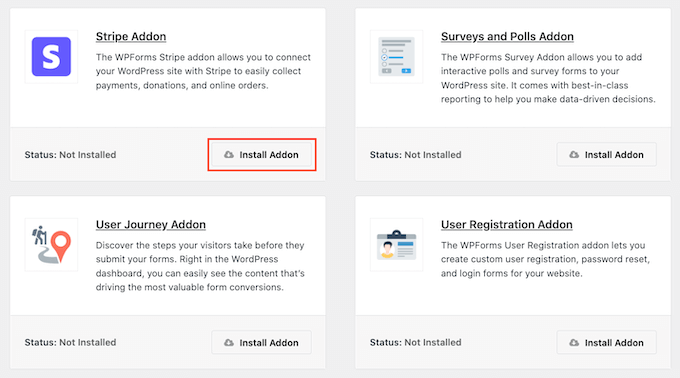
Subsequent, we’ll join WPForms with the cost platforms you intend to make use of. To do that, you might want to head over to WPForms » Addons and set up the cost addons.
As soon as there, you might want to scroll right down to the PayPal Normal Addon after which click on on its Set up Addon button.

You’ll see a message saying that the addon has been put in and activated, and the textual content on the button will change to Deactivate.
We’ll arrange your PayPal account particulars later within the tutorial.
You’ll additionally want to put in an addon for accepting bank card funds. WPForms helps Stripe, Sq. and Authorize.internet. For this tutorial, we’ll arrange Stripe, however the steps for organising the opposite two platforms are comparable.
You’ll must scroll to the Stripe Addon and click on on the Set up Addon button.
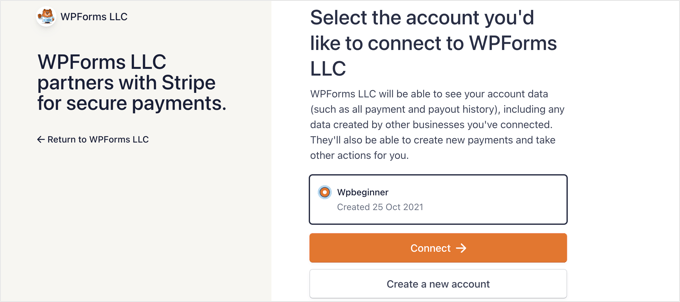
As soon as the addons have been put in and activated, you’ll want to attach WPForms to your Stripe account.
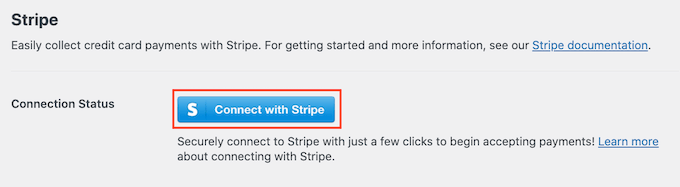
To try this, head over to WPForms » Settings web page and click on on the ‘Funds’ tab. After that, you will want to attach your Stripe account by clicking the ‘Join with Stripe’ button.
On the following display, you possibly can enter your Stripe e-mail tackle and click on the ‘Subsequent’ button. As soon as that’s performed, Stripe will now ask to your password in order that it might probably log in to your account.
After logging in, you possibly can choose your Stripe account after which click on the ‘Join’ button. You’ll then be redirected again to the WPForms Funds settings tab.
To guarantee that your account is efficiently related, you possibly can go to the Connection Standing settings beneath Stripe settings.
While you see a inexperienced tick mark, it means your Stripe account is now dwell with WPForms. Go forward and click on the ‘Save Settings’ button to retailer your settings.
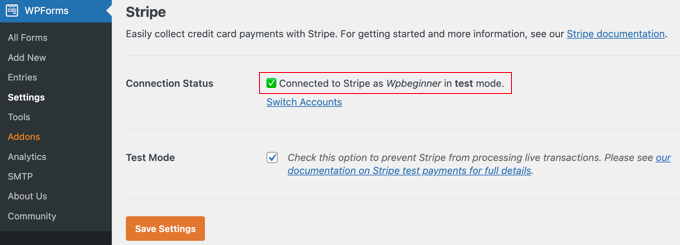
WPForms is now prepared to simply accept bank card funds.
Creating an Order Kind With A number of Fee Strategies
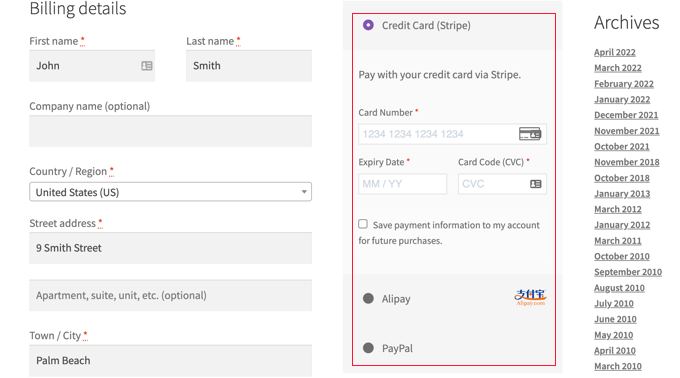
Now we’ll create a web-based order type that may settle for each PayPal and bank card funds.
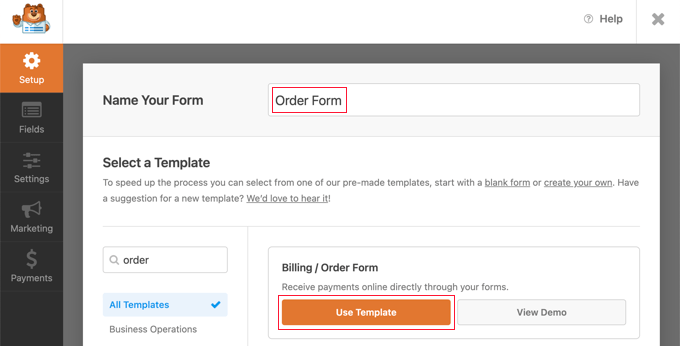
To start out, head over to the WPForms » Add New web page. From right here, you might want to present a title to your type after which choose the ‘Billing / Order Kind’ template.
WPForms will pre-load the shape builder with a easy order type with generally used fields.
You’ll be able to edit any discipline by clicking it.
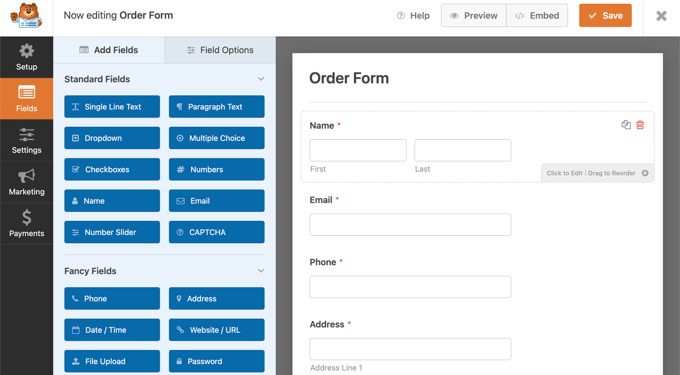
You’ll be able to add new fields from the left column utilizing drag and drop.
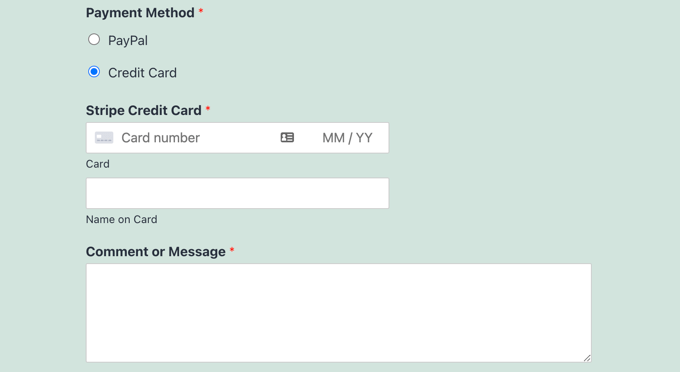
You’ll want to tug a A number of Alternative discipline onto the shape to permit your prospects to pick from a number of cost choices.
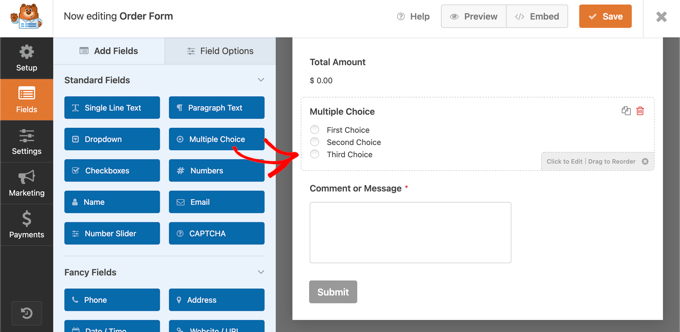
After that, you need to drag the Stripe Credit score Card discipline onto the shape simply beneath the A number of Alternative discipline.
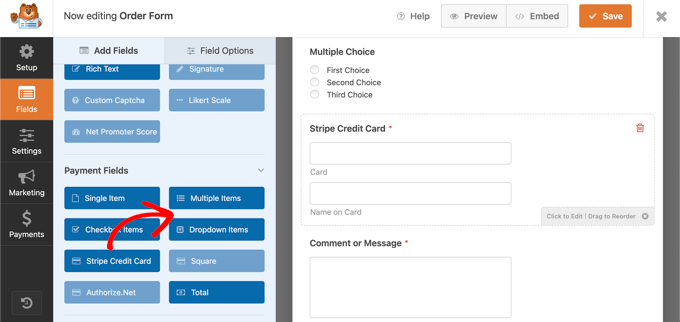
Subsequent, you might want to click on on the A number of Alternative discipline and alter the choices to match the cost strategies you might be providing.
Begin by giving the sector the label Fee Methodology. After that, you need to identify the primary two decisions PayPal and Credit score Card.
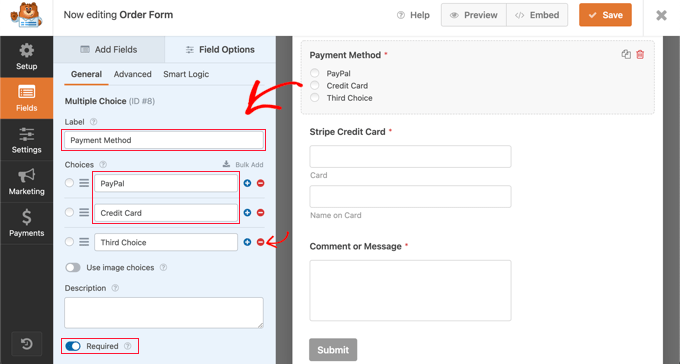
You’ll be able to merely take away the third selection by clicking the pink minus ‘–‘ button.
After that, you might want to swap the Required choice on. It will guarantee that customers choose a cost technique earlier than they submit the order type.
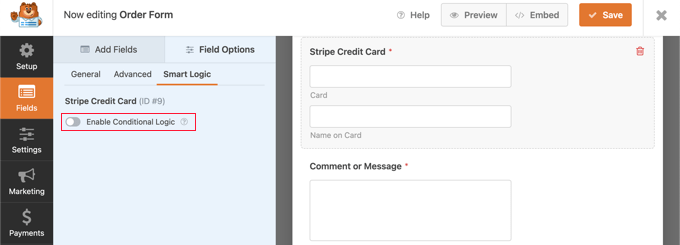
Now we have to arrange the Stripe Credit score Card discipline. We would like it to be hidden till a consumer selects it as their cost choice. We’ll want to make use of WPForms’ conditional logic function.
You’ll must click on on the Stripe discipline so to edit it, after which click on the ‘Sensible Logic’ tab. Merely allow conditional logic by clicking the toggle swap to the on place.
You’ll now see some further choices that assist you to arrange guidelines for the sector. You have to guarantee that the primary choice is chosen to ‘Present’ after which use the drop down menus in order that the remaining fields say ‘Fee is Credit score Card’.
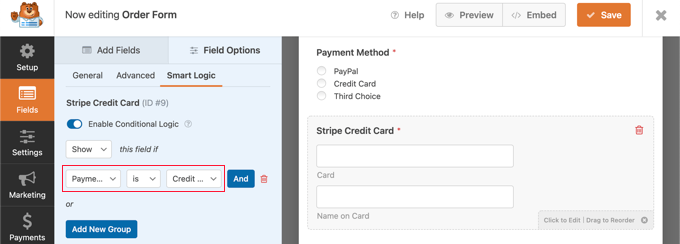
Now the Stripe Credit score Card discipline will solely be proven after a consumer selects Credit score Card from the Fee Methodology discipline.
Enabling Fee Strategies on the Order Kind
Now we’ll allow PayPal and Stripe funds for the order type.
You need to first navigate to Funds » PayPal Normal within the WPForms type builder. As soon as there, you need to verify the ‘Allow PayPal Normal funds’ field in the fitting panel.
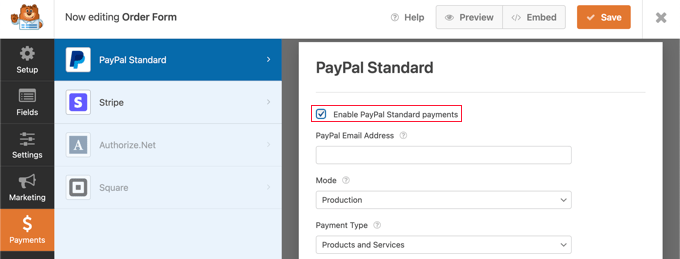
After that, you need to fill in the remainder of the fields. Kind in your PayPal e-mail tackle and place the account in Manufacturing mode. You additionally must configure whether or not customers want to produce a transport tackle.
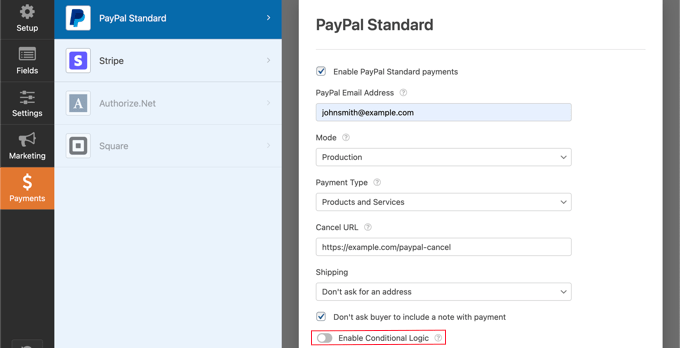
After that, you might want to scroll right down to the Allow Conditional Logic choice and toggle it to the ON place. It will reveal extra settings.

You need to set the rule to ‘Course of the cost if the Fee Methodology is PayPal’.
Subsequent, you might want to click on on the Stripe part of the Funds tab after which verify the ‘Allow Stripe funds’ field.
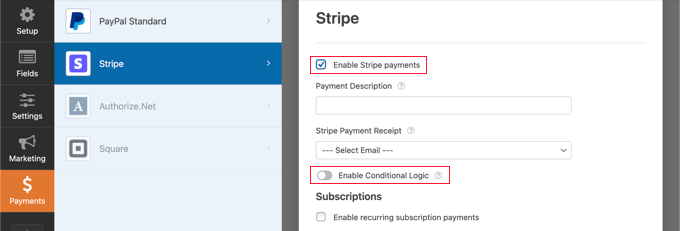
You’ll be able to add a funds description and choose to e-mail a receipt if you want. After that, you might want to swap the Allow Conditional Logic toggle to the on place so to create a rule for this cost choice.

You have to configure the rule in order that it reads ‘Course of this cost if the Fee Methodology is Credit score Card’.
If you happen to’d like to simply accept recurring subscription funds by bank card, then you possibly can scroll right down to the Subscription part and configure it.
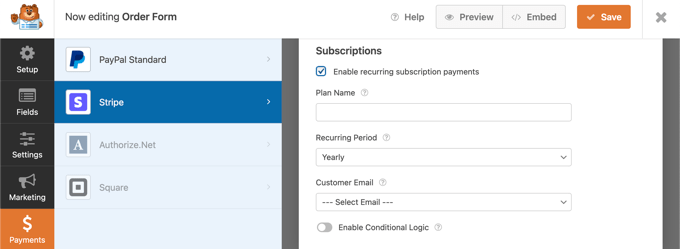
As soon as you might be performed, you might want to click on on the Save button on the high and exit the shape builder.
Including the Order Kind to Your WordPress Web site
Your on-line order type with a number of cost choices is now prepared, and you’ll add it to any WordPress web page in your web site.
So as to add your type, merely edit a put up or web page or create a brand new one. Then, click on on the plus + signal on the fitting of the web page and add a WPForms block in your WordPress editor.
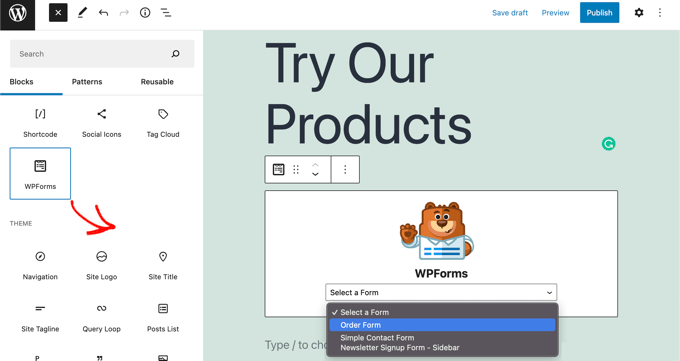
After that, you might want to click on on the drop down menu within the WPForms block, after which choose your order type. While you’ve completed, be sure to save or publish the web page.
Now you possibly can see your type in motion by clicking the ‘Preview’ button on the high of the display.
We hope this tutorial helped you learn to enable customers to decide on a cost technique in your WordPress type.
You might also need to see our knowledgeable choose of the greatest digital enterprise telephone quantity apps for small companies, and our step-by-step information on how to decide on the most effective enterprise VoIP supplier.
If you happen to appreciated this text, then please subscribe to our YouTube Channel for WordPress video tutorials. You can too discover us on Twitter and Fb.
The put up The right way to Permit Customers to Select a Fee Methodology on WordPress Types first appeared on WPBeginner.
