
Changing Angular apps to React has develop into in style as builders search smaller and speedier initiatives. They’re two of the preferred JavaScript frontend frameworks on the market, however as initiatives develop in dimension, performance, and complexity, it could develop into essential to migrate from one framework to a different.
Migrating will give your engineering workforce the chance to replace your initiatives to the requirements anticipated of contemporary apps and higher react to the ever-changing sides (primarily when it comes to upkeep) of the software program improvement lifecycle, and migrating from Angular to React isn’t any exception to this.
On this article, you’ll be taught in regards to the concerns you must make when changing Angular apps to React, migration methods, the benefits and drawbacks of migrating, why you could wish to migrate; after which lastly we’ll do a walkthrough of the method of changing an Angular app to React, which you’ll be able to observe together with at your individual tempo. Let’s get began.
Soar forward:
Issues to notice when migrating from Angular to React
Angular and React are nice frontend frameworks with distinct traits that make them basically completely different, and it’s essential to be aware of the next when migrating:
- React makes use of a digital DOM, whereas Angular works with an actual DOM
- Angular has two-way binding, whereas React has one-way binding
- Angular comes with TypeScript out of the field; React doesn’t
- Angular has built-in assist for AJAX, HTTP, and Observables, and React doesn’t.
- React has a big ecosystem and direct assist from Meta (Fb), whereas Angular is just supported by the developer neighborhood
- Angular comes with out-of-the-box options like validation, component-scoped CSS, animations, conditional rendering, and extra
- The Angular CLI permits straightforward technology of elements, modules, and different options that assist developer productiveness
What to do earlier than migrating Angular to React
Set objectives to keep away from scope creep
Many improvement groups undergo the results of not laying down the scope when engaged on initiatives.
What’s the purpose and focus of this migration? Will it strictly be a one-and-done migration, or will you utilize the chance to make updates, bug fixes, and efficiency optimizations alongside the best way? Observe that the solutions to those questions will have an effect on the supply timeline of the migration.
Perform an audit to know ache factors and blockers
What limitations and inefficiencies of your present system require a change? It is crucial that the brand new stack you’re switching to removes current blockers with out including new ones. Guarantee that there’s a legitimate cause emigrate earlier than you achieve this and also you’re not carrying over points.
Select the best migration technique
What migration technique will you utilize? Will you stagger the migration launch? Selecting the best technique is vital to a profitable migration and sustaining expectations.
Some causes groups could migrate from Angular to React
The wants of companies and improvement groups change over time, and generally these adjustments require a transition of tech stacks to adapt.
Listed below are the important thing causes you could migrate from Angular to React:
- The adoption of React is regularly rising amongst builders and new crops of internet improvement abilities deal with studying the abilities with the best market demand. Because of this it can develop into more and more tough to seek out or rent Angular builders to handle initiatives and you could want to change to React as a matter of necessity
- React has a broader vary of flexibility than Angular — you possibly can simply discover weblog templates, animation libraries, a number of part libraries, toast libraries, and extra. In comparison with Angular, React has a bigger and extra energetic open supply neighborhood that regularly develops third-party libraries, templates, on-line programs, and different sources
- Enterprise wants and focuses change over time, and builders could also be required to construct cellular apps to serve extra clients. It will likely be simpler and quicker for them to undertake a React codebase to work with React Native
Migration methods
Migrating an app’s codebase is advanced, and whereas there is no such thing as a straightforward method to do that, there are a number of methods we will discover.
Rewrite
A whole rewrite from the bottom up is taken into account a greater method of migrating functions when it comes to high quality since you get to start out with a brand new software, outline an structure that matches the brand new framework, and there’s no have to cope with integrating outdated and new code.
Nevertheless, this technique has drawbacks — it requires extra time and sources, and the supply timeline might be difficult to estimate.
Strangler sample
React and Angular are component-based frameworks and you may make the most of this when defining your migration technique. Part-based migration means you possibly can break your Angular app into particular person elements and migrate them one after the opposite.
Because the improvement of various elements can progress in parallel, you possibly can have separate groups migrating completely different elements of the app — with this technique, you possibly can stagger releases and deploy the migration for every part.
An obstacle is that you’ll have to combine the brand new framework’s structure with that of the outdated framework.
Why you could not wish to migrate from Angular to React
An everlasting good thing about Angular is that it makes determination making simpler due to its opinionated system and built-in instruments — builders don’t have to spend days and weeks assembly to debate the libraries for state administration or knowledge fetching.
Angular is constructed with TypeScript, and dealing with TypeScript out-the-box reinforces clear code and makes debugging and upkeep simpler down the road — scaling points apart.
Transferring from Angular to React will imply dropping out on the Angular CLI, which builders can use to create repeatable blocks of code like elements, companies, pipes, and directives from the command line.
Extra nice articles from LogRocket:
Changing an Angular app to React
Having regarded on the background concerned in framework migration, let’s convert an Angular app to React and see the way it’s carried out.
We’ll use Subsequent.js for the React app; nevertheless, the identical ideas and code snippets might be adopted right into a vanilla React app.
To get began, observe the steps in these Angular and Subsequent.js guides to spin up new Angular and React functions.
The venture we’ll convert
We’ll convert a easy activity tracker app from Angular to React; the picture under exhibits the app.
When the Add button is clicked, it reveals a modal the place we will add new duties.
![]()
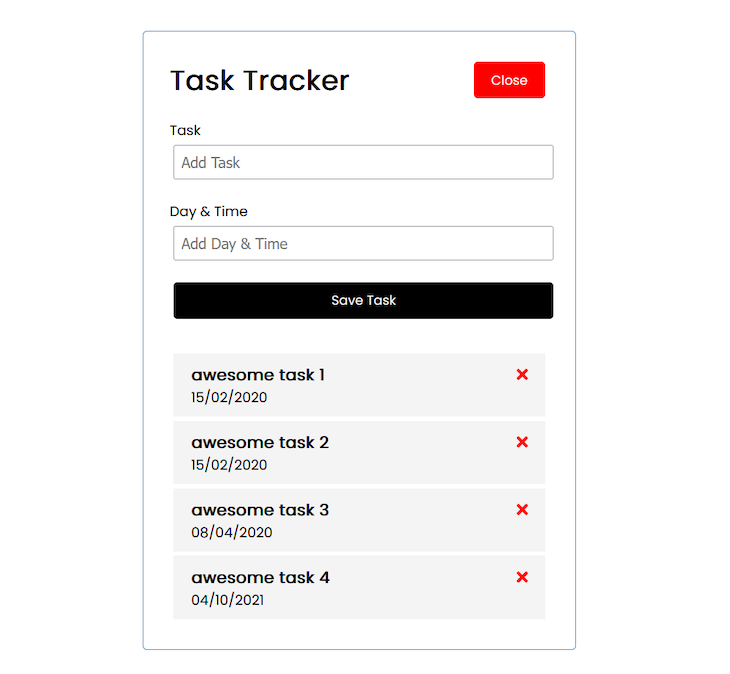
These are the completely different elements the app is made up of:
- Header: The app’s header
- Button: A reusable button part
- Add Process: A type part accountable for including new duties
- Process Merchandise: The person activity merchandise
- Duties: The part the place we render all of the duties
Let’s begin creating the elements. We’ll have a look at the Angular code first, after which convert that to React.
(Observe: Working data of Angular and Subsequent.js is required to observe together with the remainder of this text)
Defining the Angular companies
Companies are blocks of performance an app wants to finish a selected activity or to hold out an operation. Companies are a crucial a part of including performance to Angular apps; be taught extra about them right here.
There are two companies the Angular software will want, a Process service and a UI service.
Creating the Process service
This shall be in control of fetching duties from a mock API, including new duties, and deleting duties.
The code under does the next:
getTasksfetches the dutiesdeleteTaskprovides new dutiesaddTaskdeletes duties
//language: JavaScript

import { Injectable } from '@angular/core';
import { Observable } from 'rxjs';
import { Process } from 'src/app/mock-tasks';
import { HttpClient, HttpHeaders } from '@angular/frequent/http';

const httpOptions = {
  headers: new HttpHeaders({
    'Content material-Sort': 'software/json',
  }),
};

@Injectable({
  providedIn: 'root',
})

export class TaskService {
  personal apiUrl="http://localhost:5000/duties";
  constructor(personal http: HttpClient) {}

  getTasks(): Observable<Process[]> {
    return this.http.get<Process[]>(this.apiUrl);
  }

  deleteTask(activity: Process): Observable<Process> {
    const url = `${this.apiUrl}/${activity.id}`;
    return this.http.delete<Process>(url);
  }

  addTask(activity: Process): Observable<Process> {
    return this.http.submit<Process>(this.apiUrl, activity, httpOptions);
  }
}
Creating the UI Service
The UI service will management the form-toggling performance by way of the toggleAddTask perform.
//language: JavaScript

import { Injectable } from '@angular/core';
import { Observable, Topic } from 'rxjs';

@Injectable({
  providedIn: 'root',
})

export class UiService {
  personal showAddTask: boolean = false;
  personal topic = new Topic<any>();
  constructor() {}
  toggleAddTask(): void {
    this.showAddTask = !this.showAddTask;
    this.topic.subsequent(this.showAddTask);
  }
  onToggle(): Observable<any> {
    return this.topic.asObservable();
  }
}
Nice! Now that we’ve outlined the companies, now we transfer on to create the elements.
The header part will include a button, which, when clicked, will toggle the shape the person will use so as to add extra duties. As well as, the background colour and textual content of the button can even be toggled.
To set this up in Angular, create a header part within the app and do the next:
First, outline the HTML for the part.
//language: JavaScript

<header>
  <h1>Process Tracker</h1>
  <app-button
    colour="{{ showAddTask ? 'pink' : 'inexperienced' }}"
    textual content="{{ showAddTask ? 'Shut' : 'Add' }}"
    (btnClick)="toggleAddTask()"
  ></app-button>
</header>
The button accepts a btnClick handler and the toggleAddTask methodology is accountable for toggling the shape’s visibility.
Hook as much as the service and create the toggleAddTask methodology.
Then, add the code to outline the conduct:
//language: JavaScript

import { Part, OnInit } from '@angular/core';
import { Subscription } from 'rxjs';
import { UiService } from 'src/app/companies/ui.service';

@Part({
  selector: 'app-header',
  templateUrl: './header.part.html',
  styleUrls: ['./header.component.css'],
})

export class HeaderComponent implements OnInit {
  showAddTask: boolean = false;
  subscription: Subscription;

  constructor(personal uiService: UiService) {
    this.subscription = this.uiService
      .onToggle()
      .subscribe((worth) => (this.showAddTask = worth));
  }
  ngOnInit(): void {}
  ngOnDestroy() {
    // Unsubscribe to make sure no reminiscence leaks
    this.subscription.unsubscribe();
  }
  toggleAddTask() {
    this.uiService.toggleAddTask();
  }
}
We entry the UI service containing a toggleAddTask and use that to outline a second toggleAddTask methodology, which we used within the header’s HTML.
We are able to see that there are fairly quite a few shifting elements in terms of organising performance for Angular. Let’s see how this works in React.
First, create a header part and paste within the code under.
//language: JavaScript

import Button from "../Button/Button";
import styled from "styled-components";
import { useShowFormContext } from "../../context/showFormContext";

export default perform Header() {
  const { showAddTaskForm, toggleAddTaskForm } = useShowFormContext();
  return (
    <StyledHeader>
      <h1>Process Tracker</h1>
      <Button
        bgColor={showAddTaskForm ? "pink" : "inexperienced"}
        btnClickHandler={toggleAddTaskForm}
        btnLabel={showAddTaskForm ? "Shut" : "Add"}
      />
    </StyledHeader>
  );
}
Right here, we entry the showAddTaskForm boolean and the toggleAddTaskForm features from showFormContext and use them to arrange the performance. Subsequent, we create the context.
Create the showFormContext, which can include showAddTaskForm and toggleAddTaskForm.
//language: JavaScript

import { useState, useContext, createContext } from "react";
const ShowFormContext = createContext();
export const useShowFormContext = () => useContext(ShowFormContext);

export default perform ShowFormContextProvider({ youngsters }) {
  const [showAddTaskForm, setShowAddTaskForm] = useState(false);
  const toggleAddTaskForm = () => {
    setShowAddTaskForm(!showAddTaskForm);
  };
  return (
    <ShowFormContext.Supplier worth={{ showAddTaskForm, toggleAddTaskForm }}>
      {youngsters}
    </ShowFormContext.Supplier>
  );
}
We’ve arrange the identical part with comparable options however with fewer strains of code — that’s a win for React and the simplicity it provides us.
Creating the button part
This button is to not be mistaken for the button on the shape. Relatively, it’s the button we used within the header part. Let’s begin with Angular.
Create the button’s HTML:
//language: JavaScript

<button
  class="btn"
  (click on)="onClick()"
  [ngStyle]="{ 'background-color': colour }">
  {{ textual content }}
</button>
Arrange the button’s performance:
//language: JavaScript

import { Part, OnInit, Enter, Output, EventEmitter } from '@angular/core';

@Part({
  selector: 'app-button',
  templateUrl: './button.part.html',
  styleUrls: ['./button.component.css'],
})

export class ButtonComponent implements OnInit {
  @Enter() textual content: string = '';
  @Enter() colour: string = '';
  @Output() btnClick = new EventEmitter();
  constructor() {}
  ngOnInit(): void {}
  onClick() {
    this.btnClick.emit();
  }
}
The colour and textual content of the button are dynamic, so we arrange variables for them. Moreover, the button wants to just accept a click on occasion, so we emit the btnClick.
Observe how far more advanced it’s to outline props and move dynamic knowledge to elements in Angular.
Let’s arrange the button in React and see the way it appears:
//language: JavaScript

import Styled from "styled-components";
export default perform Button({ btnLabel, bgColor, btnClickHandler }) {
  return (
    <StyledButton onClick={btnClickHandler} bgColor={bgColor}>
      {btnLabel}
    </StyledButton>
  );
}
That is all it takes! Clearly, Angular’s model of ‘props’ has a better degree of complexity.
Creating the Add Process Part
The Add Process part is the shape we use so as to add new duties. Let’s set it up in Angular.
Right here’s how we outline the HTML skeleton:
//language: JavaScript

<type *ngIf="showAddTask" class="add-form" (ngSubmit)="onSubmit()">
  <div class="form-control">
    <label for="textual content">Process</label>
    <enter
      sort="textual content"
      identify="textual content"
      [(ngModel)]="textual content"
      id="textual content"
      placeholder="Add Process"
    />
  </div>
  <div class="form-control">
    <label for="day">Day & Time</label>
    <enter
      sort="textual content"
      identify="day"
      [(ngModel)]="day"
      id="day"
      placeholder="Add Day & Time"
    />
  </div>
  <enter sort="submit" worth="Save Process" class="btn btn-block" />
</type>
Right here, we do the next:
- Outline the HTML and use Angular’s
ngModeltype directive to trace the worth of the shape fields - Conditionally render the shape with the
*ngIfdirective based mostly on the state ofshowAddTask
Make the shape interactive
Subsequent, we have to add performance to the shape by defining the variables the information shall be handed to and dealing with the shape submission:
//language: JavaScript

import { Part, OnInit, Output, EventEmitter } from '@angular/core';
import { UiService } from 'src/app/companies/ui.service';
import { Subscription } from 'rxjs';
import { Process } from 'src/app/mock-tasks';
@Part({
  selector: 'app-add-task',
  templateUrl: './add-task.part.html',
  styleUrls: ['./add-task.component.css'],
})
export class AddTaskComponent implements OnInit {
  @Output() onAddTask: EventEmitter<Process> = new EventEmitter();
  textual content: string;
  day: string;
  showAddTask: boolean;
  subscription: Subscription;
  constructor(personal uiService: UiService) {
    this.subscription = this.uiService
      .onToggle()
      .subscribe((worth) => (this.showAddTask = worth));
  }
  ngOnInit(): void {}
  ngOnDestroy() {
    // Unsubscribe to make sure no reminiscence leaks
    this.subscription.unsubscribe();
  }
  onSubmit() {
    const newTask: Process = {
      textual content: this.textual content,
      day: this.day,
    };
    this.onAddTask.emit(newTask);
    this.textual content="";
    this.day = '';
  }
}
Right here, we create the onSubmit perform, which provides new duties and clears the shape area. We additionally add the mandatory variables that may maintain the shape knowledge.
Let’s arrange the identical factor in React:
//language: JavaScript

const handleSubmit = (e) => {
  e.preventDefault();
  const formData = new FormData(e.goal);
  const knowledge = Object.fromEntries(formData);
  console.log(knowledge);
};

export default perform AddTask() {
  return (
    <StyledForm className="add-form" onSubmit={handleSubmit}>
      <div className="form-control">
        <label for="textual content">Process</label>
        <enter sort="textual content" identify="activity" id="textual content" placeholder="Add Process" />
      </div>
      <div className="form-control">
        <label for="day">Day & Time</label>
        <enter sort="textual content" identify="day" id="day" placeholder="Add Day & Time" />
      </div>
      <enter sort="submit" worth="Save Process" className="btn btn-block" />
    </StyledForm>
  );
}
Let’s break down the code above:
- First, we outline the HTML
- Subsequent, we arrange the
handleSubmitperform, which leverages the FormData constructor to entry the shape’s knowledge
Creating the duty merchandise and activity elements
The duty merchandise part is every activity that’s carried out. It accommodates the duty’s title, date, and a button for deleting the duty.
Let’s set it up in Angular:
//language: JavaScript

<div class="activity">
  <h3>
    {{ activity.textual content }}
    <fa-icon
      [icon]="faTimes"
      [ngStyle]="{ colour: 'pink' }"
      (click on)="onDelete(activity)"
    ></fa-icon>
  </h3>
  <p>{{ activity.day }}</p>
</div>
We have to create the onDelete methodology that we handed to the icon.
//language: JavaScript

import { Part, OnInit, Enter, Output, EventEmitter } from '@angular/core';
import { Process } from 'src/app/mock-tasks';
import { faTimes } from '@fortawesome/free-solid-svg-icons';

@Part({
  selector: 'app-task-item',
  templateUrl: './task-item.part.html',
  styleUrls: ['./task-item.component.css'],
})

export class TaskItemComponent implements OnInit {
  @Enter() activity: Process;
  faTimes = faTimes;
  @Output() onDeleteTask = new EventEmitter<Process>();
  constructor() {}
  ngOnInit(): void {}
  onDelete(activity: Process) {
    this.onDeleteTask.emit(activity);
  }
}
Right here, we outline the onDelete methodology and use that to omit the onDeleteTask methodology, so the Process Merchandise’s mum or dad can catch the delete occasion and take away the duty.
Let’s create the Duties part to see what that appears like.
//language: JavaScript

<app-add-task (onAddTask)="addTask($occasion)"></app-add-task>
<app-task-item
  *ngFor="let activity of duties"
  [task]="activity"
  (onDeleteTask)="deleteTask(activity)"
></app-task-item>
Right here, we outline the HTML for the Duties part. There, we loop by means of the array of duties and render every activity within the Process Merchandise part.
Then, we catch the onDeleteTask delete occasion from the Process part and use that to arrange the duty deletion performance. We additionally do the identical factor for the Add Process part and the onAddTask occasion.
Lastly, we make the most of the performance of the Duties service:
//language: JavaScript

import { Part, OnInit } from '@angular/core';
import { Process } from 'src/app/mock-tasks';
import { TaskService } from 'src/app/companies/activity.service';

@Part({
  selector: 'app-tasks',
  templateUrl: './duties.part.html',
  styleUrls: ['./tasks.component.css'],
})

export class TasksComponent implements OnInit {
  duties: Process[] = [];
  constructor(personal taskService: TaskService) {}
  ngOnInit(): void {
    this.taskService.getTasks().subscribe((duties) => (this.duties = duties));
  }
  deleteTask(activity: Process) {
    this.taskService
      .deleteTask(activity)
      .subscribe(
        () => (this.duties = this.duties.filter((t) => t.id !== activity.id))
      );
  }
  addTask(activity: Process) {
    this.taskService
      .addTask(activity)
      .subscribe((activity) => this.duties.unshift(activity));
  }
}
Right here, we entry the addTask and deleteTask features from the service and use them to create one other set of addTask and deleteTask strategies that we used within the Duties and Process Merchandise elements.
Then, we fetched the listing of duties from the mock API utilizing the getTasks perform.
That’s it for Angular! Now, let’s migrate the Duties and Process Merchandise performance to React, beginning with Process Merchandise:
//language: JavaScript

export default perform TaskItem({ activity, duties, setTasks }) {
  const deleteTask = () => {
    let newTasks;
    fetch(`http://localhost:5000/duties/${activity.id}`, {
      methodology: "DELETE",
    })
      .then((newTasks = duties.filter((t) => t.id !== activity.id)))
      .then(setTasks(newTasks));
    console.log("pink");
  };
  return (
    <Container className="activity">
      <h3>
        {activity.textual content} <DeleteIcon const deleteTask={deleteTask} />
      </h3>
      <p>{activity.day}</p>
    </Container>
  );
}

perform DeleteIcon({ deleteTask }) {
  return (
    <svg
      onClick={deleteTask}
    >
      <path d=""></path>
    </svg>
  );
}
Right here, we outlined a deleteTask perform and handed it to the icon. Then we additionally rendered the information for the duty.
For the Duties part:
//language: JavaScript

import AddTask from "../AddTask/AddTask";
import TaskItem from "../TaskItem/TaskItem";
import { useShowFormContext } from "../../context/showFormContext";
import { useState, useEffect } from "react";

export default perform Duties() {
  const [tasks, setTasks] = useState(null);
  const { showAddTaskForm } = useShowFormContext();

  useEffect(() => {
    fetch("http://localhost:5000/duties")
      .then((res) => res.json())
      .then((knowledge) => setTasks(knowledge));
  }, []);

  return (
    <>
      {showAddTaskForm && <AddTask />}
      {duties
        ? duties.map((activity) => (
            <TaskItem
              key={activity.id}
              activity={activity}
              duties={duties}
              setTasks={setTasks}
            />
          ))
        : null}
    </>
  );
}
Right here, we did the next:
- Fetched the duties from the mock API
- Toggled the visibility of the shape based mostly on the worth of
showAddTaskForm - Rendered the listing of duties
With that, we’ve efficiently transformed a primary activity tracker app from Angular to React.
Nevertheless, be aware that this was a primary venture and that migration shall be extra advanced when coping with Angular apps with a number of companies, difficult state administration, and lots of pages and options — however the precept stays the identical.
Insights from the conversion course of
- Whereas Angular and React are each nice frontend frameworks, the previous is extra advanced than the latter
- On common, it takes considerably extra strains of code to create a function in Angular than it does in React
- General, changing elements from Angular to React leads to fewer strains of code and makes issues easier and quicker. This improves app efficiency and gives a greater upkeep and developer expertise shifting ahead
Conclusion
Migrating could be a relatively daunting activity that takes plenty of effort, time, planning, and improvement to make sure it goes easily with out compromising upkeep and improvement pace. You will need to take into account the professionals and cons earlier than migrating.
Whereas there are lots of advantages of changing with a complete rewrite, it isn’t at all times doable as a result of the vast majority of firms don’t have the time or sources to decide to this methodology. In such instances, we will leverage instruments that automate a big chunk of the migration course of, corresponding to ngReact, react2angular, and angular2react.
I hope you discovered this explainer and tutorial article helpful — you may get the complete supply code for the Angular and React app from this repo.
Full visibility into manufacturing React apps
Debugging React functions might be tough, particularly when customers expertise points which are exhausting to breed. When you’re concerned with monitoring and monitoring Redux state, routinely surfacing JavaScript errors, and monitoring sluggish community requests and part load time, attempt LogRocket. 

LogRocket is sort of a DVR for internet and cellular apps, recording actually every part that occurs in your React app. As an alternative of guessing why issues occur, you possibly can mixture and report on what state your software was in when a difficulty occurred. LogRocket additionally screens your app’s efficiency, reporting with metrics like shopper CPU load, shopper reminiscence utilization, and extra.
The LogRocket Redux middleware package deal provides an additional layer of visibility into your person periods. LogRocket logs all actions and state out of your Redux shops.
Modernize the way you debug your React apps — begin monitoring without cost.
