
A number of months in the past, macOS Mojave will get launched to the delight of many Mac customers. It comes with an interface overhaul that must be initiated by the consumer, involving the favored Darkish Mode. New options additionally embrace the Desktop Stacks, the reinvented Finder, and the brand new Gallery view, to call a couple of.
So far as points go, nevertheless, a Mojave improve isn’t actually resistant to Mac errors. One difficulty that retains bugging a variety of customers is when their MacBook Professional randomly goes again to the login display screen. Right here’s a particular case that demonstrates this downside.
A consumer updates his MacBook Professional to Mojave the day before today. After the set up course of, he clicks on a consumer and tries to log in. Inside simply 30 seconds, the display screen sparkles, taking him again to the login display screen.
The glitch occurs for all accounts on his machine. He has tried repairing the disk in addition to exhausting all different restore processes. However the error manages to persist on his laptop computer, which admittedly is an previous one however ought to nonetheless work pretty effectively.
In different circumstances, the Mac retains going to sleep or login display screen a number of instances a day regardless that the consumer is engaged on it and both looking or typing. The lid is saved open and there’s exercise on the pc when the system goes again to the login display screen, which could be very comparable once you press the Command + Shift + Energy buttons.
This usually occurs shortly after the consumer has logged in for a couple of minutes. For example, the consumer logs in within the morning to begin work and some seconds later, the display screen is locked out. When the consumer tries to log again in, he’s once more locked out after a couple of seconds.
In some circumstances, the screensaver randomly activates with none discover. Tapping the contact ID often toggles between the screensaver and the login display screen, however doing so doesn’t unlock the pc. Even when the password has been typed in, the pc will simply go from the login display screen again to the screensaver. This has brought about countless frustration to the affected customers and there are only a few references to this difficulty on-line.
Let’s unravel issues with this fast article.
Why Does My Mac Hold Going to the Lock Display screen?
One doable motive why your Mac locks the display screen robotically is that you’ve got arrange a Scorching Nook that shortly prompts the display screen saver once you depart your pc. To test whether or not that is the case, click on System Preferences from the Apple menu, then go to Desktop & Display screen Saver. Click on on Display screen Saver, after which select Scorching Corners.
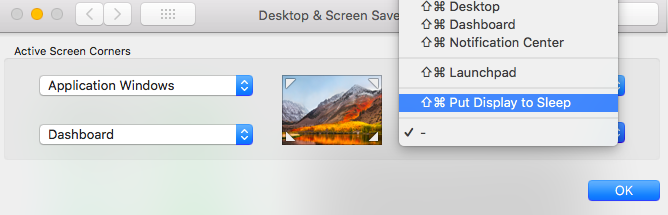
Click on the listing subsequent to the nook of the display screen to see if any of the corners are set to “Put Show to Sleep.” Whether it is, take away it from the Scorching Corners listing to repair the error.
One other doable motive is that your Mac’s Power Saver characteristic is just not configured appropriately. In case your Power Saver characteristic is just not arrange correctly, it may well trigger your Mac to fall asleep randomly. To test, click on Apple menu > System Preferences, then select Power Saver.
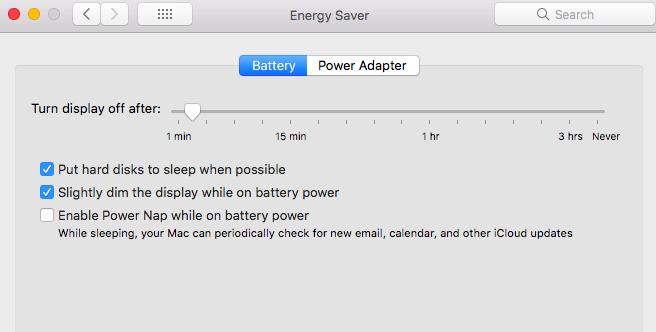
Modify a number of of the next settings when your Mac goes to sleep. Remember the fact that a few of these controls won’t be obtainable in your Mac.
- “Flip show off after”
- “Show sleep”
- “Laptop sleep”
If a slider is about to By no means, sleep is disabled for that characteristic.
You additionally must be sure that there aren’t any magnets close to your Mac as a result of magnets can intervene together with your working system and put it to sleep.
MacBook Professional Goes Again to Login Display screen Randomly
The problem right here is that there seems to be no clear sample or set off for the misbehavior. The pc appears to return to login display screen randomly and with none precise motive to take action, aside from it occurs following a Mojave replace.
We’ve related with our in-house consultants and scraped the net for viable options to this post-Mojave replace difficulty. Earlier than performing these fixes, although, attempt to test all the pieces out of your {hardware} connections to your system’s stability by way of operating a Mac restore software that you just belief. Generally, junk information which have gathered over time can intervene with regular methods and processes, in flip ruining your Mac’s efficiency.
In case your MacBook nonetheless randomly goes again to the login display screen, strive these options:
Making Primary Checks on Your MacBook
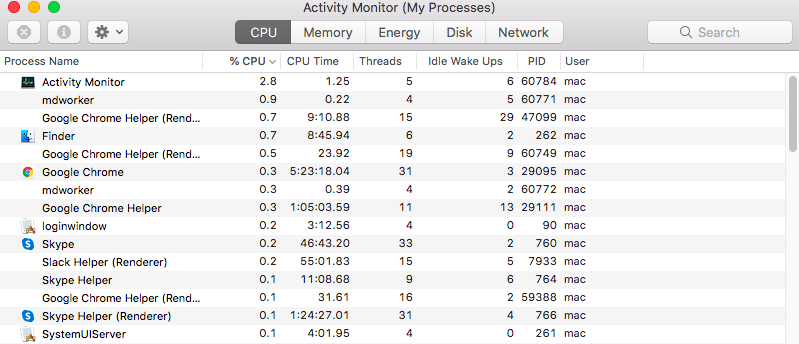
You’ll be able to attempt to obtain iStat Professional and test in your precise RAM utilization. It is suggested that you just test how full your onerous drive is, as chances are you’ll already be utilizing up your RAM. Because of this, your onerous drive might have inadequate house to create sufficient digital reminiscence.
Make certain, too, that your laptop computer is just not overheating. This will occur when you are enjoying movies, gaming, or engaged on intensive processes for an extended time period. Rule out this motive for why your laptop computer is crashing and randomly returning to the login display screen.
Boot into Protected Mode
Earlier than you strive the rest, it is advisable discover out whether or not the issue is attributable to conflicts with third-party software program. And you are able to do this by booting right into a Protected Mode surroundings. Simply press the Shift key once you restart as well into Protected Mode. Once you do that, all non-Apple elements might be loaded so you possibly can test whether or not the error is triggered by exterior components.
When you’ve booted into Protected Mode, observe your Macbook Professional whether it is nonetheless going to sleep randomly. If it does, proceed to the following step.
Making a New Person Account
If it seems that the issue is happening because of your consumer account, then you definately would possibly need to contemplate creating a brand new one. Sign off of your current consumer profile after which log again in with the brand new one, checking if the problem is lastly resolved.
Add a consumer by following these steps:
- In your Mac, click on Apple menu > System Preferences. Subsequent, proceed to Customers & Teams.
- Click on the lock icon as a way to unlock it. Enter an administrator title in addition to password.
- Afterwards, click on the Add button situated beneath the listing of customers.
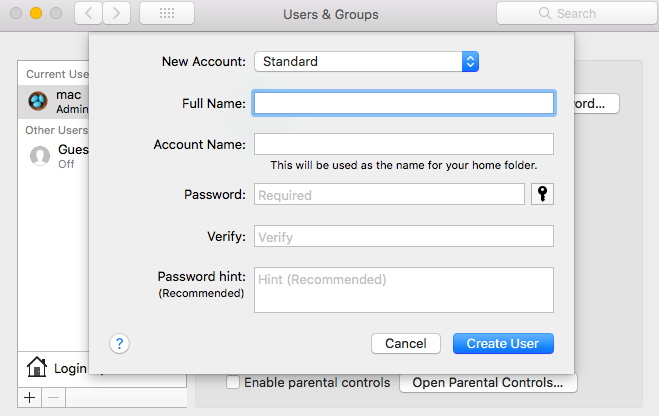
- Click on the New Account pop-up menu. From right here, choose a sort of consumer. An Administrator can add and handle different customers, set up apps, and alter settings. A Normal consumer is about up by an administrator, whereas customers with Managed with Parental Controls sort can entry solely the content material specified by the admin. Sharing Solely customers, then again, can entry shared information remotely, however they can’t log in to or change settings.
- Enter a full title for the brand new consumer. Then, an account title is robotically generated. Use a distinct account title by coming into it now. Word that you just can not change this later.
- Enter a password for the consumer. Re-enter it to confirm. Enter a password trace as effectively.
- Hit Create Person.
- Relying on the kind of consumer you create, you possibly can carry out totally different steps. For an administrator, select Enable consumer to manage this pc. For a managed consumer, select Allow parental controls.
Performing an SMS and PRAM/NVRAM Reset
System Administration Controller (SMC) is a chip embedded in Intel-based Mac units. It’s chargeable for the workings of most Mac components, together with keyboard and peripherals. It additionally figures within the operation of your onerous drive and energy provide. Reset the SMC of your MacBook with these steps:
MacBooks with Apple T2 safety chip:
- Shut down your laptop computer.
- Press and maintain the Energy button for some 10 seconds. Restart afterwards. In case you are having bother upon startup, change off your machine once more.
- Press and maintain the Energy + Shift + left Management + left Possibility keys for a couple of seconds.
- Launch all of the keys and wait a couple of extra seconds.
- Reboot your MacBook.
MacBooks with non-removable battery:
- Shut down your laptop computer.
- Press and maintain the left Possibility + Management + Shift keys whilst you press the Energy button for round 10 seconds.
- Launch all of the keys without delay and look forward to a variety of seconds.
- Swap in your MacBook.
MacBook launched earlier than 2015:
- Shut down your laptop computer.
- Take away the battery.
- Press and maintain Energy for 15 to twenty seconds.
- Put again the battery once more.
- Swap in your MacBook.
Older Mac fashions have Parameter Random Entry Reminiscence (PRAM), whereas fashionable Intel-based ones have Non-Unstable Random Entry Reminiscence (NVRAM). You’ll be able to reset your PRAM or NVRAM when there are software-related points, the pc forgot particular settings, or there are connectivity issues.
Observe these directions to reset the PRAM or NVRAM:
- Flip off your MacBook.
- Press Energy.
- Earlier than reaching the gray display screen, press the R + P + Command + Possibility keys all of sudden. Maintain them down till the pc restarts and also you hear the startup sound.
- Launch the keys collectively.
Utilizing Terminal
This technique comes instantly from Apple help, with steerage from their engineers. Listed below are the steps to comply with carefully:
- Boot into Restoration. Do that by holding the Command + R keys down and turning in your pc.
- Open Disk Utility. Subsequent, select the startup quantity.
- Be aware of the title of the quantity, which is often Macintosh HD. If the title is dimmed, hit the Mount button. Enter the password of a consumer who can unlock the disk.
- Be aware of the quantity that’s proven subsequent to Out there.
- It’s time to stop Disk Utility.
- Subsequent, select Utilities > Terminal. Substitute the bolded onerous drive title with the title your drive is known as. Enter this command: cd “/Volumes/Macintosh HD/Library/Audio/Plug-Ins/HAL”
- If this command will get accepted, enter this on the following line: mv *.plugin ..
- It the system takes the command, stop Terminal.
- Reboot your pc in regular mode and log in as regular.
Rename the .Plist Recordsdata
Generally preferences information get corrupted and trigger your Mac to fall asleep randomly or kick you again to the login display screen. You’ll be able to simply repair this by renaming the plist information to reset them. Do not forget that you could boot your machine in Protected Mode and log in utilizing your admin account to repair this.
Observe the steps beneath:
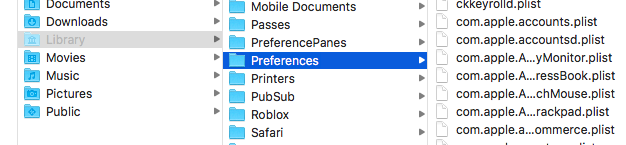
- Open Finder and click on on Go within the menu bar.
- Press the Possibility key to disclose the Library menu.
- Click on on Library to open the folder.
- Launch Terminal.
- Sort in sudo mv and drag the Preferences folder from the Library folder on to the open Terminal window.
- Rename the Choice folder. For instance: sudo mv /Customers/yourname/Library/Preferences to /Customers/yourname/Paperwork/Preferences-Outdated
- Reboot your Mac.
Boot your Mac into macOS Restoration Mode
The macOS Restoration Mode is a vital a part of the built-in restoration system of your Mac. You’ll be able to boot from macOS Restoration and make the most of its utilities to get better from particular software program points or carry out different operations in your Mac. As well into macOS Restoration Mode, comply with the steps beneath:
- Press after which maintain the ability button till your Mac turns off.
- Reboot your Mac and instantly maintain down the Command + R keys.
- Launch each keys once you see the loading bar.
- Anticipate the macOS Utilities display screen to pop up.
There are a number of operations you are able to do in macOS Restoration Mode when your Mac goes again randomly to the login display screen. One of many issues you are able to do is to restore the corrupted startup disk, in case your login downside is said to your onerous drive.
It’s doable that you’re all the time logged out and introduced again to the login display screen because of disk corruption. As soon as your startup disk is broken, a number of the capabilities received’t load usually. To repair the broken drive, it’s a must to use Mac’s built-in helper within the macOS Utilities window, the Disk Utility. The looks is likely to be totally different in OS X and mac OS, however the capabilities are the identical. Right here’s how you need to use it:
- Select Disk Utility from the macOS Utilities window, then click on Proceed.
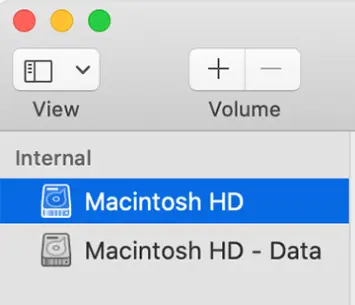
- Click on on View and choose Present All Units to listing all detected drives and volumes.
- Choose Macintosh HD, which is the startup disk within the left sidebar.
- Click on First Assist on the highest menu of Disk Utility.
- Click on on Run to test and restore errors on this drive.
- As soon as the drive is fastened, you might be good to go.
Other than fixing the corrupted disk, there are different issues you are able to do inside the macOS Restoration utility to repair Mac going again to the login display screen. For example, you possibly can reset the password, reset the launch providers database, test and repair consumer desire settings, and even reinstall the mac OS to make your pc work once more.
Disable the Razer plugin
Some Mac customers discovered that disabling the Razer plugin helped in stopping the error from displaying. So, it’s positively one thing you possibly can contemplate doing, too.
Observe these steps:
- Press the Command + R buttons concurrently whereas your Mac is booting into Restoration Mode.
- Then go to Utilities and choose Terminal.
- Navigate to the Volumes part and choose Macintosh HD.
- After that, go to this location: /Library/Audio/Plug-Ins/HAL/.
- Lastly, take away the Razer plugin and see if the error has been resolved.
This repair goals to bypass any login merchandise in your profile which may be inflicting issues and bringing you to the login display screen at random. Right here’s how:
- Flip in your MacBook as you usually would.
- On the login display screen, enter your Mac account password. However don’t enter the Login button but.
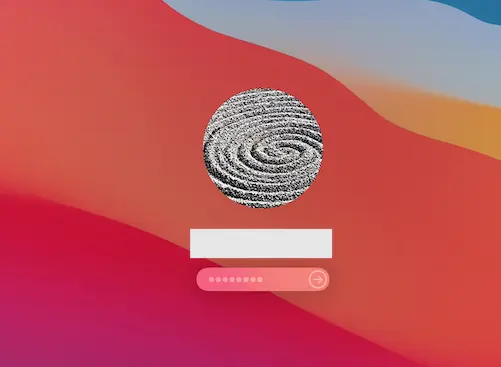
- Press and maintain the Shift key in your keyboard whereas urgent the Login button.
- See if this has resolved the problems in your Mac.
Create a consumer account within the Single Person Mode
Do you might have one other Mac admin account? Then you need to use it to repair your Mac downside. However when you’ve got no further admin account, right here’s how one can create a brand new account even when you are locked out:
- Swap off your Mac machine by urgent the Energy button.
- Whereas beginning, press and maintain the Command + S buttons to enter the Single Person Mode.
- At this level, a sequence of codes begins to point out. Then a Command Immediate will seem with the road: /root#.
- Subsequent, acquire entry to your information by typing this command: /sbin/mount -uw /
- Hit the Enter key.
- The command will then take away a sure file in your Mac, making your system consider it’s the very first time you logged in.
- Then enter this line beneath: rm /var/db/.applesetupdone/
- Press the Enter button.
- Then sort reboot and press Enter.
- Now you can create a brand new account and use it to entry your information and system.
Reinstall macOS
If all else fails, attempt to reinstall macOS in your machine. It might be the case of a problematic working system that’s inflicting you to travel to the login display screen.
Nevertheless, earlier than you reinstall your macOS, be sure you know what to do. You don’t need to do issues by yourself solely to seek out that you’ve got made the issue worse. In case you are not sure concerning the steps that you’re taking, don’t hesitate to hunt assist from Mac consultants on the right way to reinstall macOS appropriately.
And if you’re frightened, reinstalling your macOS received’t really delete your knowledge. So, you possibly can proceed with warning.
To reinstall macOS, right here’s what to do:
- Go to Utilities and choose macOS Restoration.
- Choose Proceed and comply with the on-screen prompts.
- You ought to be notified as soon as the reinstallation has been profitable.
Please be aware of the next to keep away from issues whereas reinstalling:
- In case you are requested to unlock your disk, enter your administrator password.
- If the installer can not detect your disk, you’ll have to erase your disk first.
- If the installer helps you to select between Macintosh HD or Macintosh HD – Information, then choose Macintosh HD.
- Make certain to let the set up course of full first earlier than shutting it down or closing its lid.
- Through the course of, your machine will restart now and again. So, chill out.
Closing Notes
It may be extremely disruptive on your MacBook Professional to randomly return to the login display screen following a Mojave replace. Because it’s onerous to determine how lengthy this difficulty will final and what’s really inflicting it, the options above are value a strive. Don’t assume twice about getting assist from Apple help if the problem persists!

Vic is a SEO professional, serving to to optimize web sites to make them extra user-friendly. He’s been within the business for greater than 10 years, and his work speaks so much about his expertise and experience within the IT and digital advertising and marketing fields.
Vic is the one in command of preserving our web site operating easily and effectively, to be sure that our readers have an exquisite expertise whereas visiting the web site. He’s good at troubleshooting errors and fixing Home windows points that come up both when enjoying video games or engaged on the pc.
Vic is an authorized gadget freak who feels the necessity to encompass himself with cutting-edge expertise. And this ardour has helped him so much in creating content material that informs and guides customers on utilizing and troubleshooting the most recent expertise. He’s an avid researcher who’s all the time hungry for the most recent information and updates on essentially the most cutting-edge expertise.
