Fairies are legendary creatures that take many various varieties in several cultures. In some they’re described as mischievous human-like spirits, and in others they’re merely a distinct species with magical powers. Within the modern-day, fairies are normally pictured as tiny people with insect wings, dwelling in a detailed relationship with nature.
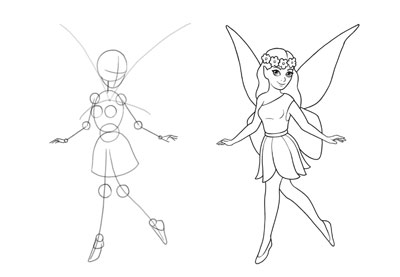
On this tutorial, I will present you ways to attract a fairy step-by-step. Drawing fairies could be very simple when you discover ways to seize the proportions of the physique! You will additionally discover ways to draw simple fairy wings, and methods to end the drawing to make the road artwork good and clear.
Should you want some inspiration on your fairy wings drawing, you may try the butterfly logos on Envato Parts! For instance, this easy butterfly brand exhibits you how one can obtain a surprising impact with quite simple shapes. in case you want extra inspiration, yow will discover extra brand examples on the finish of this tutorial.


What You will Study in This Straightforward Fairy Drawing Tutorial
- How to attract a fairy step-by-step
- How to attract a fairy the straightforward approach
- How to attract simple fairy wings
- How to attract a fairy in a cartoon model
- The best way to create a simple fairy drawing from scratch
What You Will Want
We will draw a fairy step-by-step from scratch, so you do not want something. Nonetheless, you should use this photograph of a ballerina as a pose reference.
This tutorial is common—you should use it for each conventional and digital drawing. Should you plan to attract historically, keep in mind to make the sketch strains mild and refined in an effort to erase them later. Additionally, put together a darker device (an ink liner, a softer pencil, and so forth) for the inking stage on the finish.
1. The best way to Create the Physique Proportions for an Straightforward Fairy Drawing
Step 1
Wish to understand how to attract a fairy the straightforward approach? The reply is to begin with easy, cartoon proportions.
Draw a vertical oval—this would be the chest of our fairy.


Step 2
Add a small circle under. This can mark the waist.


Step 3
Add a bell form proper underneath the chest. This would be the backside of the gown. Tilt it barely for a extra dynamic pose.


Step 4
Draw lengthy curves for the legs.


Step 5
Draw a circle at both sides of the chest to create the form of the shoulders. Then draw two strains going from that space—these are the higher arms. The ends of the higher arms (the elbows) ought to level in the direction of the waist. This can assist you to get the size proper.


Step 6
Add a circle to every elbow, after which draw the forearms—roughly the size of the arms. Finish them with little circles for the wrists.


Step 7
Add the joints within the legs now—huge circles for the knees, and smaller circles for the ankles.


Step 8
Add the neck and a really huge circle for the top. Such a giant head is typical for the cartoon model.


Step 9
Mark the angle of the face utilizing a curved cross. Add the jawline under.


Step 10
Draw two circles on the chest to shortly mark the form of the breast.


If you wish to study extra about drawing cartoon feminine proportions that you can use on your fairy drawings, try this tutorial:
2. The best way to Add Particulars to the Straightforward Fairy Drawing
Step 1
Let’s add the smaller elements of the physique now. Draw the ft, ranging from the heel.


Step 2
Add the essential “skeleton” of the arms. Artists usually discover arms very arduous to attract, so I made this pose so simple as potential—simply begin with a protracted line for one finger, and a shorter line under for the thumb.


Step 3
Join the thumb to the lengthy finger with a curve. This can assist us distinguish the outer aspect of the hand from the internal aspect.


Step 4
Add two different fingers now, beginning someplace behind that first finger.


Step 5
Draw a curve alongside the waist for the belt, and mark its sides.


Step 6
Fairies usually put on flowery clothes. Create curves for the petals this gown shall be made from.


Step 7
Placing the eyes within the appropriate place is extraordinarily necessary—people are excellent at recognizing incorrect proportions in the case of faces! So here is a trick you should use: place one eyeball proper on the fringe of the top…


…. then draw three different eyeballs ranging from there. They need to barely overlap one another (that is what occurs if you rotate a row of spheres in perspective).


Step 8
Add the opposite facial options now: the nostril, the curve of the mouth, and the ear. Maintain them quite simple.


You may study extra about drawing facial options in a Disney-like model on this tutorial:
Step 9
Add part of an ellipse across the head to arrange the place for the flower crown.


3. The best way to Draw a Fairy’s Physique the Straightforward Method
Step 1
Let’s end the physique now. Take into account that we’re nonetheless within the sketching part!
Draw the person petals making up the underside of the gown. Give every of them a barely completely different form.


Step 2
Let’s draw the legs now. To realize the proper form, make certain to attract all these curves individually:


Step 3
Add easy sneakers masking the ft. This manner, we cannot have to attract the toes!


Step 4
Define the arms and forearms simply as you probably did with the legs—utilizing the joints as reference factors.


Step 5
Define the chest now, ending the form of the gown and creating the curve of the shoulders and neck.


Step 6
Add the detailed form to the arms now. Attempt to hold them easy, in order that they match the model of the remainder of the drawing. Draw the thumb…


… the joint of the primary finger…


… after which the remainder of the fingers.


Step 7
The eyes would be the most detailed a part of the drawing, so listen! First, draw the curves round them, marking the form of the higher and decrease eyelid. It is best to purpose for a particular almond form.


Step 8
Draw the spherical iris inside every eye. It ought to be in the identical place in every eye, even when this implies part of it is going to land outdoors of the principle define.


Step 9
Add the pupil within the heart of the iris. Don’t fret if these eyes appear a little bit creepy now—we are going to repair it later with some shading.


Step 10
Mark the shine dots (the highlights) within the higher left nook. This can inform us which half must be left unshaded.


Step 11
Add easy eyelashes, and add extra particulars to the facial options.


Step 12
Draw the flowers within the flower crown. Maintain them easy!


Step 13
Draw the define of the flowing hair.


4. The best way to Draw Straightforward Fairy Wings
Step 1
Now I will present you methods to create a easy fairy wings drawing.
Draw an “X” with lengthy higher arms and brief decrease ones. Make these arms barely curved.


Step 2
Add one other set of easy curves, as in case you had been making an attempt to attract a quite simple butterfly within the again.


Step 3
Shut the form of the wings now with one other set of curves.


If you wish to discover ways to draw fairy wings in all shapes and colours, you should use actual butterflies as your reference. These tutorials shall be very useful for this objective:
5. The best way to End Your Straightforward Fairy Drawing
Step 1
The sketch is finished, so now you can swap to a darker device (or a brand new layer, in case you’re drawing digitally). All of the strains we’ll be drawing to any extent further shall be ultimate!
Draw over the strains that you just wish to hold within the ultimate picture. Add a little bit little bit of shading to the eyes: make the pupils and the eyelashes black, and the irises grey.


Step 2
To make the road artwork look extra attention-grabbing, it is good so as to add some selection to the strains. You may obtain that by thickening a few of them, particularly within the areas the place two of the strains meet.


Step 3
Repeat this course of yet one more time, giving a few of the strains much more quantity.


Step 4
The drawing is finished! Should you’re drawing digitally, now you can take away the sketch layers, and in case you’re drawing historically, erase the sketch strains.


Good Job!
Now you know the way to attract a fairy step-by-step, and the way to attract fairy wings the straightforward approach!


Fairy Wing Brand Inspiration From Envato Parts
Drawing fairies could be enjoyable, however generally you could run out of inspiration for the wings. So listed below are a few logos from Envato Parts that you should use!
Butterfly Gradient Brand [AI, EPS, JPG, PNG, PSD]


These colourful wings would look fabulous on any fairy! Their crystal look offers a magical feeling to them, and the colours complement one another properly.
Cosmic Vibes Pre-Made Model Brand Design [AI, PSD]


Are you searching for one thing extra refined and mystical? These delicate wings have a mysterious sample on them, which brings an evening sky to thoughts.
Butterfly Luxurious Brand [AI, EPS, PDF, PNG, PSD]


How about one thing easy, but elegant? These wings have a really clear form, and the refined gradient shading provides an additional stage of element.
The Butterfly Badge Brand Template [AI, EPS, PDF]


Moths and butterflies belong to the identical household, so if you wish to make your fairy distinctive, why not give her a pair of moth wings? The wings on this brand have a easy form, however their colours make them very hanging.
Butterfly Brand Circle [AI]


This is one other instance of easy and stylish wings in a basic butterfly form. You may add extra particulars to them, or depart them of their full minimalistic glory!
Advisable Drawing Tutorials
Should you appreciated this tutorial, now we have extra drawing content material for you!
