
On this article, we’ll concentrate on testing the interactions of our parts whereas utilizing React 18 and Storybook. Earlier than we get began, it’s possible you’ll wish to learn this introductory article from Chak Shun Yu that explores React 18’s new APIs, and the weblog put up saying of React 18, which gives in-depth perception into the brand new, opt-in concurrent rendering capabilities of React 18.
What’s interplay testing?
Interplay testing includes testing interactions inside React parts. These checks simulate consumer actions inside the software, similar to interacting with the parts by clicking buttons or typing into enter parts, and the habits of the appliance after such interactions.
In fashionable functions, parts maintain much more duty than they as soon as did as a result of builders have begun together with issues like information fetching operations and state administration instruments inside parts. With interplay checks, we are able to confirm the practical features of our software’s consumer interface extra successfully.
How does Storybook assist with interplay testing?
Storybook is an open supply software that allows you to construct UI parts and pages in isolation. It means that you can construct documentation for parts, which permits simple reuse of parts and permits them to be examined visually, which helps forestall bugs.
To get began with Storybook, we have to run the Storybook CLI in an current challenge’s root listing. On this case, our challenge is a React software, created utilizing Create React App.
Run the instructions under, to bootstrap the React software and add a narrative.
Create the React software:
npx create-react-app reactstorybook -template typescript
yarn begin
Open up one other terminal window and initialize Storybook in our challenge’s root listing.
npx storybook init
yarn storybook
As soon as the initialization is finished, Storybook ought to begin domestically and output an tackle. Relying in your laptop’s configuration, the Storybook surroundings might open mechanically within the browser.

Extra nice articles from LogRocket:
A narrative is a element that accepts a set of arguments, which describe easy methods to render the element. It primarily captures the rendered state of a UI element.
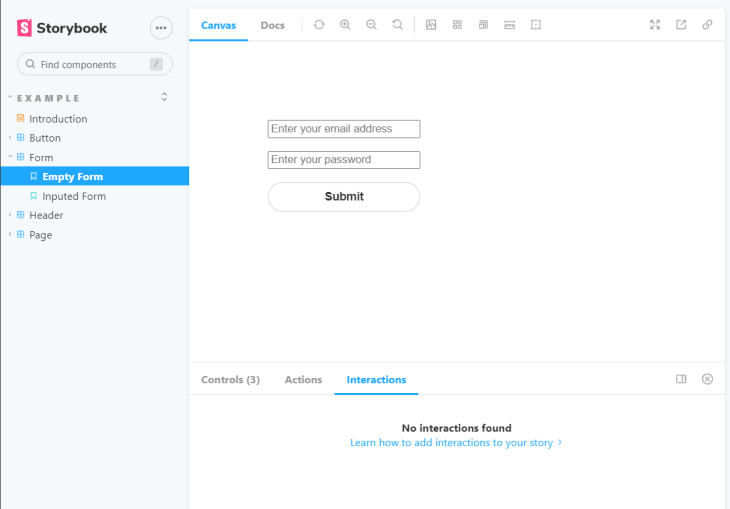
After initializing Storybook in our Create React App, Storybook creates instance parts that show the kind of parts that may be constructed with Storybook, i.e., button, header, and web page.
The instance parts define how Storybook manages state for various tales. The tales for the button element proven on Storybook UI may be present in our code editor.
Within the root listing of the React software, open the terminal window and enter the next command to view the code for the Button element and its tales.
code src/tales/Button.tales.tsx
code src/tales/Button.tsx
One key significance of tales from Storybook is to allow the developer to maintain observe of how the UI appears as modifications are made. This helps forestall unintended regressions, which Timothy Vernon talks extra about in his put up, which gives builders with testing methods for coping with visible regressions utilizing Jest.
Strategies of testing parts in Storybook
Storybook gives an surroundings for testing parts in isolation. It’s necessary to check the tales which were written as a result of it helps forestall UI bugs over time.
Storybook comes with quite a lot of instruments that allow testing the UI, mocking information or dependencies, and even mocking community requests. The check runner is certainly one of such instruments. It permits builders to mechanically check a whole Storybook and catch damaged tales.
There are numerous testing strategies out there to builders when utilizing Storybook for testing.
Visible regression checks
Visible regression checks help in catching bugs in UI look. It really works by taking screenshots of each story and evaluating them to determine modifications. Storybook is nice for working visible checks, as each story is a check specification.
Visible regression checks shouldn’t be confused with snapshot checks, as a result of snapshots work by evaluating the rendered markup of each story in opposition to identified baselines. Snapshot checks aren’t as correct as visible regression checks as a result of they examine blobs of HTML as a substitute of what’s exhibited to the consumer. This may result in false positives, as code modifications don’t yield visible modifications.
Accessibility checks
High quality assurance professionals depend on accessibility checks to catch accessibility variations which were dedicated throughout software improvement. Accessibility checks depend on the Net Content material Accessibility Pointers (WCAG) guidelines to audit the rendered DOM. If the weather within the rendered DOM aren’t consistent with WCAG guidelines, accessibility violations are thrown.
Storybook gives a really useful software for testing for accessibility in an software with the a11y add-on.
The best way to carry out interplay testing in React 18 with Storybook
Now, it’s time to have a look at how interplay testing works in terms of Storybook and React 18.
As beforehand acknowledged, interplay testing checks interactions with React parts. In interplay checks, the purpose is to fake to be the consumer, which includes actions similar to typing and clicking buttons, and ensuring that the anticipated output is obtained.
The primary purpose of a React element is to render the UI given a set of props, however there are additionally advanced parts that observe software state.
The play perform included in model 6.4 of Storybook executes a narrative as soon as it’s loaded. The play perform is vital to testing our parts; with the play perform, you allow the flexibility to simulate a consumer’s habits. The check runner can then be used to substantiate that the element renders appropriately and test that the interplay checks with the play perform move.
There are two key packages you’ll want to put in for this to work:
Opening up the terminal within the root listing of our challenge, set up the listed packages.
yarn add -dev @storybook/testing-library @storybook/jest @storybook/test-runner [email protected]
Should you’re utilizing an older model of Storybook, test your package deal.json to substantiate that the package deal @storybook/addon-interactions is accessible in devDependencies. If it isn’t, set up the package deal with the --dev flag, as it’s integral to organising interplay checks in Storybook.
The best way to replace your Storybook configuration with the interactions add-on
module.exports = {
  tales: ["../src/**/*.stories.mdx", "../src/**/*[email protected](js|jsx|ts|tsx)"],
  addons: [
    "@storybook/addon-links",
    "@storybook/addon-essentials",
    "@storybook/addon-interactions", // Addon has to be registered
    "@storybook/preset-create-react-app",
  ],
  options: {
    interactionsDebugger: true, // allow playback controls
  },
  framework: "@storybook/react",
  core: {
    builder: "@storybook/builder-webpack5",
  },
};
Creating an interplay check with Storybook and the play perform
The play perform holds the logic for the check and is related to the story we wish to check. Let’s have a look at easy methods to arrange an interplay check with Storybook and the play perform.
We depend on the @storybook/testing-library and @storybook/jest packages to assist with this.
Create a Storybook element
So as to expertise what’s occurring behind the scenes, we’ll create a type element with two states:
- One state the place the shape has no inputs
- One state dealt with by the
playperform to fill within the inputs utilizing interactions
Within the tales listing, create the recordsdata Kind.tsx and Kind.tales.tsx.
contact src/tales/Kind.tsx
contact src/tales/type.css
contact src/tales/Kind.tales.tsx
Kind.tsx is our first element. In that file, paste the next code:
import React from "react";
import { Button } from "./Button";
import "./type.css";

interface FormProps {
  placeholder?: string;
  label?: string;
  title?: string;
}

export const Kind = ({
  placeholder = "Enter your e-mail",
  ...props
}: FormProps) => {
  const [details, setDetails] = React.useState(false);

  const onClick = () => {
    setDetails(true);
  };

  return (
    <div className="form-wrapper">
      <enter
        autoComplete="off"
        placeholder="Enter your e-mail tackle"
        className={"storybook-input"}
        title="e-mail"
        aria-label="e-mail"
        id="e-mail"
        data-testid="e-mail"
        {...props}
      />
      <enter
        autoComplete="off"
        placeholder="Enter your password"
        className={"storybook-input"}
        title="password"
        id="password"
        data-testid="password"
        {...props}
      />
      <Button label="Submit" onClick={() => onClick()} />
      {particulars === true ? (
        <p>
          Get able to expertise nice improvement expertise with storybook
        </p>
      ) : (
        ""
      )}
    </div>
  );
};
Create our CSS file.
code src/tales/type.css
.form-wrapper {
  padding: 5rem;
  show: flex;
  flex-direction: column;
  hole: 1rem;
  width: 30%;
}
Creating our element’s preliminary state
Now, that the father or mother type is ready up, it’s time to create our element’s preliminary state. Let’s begin by organising a narrative to set the preliminary state of the shape.
code src/tales/Kind.tales.tsx
import React from "react";
import { ComponentStory, ComponentMeta } from "@storybook/react";
import { inside, userEvent } from "@storybook/testing-library";
import { anticipate } from "@storybook/jest";
import { Kind } from "./Kind";

export default {
  title: "Instance/Kind",
  element: Kind,
} as ComponentMeta<typeof Kind>;

const Template: ComponentStory<typeof Kind> = (args) => <Kind {...args} />;

export const EmptyForm = Template.bind({});

export const InputedForm = Template.bind({});
Within the above code block, the bottom a part of our story has been constructed.
Including the play perform
It’s time to arrange the play perform that runs after a narrative finishes rendering. With the play perform, consumer workflows may be examined.
// the play perform comes into use
InputedForm.play = async ({ canvasElement }) => {
  // begin querying the element from its root component
  const canvas = inside(canvasElement);

  // the important thing half, the place the interactions are outlined
  // Simulate interactions with the element
  await userEvent.sort(canvas.getByTestId("e-mail"), "[email protected]");

  await userEvent.sort(canvas.getByTestId("password"), "a-due-password");

  await userEvent.click on(canvas.getByRole("button"));

  // assert DOM construction
  await anticipate(
    canvas.getByText(
      "Get able to expertise nice improvement expertise with storybook"
    )
  ).toBeInTheDocument();
};
With the above code block, we’ve arrange the interplay checks. userEvent simulates the consumer’s interactions with the element, that are filling the shape and submitting it.
We’ll depend on test-runner to substantiate that the element renders appropriately. Replace your package deal.json scripts to allow the check runner.
  "scripts": {
    "test-storybook": "test-storybook",
  },
Run the check runner with the next command.
yarn test-storybook
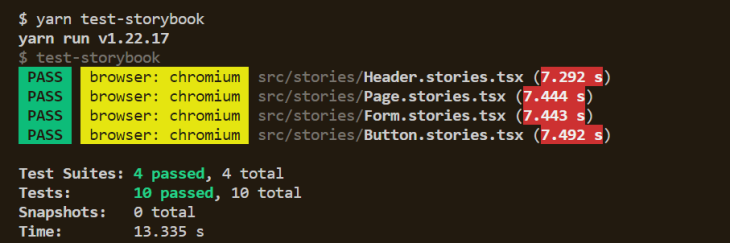
With affirmation of our passing checks, we are able to navigate to our browser window that holds our Storybook UI parts to look at the interplay check in motion.
Interplay checks in Storybook are just like Testing Library’s user-events API. Should you use the user-events API, you acquire the flexibility to hold out superior simulations of browser interactions utilizing the fireEvent technique.
Conclusion
Constructing advanced UIs is usually a tough exercise, particularly when improvement is finished amongst a number of crew members. However constructing UIs with Storybook, which locations a whole lot of significance on constructing small atomic parts, means parts may be examined extra successfully.
Visible testing is one space wherein Storybook excels, and with the brand new instruments for interplay testing, we are able to simply see how sturdy the Storybook ecosystem has turn out to be.
Full visibility into manufacturing React apps
Debugging React functions may be tough, particularly when customers expertise points which are exhausting to breed. Should you’re occupied with monitoring and monitoring Redux state, mechanically surfacing JavaScript errors, and monitoring sluggish community requests and element load time, strive LogRocket. 

LogRocket is sort of a DVR for internet and cell apps, recording actually every little thing that occurs in your React app. As an alternative of guessing why issues occur, you possibly can combination and report on what state your software was in when a difficulty occurred. LogRocket additionally displays your app’s efficiency, reporting with metrics like consumer CPU load, consumer reminiscence utilization, and extra.
The LogRocket Redux middleware package deal provides an additional layer of visibility into your consumer periods. LogRocket logs all actions and state out of your Redux shops.
Modernize the way you debug your React apps — begin monitoring at no cost.
