
Introduction
Making a customized picture uploader has practically turn into a should because the default HTML enter kind file seems to be plain.
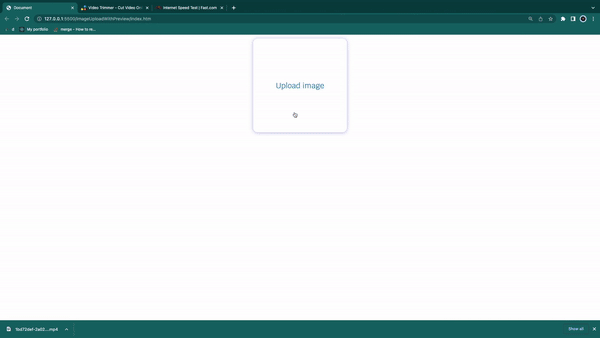
You’ll agree that fashionable internet design calls for extra, and there appears to be no direct approach to model it. Nevertheless, using ::file-selector-button CSS pseudo-element can be utilized however nonetheless has its limitations. On this article, I’ll present you the way I created a totally personalized picture uploader with preview as proven beneath.
Creating an HTML enter kind file
Create an HTML enter kind file with attribute settle for = “picture/x-png, picture/jpeg”
<enter kind="file"
   id="image-file"
   settle for="picture/x-png, picture/jpeg"
/>
By including the attribute accepts to the enter kind file, you specify the kind of file you need the enter to simply accept. In our case, we wish it to simply accept picture kind png and picture kind jpeg.
Click on on the enter to open the file explorer. You will notice you can choose photos with .png extension and pictures with .jpeg extension solely.
Creating an HTML label tag
Add a label tag and level the label for attribute to the id of the created enter file.
<enter kind="file"
  id="image-file"
  settle for="picture/x-png, picture/jpeg"
 />
 <label for="image-file">Add picture</label>
By including the for attribute of the label to the id of the enter, clicking the label aspect behaves as if we clicked the enter instantly.
The result of the above is as proven beneath. We will click on the Add picture textual content and see that it toggles the window file explorer, simply as what the enter file is doing.

Hiding the default enter
Subsequent is to cover the default enter and model the label as you need.
Since we’ve a label that behaves precisely as our enter, the following is to cover the default enter. To cover the default enter, we have to add a CSS model and set show = none to the enter file tag.
<enter kind="file"
  id="image-file"
  settle for="picture/x-png, picture/jpeg"
  model="show : none"
/>
At this level, you now have a label you’ll be able to model as you want. To model our label, add an id attribute to the label tag, then add the beneath CSS to present it a good looking card-like customized picture uploader.
<label id="image-label" for="image-file">Add picture</label>
   physique{
      show: flex;
      justify-content: middle;
   }
   #image-label{
      place: relative;
      width: 200px;
      peak: 200px;
      background: #fff;
      background-position: middle;
      background-repeat: no-repeat;
      background-size: include;
      show:flex;
      align-items: middle;
      justify-content: middle;
      box-shadow: 0px 1px 7px rgba(105, 110, 232, 0.54);
      border-radius: 10px;
      flex-direction: column;
      hole: 15px;
      user-select: none;
      cursor: pointer;
      shade: #207ed1;
      transition: all 1s;
   }
   #image-label:hover{
      shade: #18ac1c;
   }
Now that you’ve got a very personalized picture uploader, now could be time to preview the chosen picture.
Utilizing JavaScript to get a particular file from an enter kind file
Subsequent is getting the chosen picture and previewing it for the person
Now what I did is, in my JavaScript file, I hearken to the change occasion on the enter file, whereby at any time when a change is made, it returns an array of 1 aspect which accommodates the data of the uploaded file(corresponding to file title, file kind, and many others.).
const input_file = doc.getElementById('image-file');
input_file.addEventListener('change', async perform(){
   const file = doc.querySelector('#image-file').recordsdata;
   console.log("file", file)
   })
Utilizing Javascript to transform file to base64 encoded file
Now that we are able to get the file, we have to convert the file to a base64 encoded file for our browser to know the picture
const input_file = doc.getElementById('image-file');

const convert_to_base64 = file => new Promise((response) => {
   const file_reader = new FileReader();
   file_reader.readAsDataURL(file);
   file_reader.onload = () => response(file_reader.outcome);
});

input_file.addEventListener('change', async perform(){
   const file = doc.querySelector('#image-file').recordsdata;
   const my_image = await convert_to_base64(file[0]);
   console.log(my_image, "my_image")
   })
Utilizing Javascript to model a component
Now we’re executed, all we have to do is ready the base64 picture because the background picture of our label.
const input_file = doc.getElementById('image-file');
const input_label = doc.getElementById('image-label')

const convert_to_base64 = file => new Promise((response) => {
   const file_reader = new FileReader();
   file_reader.readAsDataURL(file);
   file_reader.onload = () => response(file_reader.outcome);
});

input_file.addEventListener('change', async perform(){
   const file = doc.querySelector('#image-file').recordsdata;
   const my_image = await convert_to_base64(file[0]);
   input_label.model.backgroundImage =`url(${my_image})`
   })
And that’s all. You could have an excellent cool customized picture uploader with a picture preview in a number of easy steps.
Conclusion
As a developer, you’ll agree that fashionable internet design calls for greater than only a plain picture uploader. The above articles present you the way to create a customized picture uploader with picture preview in 4 simple steps together with your HTML, CSS, and JavaScript
