
Cell apps sometimes supply numerous GUI parts for customers to carry out actions. For instance, you click on a button to log in to a selected app after getting into login credentials through enter fields. Cell apps often reply to person actions in one among two methods, once we take into account response time:
- Instantly, through which builders don’t want to point the standing of the actual person motion with an extra UI ingredient
- On a delay, through which builders ought to show the present standing of the precise occasion to keep away from customers considering the app is caught or damaged
React Native affords ActivityIndicator to show a round loading indicator for longer action-response instances. The ActivityIndicator performs the platform-specific, infinite round loading animation, so you should utilize it wherever it is advisable point out a delayed response.
We will customise ActivityIndicator in a number of methods to suit into any app. On this tutorial, I’ll clarify easy methods to customise and use it in numerous methods with sensible examples. Additionally, I’ll present you some alternative routes to show personalized cross-platform exercise indicators with a number of third-party libraries and inbuilt APIs.
Bounce forward:
Tutorial overview: React Native ActivityIndicator customization
We’ll construct a easy app that lists some fruit names to reveal ActivityIndicator customization. The app masses the information with an asynchronous operate that creates a man-made two-second delay to simulate community latency. We are going to show the exercise indicator throughout that two-second delay to point the loading state.
You possibly can both create a brand new challenge or use the next code in your present initiatives. If you want to check out the upcoming code snippets with a brand new challenge, create one with the next command:
npx react-native init ActivityIndicatorExample
cd ActivityIndicatorExample
After the challenge setup, run the app to guarantee that every thing works fantastic:
npx react-native run-android
# --- or ---
npx react-native run-ios
A fundamental ActivityIndicator instance
We deliberate to create an app to conditionally present/disguise the loading indicator, however how about constantly exhibiting the loading indicator first to see what it’s? Paste the next code in your App.js file:
import React from 'react';
import {
  SafeAreaView,
  ActivityIndicator,
} from 'react-native';

operate App() {
  return (
    <SafeAreaView>
      <ActivityIndicator/>
    </SafeAreaView>
  );
};

export default App;
The above code all the time renders a round indicator. If doable, take a look at the app on each Android and iOS platforms. You will note a round indicator ingredient that’s styled based mostly in your present working system. See the way it seems to be on Android:
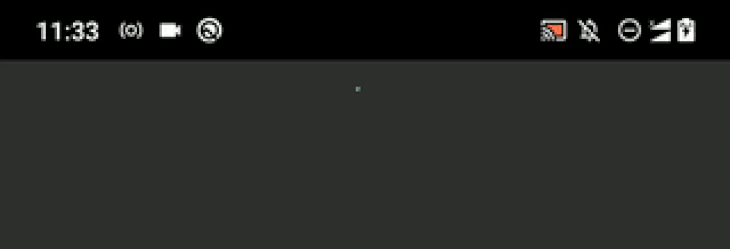
The indicator seems to be a bit small, proper? By default, React Native shows a small exercise indicator, however you possibly can enlarge it as follows:
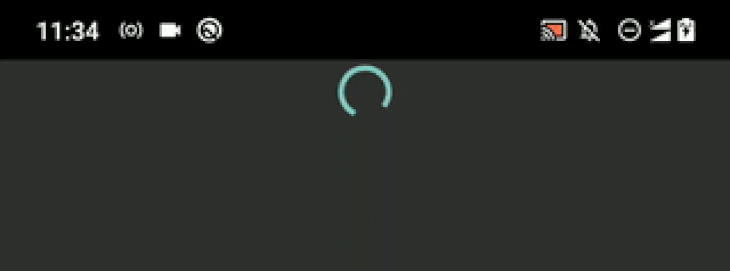
<ActivityIndicator dimension="massive"/>
Now, you will notice a considerably enlarged indicator animation as follows:
The best way to present/disguise the exercise indicator
In the event you test the official documentation, you’ll discover that we will use the animating prop to point out and conceal the indicator, nevertheless it doesn’t take away the house you’ve allotted for the exercise indicator within the viewport. Subsequently, displaying the indicator element conditionally — both with an if assertion, && operator, or ternary operator — is a good choice.
Let’s construct the app I discussed earlier than to grasp conditional rendering. Replace your App.js file with the next code:
import React, { useState, useEffect } from 'react';
import {
  SafeAreaView,
  FlatList,
  ActivityIndicator,
  StyleSheet,
  Textual content,
  View,
} from 'react-native';

async operate getItems() {
  await new Promise((resolve) => setTimeout(resolve, 2000));
  return ['Apple', 'Banana'];
}

operate Merchandise({ identify }) {
  return (
    <View model={kinds.merchandise}>
      <Textual content model={kinds.itemText}>{identify}</Textual content>
    </View>
  );
}

operate App() {
  const [items, setItems] = useState([]);
  const [loading, setLoading] = useState(true);

  useEffect(() => {
    getItems().then((objects) => {
      setItems(objects);
      setLoading(false);
    });
  }, []);

  const renderItem = ({ merchandise }) => (
    <Merchandise identify={merchandise}/>
  );
  return (
    <SafeAreaView model={kinds.container}>
     { loading ?
      <ActivityIndicator dimension="massive"/> :
      <FlatList
        knowledge={objects}
        renderItem={renderItem}
      /> }
    </SafeAreaView>
  );
};

const kinds = StyleSheet.create({
  container: {
    flex: 1,
  },
  merchandise: {
    backgroundColor: '#888',
    padding: 12,
    marginBottom: 12
  },
  itemText: {
    shade: '#fff',
    fontSize: 24,
  }
});

export default App;
As talked about earlier, we’re utilizing a two-second delay to simulate community latency, so after displaying the exercise indicator for 2 seconds, we are going to show the fruit checklist.
Have a look at what we return from the App element:
<SafeAreaView model={kinds.container}>
     { loading ?
      <ActivityIndicator dimension="massive"/> :
      <FlatList
        knowledge={objects}
        renderItem={renderItem}
      /> }
</SafeAreaView>
Right here, we present the ActivityIndicator if the loading state variable is true; in any other case, we show the FlatList element as a result of the loading state has completed. We use the identical SafeAreaView wrapper for each conditional parts, as common.
Run the challenge. You will note the fruit checklist after the round loading animation, as proven within the following preview:
The best way to place exercise indicators correctly
You possibly can enhance your cellular apps’ UI/UX qualities by positioning GUI parts accordingly — that’s why each cellular developer strives to rearrange buttons, enter fields, and different GUI parts in apps the easiest way they will. The exercise indicator can be a GUI ingredient, so accurately positioning it’s important.
The ActivityIndicator element accepts View props, so we don’t must wrap our ActivityIndicator with one other View, as we sometimes would to use positional kinds to Button parts.
Extra nice articles from LogRocket:
You should use a hard and fast margin for the round indicator as follows. Add the next styling object to your stylesheet:
indicator: {
  marginTop: 100
}
Subsequent, use the newly added styling definition in your app structure:
<ActivityIndicator dimension="massive" model={kinds.indicator}/>
Now, customers will discover the indicator instantly:

You may as well middle the round indicator with the next setup:
indicator: {
  flex: 1
}
Now you will notice the loading animation on the middle of the display screen:

Attempt to modify the exercise indicator place correctly with View kinds. If, for a fancy app, you’re loading knowledge for a number of lists concurrently, you should utilize tight top-bottom margins for every indicator ingredient to keep away from undesirable clean areas.
Including standing textual content with the exercise indicator ingredient
In some eventualities, customers can’t predict why the app is displaying a loading animation for a very long time. In our instance, we didn’t present a title for our fruit checklist app, so our customers can’t guess why we’re displaying the loading indicator. But when we present a title (i.e., Fruits) and show the exercise indicator animation subsequent to the title, customers can intuit that the checklist of fruits remains to be loading.
Let’s add a standing textual content to make it clear for our customers! Add the next code to your App.js file:
import React, { useState, useEffect } from 'react';
import {
  SafeAreaView,
  FlatList,
  ActivityIndicator,
  StyleSheet,
  Textual content,
  View,
} from 'react-native';

async operate getItems() {
  await new Promise((resolve) => setTimeout(resolve, 2000));
  return ['Apple', 'Banana', 'Orange', 'Pineapple', 'Mango', 'Kiwi'];
}

operate Merchandise({ identify }) {
  return (
    <View model={kinds.merchandise}>
      <Textual content model={kinds.itemText}>{identify}</Textual content>
    </View>
  );
}

operate LoadingAnimation() {
  return (
    <View model={kinds.indicatorWrapper}>
      <ActivityIndicator dimension="massive" model={kinds.indicator}/>
      <Textual content model={kinds.indicatorText}>Loading fruits...</Textual content>
    </View>
  );
}

operate App() {
  const [items, setItems] = useState([]);
  const [loading, setLoading] = useState(true);

  useEffect(() => {
    getItems().then((objects) => {
      setItems(objects);
      setLoading(false);
    });
  }, []);

  const renderItem = ({ merchandise }) => (
    <Merchandise identify={merchandise}/>
  );

  return (
    <SafeAreaView model={kinds.container}>
     { loading ?
      <LoadingAnimation/> :
      <FlatList
        knowledge={objects}
        renderItem={renderItem}
      /> }
    </SafeAreaView>
  );
};

const kinds = StyleSheet.create({
  container: {
    flex: 1,
  },
  merchandise: {
    backgroundColor: '#888',
    padding: 12,
    marginBottom: 12,
    marginLeft: 8,
    marginRight: 8,
  },
  itemText: {
    shade: '#fff',
    fontSize: 24,
  },
  indicatorWrapper: {
    flex: 1,
    alignItems: 'middle',
    justifyContent: 'middle',
  },
  indicator: {},
  indicatorText: {
    fontSize: 18,
    marginTop: 12,
  },
});

export default App;
We wrapped the ActivityIndicator element with a View and likewise added a Textual content element. We’ve added these parts to a brand new element, LoadingAnimation, so we will use it wherever as a reusable element and the App element is clear too. Additionally, we’ve modified the font dimension and margin of the loading indicator textual content to enhance the UI high quality.
Run the app. Now, you possibly can see a standing textual content together with the round loading animation, as proven within the following preview:
On this state of affairs, the exercise indicator disappears after two seconds, however in some real-world eventualities, customers with excessive community site visitors circumstances may need to attend for a couple of minutes. In these circumstances, you possibly can dynamically change the standing textual content to incorporate a pleasant message to maintain the person up to date. You may as well show correct error messages for backend points as a substitute of exhibiting the exercise indicator constantly.
Customizing the exercise indicator’s look
We already know easy methods to change the scale of the indicator ingredient with the dimension prop. However ActivityIndicator accepts View kinds, so it’s additionally doable to customise its background shade, opacity, border, margin, padding, and so forth.
React Native allows you to change the exercise indicator ingredient’s shade too. For instance, you possibly can override the default system theme shade as follows:
<ActivityIndicator dimension="massive" shade="#bb5533" model={kinds.indicator}/>
Now, you possibly can see a customized shade for the indicator ingredient:

Now, let’s modify the background shade, border, and padding. Use the next setup for indicator within the present stylesheet:
indicator: {
  padding: 12,
  backgroundColor: '#555',
  borderRadius: 12
},
Have a look at the app. Now, you will notice an indicator with a background layer as follows:

Apply extra View kinds and attempt to create numerous personalized exercise indicators.
Utilizing theme colours for exercise indicators
React Native apps sometimes help two system themes: darkish and lightweight. Some builders develop apps that help greater than two themes. These days, most React Native builders use the inbuilt Look module’s [useColorScheme](https://reactnative.dev/docs/usecolorscheme) Hook to deal with darkish and lightweight theme-related styling.
Have a look at the next instance code snippet:
import React from 'react';
import {
  SafeAreaView,
  ActivityIndicator,
  useColorScheme,
} from 'react-native';

const Colours = {
  mild: {
    indicator: '#000',
    container: '#fff',
  },
  darkish: {
    indicator: '#fff',
    container: '#000',
  },
};

operate App() {
  const theme = useColorScheme();
  const colours = Colours[theme];

  return (
    <SafeAreaView model={{ flex: 1, backgroundColor: colours.container}}>
      <ActivityIndicator
        dimension="massive"
        shade={colours.indicator}/>
    </SafeAreaView>
  );
};

export default App;
Right here, we alter the exercise indicator’s shade based mostly on the present theme, so when you run the app, you will notice an inverted shade for the exercise indicator based mostly on the present theme. For instance, when you take a look at the app on darkish mode, you will notice a white exercise indicator, and vice versa.
You possibly can study extra about darkish/mild themes from this text.
Modifying exercise indicator animation
The ActivityIndicator element doesn’t let builders change its default animation as a result of the underlying, platform-specific UI ingredient all the time performs the system-defined round loading animation. Nevertheless, you possibly can change the indicator’s dimension and shade with setInterval to customise its default animation.
Let’s carry again our fruit checklist app once more. See the way it toggles the indicator’s shade:
import React, { useState, useEffect } from 'react';
import {
  SafeAreaView,
  FlatList,
  ActivityIndicator,
  StyleSheet,
  Textual content,
  View,
} from 'react-native';

async operate getItems() {
  await new Promise((resolve) => setTimeout(resolve, 3000));
  return ['Apple', 'Banana', 'Orange', 'Pineapple', 'Mango', 'Kiwi'];
}

operate Merchandise({ identify }) {
  return (
    <View model={kinds.merchandise}>
      <Textual content model={kinds.itemText}>{identify}</Textual content>
    </View>
  );
}

operate LoadingAnimation() {
  const [color, setColor] = useState('teal');
  useEffect(() => {
    const id = setInterval(() => {
      setColor((shade) => shade == 'teal' ? 'royalblue' : 'teal');
    }, 700);
    return () => clearInterval(id);
  }, []);

  return (
    <View model={kinds.indicatorWrapper}>
      <ActivityIndicator dimension="massive" shade={shade} model={kinds.indicator}/>
      <Textual content model={kinds.indicatorText}>Loading fruits...</Textual content>
    </View>
  );
}

operate App() {
  const [items, setItems] = useState([]);
  const [loading, setLoading] = useState(true);

  useEffect(() => {
    getItems().then((objects) => {
      setItems(objects);
      setLoading(false);
    });
  }, []);

  const renderItem = ({ merchandise }) => (
    <Merchandise identify={merchandise}/>
  );

  return (
    <SafeAreaView model={kinds.container}>
     { loading ?
      <LoadingAnimation/> :
      <FlatList
        knowledge={objects}
        renderItem={renderItem}
      /> }
    </SafeAreaView>
  );
};

const kinds = StyleSheet.create({
  container: {
    flex: 1,
  },
  merchandise: {
    backgroundColor: '#888',
    padding: 12,
    marginBottom: 12,
    marginLeft: 8,
    marginRight: 8,
  },
  itemText: {
    shade: '#fff',
    fontSize: 24,
  },
  indicatorWrapper: {
    flex: 1,
    alignItems: 'middle',
    justifyContent: 'middle',
  },
  indicator: {},
  indicatorText: {
    fontSize: 18,
    marginTop: 12,
  },
});

export default App;
Right here we toggled the indicator shade with the setInterval operate. When you run the app, you will notice a modified animation:

Attempt to create a customized exercise indicator that helps configurable animation colours by extending the above code (i.e., utilizing colours as a prop). You possibly can dynamically change the scale, background shade, border, and different styling props to customise its animation. I’ll clarify easy methods to change styling props with React Native’s Animated API on the finish of this text.
Layering exercise indicators
With a View Overlay
In some eventualities, we have to present exercise indicators on high of different GUI parts. You possibly can both use a View overlay or a Modal to implement such indicators.
First, let’s implement an exercise indicator with a View overlay by modifying the earlier fruit checklist app. Add the next code to your App.js file:
import React, { useState, useEffect } from 'react';
import {
  SafeAreaView,
  FlatList,
  ActivityIndicator,
  StyleSheet,
  Textual content,
  View,
} from 'react-native';

async operate getItems() {
  await new Promise((resolve) => setTimeout(resolve, 3000));
  return ['Apple', 'Banana', 'Orange', 'Pineapple', 'Mango', 'Kiwi'];
}

operate Merchandise({ identify }) {
  return (
    <View model={kinds.merchandise}>
      <Textual content model={kinds.itemText}>{identify}</Textual content>
    </View>
  );
}

operate LoadingAnimation() {
  return (
    <View model={kinds.indicatorWrapper}>
      <ActivityIndicator dimension="massive"/>
      <Textual content model={kinds.indicatorText}>Loading fruits...</Textual content>
    </View>
  );
}

operate App() {
  const [items, setItems] = useState(['Pineapple', 'Mango', 'Kiwi']);
  const [loading, setLoading] = useState(true);

  useEffect(() => {
    getItems().then((objects) => {
      setItems(objects);
      setLoading(false);
    });
  }, []);

  const renderItem = ({ merchandise }) => (
    <Merchandise identify={merchandise}/>
  );

  return (
    <SafeAreaView model={kinds.container}>
      <FlatList
        knowledge={objects}
        renderItem={renderItem}
      />
      { loading && <LoadingAnimation/> }
    </SafeAreaView>
  );
};

const kinds = StyleSheet.create({
  container: {
    flex: 1,
  },
  merchandise: {
    backgroundColor: '#888',
    padding: 12,
    marginBottom: 12,
    marginLeft: 8,
    marginRight: 8,
  },
  itemText: {
    shade: '#fff',
    fontSize: 24,
  },
  indicatorWrapper: {
    place: 'absolute',
    left: 0,
    proper: 0,
    high: 0,
    backside: 0,
    alignItems: 'middle',
    justifyContent: 'middle',
    backgroundColor: 'rgba(100, 100, 100, 0.6)',
  },
  indicatorText: {
    fontSize: 18,
    marginTop: 12,
  },
});

export default App;
We’ve got utilized the next adjustments to the earlier fruit checklist app:
- Confirmed the
FlatListelement initially with some knowledge and let it retrieve new knowledge after three seconds - Transformed the indicator’s wrapper
Viewelement to an overlay by making use of a somewhat-transparent background shade and making the place absolute
Now, you will notice the exercise indicator on an overlay, as proven within the following preview:

In React Native Modals
Beforehand, we carried out an overlay with numerous positional styling props, however we will obtain the identical end result with the prebuilt Modal element utilizing much less styling-related code. Let’s copy the earlier code and use the Modal element.
First, add Modal to your imports:
import {
  SafeAreaView,
  FlatList,
  ActivityIndicator,
  StyleSheet,
  Textual content,
  View,
  Modal,
} from 'react-native';
Use the next styling code for indicatorWrapper:
indicatorWrapper: {
  flex: 1,
  alignItems: 'middle',
  justifyContent: 'middle',
  backgroundColor: 'rgba(100, 100, 100, 0.6)',
},
Subsequent, use the next implementation for LoadingAnimation:
operate LoadingAnimation() {
  return (
    <Modal clear={true}>
      <View model={kinds.indicatorWrapper}>
        <ActivityIndicator dimension="massive"/>
        <Textual content model={kinds.indicatorText}>Loading fruits...</Textual content>
      </View>
    </Modal>
  );
}
When you run the app, you will notice the identical end result because the View-based overlay implementation. View-based overlay and Modal-based one seemed the identical, however you are able to do much more with Modal, resembling including transition animations or attaching callbacks.
Be taught extra about React Native Modal with this text.
Utilizing exercise indicator libraries
Inbuilt framework parts typically include limitations, so the developer neighborhood tends to create libraries for particular use circumstances. The inbuilt ActivityIndicator element makes use of an Intermediate Progress GUI ingredient on Android. On iOS, it makes use of the [UIActivityIndicatorView](https://developer.apple.com/documentation/uikit/uiactivityindicatorview) Apple SDK ingredient. These platform-specific GUI parts present round loading indicators based on the working system’s UI/UX definitions, they usually received’t supply versatile customizations for app builders.
For instance, you possibly can’t create a three-dot loading indicator with the inbuilt exercise indicator. Subsequently, when you don’t just like the platform-specific exercise indicator, you’ll have to use a third-party library or construct your individual customized exercise indicator.
Let’s talk about easy methods to create trendy, customized exercise indicators with neighborhood libraries.
Creating SVG-based exercise indicators with react-native-progress
The react-native-progress library affords trendy, cross-platform progress indicators like round and bar loaders. Every progress indicator helps numerous props for personalisation, and the library renders customized exercise indicator parts on the app display screen utilizing the react-native-svg library.
Create a brand new React Native challenge to check out our chosen progress indicator libraries:
npx react-native init ProgressIndicatorLibs
cd ProgressIndicatorLibs
Subsequent, set up the library:
npm set up react-native-progress
# --- or ---
yarn add react-native-progress
Now, add the next code to your App.js file to implement a easy round exercise indicator:
import React from 'react';
import {
  SafeAreaView,
} from 'react-native';
import * as Progress from 'react-native-progress';

operate App() {
  return (
    <SafeAreaView model={{ flex: 1, alignItems: 'middle', justifyContent: 'middle' }}>
      <Progress.Circle
        dimension={100}
        shade="pink"
        indeterminate={true}
        endAngle={0.7} />
    </SafeAreaView>
  );
};

export default App;
Run the app. You will note a unique round loading indicator in comparison with the inbuilt platform-specific ActivityIndicator:
Strive setting a decrease worth for the endAngle prop — then you will notice a shorter circle circumference phase.
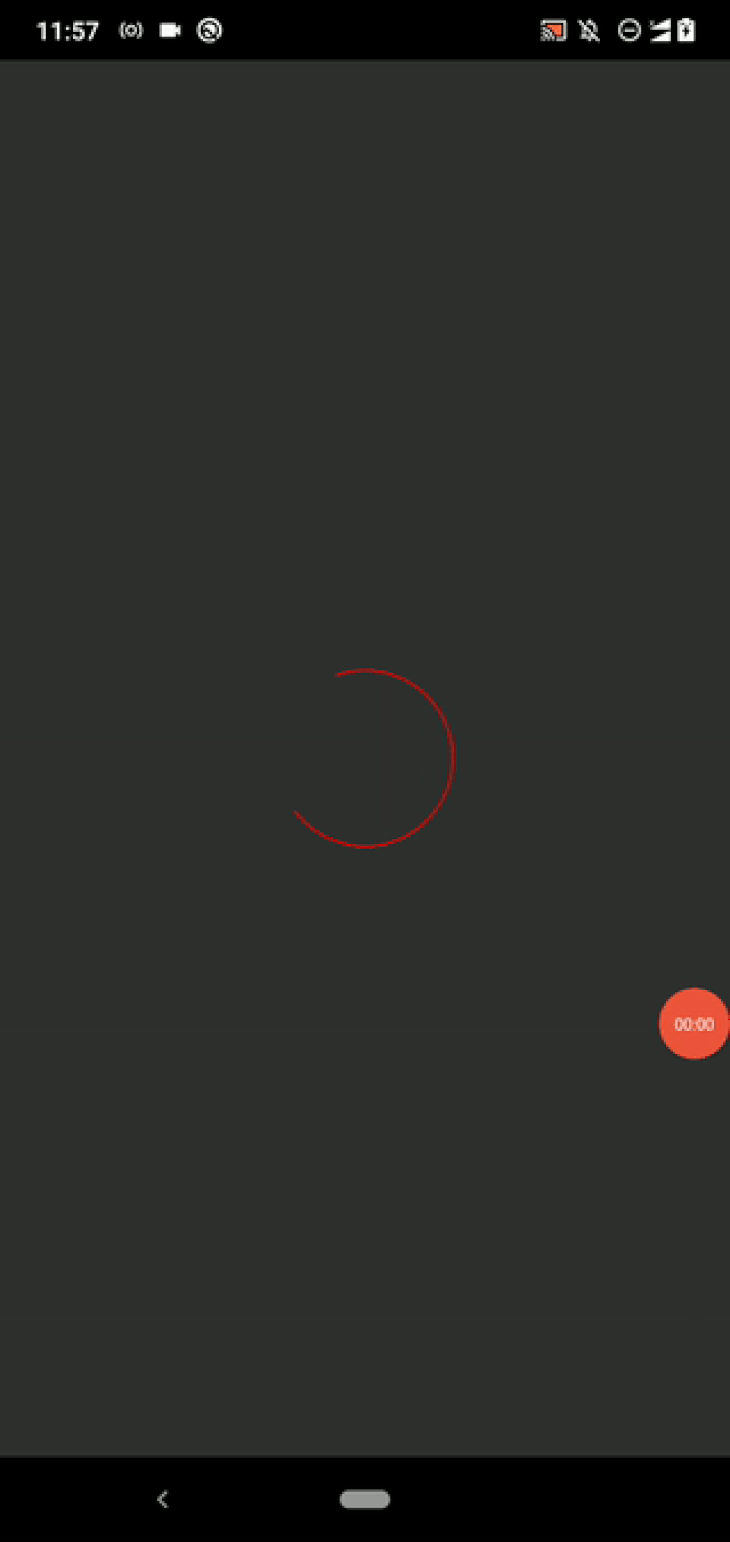
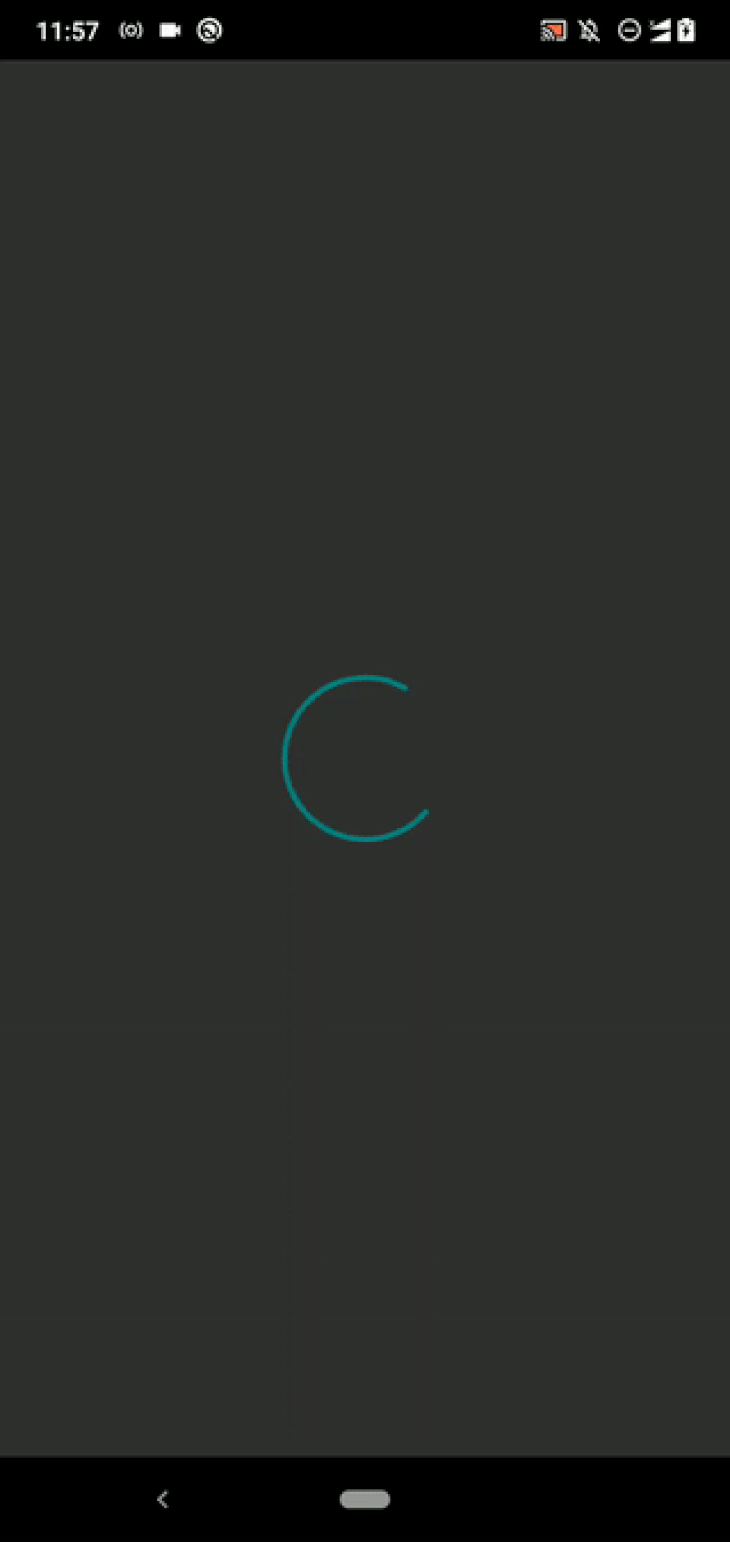
This library affords one other three progress indicator sorts: Bar, CircleSnail, and Pie. For instance, you should utilize the CircleSnail element to create a futuristic multi-color exercise indicator. Have a look at the next code snippet:
<Progress.CircleSnail
  dimension={100}
  shade={['teal', 'royalblue']}
/>
As soon as you employ the above code snippet with the earlier challenge supply, you will notice the next end result:
You possibly can show a most well-liked progress worth with the progress prop. Examine the library’s GitHub Readme to see all supported props and indicator sorts.
Creating indicator overlays with react-native-loading-spinner-overlay
Earlier, we displayed an indicator ingredient together with a View overlay and Modal by writing some implementation code. You should use a pre-implemented Modal-based overlay with the react-native-loading-spinner-overlay library.
First, set up the library to get began:
npm set up react-native-loading-spinner-overlay
# --- or ---
yarn add react-native-loading-spinner-overlay
Now, use the library with the earlier fruit checklist app:
import React, { useState, useEffect } from 'react';
import {
  SafeAreaView,
  FlatList,
  StyleSheet,
  Textual content,
  View,
} from 'react-native';
import Spinner from 'react-native-loading-spinner-overlay';

async operate getItems() {
  await new Promise((resolve) => setTimeout(resolve, 2000));
  return ['Apple', 'Banana', 'Orange', 'Pineapple', 'Mango', 'Kiwi'];
}

operate Merchandise({ identify }) {
  return (
    <View model={kinds.merchandise}>
      <Textual content model={kinds.itemText}>{identify}</Textual content>
    </View>
  );
}

operate App() {
  const [items, setItems] = useState(['Pineapple', 'Mango', 'Kiwi']);
  const [loading, setLoading] = useState(true);

  useEffect(() => {
    getItems().then((objects) => {
      setItems(objects);
      setLoading(false);
    });
  }, []);

  const renderItem = ({ merchandise }) => (
    <Merchandise identify={merchandise}/>
  );

  return (
    <SafeAreaView model={kinds.container}>
      <FlatList
        knowledge={objects}
        renderItem={renderItem}
      />
      { loading && <Spinner
        seen={true}
        textContent="Loading fruits..."
        /> }
    </SafeAreaView>
  );
};

const kinds = StyleSheet.create({
  container: {
    flex: 1,
  },
  merchandise: {
    backgroundColor: '#888',
    padding: 12,
    marginBottom: 12,
    marginLeft: 8,
    marginRight: 8,
  },
  itemText: {
    shade: '#fff',
    fontSize: 24,
  },
});

export default App;
The above code will show a Modal-based indicator ingredient, as we noticed within the earlier implementation.
Different different libraries to create customized indicators embracereact-native-progress and react-native-loading-spinner-overlay, two well-liked libraries for creating customized exercise indicators. Like some other npm package deal, we will discover some different libraries for this state of affairs too. Have a look at the next different libraries:
Select one based on your UI/UX necessities.
Creating your individual exercise indicator ingredient
We’ve mentioned how one can create customized exercise indicators by modifying the inbuilt ActivityIndicator element, and we’ve checked out two third-party exercise indicator libraries. In some uncommon conditions, these approaches won’t fulfill your UI/UX necessities as a consequence of their limitations. Then, you possibly can create your individual exercise indicator based on your strict UI/UX ideas with the React Native Animated API.
This instance is about constructing an exercise indicator element from scratch. I’ll share its supply code with you and clarify solely the important info to maintain this part transient.
Clone or obtain the customized exercise indicator supply from this GitHub repository.
Set up dependencies:
npm set up
# --- or ---
yarn set up
Run the app. Now, you will notice an animated circle because the exercise indicator, as proven within the following preview:

Open the App.js file and take a look at the next important info:
- The
CustomActivityIndicatorelement renders an animation withAnimated.Viewthrough the Animated API - The supply code defines two animations with
Animated.timing, creates a body sequence withAnimated.sequence, and begins an animation loop withAnimated.loop - We develop and shrink the circle constantly through the
scaleX: scaleAnim, scaleY: scaleAnimstyling definition - Animation definitions use the inbuilt Easing module to make clean, trendy animations
You may make a coin-spinning animation by eradicating the scaleY: scaleAnim code phase. It’s additionally doable to make a coin-flipping animation by deleting the scaleX: scaleAnim code phase. Regulate the circle’s animation as you would like through the use of completely different easing measurements and configuring the beginning/finish animation body definition.
You possibly can create your individual exercise indicator by animating View kinds with the Animated API. If it is advisable draw extra superior animated shapes, and View kinds don’t fulfill your design necessities , I like to recommend utilizing the react-native-svg library.
Conclusion
We’ve mentioned creating personalized exercise indicators with the inbuilt ActivityIndicator element and neighborhood libraries. I additionally confirmed you easy methods to develop your individual exercise indicator with the Animated API.
Try the choice indicator libraries as nicely earlier than choosing a third-party exercise indicator package deal. Most builders use indeterminate animations because it’s exhausting to foretell the completion time of a particular occasion. For instance, if we load some knowledge from a RESTful API, we will’t estimate once we’ll obtain the response because of the uncertainty of the community site visitors.
Regardless of this, it’s extra user-friendly when you present the progress for determinate occasions. For instance, virtually all file supervisor apps show real-time progress with a progress bar ingredient once we copy, transfer, or delete a number of recordsdata as a substitute of indeterminate round animations.
Most trendy app occasions are sometimes accomplished instantly or after a number of seconds, so utilizing an indeterminate round loading animation needs to be greater than appropriate for nearly all use circumstances. Ensure that to customise it based mostly in your choice, as we discovered on this tutorial.
LogRocket: Immediately recreate points in your React Native apps.

LogRocket is a React Native monitoring resolution that helps you reproduce points immediately, prioritize bugs, and perceive efficiency in your React Native apps.
LogRocket additionally helps you improve conversion charges and product utilization by exhibiting you precisely how customers are interacting together with your app. LogRocket’s product analytics options floor the the reason why customers do not full a selected move or do not undertake a brand new characteristic.
Begin proactively monitoring your React Native apps — strive LogRocket at no cost.
