
Within the first years of Unity, there wasn’t stable assist for 2D recreation improvement contained in the engine — for years, the precise technique to seek advice from it was “Unity 3D”. Although it was doable to develop 2D video games with Unity, with out official engine assist, it wasn’t a clean course of like it’s these days.
Round 2013, Unity began to assist 2D recreation improvement with inbuilt parts, like a 2D physics engine — Collider2D, Rigidbody2D, Vector2, Sprite, Tilemap, and so on.
On this publish, we’ll cowl the frequent properties and behaviors of 2D colliders, which messages are despatched to their GameObjects, how we will use them in our scripts, and the way every collider setup interacts with others.
These are the tutorial sections:
Conditions
The next conditions are required to observe together with this tutorial:
- Primary data of Unity
- Earlier expertise writing C# scripts in Unity
Establishing our Unity mission
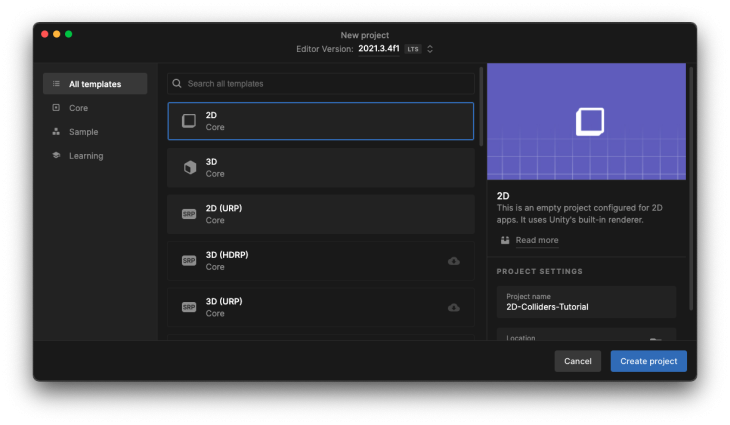
First, we have to create our Unity mission. For this tutorial, we’ll use the model 2021.3.4f1, which, in the intervening time I’m writing, is the latest LTS Unity model.
On the mission templates record, select 2D(core), give it a reputation, and click on the Create mission button. We’ll name ours SampleScene.
With the mission began, create two folders referred to as Scripts and Physic Supplies contained in the Belongings folder. We’ll use them to maintain our mission organized in the course of the tutorial.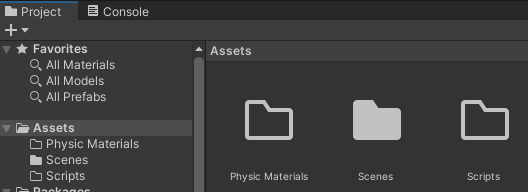
What are colliders?
Earlier than we begin utilizing our Unity mission, we have to take a bit of dive into the fundamental ideas of colliders.
Colliders are the way in which that Unity (and a lot of the obtainable recreation engines, if not all) manages collisions between GameObjects. For the sake of this tutorial, we’re solely utilizing the 2D colliders, however a number of the principles talked about under are relevant to 3D colliders, too.
In Unity, a 2D collider is a element that permits us to outline a form, the place we need to obtain notifications in our GameObject’s script each time one other GameObject (with one other collider) collides with the primary collider.
Unity doc tip: A collider is invisible, and doesn’t must be the very same form because the GameObject’s mesh. A tough approximation of the mesh is commonly extra environment friendly and indistinguishable in gameplay.
Proper now, Unity has eight inbuilt sorts of 2D colliders:
BoxCollider2DCapsuleCollider2DCircleCollider2DCompositeCollider2DCustomCollider2DEdgeCollider2DPolygonCollider2DTilemapCollider2D

Frequent properties and behaviors of colliders
Each 2D collider in Unity inherits from a standard class referred to as Collider2D. Because of this, they share frequent properties. Under is a listing of essentially the most notable and widely-used ones:
- Form (Edit collider) — Every type of 2D collider has a special form, however most of them permit us to vary some properties of their shapes, like the dimensions and distance of vertices
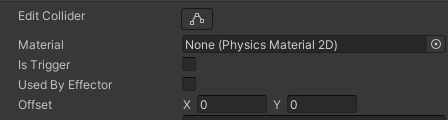
- Materials — Defines the
PhysicsMaterial2Dthat can be utilized by the collider to outline issues like friction and bounciness - isTrigger — If it’s checked, the collider will behave as a set off. When a collider will not be marked as a set off, the physics engine will generate a collision; when the collider hits one other collider, it produces the anticipated behaviors primarily based on the colliders’ setups, like shifting them to reverse instructions or stopping them. Nonetheless, when a collider is marked as a set off, the physics engine will merely detect when it enters the area of one other and no collision will likely be created
- Utilized by Effector — Determines whether or not the collider will likely be utilized by an
Effector2Dconnected to the GameObject
Unity doc tip: Effector2D parts are used to direct the forces when colliders come into contact with one another
- Offset — Because the collider will likely be connected to a GameObject, we will use this property to outline an offset place relative to the GameObject
Including a 2D collider to a GameObject
In our Unity mission, add a Sprite (Sq.) to the opened scene (SampleScene):
![]()
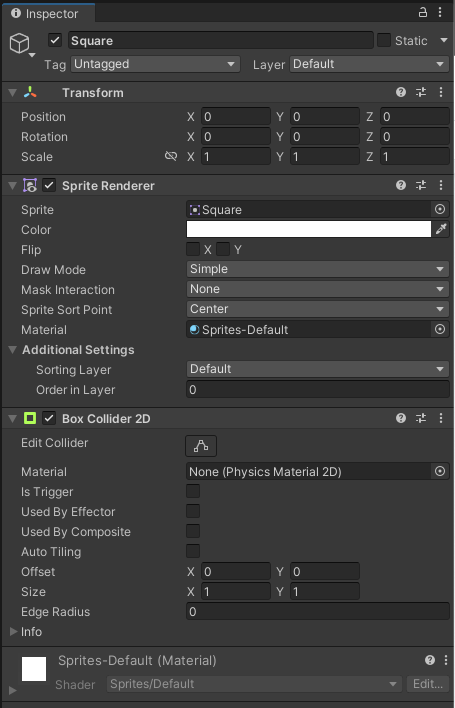
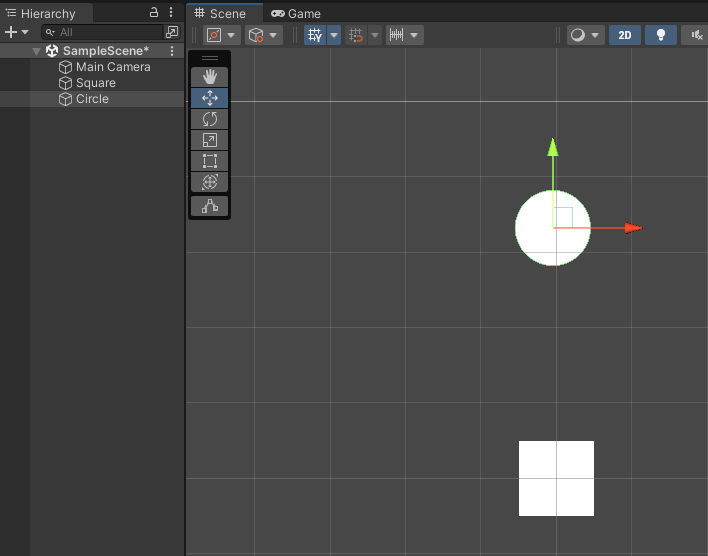
Choose the Sprite (Sq.) GameObject and add a element referred to as BoxCollider2D:
Now repeat the method, however add a Sprite (Circle) to the scene and add a CircleCollider2D element to it.
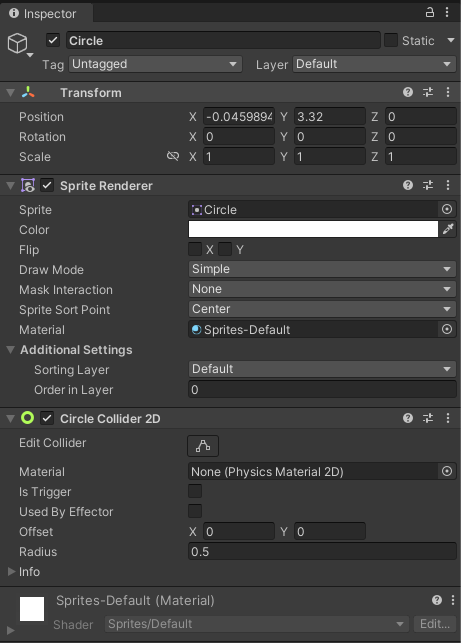
Transfer the Circle GameObject a bit of on prime of the Sq. GameObject:
If we hit the Play button now, nothing will occur, even when we transfer the GameObjects contained in the editor. No collision will occur.
Why does nothing occur? Effectively, we have to discuss concerning the Rigidbody2D element.
What’s a Rigidbody2D element?
A Rigidbody2D is a element used to inform Unity that it ought to put the GameObject underneath the management of the physics engine. In different phrases, GameObjects and not using a rigidbody don’t exist for the physics engine.
If we simply add a 2D collider to our GameObject, nothing will occur as a result of the physics engine will not be conscious of it. If we wish the physics engine to manage our GameObject, we have to add a Rigidbody2D element to it.
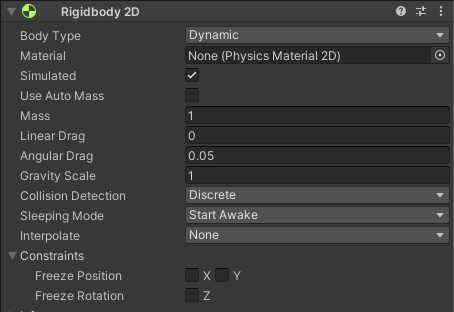
Which means that now our GameObject is affected by gravity by way of the Gravity Scale property, and might be managed from scripts utilizing forces.
We Simply want so as to add a Rigidbody2D to every of the GameObjects that we’ve already created and hit the Play button:

With the Rigidbody2D parts added to our GameObjects, the physics engine is conscious of them and has began making the gravity act.
Utilizing PhysicsMaterial2D so as to add results
In our pattern, the 2 GameObjects are simply falling, however what if we want to have the Sq. GameObject keep in its place and the Circle GameObject hit it, earlier than bouncing like a ball?
A simple technique to obtain that is utilizing PhysicsMaterial2D.
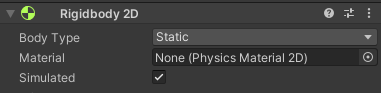
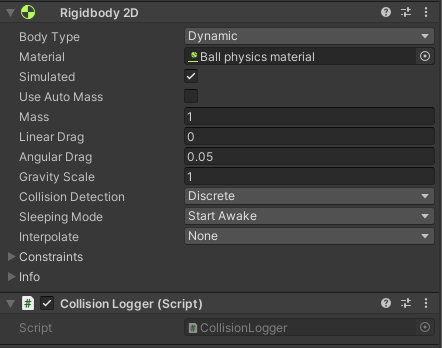
Let’s add that ball impact to our pattern scene. First, on the Sq. GameObject, change the property Physique Sort of its Rigidbody2D to Static:
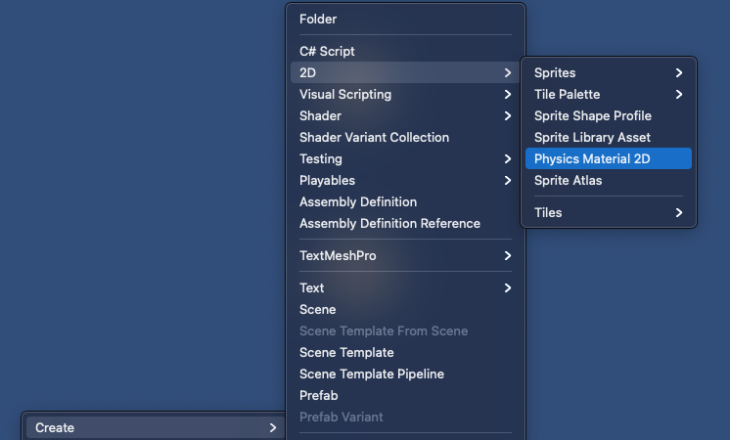
 Create a brand new
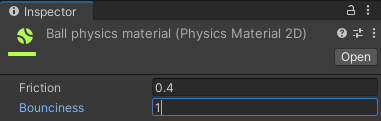
 PhysicsMaterial2D, title it Ball physics materials, and place it inside our Physics Supplies folder:
Change its Bounciness property to 1:
On the Circle GameObject's Rigidbody2D, change the Materials property to make use of the Ball physics materials that we’ve simply created:
 Hit the Play button once more. Now we must always see this occur:

Collisions callbacks
When one collider interacts with one other collider, Unity sends some messages (e.g., name a way on any MonoBehavior connected to the GameObject). Within the case of a 2D collider, there are six obtainable messages:
- When
IsTriggerwill not be checked:OnCollisionEnter2D: referred to as within the first body when the collision beginsOnCollisionStay2D: referred to as in every body whereas the collision is going onOnCollsionExit2D: referred to as within the first body when the collision ends
- When
IsTriggeris checked:OnTriggerEnter2D: referred to as within the first body when the collision beginsOnTriggerStay2D: referred to as in every body whereas the collision is going onOnTriggerExit2D: referred to as within the first body when the collision ends
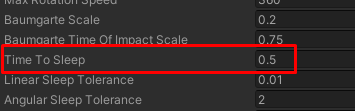
OnCollisionStay2D and OnTriggerStay2D are referred to as every body till they attain Time To Sleep (if the GameObject will not be shifting anymore).
Utilizing collision callbacks on scripts
It’s time to put in writing some code. Let’s create a script to log each time that our Circle GameObject hits the Sq. GameObject (OnCollisionEnter2D) to the console window. We’ll document what number of frames they keep in touch (OnCollisionStay2D), and once they cease hitting one another (OnCollsionExit2D). We’ll additionally present what occurs with and and not using a set off.
With no set off
Inside our Scripts folder, create a script referred to as CollisionLogger and add it to the Circle GameObject:
Open the CollisionLogger script in VS Code and kind these strategies in it:
utilizing System.Runtime.CompilerServices;
utilizing UnityEngine;

public class CollisionLogger : MonoBehaviour
{
    void OnCollisionEnter2D(Collision2D collision) => Log(collision);
    void OnCollisionStay2D(Collision2D collision) => Log(collision);
    void OnCollisionExit2D(Collision2D collision) => Log(collision);

    void Log(Collision2D collision, [CallerMemberName] string message = null)
    {
        Debug.Log($"{message} referred to as on {title} as a result of a collision with {collision.collider.title}");
    }
}
Hit the Play button, and we must always see one thing like this within the Console window:
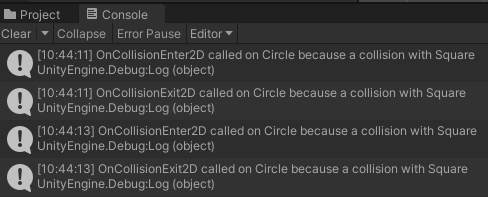
As we will see, OnCollisionEnter2D is known as when the Circle GameObject hits the Sq. GameObject. OnCollsionExit2D is known as once they aren’t hitting one another anymore, and OnCollisionStay2D has not been referred to as as a result of the 2 GameObjects usually are not protecting contact. To see OnCollisionStay2D being despatched, simply take away the Ball physics materials from the Circle GameObject's Rigidbody2D:

Hit the Play button once more and the output in our Console window needs to be:
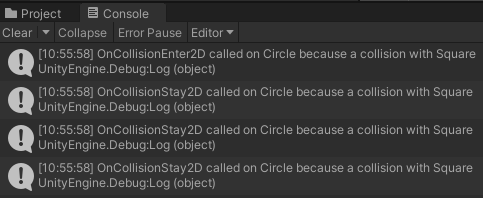
Now we have now one OnCollisionEnter2D and a number of OnCollisionStay2Ds that will likely be referred to as till the 2 GameObjects preserve the contact or till Time To Sleep is reached.
Now, re-enable the Ball physics materials on the Circle GameObject's Rigidbody2D and add the CollisionLogger to the Sq. GameObjects too.
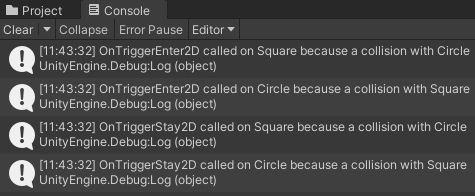
Hit Play, and the Console window ought to appear to be this:

As anticipated, the messages are referred to as in all GameObjects concerned within the collision.
With a set off
What concerning the OnTrigger methodology? Proper now, none of our colliders are marked as a set off (IsTrigger), which is why solely OnCollision has been referred to as.
Triggers are helpful when we have to detect {that a} given GameObject has reached a degree or one other GameObject. Let’s say we need to be notified on Sq. GameObject each time that the Circle GameObject passes via it. We are able to add a collider with IsTrigger checked on it and we are going to obtain the notification when the physics engine calls the OnTriggerEnter2D methodology.
To see a set off in motion, mark the Sq. GameObject's collider as a set off:
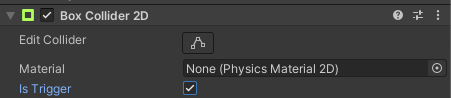
Play the scene, and we’ll see that Circle GameObject is passing via the Sq. GameObject:
 This occurs as a result of the
 Sq. GameObject is a set off now. The physics engine received’t generate the anticipated habits when two objects collide, however will as a substitute ship the OnTrigger strategies to the concerned GameObjects.
If we take a look at the Console window, you’ll discover that it’s empty as a result of no OnCollision strategies are referred to as. To log the OnTrigger strategies, open our CollisionLogger script and add these new strategies:
void OnTriggerEnter2D(Collider2D collision) => Log(collision);
void OnTriggerStay2D(Collider2D collision) => Log(collision);
void OnTriggerExit2D(Collider2D collision) => Log(collision);

void Log(Collider2D collision, [CallerMemberName] string message = null)
{
    Debug.Log($"{message} referred to as on {title} as a result of a collision with {collision.gameObject.title}");
}
Run the scene and we will see this log within the Console window:

Now solely OnTrigger strategies are referred to as as a result of there’s a set off concerned within the collision.
An necessary factor to notice is that each one OnCollision and OnTrigger strategies obtain the parameter Collision2D/Collider2D. This parameter can maintain details about the collision itself, reminiscent of:
- Which different GameObject collides with the present GameObject
- Which contact factors are concerned within the collision
- The relative linear velocity of the 2 colliding objects
If we don’t want to make use of this data in our script, we will declare the OnCollision/OnTrigger strategies with out the logging parameter.
Collider interactions
You most likely seen within the final part that there’s parity between the OnCollision and OnTrigger strategies the physics engine calls on the GameObjects concerned within the collision. Figuring out when every type of interplay raises every type of message/methodology within the concerned GameObjects generally is a little tough; regardless of this obvious similarity, there are some guidelines for interplay potentialities between completely different collider setups.
There are six completely different setups a collider can have that may in a different way have an effect on the way it interacts with different colliders. These setups might be accomplished by a mix of the properties IsTrigger of the Collider2D and the property Physique Sort of the Rigidbody2D connected to the identical GameObject. Under is a listing of comparable setups:
- Static Collider
- IsTrigger:
false - Physique Sort: Static
- IsTrigger:
- Rigidbody Collider
- IsTrigger:
false - Physique Sort: Dynamic
- IsTrigger:
- Kinematic Rigidbody Collider
- IsTrigger:
false - Physique Sort: Kinematic
- IsTrigger:
- Static Set off Collider
- IsTrigger:
true - Physique Sort: Static
- IsTrigger:
- Rigidbody Set off Collider
- IsTrigger:
true - Physique Sort: Dynamic
- IsTrigger:
- Kinematic Rigidbody Set off Collider
- IsTrigger:
true - Physique Sort: Kinematic
- IsTrigger:
How do these setups have an effect on collider interactions?
The reply to this query is within the desk under, which I took from the Unity documentation web site. It exhibits us the place we will see when collisions occur and when the collision callbacks (the OnCollision and OnTrigger strategies) are referred to as.
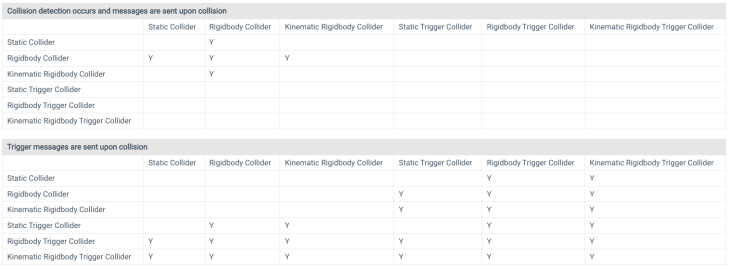 Supply: Unity docs
Trying on the desk, we will determine issues like:
- A Static collider solely interacts with a Rigidbody collider
- A Rigidbody collider can work together with a Static collider, Rigidbody Collider, and Kinematic Rigidbody Collider
These tables might be very helpful throughout recreation improvement, after we get caught with some type of collider interplay that we anticipated to occur however doesn’t.
To assist us to higher perceive the colliders’ interactions, now and after we face the type of drawback talked about above, I created a pattern the place we will transfer the GameObjects via every of the six doable interplay setups, see how they work together with one another, and what callbacks messages are despatched.
Strive the web pattern right here and transfer every collider setup to higher perceive what messages are despatched for every interplay.
Physics2D settings
For the final a part of this tutorial, I want to point out the Physics2D settings.
These settings usually are not inside the scope of this tutorial — speaking about a few of them may fill one other entire tutorial — however I believe it’s necessary to know that they exist, what their default values are, and that we will alter them to the wants of our mission.
You possibly can entry these settings by way of Undertaking Settings > Physics 2D.
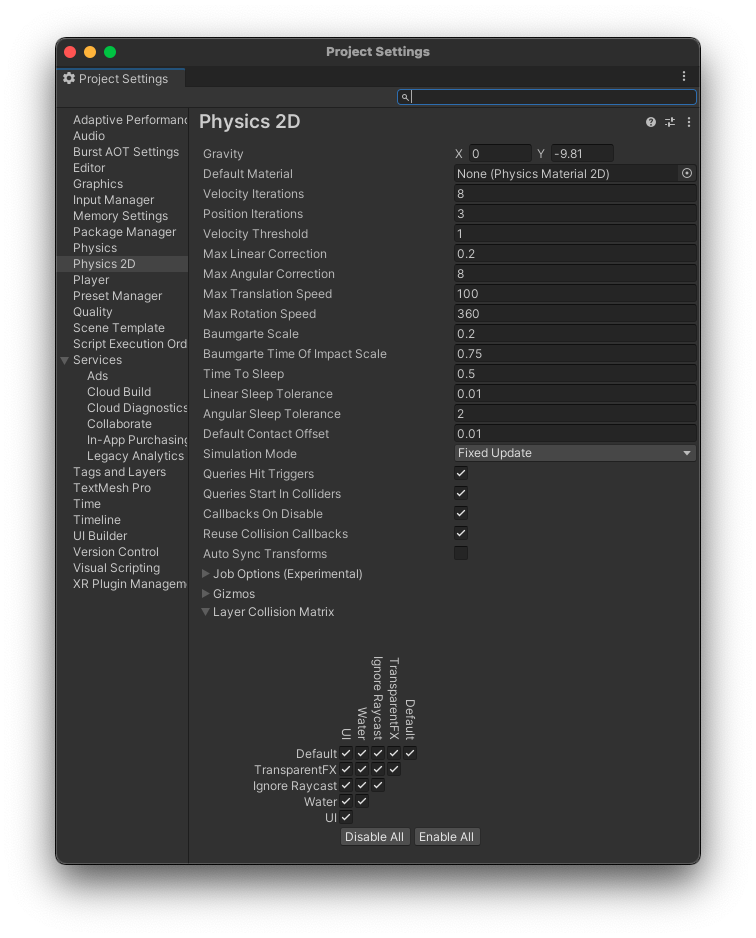
Settings like Gravity are fairly simple, however issues like Velocity Iterations and Place Iterations generally is a little obscure and may have an effect on recreation behaviors loads.
Most of those settings are modified when we have to obtain some type of non-conventional physics habits or efficiency enchancment, however you need to be conscious that you simply’ll must retest gameplay after every change you make to those settings to make sure that you haven’t damaged something.
The underside line is: be sure that to solely change these settings after learning and understanding their impression.
Supply code and samples
Conclusion
On this tutorial, we’ve defined the basics of Unity 2D Colliders: what they’re, what their frequent properties and behaviors are, methods to add a BoxCollider2D and CircleCollider2D to a GameObject, what a Rigidbody2D is and methods to use PhysicsMaterial2D, what the collision callbacks are and methods to use them on our scripts, and, lastly, the sorts of collider setups and the way they work together.
LogRocket: Full visibility into your net and cellular apps

LogRocket is a frontend utility monitoring resolution that permits you to replay issues as in the event that they occurred in your individual browser. As a substitute of guessing why errors occur, or asking customers for screenshots and log dumps, LogRocket allows you to replay the session to rapidly perceive what went improper. It really works completely with any app, no matter framework, and has plugins to log extra context from Redux, Vuex, and @ngrx/retailer.
Along with logging Redux actions and state, LogRocket information console logs, JavaScript errors, stacktraces, community requests/responses with headers + our bodies, browser metadata, and customized logs. It additionally devices the DOM to document the HTML and CSS on the web page, recreating pixel-perfect movies of even essentially the most complicated single-page net and cellular apps.
