
We’re all aware of dwelling switches to change on and off our lighting system and different electrical home equipment. We’re additionally aware of toggle buttons; when you’ve got electrical cookware or induction at dwelling, you’ll be able to toggle between its voltage and cooking features.
Equally, our cellular purposes have switches and toggles to activate/off Wi-Fi, Bluetooth, and so forth.
As we speak, we’re profoundly diving into understanding the parameters and properties of Flutter switches and toggles.
Desk of contents
A change button is a Flutter widget with solely two states, both true/false or on/off. Usually,a change is a button with a thumb slider for the consumer to tug it from left to proper and vice versa to change between the states. It doesn’t keep its state by itself. You will need to name the onChanged property to maintain the button on or off.
Equally, a toggle widget has solely two states: true/false or on/off. However a toggle widget creates a number of buttons organized in rows, permitting customers to toggle between them.
The vital distinction between a change and a toggle
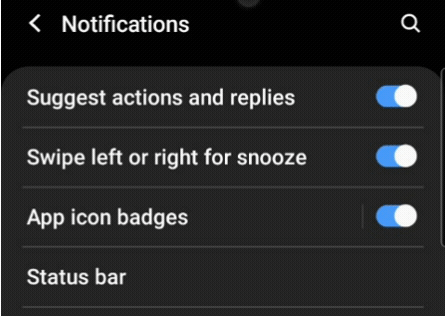
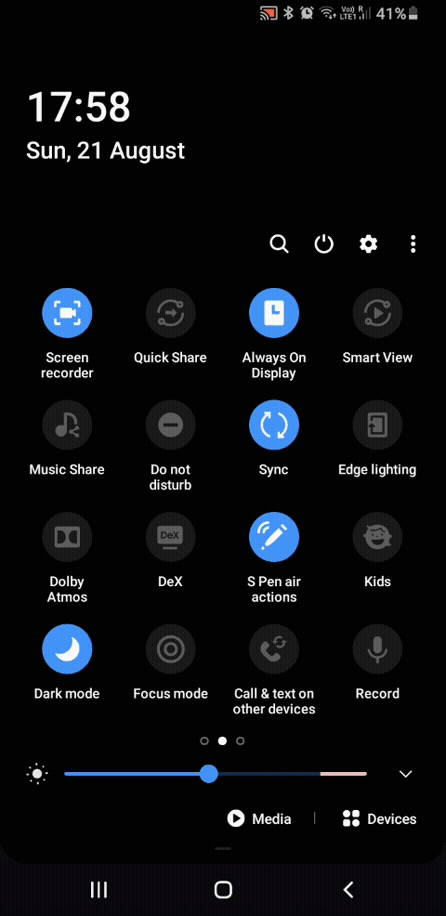
It’s a matter of use instances in a cellular software. Most often, these widgets are used on the settings web page. For those who drag down the notification panel of your cellular software, you will notice a grid of toggle buttons. However while you go to the settings web page, these buttons are modified to switches.
You will need to have understood the distinction. In your cellular software, when you’ve got a listing of controls requiring solely two states, you need to be utilizing switches. And when you’ve got a couple of management in a row or in a grid, you must use toggles.
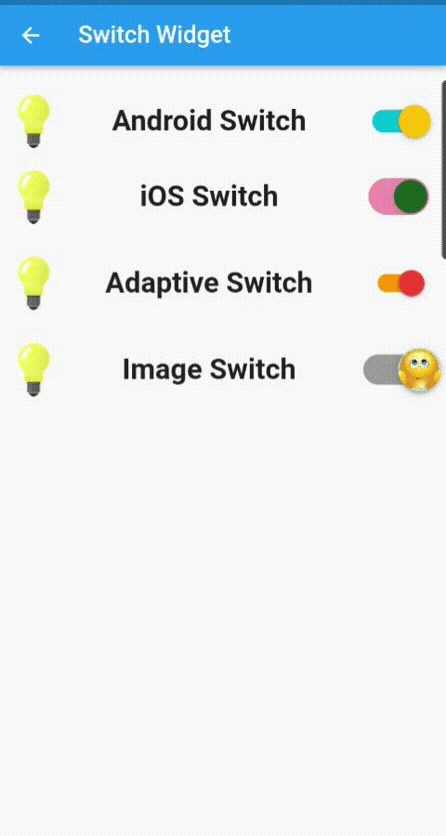
Flutter gives three forms of change widgets:
- Change (Android)
- CupertinoSwitch (iOS)
Change.adaptive(it adapts in keeping with platform)
Let’s take a look at the most typical properties used to customise the widget:
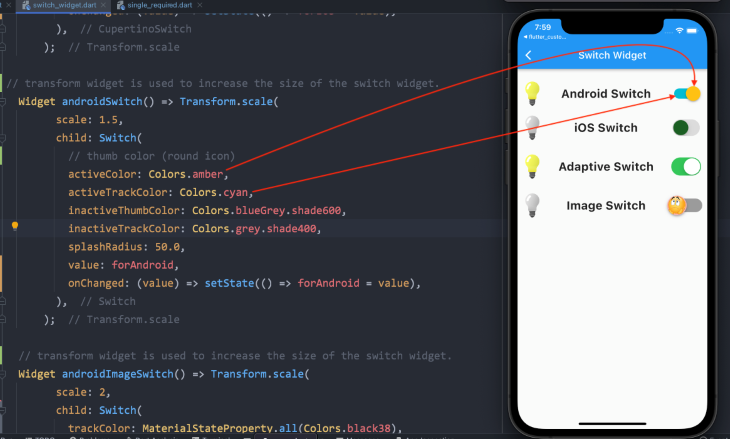
Change (Android)
Change(
  // thumb shade (spherical icon)
  activeColor: Colours.amber,
  activeTrackColor: Colours.cyan,
  inactiveThumbColor: Colours.blueGrey.shade600,
  inactiveTrackColor: Colours.gray.shade400,
  splashRadius: 50.0,
  // boolean variable worth
  worth: forAndroid,
  // adjustments the state of the change
  onChanged: (worth) => setState(() => forAndroid = worth),
),
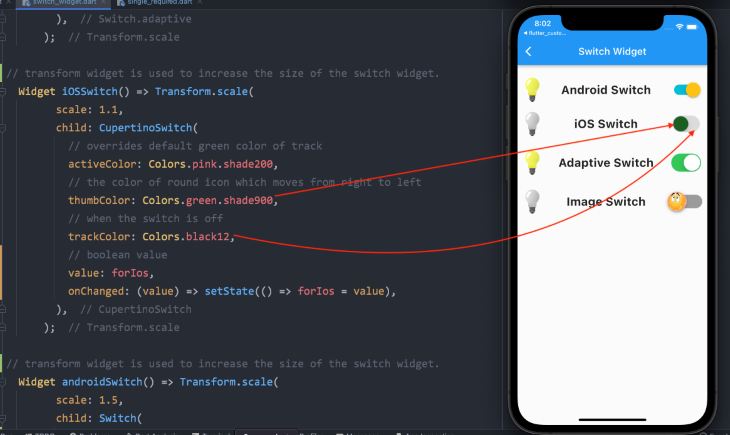
CupertinoSwitch (iOS)
CupertinoSwitch(
  // overrides the default inexperienced shade of the monitor
  activeColor: Colours.pink.shade200,
  // shade of the spherical icon, which strikes from proper to left
  thumbColor: Colours.inexperienced.shade900,
  // when the change is off
  trackColor: Colours.black12,
  // boolean variable worth
  worth: forIos,
  // adjustments the state of the change
  onChanged: (worth) => setState(() => forIos = worth),
),
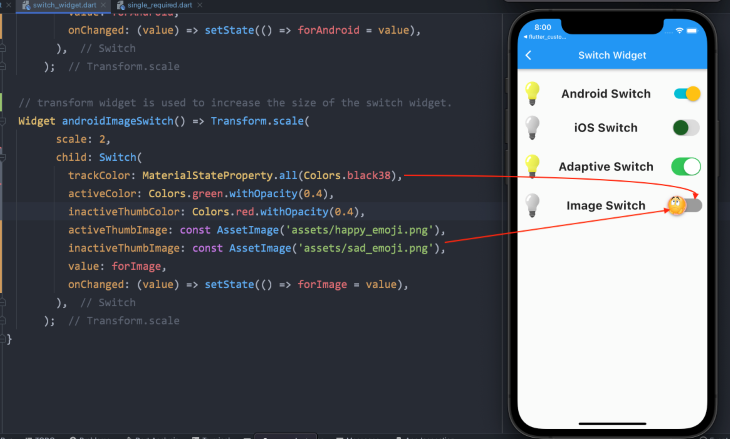
There aren’t any distinctive or completely different properties for the adaptive change widget. However the Android Change widget might be additional personalized if you’d like a picture or icon as a substitute of the standard thumb shade. You could outline the thumb picture property with an asset picture. Please take a look at the code under.
Android Change with Picture
Change(
  trackColor: MaterialStateProperty.all(Colours.black38),
  activeColor: Colours.inexperienced.withOpacity(0.4),
  inactiveThumbColor: Colours.purple.withOpacity(0.4),
// when the change is on, this picture shall be displayed
  activeThumbImage: const AssetImage('belongings/happy_emoji.png'),
// when the change is off, this picture shall be displayed
  inactiveThumbImage: const AssetImage('belongings/sad_emoji.png'),
  worth: forImage,
  onChanged: (worth) => setState(() => forImage = worth),
),
That is how the code seems in motion:
Extra nice articles from LogRocket:
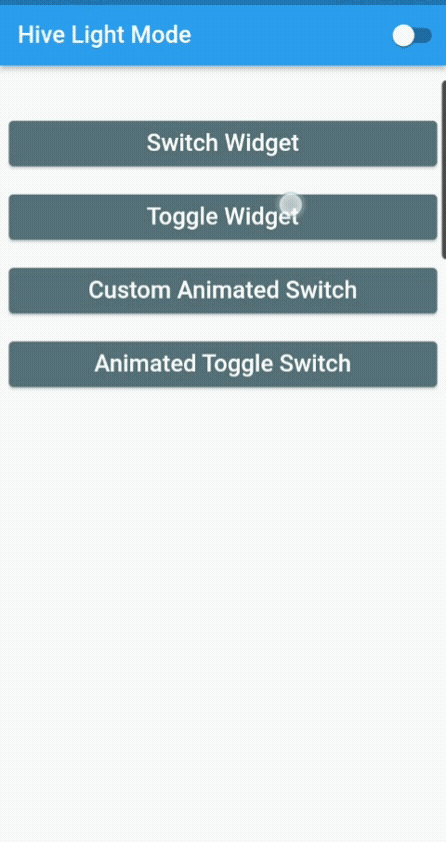
At the moment, we aren’t saving the state of the change widget; we’re solely altering it. Subsequent is making a small software, the place we are going to change the theme from gentle to darkish and vice versa, and while you shut the applying, its state shall be saved.
It’s a easy one-page software with a change button within the appBar, which is able to change the theme.
I’ve used Flutter Hive to avoid wasting the state of the app. You should use SharedPreferences, however I’ve opted for Hive as a result of it’s a quick, light-weight, NoSQL database for Flutter and Dart purposes. Hive is useful in case you want an easy key-value database with out quite a few relations. It’s easy to make the most of and is an offline database (shops information regionally).
Let’s take a look at the code first…
We’re utilizing ValueListenableBuilder to replace the UI. It builds the actual widget each time the worth adjustments for which it listens. Its values stay synced with listeners; i.e., every time the values change, the ValueListenable listens to it and updates the UI with out utilizing setState() or some other state administration approach:
const themeBox = 'hiveThemeBox';
void primary() async {
 await Hive.initFlutter();
 await Hive.openBox(themeBox);
 runApp(const MyApp());
}

class MyApp extends StatelessWidget {
 const MyApp({Key? key}) : tremendous(key: key);

 @override
 Widget construct(BuildContext context) {
   //to replace the UI with out utilizing setState()
   return ValueListenableBuilder(
     valueListenable: Hive.field(themeBox).listenable(),
     builder: (context, field, widget) {
       //saving the worth contained in the hive field,
       var darkMode = Hive.field(themeBox).get('darkMode', defaultValue: false);
       return MaterialApp(
           debugShowCheckedModeBanner: false,
           //switching between gentle and darkish theme,
           themeMode: darkMode ? ThemeMode.darkish : ThemeMode.gentle,
           title: 'Flutter Demo',
           darkTheme: ThemeData.darkish(),
           dwelling: HomePage(
             worth: darkMode,
           ));
     },
   );
 }
}

class HomePage extends StatelessWidget {
 closing bool worth;
 const HomePage({Key? key, required this.worth}) : tremendous(key: key);

 @override
 Widget construct(BuildContext context) {
   return Scaffold(
     appBar: AppBar(
       title: Textual content(worth ? 'Hive Darkish Mode' : 'Hive Gentle Mode'),
       actions: [
         Switch(
           value: value,
           onChanged: (val) {
             Hive.box(themeBox).put('darkMode', !value);
           },
         ),
       ],
     ),
     physique: Padding(
       padding: const EdgeInsets.all(8.0),
       baby: Column(
         crossAxisAlignment: CrossAxisAlignment.stretch,
         kids: [ ],
       ),
     ),
   );
 }
}
Right here we are going to take a look at 4 other ways to implement the toggle widget in our software.
- Single and required: The consumer has to pick out at the least one possibility out of two
- Single and never required: The consumer shouldn’t be required to pick out any possibility
- A number of and required: The consumer should select at the least one of many given choices however can even choose a number of choices
- A number of and never required: The consumer can choose or deselect as per requirement however can even select a number of choices
First, let’s take a look at the usual properties of a toggle widget to customise it, after which we are going to undergo the code for every one, together with its illustrated photographs:
ToggleButtons(
  // listing of booleans
  isSelected: isSelected,
  // textual content shade of chosen toggle
  selectedColor: Colours.white,
  // textual content shade of not chosen toggle
  shade: Colours.blue,
  // fill shade of chosen toggle
  fillColor: Colours.lightBlue.shade900,
  // when pressed, splash shade is seen
  splashColor: Colours.purple,
  // lengthy press to establish spotlight shade
  highlightColor: Colours.orange,
  // if consistency is required for all textual content fashion
  textStyle: const TextStyle(fontWeight: FontWeight.daring),
  // border properties for every toggle
  renderBorder: true,
  borderColor: Colours.black,
  borderWidth: 1.5,
  borderRadius: BorderRadius.round(10),
  selectedBorderColor: Colours.pink,
// add widgets for which the customers must toggle
   kids: [ ],
// to pick out or deselect when pressed
  onPressed: (int newIndex) { }
);
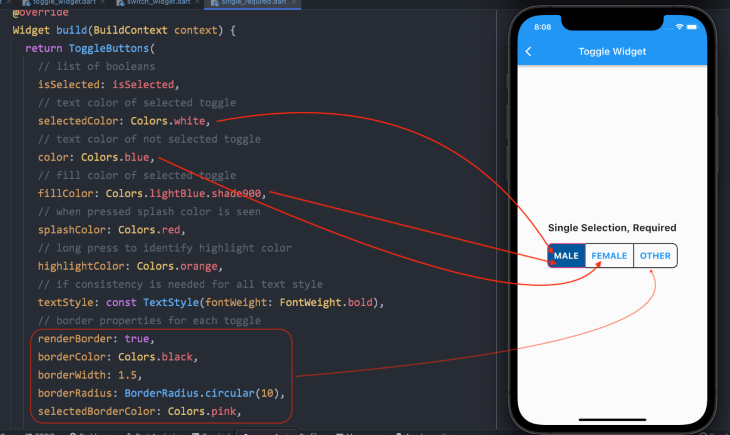
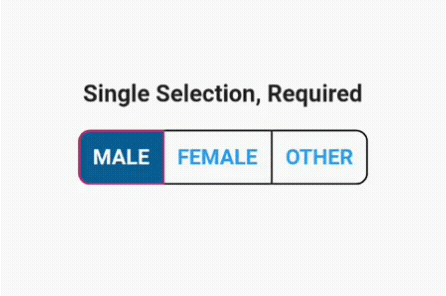
Single and required toggle change
First, we should initialize a listing of Boolean variables:
// one should all the time be true, means chosen.
Listing<bool> isSelected = [true, false, false];
Since we drive the system to have at the least one possibility all the time chosen, now we have initialized one worth as true.
We’ve got already mentioned different properties to customise the toggle widget. Now we add baby widgets to its kids property.
N.B., it’s important to add the identical variety of the kid widgets because the listing of Boolean values. In any other case, it would throw an error.
// add widgets for which the customers must toggle
kids: const [
  Padding(
    padding: EdgeInsets.symmetric(horizontal: 12),
    child: Text('MALE', style: TextStyle(fontSize: 18)),
  ),
  Padding(
    padding: EdgeInsets.symmetric(horizontal: 12),
    child: Text('FEMALE', style: TextStyle(fontSize: 18)),
  ),
  Padding(
    padding: EdgeInsets.symmetric(horizontal: 12),
    child: Text('OTHER', style: TextStyle(fontSize: 18)),
  ),
],
Subsequent, now we have so as to add logic to the onPressed() property of the toggle widget contained in the setState() operate.
- Utilizing the
forloop, we are going to undergo the listing of Boolean values - Utilizing the
ifassertion, we are going to test for theindexworth and all the time set it totrue. Different buttons shall be set tofalseonPressed: (int newIndex) { setState(() { // looping via the listing of booleans values for (int index = 0; index < isSelected.size; index++) { // checking for the index worth if (index == newIndex) { // one button is all the time set to true isSelected[index] = true; } else { // different two shall be set to false and never chosen isSelected[index] = false; } } }); },
That is how our closing product will look.
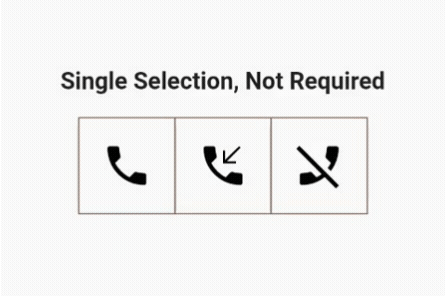
Single and never required toggle change
We have to make solely two adjustments for this to work. The consumer can choose just one out of three choices however shouldn’t be required to decide on it.
Values contained in the listing of Boolean variables are all initialized as false:
// all values are false
Listing<bool> isSelected = [false, false, false];
Contained in the if assertion within the onPressed() operate, we solely toggle between buttons to set it to true:
onPressed: (int newIndex) {
  setState(() {
    // looping via the listing of booleans values
    for (int index = 0; index < isSelected.size; index++) {
      if (index == newIndex) {
        // toggling between the button to set it to true
        isSelected[index] = !isSelected[index];
      } else {
        // different two buttons is not going to be chosen and are set to false
        isSelected[index] = false;
      }
    }
  });
},
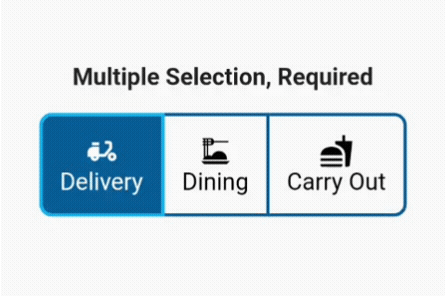
A number of alternatives which are required
As talked about earlier, the consumer can choose a number of choices, however the system will hold at the least one possibility all the time chosen.
Sure, you guessed appropriately that one of many values within the listing of Booleans shall be true:
Listing<bool> isSelected = [true, false, false];
Issues get a bit of fascinating contained in the onPressed operate.
First, we add a variable to loop via the listing of Booleans and be certain that the worth is true; subsequently, at the least one button is all the time chosen:
closing isOneSelected = isSelected.the place((component) => component).size == 1;
If just one button is chosen, the consumer can’t toggle it to false till an alternative choice is chosen:
if (isOneSelected && isSelected[newIndex]) return;
Subsequent, contained in the setState() operate, we loop via our listing once more, test for the brand new index worth, and toggle between the previous and new indexes:
setState(() {
  // looping via the listing of booleans
  for (int index = 0; index < isSelected.size; index++) {
    // checking for the index worth
    if (index == newIndex) {
      // toggle between the previous index and new index worth
      isSelected[index] = !isSelected[index];
    }
  }
});
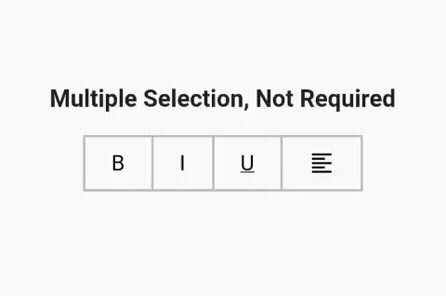
A number of alternatives that aren’t required
That is fairly simple. I’ve made a row of textual content enhancing choices you normally see in any textual content editor to format the written textual content. There are 4 choices, so now we have 4 values inside our listing, and all are set to false:
Listing<bool> isSelected = [false, false, false, false];
In our onPressed() operate, we merely toggle between true and false values:
onPressed: (int index) {
  setState(() {
    // merely toggling buttons between true and false state
    isSelected[index] = !isSelected[index];
  });
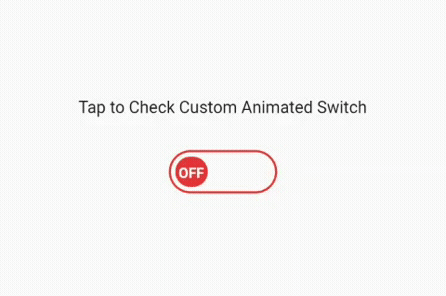
We’ve got completed explaining the change and toggle widget and easy methods to use it the standard approach. Now, let’s get into little complicated programming by making a {custom} animated change button, which is able to look one thing just like the picture under after implementing the subsequent code set.
Making a {custom} animated change button
We’ve got divided this button into two elements. The primary is a stateless widget that I’ve named as CustomAnimatedSwitch. On this stateless widget, we are going to create the {custom} change. Later, we are going to add it to the stateful widget to make use of the setState() operate to change on and off.
Step 1: Add dependencies
simple_animations: ^5.0.0+2
Step 2: Outline variables
First, we are going to outline our named fixed variables utilizing an enum and a Boolean:
enum _CustomSwitchParams { paddingLeft, shade, textual content, rotation }

closing bool toggle;
Secondly, since we’re utilizing the straightforward animation package deal with the cascade notation (double dot operator), we’re calling features on the MovieTween object we created to entry its properties. Principally, we’re including animations to the enums that we added earlier:
var customTween = MovieTween()
  ..scene(length: const Length(seconds: 1))
      .tween(_CustomSwitchParams.paddingLeft, 0.0.tweenTo(60.0))
  ..scene(length: const Length(seconds: 1))
      .tween(_CustomSwitchParams.shade, Colours.purple.tweenTo(Colours.inexperienced))
  ..scene(length: const Length(milliseconds: 500))
      .tween(_CustomSwitchParams.textual content, ConstantTween('OFF'))
      .thenTween(_CustomSwitchParams.textual content, ConstantTween('ON'),
          length: const Length(milliseconds: 500))
  ..scene(length: const Length(seconds: 1))
      .tween(_CustomSwitchParams.rotation, (-2 * pi).tweenTo(0.0));
Step 3: CustomAnimationBuilder
Subsequent, we are going to construct our CustomAnimationBuilder widget and outline its required properties to assemble the change animation:
CustomAnimationBuilder<Film>(
   // management of the animation
   management: toggle ? Management.play : Management.playReverse,
   // the relative place the place animation will begin
   startPosition: toggle ? 1.0 : 0.0,
   // outline distinctive key
   key: const Key('0'),
   length: customTween.length * 1.2,
   // film tween object
   tween: customTween,
   curve: Curves.easeInOut,
   builder: (context, worth, baby) {
     return Container(
       ornament:
           _outerDecoration(shade: worth.get(_CustomSwitchParams.shade)),
       width: 100.0,
       peak: 40.0,
       padding: const EdgeInsets.all(4.0),
       baby: Stack(
         kids: [
           Positioned(
             child: Padding(
               padding: EdgeInsets.only(
                 left: value.get(_CustomSwitchParams.paddingLeft),
               ),
               child: Transform.rotate(
                 angle: value.get(_CustomSwitchParams.rotation),
                 child: Container(
                   decoration: _innerDecoration(
                     color: value.get(_CustomSwitchParams.color),
                   ),
                   width: 30.0,
                   child: Center(
                     child: Text(
                       value.get(_CustomSwitchParams.text),
                       style: const TextStyle(
                           height: 1.5,
                           fontSize: 12,
                           fontWeight: FontWeight.bold,
                           color: Colors.white),
                     ),
                   ),
                 ),
               ),
             ),
           ),
         ],
       ),
     );
   },
 );
}
Step 4: CustomSwitchButton (stateful widget)
Coming to the second a part of creating our {custom} change button, now we have so as to add one other Dart file containing a stateful widget, which we are going to name CustomSwitchButton.
First, outline a Boolean variable and set its worth to false:
bool _switched = false;
Secondly, create a technique with the setState() operate to toggle between true and false:
void toggleSwitch() {
  setState(() {
    _switched = !_switched;
  });
}
Lastly, we’re including our CustomAnimatedSwitch to this Dart file wrapped with GestureDetector, including the toggleSwitch technique to the onTap() operate.
That’s it! We’ve got our absolutely practical, custom-made, animated change button. Please take a look at the code under and the photographs together with it:
@override
 Widget construct(BuildContext context) {
   return Scaffold(
     appBar: AppBar(
       title: const Textual content('Customized Animated Change'),
     ),
     physique: GestureDetector(
       onTap: toggleSwitch,
       baby: Middle(
         baby: Column(
           crossAxisAlignment: CrossAxisAlignment.heart,
           mainAxisAlignment: MainAxisAlignment.heart,
           kids: [
             const Padding(
               padding: EdgeInsets.all(10.0),
               child: Text('Tap to Check Custom Animated Switch'),
             ),
             const SizedBox(
               height: 20.0,
             ),
             CustomAnimatedSwitch(toggle: _switched),
           ],
         ),
       ),
     ),
   );
 }
}
Common Flutter packages for switches and toggles
If you don’t want to create your individual change button, you’ll be able to all the time use any of the under packages that do the very same as we did to make our personal {custom} animated change.
AnimatedToggleSwitch: Easy and animated toggle change for a number of selections. It’s a very good different in case you don’t wish to use one thing like a dropdown menu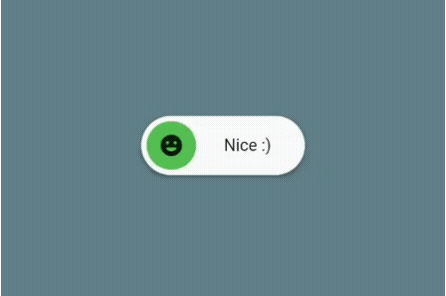
FlutterSwitch: A simple-to-implement {custom} change created for Flutter. Give it a {custom} peak and width, border for the change and toggle, border radius, colours, toggle dimension, a option to show an On and Off textual content, and be capable to add an icon contained in the toggleToggleSwitch: A easy toggle change widget. It may be absolutely personalized with desired icons, width, colours, textual content, nook radius, animation, and many others. It additionally maintains a variety state
I’m leaving the hyperlink to the entire venture that you could find on my GitHub web page. If there are any points or you’ll be able to enhance the code, let me know, and I will provide you with entry to my venture.
Thanks very a lot and keep protected!
