

Content material, content material, content material! Are you overwhelmed by the quantity of content material you’re requested to learn each day? Don’t you want you could possibly shortly summarize massive chunks of textual content? It’d be an enormous timesaver, particularly for faculty college students who learn a whole lot of content material!
On this weblog publish, I’ll educate you find out how to construct an app in Python that performs textual content recognition on pictures, summarizes that textual content, after which sends you a abstract by way of SMS.
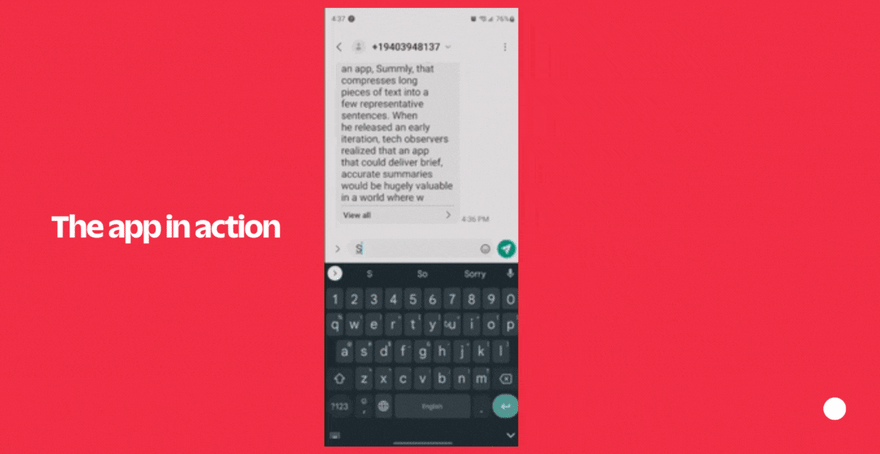
Right here’s a typical use case: you see a big wall of textual content that you simply don’t wish to learn, so that you pull out your telephone to take an image of that textual content, then you definately obtain a SMS with a pleasant summarization. Growth, time saved!

Conditions
Earlier than getting began, it’s essential to have the next earlier than shifting on:
Entry the Code
If weblog posts aren’t your factor and also you’d want to simply take a look at the code, it’s accessible on this GitHub repository.
Desk of Contents
For context, this weblog publish is structured as follows:
- Setup Google Cloud Imaginative and prescient: Arrange our Google Cloud account and allow the Imaginative and prescient API
- Setup OpenAI: Arrange our OpenAI account
- Setup Native Setting: Arrange our native growth setting
- Cloud Imaginative and prescient API: Utilizing ML, detect phrases from photos utilizing the Google Cloud Imaginative and prescient API
- **OpenAI API: **Utilizing AI, generate a abstract of textual content from the OpenAI API
- Twilio SMS API: Ship a textual content message (containing the abstract) when the appliance is triggered
Setup Google Cloud Imaginative and prescient
To make use of the Google Cloud Imaginative and prescient API, we have to set it up by following the quickstart information. This course of does take a while, however don’t get discouraged. Simply observe the quickstart information step-by-step, or proceed alongside right here (should you don’t wish to tab out).
Assuming you have already got a Google Cloud account, you’ll must create a brand new mission inside Google Cloud. Give it a Mission identify of summarize-text and click on Create.

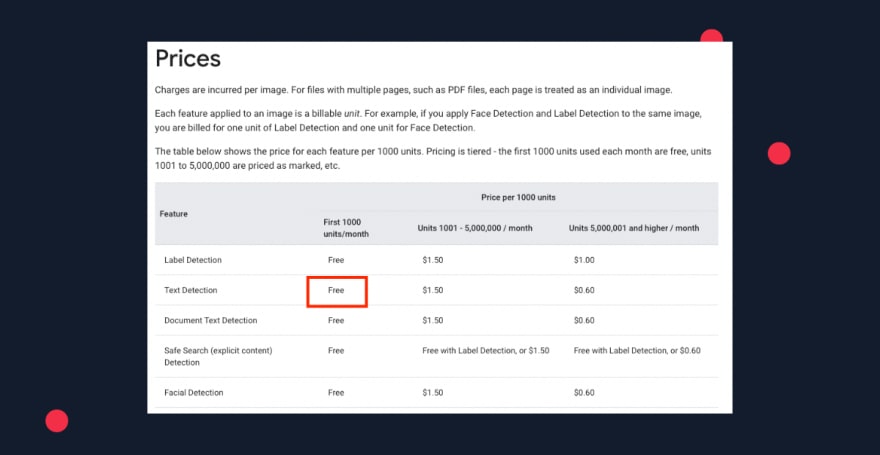
Subsequent, allow billing for the mission we simply created. However don’t fear, you received’t be charged except you exceed the Cloud Imaginative and prescient month-to-month limits. Discover ways to verify if billing is enabled on a mission.
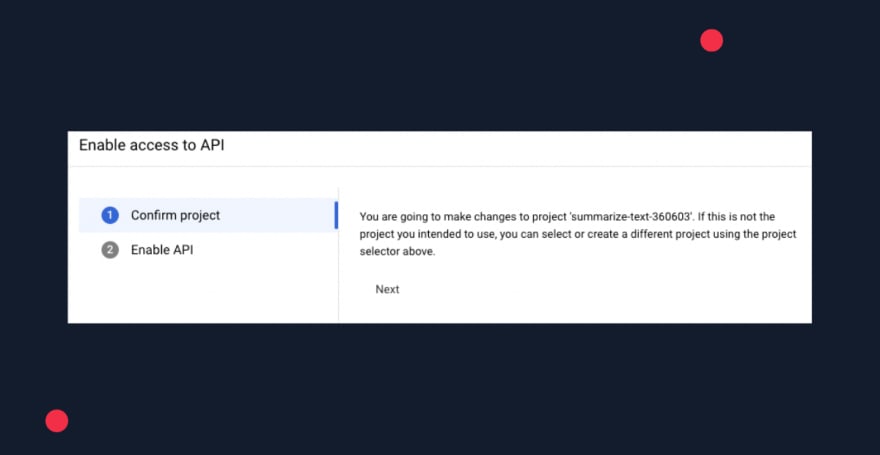
Allow the Imaginative and prescient API for the mission we created earlier, referred to as summarize-text.
Subsequent, arrange authentication with a service account. Go to Create a service account, choose our mission (summarize-text), within the Service account identify subject, enter a reputation of summarize-text, within the Service account description subject, enter an outline of Service account for summarize-text. Proceed after which grant the position of Mission > Proprietor to your service account.
After making a service account, create a service account key by clicking on the e-mail tackle of service account: summarize-text. Click on Keys, then Create new key. After doing this, a JSON key file shall be downloaded to your laptop. You’ll must retailer this file in a location of your selection after which set an setting variable pointing to the trail of this JSON file.
For instance, on Linux or MacOS, in .zshrc:
export GOOGLE_APPLICATION_CREDENTIALS="/residence/person/Downloads/service-account-file.json"
For instance, on Home windows with PowerShell:
$env:GOOGLE_APPLICATION_CREDENTIALS="C:UsersusernameDownloadsservice-account-file.json"
Subsequent, set up the Google Cloud CLI. Since that is completely different for every working system, observe the steps outlined in Google’s gcloud CLI set up information.
Lastly, set up the Python consumer library with the next command:
pip set up --upgrade google-cloud-vision
Setup OpenAI
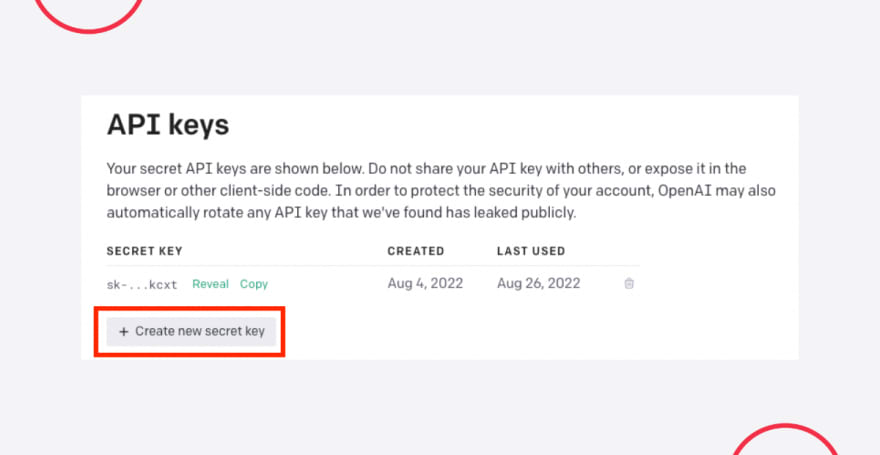
Assuming you already registered for an account with OpenAI, you’ll must create an API key in your person account settings, which can permit you to authenticate your software with OpenAI. Copy this key and don’t share it with anybody!
We’ll securely retailer this API key within the following part.
Setup Native Setting
Create an empty mission listing:
mkdir summarize_text
Then grow to be that listing as that’s the place our code shall be.
cd summarize_text
Create a digital setting:
python -m venv summarize
Activate our digital setting:
supply summarize/bin/activate
Set up dependencies to our digital setting:
pip set up python-dotenv twilio Flask requests google-cloud-vision openai
Let’s create a file referred to as .env within the mission’s root listing to retailer our API keys in setting variables.
Inside that file, we’ll create an setting variable referred to as OPENAI_API_KEY.
(Exchange PASTE_YOUR_API_KEY_HERE with the API key that you simply copied earlier.)
OPENAI_API_KEY=PASTE_YOUR_API_KEY_HERE
For instance:
OPENAI_API_KEY=sk-1234567890abcdefg
Since we’ll even be working with our Twilio account, we’ll want to change this file much more. Log into your Twilio console, then scroll down to search out your Account SID and Auth Token. Add two further traces to the .env file, however change the values to equal your distinctive Account SID and Auth Token.
TWILIO_ACCOUNT_SID=PASTE_YOUR_ACCOUNT_SID_HERE
TWILIO_AUTH_TOKEN=PASTE_YOUR_AUTH_TOKEN_HERE
For instance:
TWILIO_ACCOUNT_SID=ACxxxxxxxxxxxx
TWILIO_AUTH_TOKEN=321321321321321
In the event you’re pushing these to a Git repository, please be certain that so as to add the .env file to your .gitignore in order that these credentials are secured.
We’ll be working with native photos, so in your mission’s root listing, create a brand new listing referred to as assets. For now, it will likely be an empty listing, however later that is the place photos shall be saved.
Cloud Imaginative and prescient API
Since we set it up already, it’s possible you’ll be questioning what the Imaginative and prescient API is. It’s a Google API that gives highly effective pre-trained machine studying fashions by way of REST. With the API, you are able to do issues like detect faces, determine locations, acknowledge celebrities, and rather more. For this app, we shall be utilizing Optical Character Recognition (OCR) to acknowledge textual content in photos.
Create a file referred to as detect.py within the mission’s root listing and duplicate and paste the next code into the file:
import io
import os
from google.cloud import imaginative and prescient


def detect_text():
    consumer = imaginative and prescient.ImageAnnotatorClient()

    file_name = os.path.abspath('assets/picture.jpg')

    with io.open(file_name, 'rb') as image_file:
        content material = image_file.learn()

    picture = imaginative and prescient.Picture(content material=content material)

    response = consumer.text_detection(picture=picture)
    texts = response.text_annotations
    return(texts[0].description)
The detect_text operate will take a look at an area file out of your laptop–on this case a picture from the assets/ listing referred to as picture.jpg. Then, we’ll learn the content material from that picture and use the text_detection operate from the Imaginative and prescient API to detect textual content. Lastly, we’ll return that textual content.
In the event you had been to run the detect_text operate as is, it wouldn’t work since we’re studying a picture referred to as picture.jpg from the assets/ listing that doesn’t at present exist. However we’ll come again to this later.
Create a brand new file referred to as utilities.py within the mission’s root listing and paste the next code into the file:
import requests

def save_image(image_url):
    img_data = requests.get(image_url).content material
    with open('assets/picture.jpg', 'wb') as handler:
        handler.write(img_data)
The save_image operate will take a picture url and reserve it as a file referred to as picture.jpg inside the assets/ listing.
OpenAI API
Now that we’ve written the code for interacting with the Cloud Imaginative and prescient API that permits us to carry out textual content recognition on pictures, we are able to use the OpenAI API to summarize that textual content. OpenAI is an AI firm (shock, shock) that applies fashions on pure language for varied duties. You give the API a immediate, which is pure language that you simply enter, and the AI will generate a response. For instance, should you enter a immediate “write a tagline for an ice cream store” you might even see a response like “we serve up smiles with each scoop!”
Within the mission’s root listing create a file referred to as summarize.py and paste the next code into the file:
import os
import openai
from dotenv import load_dotenv
from detect import detect_text
from utilities import save_image

load_dotenv()

openai.api_key = os.getenv("OPENAI_API_KEY")

def get_text_from_image(url):
    save_image(url)
    return detect_text()

def generate_prompt(url):
    return f"In a single-sentence, summarize the next textual content: n {get_text_from_image(url)} n"

def summarize_prompt(url):
    response = openai.Completion.create(
        mannequin="text-davinci-002",
        immediate=generate_prompt(url),
        temperature=0.8,
        max_tokens=100,
        top_p=1.0,
        frequency_penalty=0.0,
        presence_penalty=0.0
    )
    print(response.selections[0].textual content)
    return(response.selections[0].textual content)
The summarize_prompt operate makes use of the OpenAI API create operate to reply to a immediate that we give it (generate_prompt). The mannequin we’re specifying (text-davinci-002) is OpenAI’s most succesful GPT-3 mannequin. The max_tokens parameter units an higher certain on what number of tokens the API will return, or how lengthy our response shall be. generate_prompt will create a immediate that summarizes textual content in a single sentence. get_text_from_image will name our beforehand created features from the earlier part.
Twilio SMS API
Now, we’ll create the code in our software that can all us to textual content our Twilio telephone quantity and get again a response. That is referred to as sending an Inbound SMS. Consider inbound as an inbound SMS to a Twilio telephone quantity triggering your software. On this case, we shall be sending a textual content to a Twilio telephone quantity (our set off), then having it reply by sending a reply containing a abstract.
Create a brand new file (in the identical listing) referred to as app.py. Utilizing Flask, a Python net framework, we’ll create an app that runs on an area server. Paste the next code into app.py:
from flask import Flask, request
from twilio.twiml.messaging_response import MessagingResponse
from summarize import summarize_prompt

app = Flask(__name__)

def reply(message):
   response = MessagingResponse()
   response.message(message)
   return str(response)

@app.route("/abstract", strategies=['GET', 'POST'])
def incoming_sms():
   user_input = request.type.get('NumMedia')
   if user_input == '1':
       pic_url = request.type.get('MediaUrl0')
       abstract = summarize_prompt(pic_url)
       return reply(f"{abstract}")
   else:
       return reply(f"Please ship an image containing textual content!")

if __name__ == "__main__":
   app.run(host='localhost', debug=True, port=8080)
Run the appliance in your native server with this command in your console (from the basis listing):
python app.py
Your software ought to be operating on http://localhost:8080. Output will look much like this:
 * Serving Flask app 'app' (lazy loading)
 * Setting: manufacturing
   WARNING: It is a growth server. Don't use it in a manufacturing deployment.
   Use a manufacturing WSGI server as an alternative.
 * Debug mode: on
 * Working on http://localhost:8080 (Press CTRL+C to stop)
 * Restarting with stat
 * Debugger is energetic!
 * Debugger PIN: 199-776-319
As of now, our software is just operating on a server inside your laptop. However we want a public-facing URL (not http://localhost) to configure a Webhook so Twilio can discover it. By utilizing a software, referred to as ngrok, we’ll “put localhost on the Web” so we are able to configure our webhook.
In one other console tab run the command:
ngrok http 8080
It will create a “tunnel” from the general public Web into port 8080 in our native machine, the place the Flask app is listening for requests. It is best to see output much like this:
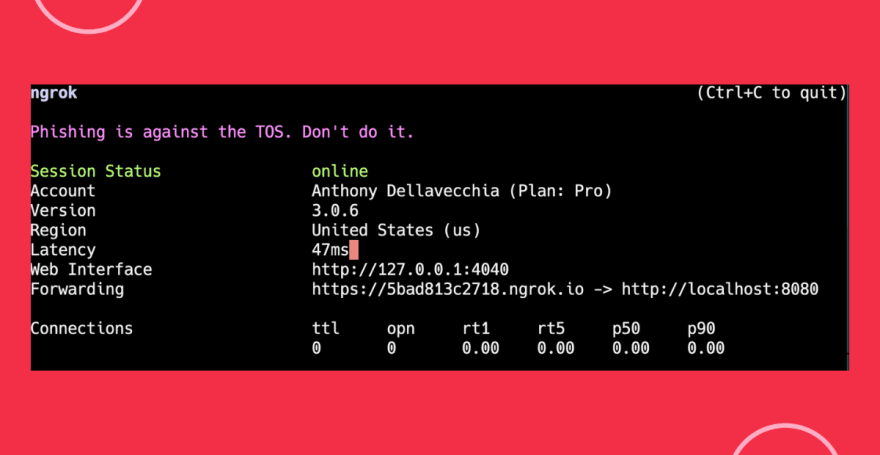
Be aware of the road that claims “Forwarding”. Within the picture above, it exhibits:
https://5bad813c2718.ngrok.io -> http://localhost:8080
Which means that our native software is operating publicly on
https://5bad813c2718.ngrok.io/abstract
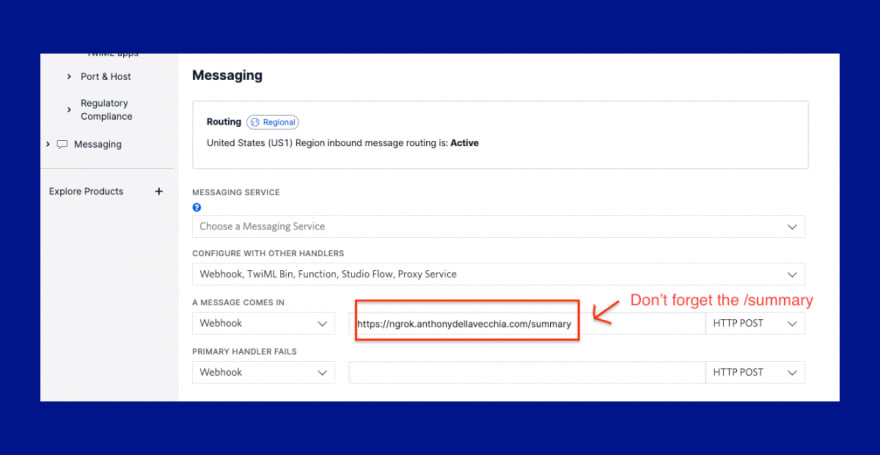
Throughout the Console, enter within the ngrok URL as a Webhook when “A Message Comes In”.
Please bear in mind that except you will have a paid ngrok account, every time you run the ngrok command a brand new URL shall be generated, so be sure you make the modifications inside the Twilio console.
Since our software and ngrok are operating, we are able to ship a textual content message to our Twilio telephone quantity and it’ll reply again with a abstract of textual content!

Present Me What You Construct
Now if there’s an enormous wall of textual content that you simply don’t wish to learn, pull out your telephone, take an image, after which textual content it to your Twilio quantity. You’ll get a response again with a brief abstract!
Thanks a lot for studying! In the event you discovered this tutorial useful, have any questions, or wish to present me what you’ve constructed, let me know on-line. And if you wish to study extra about me, take a look at my intro weblog publish.

