At this level, we’re half manner via a significant enchancment to the block we’ve been engaged on. Now we have the flexibility to edit the content material within the editor however we aren’t in a position to reserve it and since we aren’t in a position to reserve it, we aren’t capable of view it on the frontend.
Now, although, we’re at a spot the place we will save our knowledge, render it on the frontend, and proceed to guarantee that what the writer sees is what the guests see.
As I’ve performed with the remainder of the sequence, I like to recommend studying these first elements as a result of they’ll convey you in control on every little thing it is advisable do to rise up thus far:
- Required Instruments, Plugin Construction, Dependencies, Block Metadata
- The Backend, The Frontend, Performance, Types, a Working Demo
- Block Attributes, Editable Content material, Parts, Editor Types
Word that I nonetheless don’t have a GitHub repository arrange for this plugin. I’ll as soon as we attain a sure level, however not but. And that’s as a result of I feel studying via the fabric and having to implement it versus cloning and altering a number of issues round will help you study a few of this materials quicker.
Anyway, I ended the earlier put up stating:
We’re going to cowl
- easy methods to save the content material,
- render it on the frontend
And that may wrap up this preliminary half.
In order that’s what we’re going to do.
Block Editor Blocks: Saving Content material
By this level, try to be well-versed in each my opinions of the aim for the edit and save strategies. Within the earlier put up, we centered on the previous. On this put up, we’re going to deal with the latter.
However earlier than doing that, there’s a few ideas which are key to understanding earlier than merely implementing the performance of the save perform.
 Saving Information
Recall from earlier within the sequence that our save perform at present appears to be like like this:
save: () => {
    const blockProps = useBlockProps.save();
    return (
        <div {...blockProps}>
            That is content material from the frontend.
        </div>
    );
}
And all this does is solely write out the block attributes to the div container to the frontend, and it renders the desired string throughout the block. However as of the final put up, we’re now capable of edit the content material of the block. So what we need to do now just isn’t solely serialize the data however render it, too. And although the save perform makes each of these attainable, let’s first begin with merely saving the data.
To do that, we’re going to want to go the attributes to the save perform in order that we will entry them throughout the perform. Bear in mind the attributes we outlined within the earlier put up appear like this:
attributes: {
    content material: {
        kind: 'string',
        supply: 'textual content',
        selector: 'enter'
    },
}
And so the save perform signature ought to now appear like this:
save: ({ attributes }) => {
    // TODO...
}
Word from the JSON knowledge above, we’ve a content material property. So let’s first begin by changing the string of content material within the save perform with attributes.content material and see what occurs. The code ought to appear like this:
save: ({ attributes }) => {
    const blockProps = useBlockProps.save();
    return (
        <div {...blockProps}>
            {attributes.content material}
        </div>
    );
}
Run npm run construct within the root of your venture after which refresh the editor that has your block. You’ll most likely see a message about the way you’ll have to Try Block Restoration and that is just because we’ve rebuilt the belongings. Click on the button after which the block ought to seem precisely because it did after we left off.
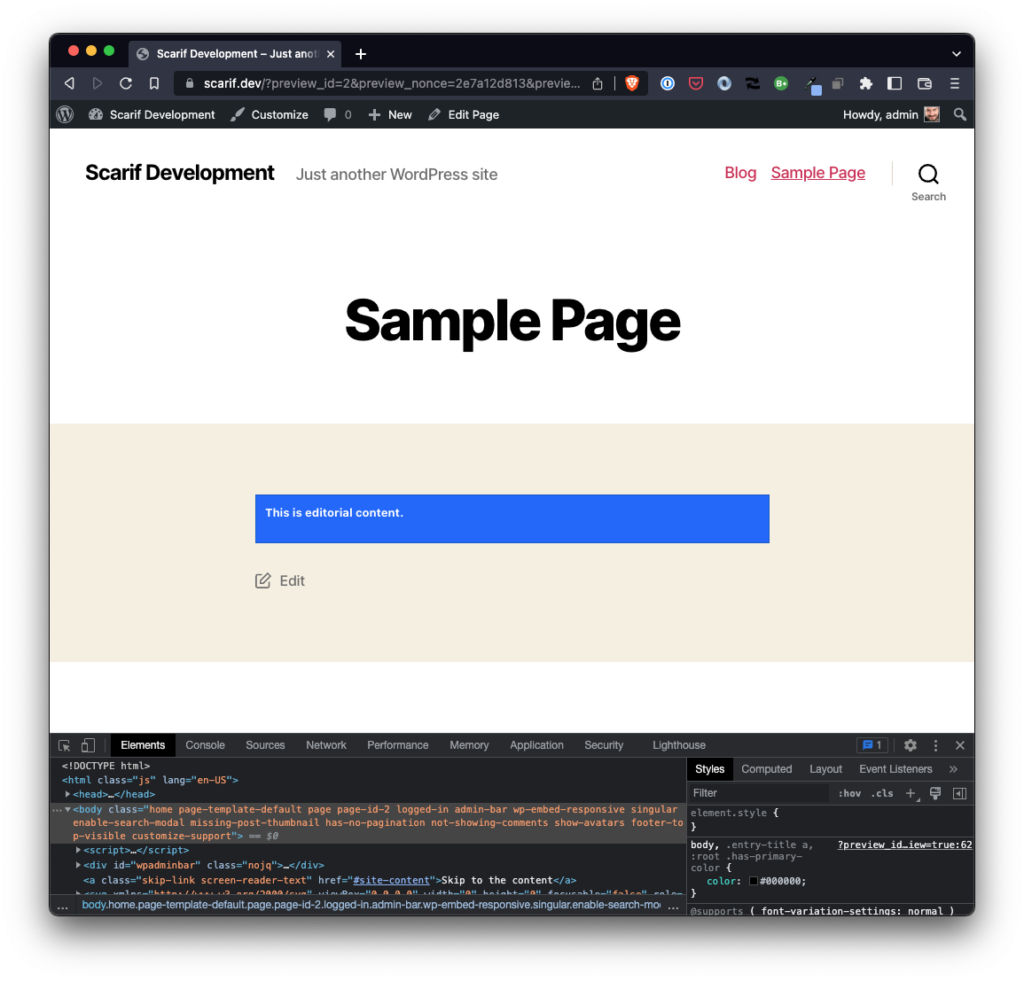
Now go forward and kind some content material into the block. Click on Save Draft after which click on on Preview in a brand new tab. This may open the window in, y’know, a brand new tab and you need to see see the content material you’ve typed (although it might not be styled the identical manner – that’s coming later).
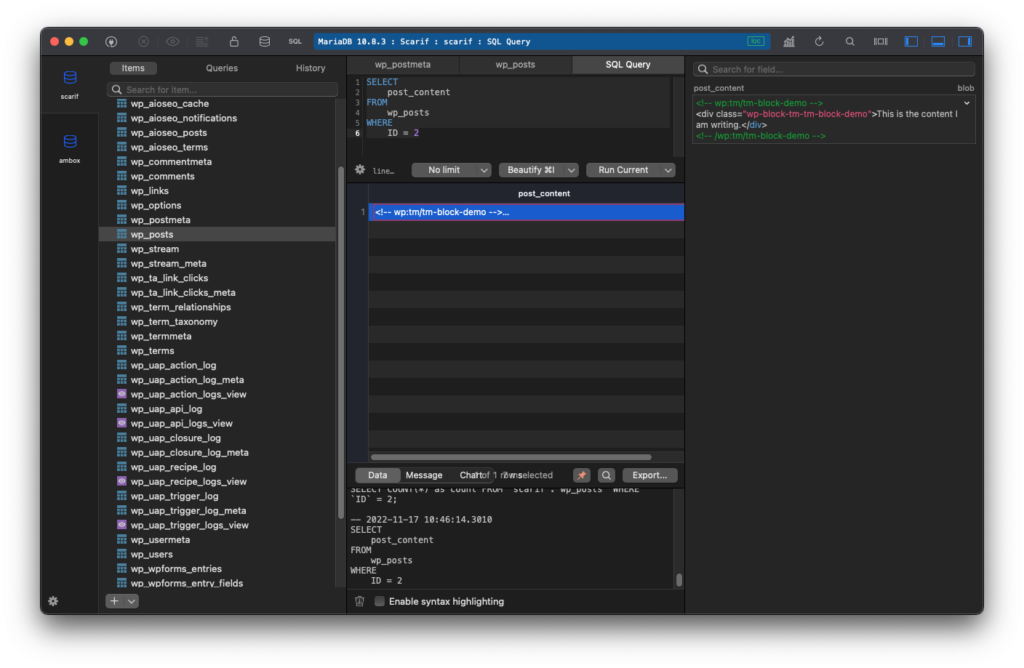
Discover the information has saved. Simple, proper? We will take this a step additional by wanting on the database to see what was really written.
- Open your database front-end
- Navigate to the
postsdesk - Then run a question towards, say, the put up ID or the put up title the place you possibly can evaluation the content material.
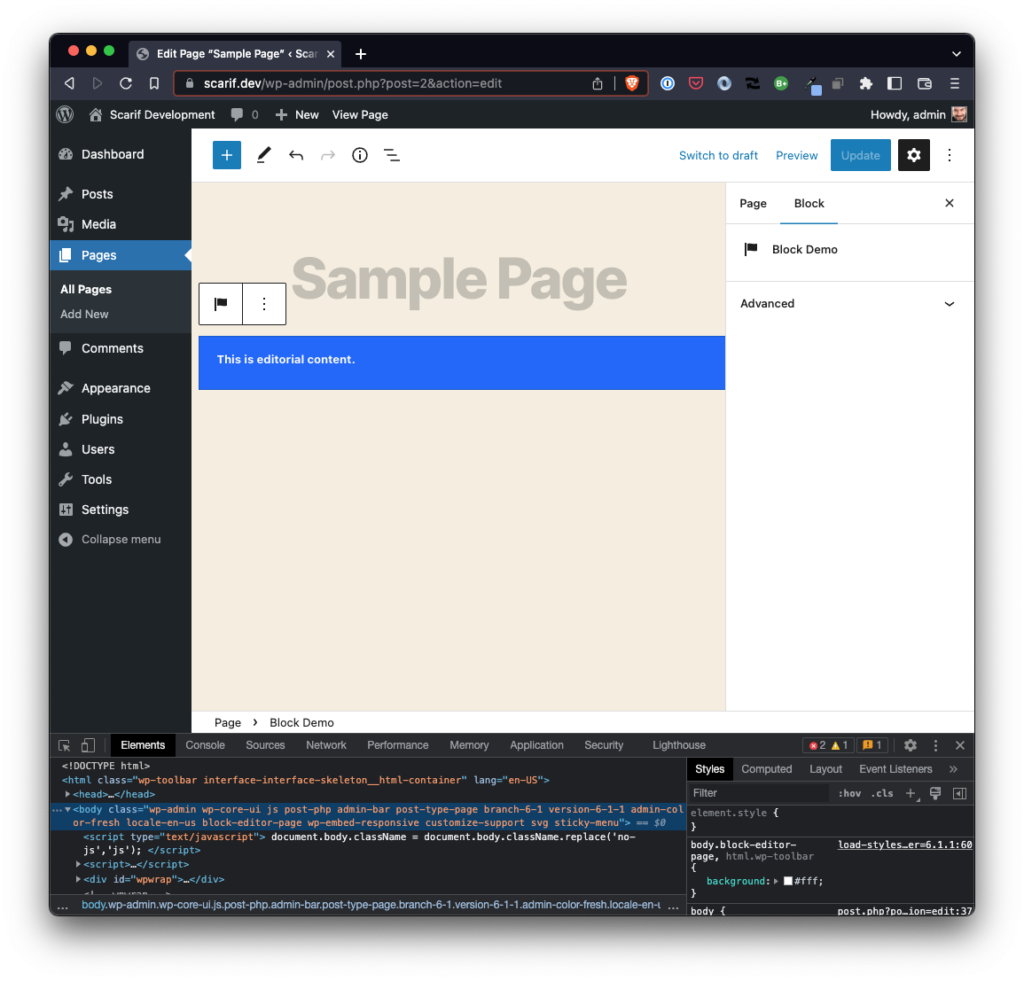
What you need to see is the put up knowledge together with the textual content written within the customized block we’ve been engaged on:
And that is the place WordPress has the entire built-in performance for saving the content material to the database.
 Fashion the Frontend
Now what we have to do is ensure that the frontend appears to be like just like the backend which is considerably inconvenient as a result of altering the backend is what’s inflicting us to do that (recall from the earlier put up the rationale we needed to modify the kinds is due to the TextControl).
Briefly, we have to change the font-family, the font-size, and the padding. We additionally want so as to add a div across the content material on the frontend. We will, and can, change this up later however for now this may proceed to indicate the iterative nature of block growth.
At this level, there are a variety of how in which you’ll choose to implement your adjustments. For me, I’m a fan of merely launch the dev instruments in no matter browser I’m utilizing (I’m a fan of Courageous or Firefox) after which inspecting the weather that I have to model.
So the very first thing I’m going to do is to change the the aave perform yet one more time so as to add a wrapper across the {attributes.content material} in order that it inherits among the kinds of the theme I’m utilizing.
save: ({ attributes }) => {
    const blockProps = useBlockProps.save();
    return (
        <div {...blockProps}>
            <div>{attributes.content material}</div>
        </div>
    );
}
Subsequent, I’m going so as to add the next kinds to my index.scss file:
.entry-content .wp-block-tm-tm-block-demo div {
    font-family: -apple-system, BlinkMacSystemFont, Segoe UI, Roboto, Oxygen-Sans, Ubuntu, Cantarell, Helvetica Neue, sans-serif;
    font-size: 13px;
    padding: 0 0 1em;
}
Word the rationale I’m ensuring to focus on the block throughout the entry-content selector is as a result of I solely need it to use on the frontend. Certain, there are methods we will clear this up or do that in a different way given among the work that the API offers however, for now, this will get us one step nearer from what wee see within the backend:
To what we see on the frontend:
Fortunate for us, although, there’s extra we will do if we need to introduce options that permit the customers to choose their solely colours from throughout the editor.
 TODO
TODO
There are a selection of locations we will go from right here particularly because it pertains to styling our block and introducing options for customers to customise what they see.
So beginning within the subsequent article, we’ll get into precisely that. It would possible require us eradicating among the work we’ve performed but additionally introducing new options into the Block Editor in addition to working with options of WordPress that require us to show choices that save knowledge into the put up metadata desk.
However it’s all attainable given the APIs accessible to us by WordPress.
 References