The primary two articles on this sequence have been lengthy. Not solely lengthy by way of the content material they cowl, however lengthy compared to the standard content material I write. A part of that is due to the character of what I’m making an attempt to cowl and a part of it has to do with getting the essential plugin going.
We’re at a degree now, although, the place we are able to begin to shorten the size of the article and focus extra narrowly on the performance and its implementation.
Should you’re stumbling throughout this sequence and that is the primary submit you’re studying otherwise you’ve not performed any of the work previous to get every part off the bottom but (as I don’t have a GitHub repository arrange for this plugin simply but – and that’s on goal  ), right here’s what’s been coated to date:
- Required Instruments, Plugin Construction, Dependencies, Block Metadata
- The Backend, The Frontend, Performance, Kinds, a Working Demo
Within the earlier article, I acknowledged:
Within the subsequent article, we’ll begin speaking about how we are able to edit textual content throughout the context of the Block Editor, tips on how to save the modifications, after which view them on the frontend.
Initially, I deliberate to cowl the next in a single article:
- convert the factor within the block editor right into a subject we are able to edit,
- save the content material of the sphere,
- render the content material that’s above
As an alternative, I’m going to cowl simply the primary level above so we are able to focuses solely on the editor and tips on how to manipulate information inside its context. Then we’ll comply with the article up with tips on how to save the content material and render it on the frontend.
Block Editor Blocks: Editable Content material
Recall from the earlier article, working with blocks into the Block Editor is normally made up of two capabilities:
And although this text is primarily going to be involved with permitting us to edit the content material throughout the Block Editor, it’s vital to do not forget that the operate names are overloaded.
That’s, edit might be regarded as the operate through which the code accountable for manipulating the info and that’s it (which isn’t all that unhealthy). Nonetheless, save has far more duty.
Since we’re about to get into the performance of modifying content material within the Block Editor and that content material will finally must be saved and rendered, this is why I’m breaking this subject into a number of components.
 Understanding Block Attributes
Earlier than moving into anymore code, there’s an vital idea to know concerning blocks particularly in the case of modifying and serializing data. And that’s the idea of block attributes.
From the handbook:
Attributes are the best way a block shops information, they outline how a block is parsed to extract information from the saved content material.
Personally, I want that is was a little bit extra fleshed out throughout the Handbook however I’ll do what I can to develop on it right here.
First, it’s vital to notice that attributes are handed to the registerBlockType operate.
Secondly, they’re the second argument handed (after the identify of the block), and is a JSON object – or, extra usually, a knowledge construction – that identifies what content material goes to be saved and the way it may be learn.
Third, the JSON is structured such that the attributes node has youngster components the place every youngster represents the content material to be saved. For instance, let’s say that we’re going to have a content material string. Then, the info construction would begin to seem like this:
attributes: {
  content material: {
  }
}
And in our case, we’re going to be working with a string that might be situated inside an enter factor (which I’ll focus on later on this article). So the construction may look one thing like this:
attributes: {
  content material: {
    kind: 'string',
    supply: 'textual content',
    selector: 'enter',
  }
}
And that is however a easy instance. We’ll see this extra in only a bit. Word there are just a few supported sorts for blocks which might be discovered right here
How Do We Set These Attributes?
One other idea that we’ve got to know in the case of attributes is tips on how to really set or save them for the block we’re creating. And since we’ve got the info construction obtainable, both we’re going to want to jot down the code or we are able to leverage one thing that exists throughout the underlying utility.
This operate permits the block to replace particular person attributes based mostly on consumer interactions.
That is the place the setAttributes operate comes into play. In brief, setAttributes is a operate supplied by WordPress that permits us to save lots of the attributes information construction at any time when we’re modifying the content material of a block.
The primary take away proper now’s that each the attributes construction and a reference to the setAttributes operate must be handed to them edit operate.
For instance, the operate signature will now look one thing like this:
edit: ({ attributes, setAttributes }) => {
  // ...
}
And now we are able to name this operate inside edit at any time when content material is being edited. We’ll see how this works after we get into the implementation.
 Changing an Component Into Editable Content material
Now that we’ve coated how a block can have attributes and people attributes might be saved, it’s time to start refactoring the edit operate so it permits us to really edit the content material of the block.
Recall from the earlier articles that our edit operate presently seems like this:
edit: () => {
    return (
        "That is content material from the editor."
    );
},
We have to replace this in 3 ways:
- add help for attributes,
- replace the operate to work with these attributes,
- use an obtainable management to make the textual content editable.
Right here’s how we do all the above.
Attributes
First, let’s add the attributes information construction that outlines the info that must be serialized from the editor:
registerBlockType(identify, {
    attributes: {
        content material: {
            kind: 'string',
            supply: 'textual content',
            selector: 'enter'
        },
    },
Word right here that the selector kind we’re utilizing is an enter. This has to do with the kind of management that we’re going to be utilizing later.
For the sake of readability, although, know that we’re going to be leveraging a management inside our div factor such that the consumer can edit the content material of it. And, since every part boils all the way down to HTML ultimately, this explicit editable performance might be supplied by an enter factor.
Replace the Operate
Subsequent, we have to replace the edit operate such that it accepts the attributes and a reference to the setAttribute operate. To do that, we’ll arrange the operate in order that it seems like what we mentioned above.
edit: ({ attributes, setAttributes }) => {
    const blockProps = useBlockProps({
        className: 'tm-block-demo-container'
    });
    return (
        <div {...blockProps}>
          <!-- TODO -->
        </div>
    );
},
Will populate the remainder of the performance within the subsequent step. Discover, although, the fundamentals of the operate haven’t modified:
- we’re nonetheless utilizing a
divfactor as our main container, - we’re making use of the
blockPropsto thedivin order that we’ve got management of it throughout the Block Editor.
What we’ve modified, although, is what the operate accepts as arguments and we’ve eliminated the string that was initially there. We’ll be changing this with one thing supplied by WordPress, however first, all of this must be put in place so we are able to do this.
Editable Content material
Step one to creating certain our content material is editable is so as to add a management that permits us to really edit content material. In normal HTML, this is able to be one thing like an enter or a textarea after which we’d validate, sanitize, and serialize on the server-side utilizing an current WordPress hook and API name.
One thing like that also occurs, nevertheless it’s a little bit totally different utilizing the Block Editor and it’s one thing I’ll showcase within the subsequent submit.
However this raises a query: What management, or element, does WordPress present that permits us to to enter components?
At any time when we’re confronted with a query like this, the primary place we should always test is the Part Reference within the Block Editor Handbook. And it so occurs there’s a TextControl.
TextControls are greatest used at no cost textual content entry. … As a result of TextControls are single-line fields, they aren’t appropriate for amassing lengthy responses.
Based on the handbook, we have to use the @wordpress/parts package deal to seize the element after which we’ll add the next to the highest of our index.js file such that it seems like this:
import { registerBlockType } from '@wordpress/blocks';
import { useBlockProps } from '@wordpress/block-editor';
import { TextControl } from '@wordpress/parts';

import metadata from './block.json';
const { identify } = metadata;

import './index.scss';
Then, we’ll come all the way down to the edit operate and full it by including the next:
edit: ({ attributes, setAttributes }) => {
    const blockProps = useBlockProps({
        className: 'tm-block-demo-container'
    });
    return (
        <div {...blockProps}>
            <TextControl
                placeholder="That is content material from the editor."
                className="tm-block-demo-input"
                worth={attributes.content material}
                onChange={(worth) => setAttributes({ content material: worth })}
            />
        </div>
    );
},
The important thing issues to note listed below are the next:
- The
placeholderattribute has the identical textual content that we initially had displaying within the first iteration of the plugin. This worth won’t render on the frontend however its meant to indicate, on this sequence of articles, and we start transferring from static information to dynamic information. - The
worthattribute reads thecontent materialproperty of theattributesinformation construction and, if set, locations it into the sphere. Additional, since it is aTextControl, that is the place the consumer can enter their data to render on the frontend, as nicely. - The
onChangeattribute is a operate that accepts the contents of theworthattribute, applies to thecontent materialproperty of theattributesinformation construction, after which passing that tosetAttributesto the info can [eventually] be saved.
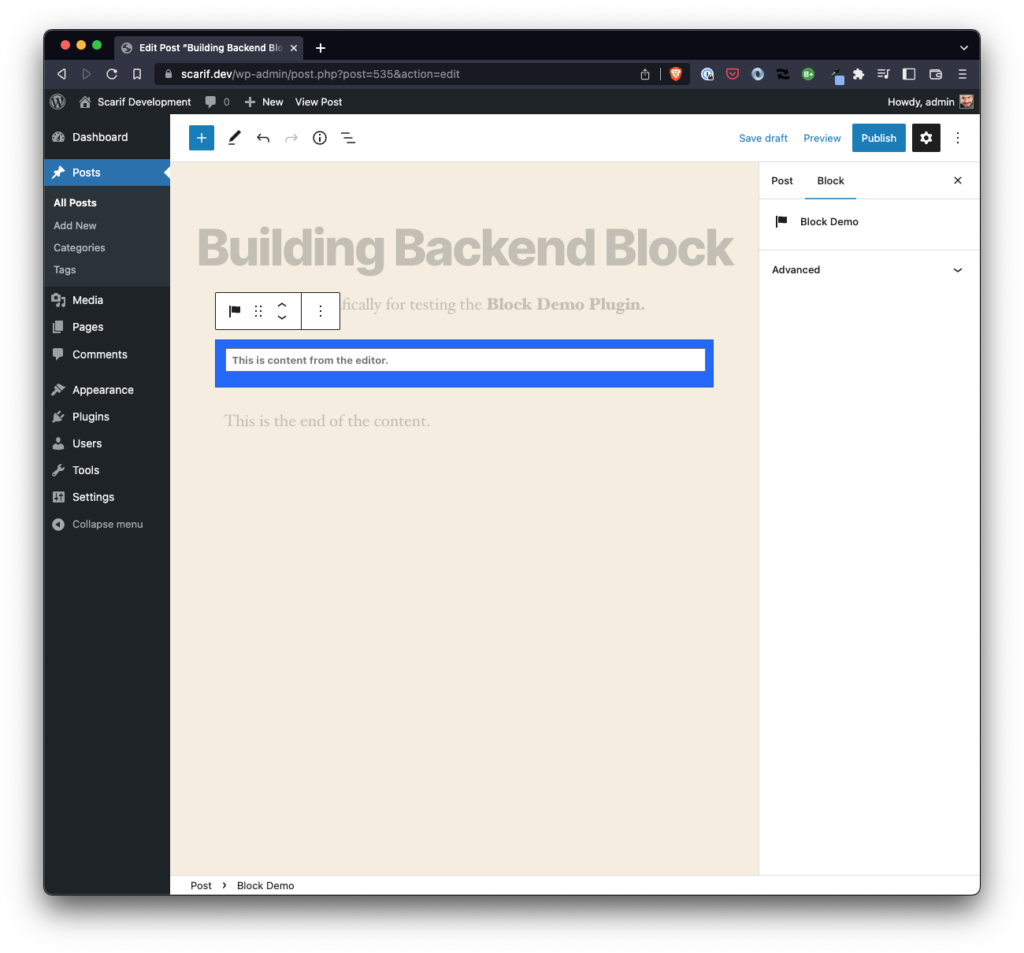
While you run npm run construct within the terminal after which add the block to the Block Editor, you need to see one thing like this:
After which you may introduce your personal textual content into the management in order that it seems one thing like this:
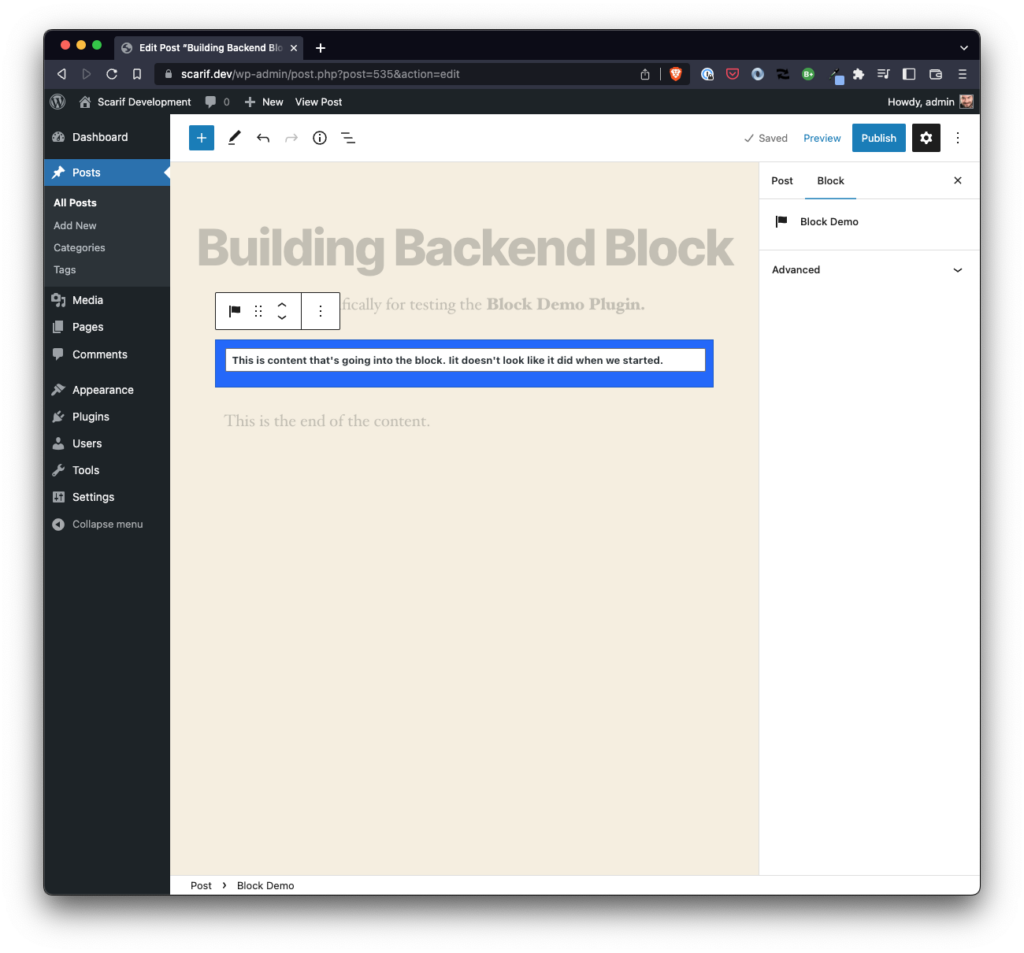
Clearly, although, this doesn’t seem like it did after we began and this is the place we come to the final a part of this explicit article.
 Styling the Block
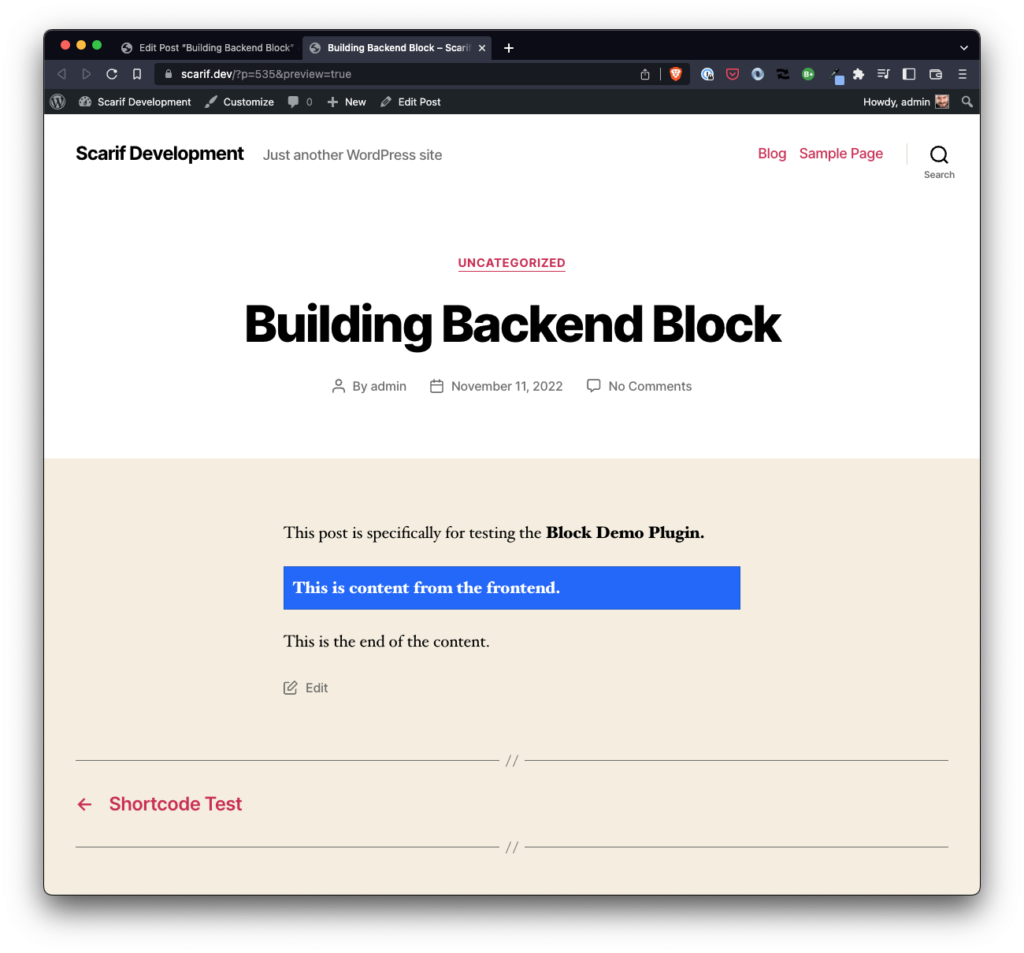
Should you’re questioning how this could look, there are two issues which can be obtainable to simply information us:
- the prevailing stylesheet,
- the best way the block seems on the frontend (as a result of we aren’t but rendering what we’ve developed within the
editoperate)
Recall:
After which for those who take a look at the prevailing index.scss, you’ll see the next:
.tm-block-demo-container,
.tm-block-demo-container,
.wp-block-tm-tm-block-demo {
    shade: #fff;
    background: #0d63fd;
    border: 1px stable #0a58ca;
    font-weight: daring;
    padding: 0.5em;
    width: 100%;
}
The gist of what we have to do is to replace the enter factor kinds in order that it seems prefer it was a part of the div factor we initially had within the edit operate. To do that, you should utilize the developer instruments in your most well-liked browser.
In the end, you need to find yourself with one thing like this:
.tm-block-demo-container,
.wp-block-tm-tm-block-demo {
    shade: #fff;
    background: #0d63fd;
    border: 1px stable #0a58ca;
    font-weight: daring;
    padding: 0.5em;
    width: 100%;
}

.tm-block-demo-input enter,
.tm-block-demo-input enter:focus {
    border: none !vital;
    background: #0d63fd;
    shade: white;
}
Now run npm run construct and refresh the browser. You’ll see the next:
- the font seems totally different,
- the
placeholderhas a unique, - specializing in the
enterfactor exhibits a slight border
All of these items might be mounted and we could do that earlier than the sequence is over; nonetheless, the differentiation between the states of the factor matter. That’s, when there’s only a placeholder and when the consumer is modifying the content material issues.
Granted, the colours proper now aren’t nice by way of distinction however we’re going to proceed transferring ahead with this block as-is. In the end, we’re going to be including extra performance and we’re going to be permitting the consumer to alter colours of the factor.
So I don’t wish to get too far forward of ourselves by introducing content material that we’re simply going to must finally take away later. In different phrases, why do work that we’re simply going to take away later?
 TODO
TODO
At this level, we’ve launched lots of performance to the Block Editor and we’ve coated a couple of further ideas that start to provide the editor side of our customized block extra utility.
However what good is it actually at any time when our readers can’t see what’s taking place? So within the subsequent submit, we’re going to proceed constructing this out particularly so our customers can see the modifications we’re making within the editorial facet of WordPress.
Particularly, we’re going to cowl:
- tips on how to save the content material,
- render it on the frontend
And that can wrap up this preliminary a part of getting a block began that helps consumer enter and serialization. However there’s much more to go from there.
 Reference