The Unity Terrain is a Unity native, highly effective, and versatile device for degree and environmental designing. It supplies simple mechanisms to mould and modify terrains utilizing the idea of top maps.
On this article, we’ll see the fundamentals of easy methods to use this device and its most important options. We begin with the idea of how terrain era works through the use of top maps. Then we’ll talk about the first mechanisms to change a terrain. By the tip of the article, I current a typical workflow for making good Unity scenes utilizing free belongings and the Unity Terrain device.
From top maps to terrains
A top map is a texture that modifications how a selected mesh is seen by the participant, just like how regular maps work. Extra particularly, the peak map info shifts the mesh’s vertices to show options similar to elevations, cliffs, plains, and craters.
Resulting from its 2D nature, a single top map can solely intrude with one axis of the vertices at a time. Notably, the Unity Terrain top map alters the place of the vertices on the y-axis.
Once we work with a Unity Terrain by elevating or decreasing its elements, we’re technically altering its top map. The alteration acts instantly, and we are able to see the outcomes of our change within the terrain. Alternatively, it’s also potential to alter the peak map instantly outdoors Unity and import top maps to the engine.
For instance, the web site Cities: Skylines Top Map Generator supplies mechanisms to extract top map info from the true world. Though the web site is supposed for use within the Cities: Skylines recreation, the maps work simply as effectively in Unity. Think about, although, that they may comprise real-world distances and would possibly must be adjusted in an exterior device for optimum utilization in Unity.
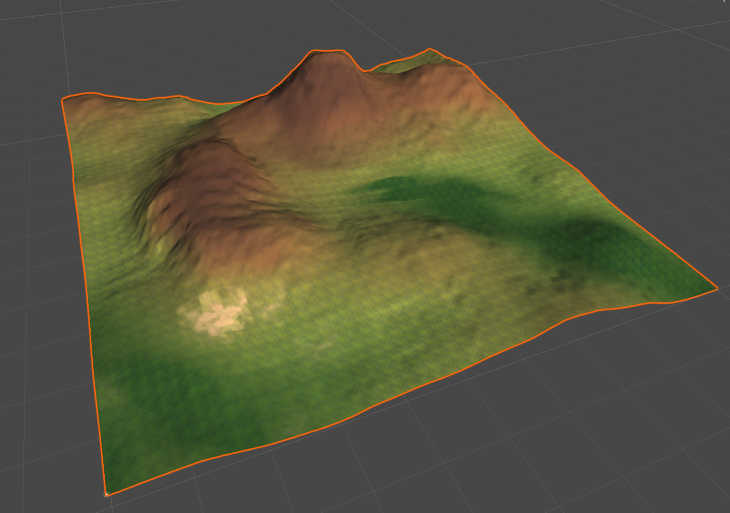
The pictures under present a top map extracted from the web site and imported right into a Unity Terrain.


Unity Terrain settings
When chosen, a Unity Terrain could be edited through the use of the Terrain Toolbar. The toolbar incorporates the primary functionalities for the terrain grouped in 5 sections: Adjoining Terrain Tiles; Sculpt and Paint; Add Trees; Add Particulars; and Normal Settings.
Extra nice articles from LogRocket:
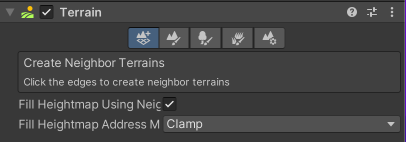
Adjoining Terrain Tiles assist you to create different terrains in a grid-like format close to the present terrain. It’s helpful to make use of it when you have already got a well-established terrain however want more room subsequent to it.
That could be a extra appropriate resolution than rising the terrain measurement. Altering the dimensions will have an effect on how the heightmap is learn, and a proportional scale issue will probably be utilized to the terrain and all its parts.
Relating to top maps, creating a brand new adjoining terrain will create a brand new terrain recreation object with its top map. The newly created heightmap will attempt to match the values in its border, seamlessly coupling it to the earlier terrain it was related to.
The Sculpt and Paint possibility works instantly with the peak map. This selection incorporates its Terrain Instruments, which we’ll cowl within the following part. In brief, this feature permits us to deform the heightmap and conceal parts of it to create holes and entrances, for instance.
Each choices to Add Bushes and Add Particulars are used to populate the terrain with parts which are dealt with mechanically by Unity, similar to timber, bushes, shrubs, stones, grass patches, and others. One benefit of utilizing the Unity Terrain over utilizing user-placed recreation objects within the scene is that Unity manages many optimization strategies for the weather of a terrain. Bushes and particulars are mechanically accounted for in visibility culling–associated algorithms and billboarding.
Lastly, the Normal Settings possibility holds all related info concerning the terrain recreation object, such because the optimization strategies (element distance, billboarding distance, shadows, and many others.) and the dimensions of the terrain.
The Normal Settings are divided into Fundamental Terran, Tree & Element Objects, Wind Settings for Grass, Mesh Decision, Gap Settings, Texture Resolutions, Lighting, and Lightmapping. It’s outdoors of this piece’s scope to cowl every possibility extensively, however we’ll undergo essentially the most used ones.
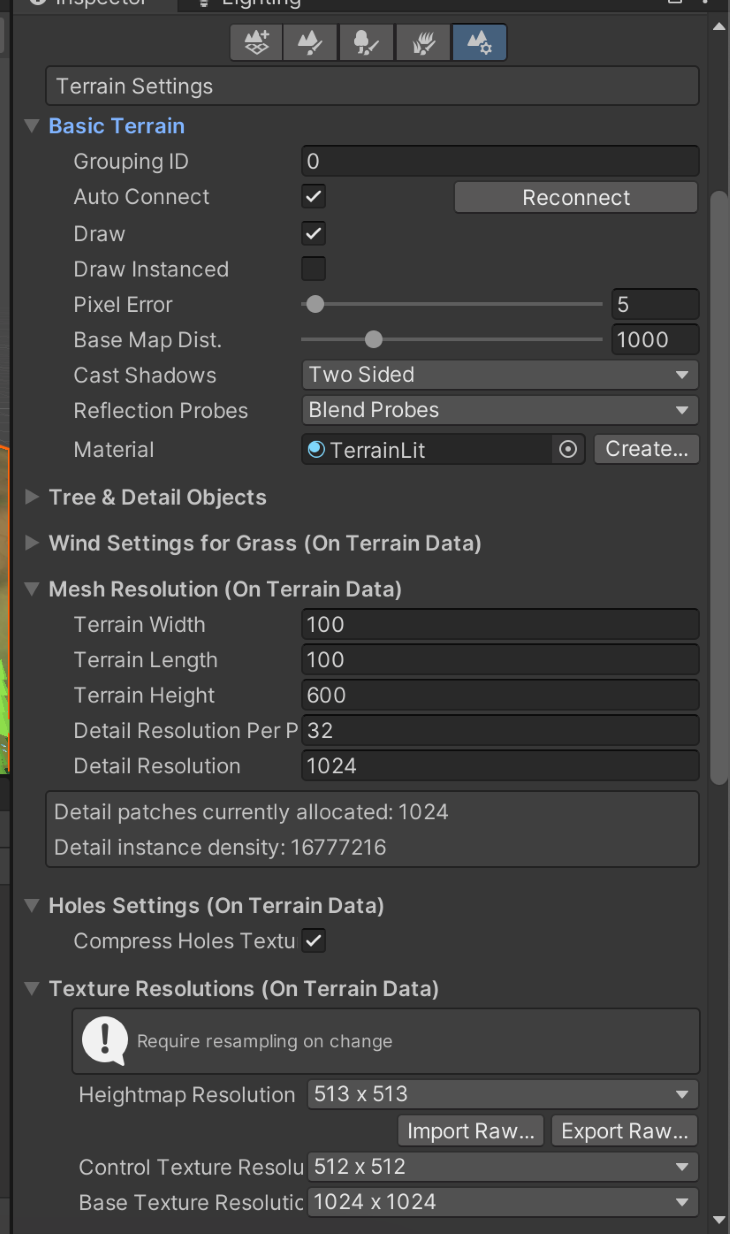
The Fundamental Terrain part covers the primary rendering facets of the terrain, such because the terrain materials, its shadow properties, and the draw mode used. Discover that in the event you anticipate to make use of self-made post-processing shaders or scripted rendering passes, the choice Draw Instanced must be disabled.
The Mesh Decision values decide the dimensions of the terrain. Altering the width and size of the terrain will instantly change how the peak map info will probably be learn. The terrain width, size, and top decide the terrain’s measurement within the x, y, and z axes.
The Texture Resolutions part handles the extra particular top map texture info. You’ll be able to set the decision for the peak map and import/export top maps there. Utilizing the import operate, you should use the info acquired from different sources (such because the one offered earlier) to your map. Additionally it is frequent to export the present top map, alter it in an exterior device, after which import it again.
Choices for sculpting and altering the terrain
As said beforehand, the Sculpt and Paint possibility permits us to change the terrain by altering the peak map. These choices have six instruments: Increase or Decrease Terrain, Paint Holes, Paint Texture, Set Top, Clean Top, and Stamp Terrain.
The choices for Increase or Decrease Terrain, Set Top, and Clean Top are all used to instantly have an effect on the peak map by both rising or reducing its values. Set Top is used to alter the peak map to fulfill a selected desired consequence, whereas Clean Top softens the terrain as if blurring the chosen areas within the top map. All of those choices are achieved through the use of Terrain Brushes (as seen within the picture above).
Terrain Brushes are just like how brushes work in different picture modifying software program, similar to GIMP and Photoshop. A brush presents a sample in shades of gray and alpha, which is utilized to the terrain to mould it utilizing its values. Clear areas of the comb won’t have an effect on the terrain, and darker areas will affect the terrain greater than lighter areas. Unity’s default terrain brush set comes with over ten brushes.
The Paint Texture possibility is used to use texture layers within the terrain, actively including shade to it and different texture properties. The feel layers are utilized utilizing the identical terrain brushes as used for the opposite Sculpt and Paint instruments. Nonetheless, Unity’s default terrain comes with no texture layer.


Every terrain layer is an asset of its personal and could be reused by a number of terrains, even in several scenes. The primary terrain layer added will mechanically cowl your entire terrain. Use that as a fast method to arrange your base colours. Every terrain layer can have Diffuse, Regular, and Masks Maps.
The diffuse map is the feel displayed by the terrain. As soon as set, the choice to alter its tint turns into seen. Altering the tint is a fast and efficient method to create terrain variation with out resorting to utilizing extra textures or modifying your belongings in exterior packages.
Whereas the conventional map is used to convey regular info on the layer and usually works the identical as a daily regular map, the masks map is explicitly used for the Excessive Definition and Common Render Pipelines to convey extra info, similar to metallic, ambient occlusion, top, and smoothness.
Lastly, tile settings are helpful choices for the terrain layer. The dimensions and offset values alter how typically the feel will tile within the terrain and with which base offset for every repetition.
Usually, for big terrain, it’s good to have a few variations of the terrain layers with diversified values for the dimensions, as it could possibly assist to interrupt the seen repetition on the terrain’s flooring.
As said earlier than, terrain brushes come by default with Unity’s terrain, however there are not any terrain layers when creating a brand new terrain object.
Furthermore, it’s essential to have maps and textures to create your terrain layers. For this text, I’ve used a few new free brushes from the asset retailer (Generic Terrain Brushes by Flaming Sands and StampIT! Assortment Examples by Rowlan Inc) in addition to a bundle of free textures for the terrain layers (Handpainted Grass & Floor Textures by Chromisu).
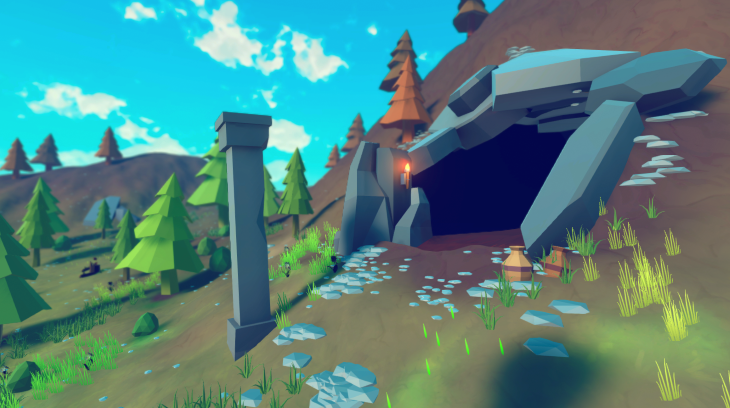
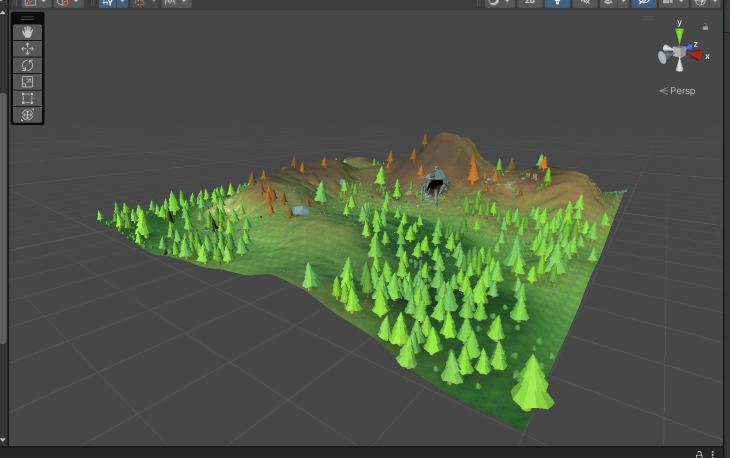
The outcomes for the bottom terrain with some textures could be seen under:
Whereas engaged on terrain, I often attempt to steadiness peak areas and plain areas. That tends to present me sufficient area to unfold vegetation and never overcrowd the area. Furthermore, I attempt to have one key ingredient within the terrain to carry its most important parts and focus, similar to a mountain, a glade, or a river, for instance.
Having one most important element helps the decision-making for which belongings to make use of and easy methods to distribute them. On this case, we’re going to make a small hill with a cave-like entrance to discover extra of the terrain choices and a few small areas of curiosity to diversify the view.
Additionally, discover that I attempted to discover the a number of terrain layers to interrupt the visible repetition they have an inclination to make. At this stage, I attempt to solely block out main spots, separating hills from common grass and plain areas, in addition to sprinkling some variety right here and there with some sand and darker patches of grass flooring.
Planting timber, grass, and…stones?
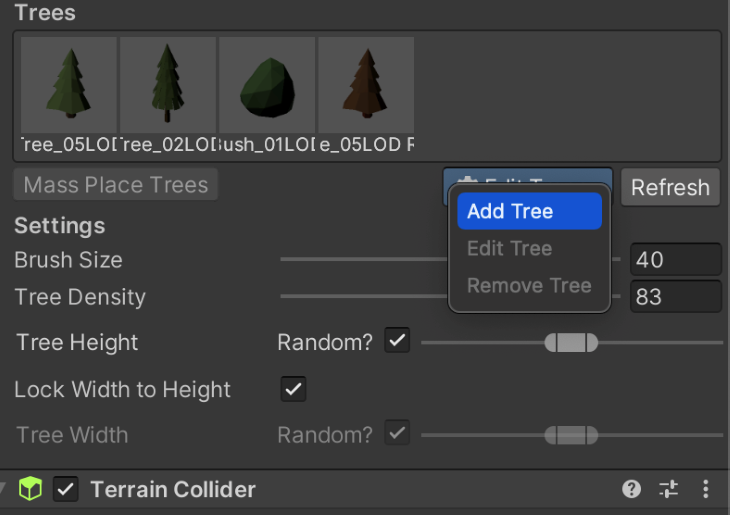
Vegetation could be added in two methods, both with the Add Tree possibility or with the Add Element possibility. Add Tree is sort of simple and permits you to place objects with tree-like traits.
For higher synergy, timber needs to be created utilizing the Unity Instruments, such because the Velocity Tree or the Tree Editor, or utilizing the precise terrain tree supplies. That’s not necessary although, and within the following sections, I’ll present one other strategy that yields related outcomes and permit for extra inventive freedom.
In any case, terrain timber have a limitation of a most of two supplies per mesh (one for the bark and one other one for the leaves). In case your mesh has greater than two supplies, it may not render appropriately. A standard resolution to this limitation is to resort to texture atlas. Additionally, it is not uncommon to separate the leaf supplies from the bark materials for a extra fascinating impact, which permits us to program shaders only for the leaves (similar to faking wind motion).
Much like terrain layers, timber additionally must be added to the terrain individually, then positioned on through the use of the terrain’s brushes. Bushes could be added as naked meshes and likewise as prefabs.
Discover that including a tree as a prefab won’t essentially add all the prefab parts nor behave precisely as your meant prefab. For instance, inserting a tree prefab with an animator will ignore the animator and act as a static tree.
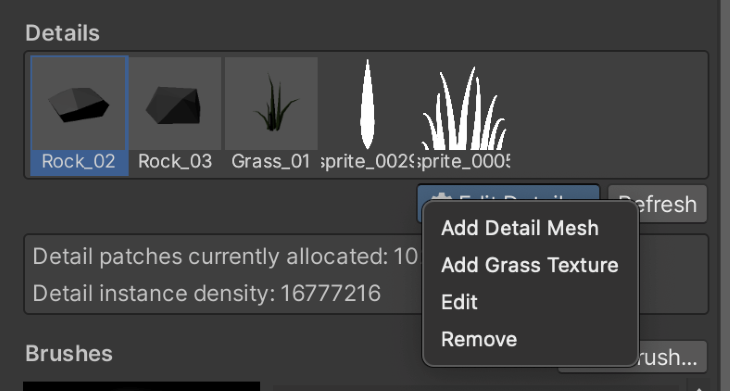
Similarly, particulars are parts that may be positioned within the terrain to diversify its visuals. Particulars could be of two varieties: Element Mesh and Grass Texture. Element Mesh works like common meshes that keep static within the scene, similar to stones, pebbles, and even shrubs.
Element meshes are restricted to 1 materials. When you attempt to use meshes with multiple materials, they won’t be rendered appropriately.
Element meshes may also be rendered as Vertex Lit or Grass. Vertex Lit will render the mesh as common lit Sport Objects and don’t react to the wind, which is acceptable for stones and tree stumps. Grass rendering works just like Grass Textures, permitting the terrain’s wind to have an effect on the mesh.
Nonetheless, from expertise, grass rendering solely yields visually pleasing outcomes when the wind bending property is about to a low worth (beneath the Terrain Normal Settings). In any other case, the element mesh would possibly transfer round unrealistically.
Grass Textures are sprites rendered within the terrain that behave in response to the terrain’s wind. As said in Unity’s documentation, the time period “Grass Texture” is deceptive since you should use any generic texture, similar to flowers or sticks, with the identical device. Completely different from Element Meshes rendered as Grass, Grass Textures will maintain their pivot on the bottom and transfer with the wind retaining the identical place — as you’d anticipate grass to behave.
For this text, I’ve used timber and different meshes from the asset retailer (Low-Poly Easy Nature Pack by JustCreate, and Low Poly Rock Pack by Damaged Vector). For the grass textures, I used the wonderful Foliage Sprites from Kenney, a terrific supply of copyright-free, high-quality belongings. Lastly, as extra ornament belongings, I’ve used the Low Poly Dungeons Lite by JustCreate.
Making use of these to our terrain, we have now the next consequence:
Extra versatile timber with LOD Teams
As stated beforehand, Unity’s timber are one way or the other restricted because of the optimizations achieved by the terrain system. When you use customized supplies or different variations, some tree placement choices may be ignored, resulting in a really bland and repetitive scene.
Nonetheless, the system additionally permits us to bypass a few of its restrictions to realize a better degree of versatility concerning supplies utilization and elegance. For that, we have now to observe a selected course of.
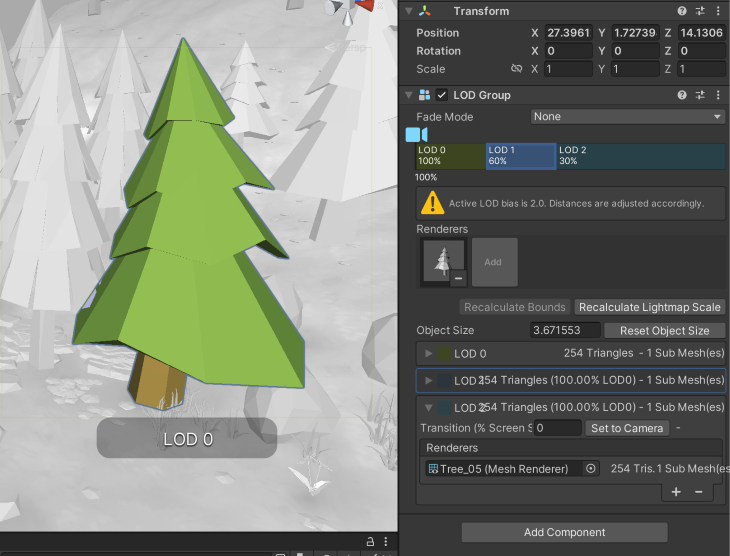
First, it’s essential to create a brand new prefab for the tree by which the foundation recreation object (the primary within the hierarchy) is an empty recreation object with the LOD Group element. Then, you possibly can place your tree prefab within the hierarchy under the foundation recreation object. After that, add the tree prefab to the LOD Group, and that’s it.
The tree prefab will work together with your customized shaders and obtain the common tree inserting properties from the terrain, similar to altering the tree’s width, top, and rotation. For shade variation, it’s vital to change the shader to learn the _TreeInstanceColor property, however this step goes outdoors the scope of this text.
You’ll be able to, in fact, use the LOD Group options already to deal with the opposite degree of particulars on your tree. Nonetheless, in the event you merely desire a extra versatile materials in your timber whereas nonetheless utilizing the terrain placement properties, you possibly can change the variety of LODs to 1 and use solely a single tree prefab.
Reaching these steps ought to get you to a consequence just like the one under:
Proposed terrain workflow for higher outcomes
Now that we have now coated the primary facets of easy methods to use the terrain device, I need to supply a easy workflow I take advantage of to get fairly good outcomes with out a lot effort whereas additionally protecting another rendering facets that may enhance your surroundings.
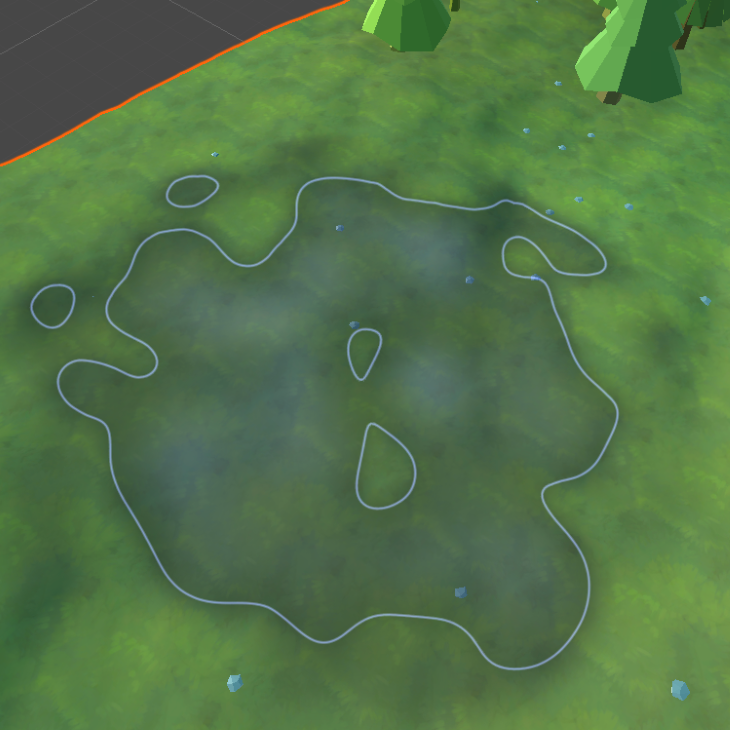
Making a cave entrance
Allow us to begin with the cave I discussed beforehand. The Unity Terrain doesn’t enable us to create entrances or to carve the peak map horizontally (making use of top info within the x-z airplane). Nonetheless, it’s going to allow us to color holes on it.
Holes within the Unity Terrain conceal elements of the terrain mesh as if we’re slicing items. Holes could be painted like the opposite parts within the Sculpt Terrain instruments with terrain brushes.
To make a visually thrilling cave entrance, I like to recommend you increase the terrain, retaining the elevation to an angle between 40 and 60 levels. Greater than which may stretch the terrain grid an excessive amount of and make it tougher to cowl with different parts and prefabs. By doing so, we must always get a consequence such because the one under:
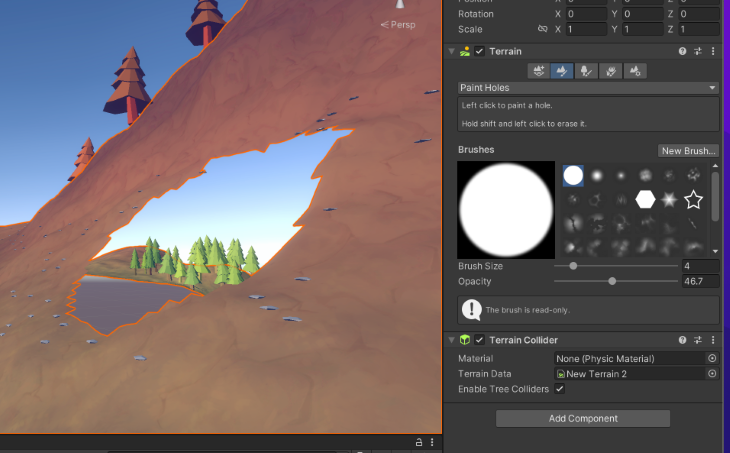
As you possibly can see, terrain holes conceal elements of the terrain in a binary vogue: they’re both utterly gone or utterly seen. For that, it’s essential to cowl the seams with belongings and different parts to realize higher visible high quality.

Utilizing the identical free belongings talked about earlier than, I scaled and rotated completely different stones across the cave entrance to cover the seams between the holes and the seen terrain. I additionally tried so as to add extra rocks and pebbles than essential to create a extra pure look. It’s common to regulate the peak map to suit the reference to the rocks higher.
Furthermore, including further props round areas of curiosity is all the time good to extend the participant’s focus. For that, I added some jars half-buried on the bottom and a pillar proper in entrance of the cave, which helps to create some thriller and narrative. I added a small mild subsequent to the cave entrance to information the eyes even additional.
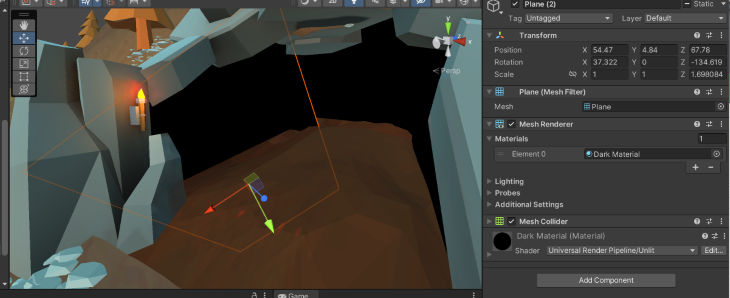
As seen earlier than, the outlet additionally permits the person to see via the terrain. To keep away from that, I used planes with a selected materials that ignores lighting (Unlit). That’s necessary as a result of in any other case, modifications within the scene’s mild would show these darkish partitions as stable, whereas the visible consequence we wish is for it to seem like a darkish/shadow space.
Furthermore, I’ve used a number of the meshes from the Low Poly bundle to function the cave’s floor since we can’t use the identical terrain we have now been utilizing to date.
You will need to be aware that the cave we did to date just isn’t best if you’d like your participant to enter and navigate within it. For that, you would want to correctly set meshes across the gap, considerably modeling the cave’s inside from all sides. It will be potential to realize that utilizing a brand new terrain object, however I reckon that the work required for which may not be optimum.
However, this resolution works fairly effectively so that you can use as some extent to maneuver the participant to a brand new scene devoted to the cave’s inside.
Handbook ambient occlusion


A standard method I take advantage of to enhance the lighting in a Unity Terrain is to manually use a darker variation of the terrain layer beneath objects positioned on the bottom. That helps to raise the cohesiveness of the terrain parts since some lighting results, similar to ambient occlusion, should not utilized to the terrain objects, particularly in case you are utilizing customized shaders and different strategies.

Discover that that is completely different than casting shadows. Unity terrains will forged shadows from objects appropriately, however which may nonetheless trigger the impression that objects are both floating or should not actually related. Utilizing a darkish terrain layer at some spots helps carry the objects and the bottom nearer with out requiring extra sources or costly lighting calculations.
Furthermore, I typically apply this to the underside of different objects and prefabs that aren’t terrain objects. As seen within the picture above, I used a little bit of the darker tone beneath the books and the cauldron to assist make the weather come nearer collectively.
Actual ambient occlusion and light-weight baking
Darker layers will assist with the faux lighting to a sure diploma, however it may be amplified by baking the sunshine within the scene. A whole dialogue on mild baking is outdoors the scope of this text, however just a few of its most important parts will probably be mentioned as to easy methods to use them to enhance the visuals for a terrain.
First, Gentle Baking is a course of by which we pre-calculate the sunshine in a scene and retailer the info to then apply it on prime of the objects within the scene. Unity particularly makes use of Lightmapping, which bakes the brightness of the thing’s floor in texture maps.
These textures, although, can’t be modified in runtime and must be precalculated once more for each change within the scene, similar to shifting objects to a unique place or updating the lights’ remodel. Additionally, it’s only utilized to things flagged as static.
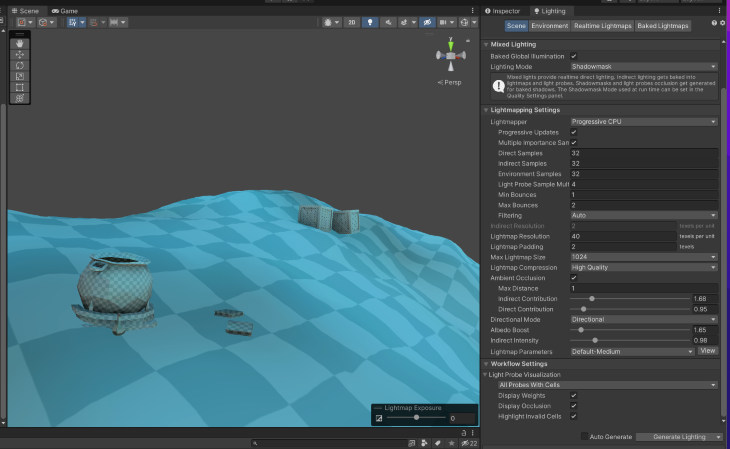
Gentle baking could be achieved within the Lighting tab (you possibly can entry it via the Window menu, adopted by Rendering, after which Lighting). Unity’s default values for the sunshine bake are significantly excessive and would possibly take too lengthy to course of. For that, I like to recommend you cut back all of the Direct Samples, Oblique Samples, and Setting Samples to a decrease quantity, similar to 16 or 32.
These attributes are instantly associated to what number of steps the Lightmapper will take to calculate the sunshine at any given level within the scene (for static parts). Rising any of them will yield higher and extra practical outcomes however will significantly enhance the baking time.
I often begin with low values to evaluate the primary impressions within the scene after which progressively enhance them as I see match. For extra stylistics or customized supplies, utilizing decrease values is often sufficient to realize good visuals.
Moreover, the primary bakes would possibly present you inconsistencies within the placement of objects and different errors that needs to be fastened earlier than making use of a extra thorough and practical mild mapping process.
I additionally suggest turning on the sunshine baking Ambient Occlusion within the Lighting properties for the baking. Ambient Occlusion is the visible impact that occurs when surfaces are shut to one another, occluding the sunshine and projecting shadows of their intersecting factors, making them seem darker. We beforehand faked it utilizing darker terrain layer colours, however mild mapping can really calculate correct ambient occlusion and bake it into textures.
The pictures under present the outcomes with and with out mild baking.


As you possibly can see, there isn’t any ambient occlusion between the tree trunks and the bottom. Nonetheless, the underside a part of the cauldron and the intersections between the crates on the again of the picture are darker and extra practical than their model with out baking.
Inserting a skybox and making use of post-processing
Lastly, to enhance the visuals even additional and tie the weather collectively, these two steps are important: inserting a greater skybox and making use of just a few post-processing results.
For this text, I used the Free Stylized Skybox from Yuki2022. These skyboxes match the low poly model fairly effectively for his or her cartoon look.
The skybox could be added beneath the Lighting tab (the identical because the Gentle Baking), beneath the tab Setting.
The post-processing results require extra steps. First, it’s essential to add the post-processing bundle to your challenge relying in your rendering pipeline put in. Utilizing the Constructed-in Render Pipeline, you want to set up the Publish-Processing Stack in your challenge utilizing the Bundle Supervisor.
In any other case, in case you are utilizing the Common Render Pipeline or the Excessive Definition Render Pipeline, you have already got the equal post-processing system put in. I’m utilizing the Common Render Pipeline for this text, however the results and configurations are just like the opposite pipelines.
The picture under reveals the ultimate post-processing quantity I used for the ultimate model of the terrain:
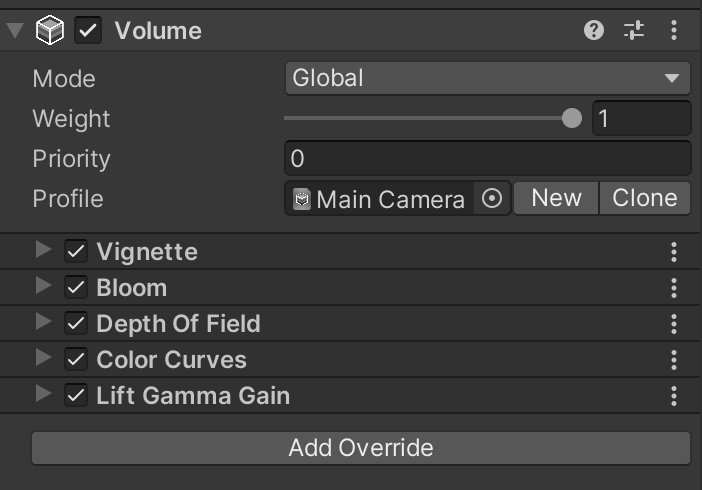
The consequences used have been:
- Vignette: darkens the corners of the display screen, focusing the participant’s consideration on the central parts
- Bloom: expands the spotlight parts within the scene, blurring their areas with neighboring objects, which acts as a faux (however good) international illumination different
- Depth of Area: mimics the main target of our eyes and actual cameras by making parts nearer to us (in the point of interest) sharp, whereas different parts are blurred in response to their distance
- Coloration Curves: alters the ultimate colours rendered to match a extra desired look. On this case, I elevated the purple shade over others and barely elevated the blue shade
- Raise Gamma Acquire: shifts the general shade of the render, in addition to will increase the management of darkish tones, mid-range tones, and highlights
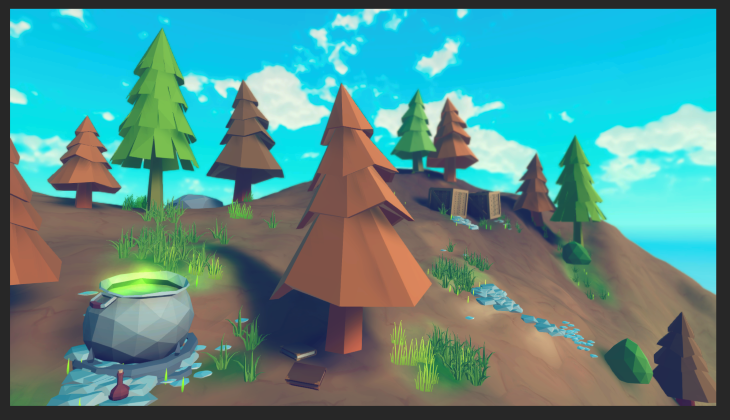
The ultimate outcomes for the 2 areas we did throughout this text could be seen within the photos under:

Thanks for studying, and let me know if you want to learn extra on the various subjects mentioned that have been outdoors this text’s scope. Every considered one of them definitely deserve their very own article. You’ll be able to see extra of my work at www.dagongraphics.com.
LogRocket: Full visibility into your net and cell apps

LogRocket is a frontend software monitoring resolution that allows you to replay issues as in the event that they occurred in your individual browser. As an alternative of guessing why errors occur, or asking customers for screenshots and log dumps, LogRocket enables you to replay the session to rapidly perceive what went incorrect. It really works completely with any app, no matter framework, and has plugins to log extra context from Redux, Vuex, and @ngrx/retailer.
Along with logging Redux actions and state, LogRocket data console logs, JavaScript errors, stacktraces, community requests/responses with headers + our bodies, browser metadata, and customized logs. It additionally devices the DOM to file the HTML and CSS on the web page, recreating pixel-perfect movies of even essentially the most advanced single-page net and cell apps.
