
Have you ever ever wished to create your personal recreation however discover it too overwhelming or not understanding the place to begin?
So let’s begin with very staple items, like making our character transfer from A to B!
On this tutorial we shall be utilizing Enter System from Unity to create a 2D Platformer. It is not out there by default so you will want so as to add it to your mission.
Putting in Enter Supervisor
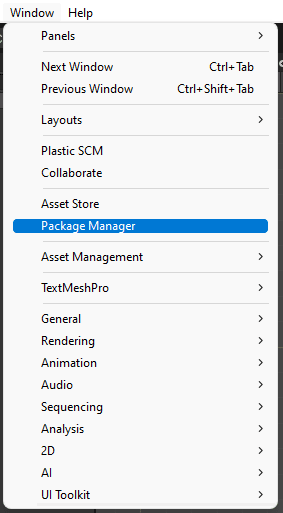
To try this, merely go choose window within the to bar menu, navigate to Package deal Supervisor, within the package deal supervisor window, change the package deal useful resource to Unity Registry and obtain the Enter System into your mission!
When the package deal is put in, it will pop up a warning, saying that it will change the default enter system to the brand new put in package deal, hit Sure and Unity shall be restarted.


Utilizing the Enter Supervisor
Now that the Enter Supervisor is put in let’s begin utilizing it!
First, let’s create a mock for our participant character. Within the Belongings folder, click on with the precise mouse button and create a brand new 2D Sprite, I personally use squares for the participant mockups, however you’ll be able to choose no matter sprite you need! Along with your sprite created, drag it up into the scene so we are able to have a GameObject.
Now that you’ve our Participant Sport Object created in our scene, let’s add the Enter system.

Choose Open Enter Settings and within the newly opened window, click on Create settings asset


As soon as the settings are created, click on in Create actions within the Participant Enter part in you Participant Sport Object, this may immediate you to create a Enter Supervisor to our participant. I created a folder referred to as Enter Managers contained in the asset folder and renamed the file title to PlayerInput.
Should you open this file, you will see a window with some pre-defined choices, like transfer, which we’re going to use on this tutorial!

Remember to verify Generate C# Class int the just lately created PlayerInput, so we are able to use in our code!

Participant motion
Our setup for inputs is prepared! now, we have to make it work with our participant!
Further elements
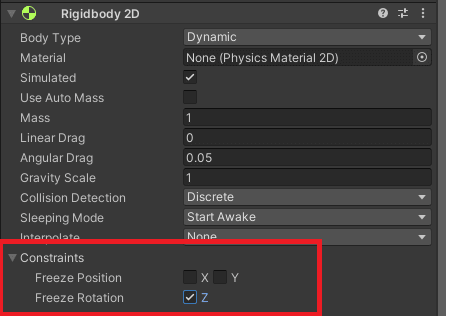
There’s two elements we have to add to our participant recreation object, first, BoxCollider2D, this part shall be accountable to deal with collisions and triggers… let’s go away it as it’s. The second part is Rigidbody2D, this part will deal with our physics, for this part, increase constraints and freeze rotation on the Z axis, this may forestall the sport object to rotate.
Participant Controller
To make issues extra organized, let’s create a folder referred to as Scripts and a folder referred to as PlayerScripts inside that folder, the construction ought to appear like this:
Belongings/
├─ Scripts/
│  ├─ PlayerScripts/
│  │  ├─ PlayerController.cs
Let’s begin defining some properties, let’s begin with velocity! I wish to maintain these properties personal and beautify them with [SerializeField]. Adorning it as Serialize Area, you’ll be able to nonetheless entry the property within the editor, even when it is personal.
[SerializeField]
personal float velocity = 5f;
And let’s get our PlayerInput.
First we create a property, and we’re not going to brighten with [SerializeField] as a result of we do not need to entry it within the editor.
personal PlayerInput playerInput;
Within the Awake technique we will instantiate our playerInput.
We have to initialize it on Awake technique as a result of the lifecycle of the MonoBehaviour, Awake is named at the start else within the script.
void Awake()
{
    playerInput = new PlayerInput();
}
And couple of strategies for the participant enter.
personal void OnEnable()
{
    playerInput.Participant.Allow();
}

personal void OnDisable()
{
    playerInput.Participant.Disable();
}
We additionally must initialize the rigidbody in our Begin technique, making it appear like this:
personal PlayerInput playerInput;
personal Rigidbody physique;

void Awake()
{
    playerInput = new PlayerInput();
}

void Begin()
{
    physique = GetComponent<Rigidbody>();
}
With all this, we are able to connect this script to the Participant Sport Object, return to the thing and add the part, you’ll be able to seek for the script when including a part.

GetComponent
The GetComponent<>() technique is chargeable for getting a part connected to the GameObject.
Participant Motion
For the participant motion, we’ll deal with the in then Replace technique, which is named each body 
For the reason that recreation is a platformer, let’s get the X worth of the enter from the participant.
var horizontal = Mathf.RoundToInt(playerInput.Participant.Transfer.ReadValue<Vector2>().x);
The Mathf.RoundToInt will make certain the worth is -1 when the participant is shifting left, 0 when no enter is detected and 1 when the participant ,is shifting to the precise.
With the horizontal enter recognized, we are able to calculate the speed which we’ll transfer the participant recreation object.
var velocityX = velocity * horizontal;
And eventually, MOVE THE PLAYER! By altering the physique velocity.
physique.velocity = new Vector2(velocityX, physique.velocity.y);
However there is a factor, if we begin the sport our Participant Sport Object will begin falling into the void…
To repair this downside, let’s create a ground for our participant to be on.
Similar as making a participant, create a brand new Sq. Sprite (make issues a little bit bit simpler), drag and drop into the scene and increase it on the X axis.


And add BoxCollider2D and RigidBody2D to the ground recreation object and mark the Physique Sort within the rigidbody part as Static, so it will not transfer.
Beginning the scene
Should you reached right here it is best to have a shifting participant object!
The most effective a part of it, you’ll be able to transfer the participant utilizing A, D, Left arrow key and Proper arrow key on the keyboard and when you have a controller related, you’ll be able to transfer it through the use of the left joystick!
Within the subsequent publish we’re making the participant soar!
