
1. Provisioning
2. Istio Setup with Helm chart
3. Cross community gateway validation
Hey! On this submit, We can be exploring a know-how known as ServiceMesh powered by Istio.
Quick Intro on Non-Istio customers
Istio is an open supply service mesh that layers transparently onto current distributed functions.
Istio’s highly effective options present a uniform and extra environment friendly method to safe, join, and monitor providers. Its highly effective management airplane brings important options, together with:
Safe service-to-service communication in a cluster with TLS encryption, robust identity-based authentication and authorization.
Computerized load balancing for HTTP, gRPC, WebSocket, and TCP visitors
Fantastic-grained management of visitors conduct with wealthy routing guidelines, retries, failovers, and fault injection
A pluggable coverage layer and configuration API supporting entry controls, price limits and quotas
Computerized metrics, logs, and traces for all visitors inside a cluster, together with cluster ingress and egress
Most of you might be already aware of Istio. Since, Kubernetes federation is presently not but accessible and the most recent model is on a Beta model and also you need to distribute your visitors throughout completely different clusters with manufacturing grade deployment.
So, Let’s shortly undergo the Step-by-Step process to implement Multi Cluster Deployment with Istio.
This tutorial is extremely primarily based on AWS and Terraform and in addition Helm Charts.
Provisioning
Required assets
- EKS Clusters
- Safety Group / Rule
- S3 Bucket for terraform states
- IAM Roles
- IAM Permissions
- AWS ALB (Software LoadBalancer)
IAM Position
Create your IAM Position on your EKS Cluster.
iam.tf
useful resource "aws_iam_role" "eks_iam_role" {
  identify = "AmazonAwsEksRole"
  assume_role_policy = jsonencode({
    "Model" : "2012-10-17",
    "Assertion" : [
      {
        "Effect" : "Allow",
        "Principal" : {
          "Service" : "eks.amazonaws.com"
        },
        "Action" : "sts:AssumeRole"
      }
    ]
  })
  tags = native.default_tags
}

useful resource "aws_iam_policy_attachment" "eksClusterPolicyAttachmentDefault" {
  identify       = "eksClusterPolicyAttachmentDefault"
  roles      = [aws_iam_role.eks_iam_role.name]
  policy_arn = "arn:aws:iam::aws:coverage/AmazonEKSClusterPolicy"
}

useful resource "aws_iam_role" "eks_iam_node_role" {
  identify = "AmazonAwsEksNodeRole"
  assume_role_policy = jsonencode({
    "Model" : "2012-10-17",
    "Assertion" : [
      {
        "Effect" : "Allow",
        "Principal" : {
          "Service" : "ec2.amazonaws.com"
        },
        "Action" : "sts:AssumeRole"
      }
    ]
  })

  tags = native.default_tags
  depends_on = [
    aws_iam_role.eks_iam_role,
    aws_iam_policy_attachment.eksClusterPolicyAttachmentDefault
  ]
}
useful resource "aws_iam_policy_attachment" "AmazonEKSWorkerNodePolicyAttachment" {
  identify       = "AmazonEKSWorkerNodePolicyAttachment"
  roles      = [aws_iam_role.eks_iam_node_role.name]
  policy_arn = "arn:aws:iam::aws:coverage/AmazonEKSWorkerNodePolicy"
}

useful resource "aws_iam_policy_attachment" "AmazonEC2ContainerRegistryReadOnlyAttachment" {
  identify       = "AmazonEC2ContainerRegistryReadOnlyAttachment"
  roles      = [aws_iam_role.eks_iam_node_role.name]
  policy_arn = "arn:aws:iam::aws:coverage/AmazonEC2ContainerRegistryReadOnly"
}

useful resource "aws_iam_policy_attachment" "AmazonEKSCNIPolicyAttachment" {
  identify       = "AmazonEKSCNIPolicyAttachment"
  roles      = [aws_iam_role.eks_iam_node_role.name]
  policy_arn = "arn:aws:iam::aws:coverage/AmazonEKS_CNI_Policy"
}
Safety Group
AWS Safety Group is required in ready on your cluster to speak.
securitygroup.tf
useful resource "aws_security_group" "cluster_sg" {
  identify        = "cluster-security-group"
  description = "Communication with Employee Nodes"
  vpc_id      = var.vpc_id
  egress {
    from_port   = 0
    to_port     = 0
    protocol    = "-1"
    cidr_blocks = ["0.0.0.0/0"]
  }

  ingress {
    from_port = 0
    to_port   = 0
    protocol  = "-1"
    self      = true
  }

  ingress {
    from_port = 0
    to_port   = 0
    protocol  = "-1"
  }

  tags = native.default_tags
}


useful resource "aws_security_group" "cp_sg" {
  identify        = "cp-sg"
  description = "CP and Nodegroup communication"
  vpc_id      = var.vpc_id
  egress {
    from_port   = 0
    to_port     = 0
    protocol    = "-1"
    cidr_blocks = ["0.0.0.0/0"]
  }

  ingress {
    description = "Enable all"
    cidr_blocks = ["0.0.0.0/0"]
    from_port   = 0
    to_port     = 0
    protocol    = "-1"
  }

  tags = native.default_tags
}

useful resource "aws_security_group" "wrkr_node" {
  identify        = "worker-sg"
  description = "Employee Node SG"
  vpc_id      = var.vpc_id
  egress {
    from_port   = 0
    to_port     = 0
    protocol    = "-1"
    cidr_blocks = ["0.0.0.0/0"]
  }

  ingress {
    description = "Enable All"
    cidr_blocks = ["0.0.0.0/0"]
    from_port   = 0
    to_port     = 0
    protocol    = "-1"
  }

  ingress {
    description = "Self Communication"
    from_port   = 0
    to_port     = 0
    protocol    = "-1"
    self        = true
  }

  tags = native.default_tags
}
EKS Clusters
On this part, you’ll provision the two EKS Cluster.
eks.tf
locals {
  default_tags = {
    Provisioner = "Terraform"
    Surroundings = "Testing"
  }
}

useful resource "aws_eks_cluster" "istio_service_mesh_primary_1" {
  identify     = "istio-service-mesh-primary-1"
  role_arn = aws_iam_role.eks_iam_role.arn

  vpc_config {
    subnet_ids          = var.subnet_ids
    public_access_cidrs = ["0.0.0.0/0"]
    security_group_ids = [
      aws_security_group.cluster_sg.id,
      aws_security_group.cp_sg.id
    ]
  }
  model = "1.21"

  timeouts {
    create = "15m"
  }
  depends_on = [
    aws_iam_role.eks_iam_role,
    aws_iam_role.eks_iam_node_role,
    aws_security_group.cluster_sg,
    aws_security_group.cp_sg,
    aws_security_group.wrkr_node
  ]
}

useful resource "aws_eks_cluster" "istio_service_mesh_primary_2" {
  identify     = "istio-service-mesh-primary-2"
  role_arn = aws_iam_role.eks_iam_role.arn

  vpc_config {
    subnet_ids          = var.subnet_ids
    public_access_cidrs = ["0.0.0.0/0"]
    security_group_ids = [
      aws_security_group.cluster_sg.id,
      aws_security_group.cp_sg.id
    ]
  }
  model = "1.21"

  timeouts {
    create = "15m"
  }
  tags = native.default_tags
  depends_on = [
    aws_iam_role.eks_iam_role,
    aws_iam_role.eks_iam_node_role,
    aws_iam_policy_attachment.eksClusterPolicyAttachmentDefault,
    aws_security_group.cluster_sg,
    aws_security_group.cp_sg,
    aws_security_group.wrkr_node
  ]
}


useful resource "aws_eks_addon" "eks_addon_vpc-cni" {
  cluster_name = aws_eks_cluster.istio_service_mesh_primary_1.identify
  addon_name   = "vpc-cni"
  depends_on = [
    aws_iam_role.eks_iam_role,
    aws_iam_role.eks_iam_node_role,
    aws_security_group.cluster_sg,
    aws_security_group.cp_sg,
    aws_security_group.wrkr_node,
    aws_eks_cluster.istio_service_mesh_primary_1
  ]
}

useful resource "aws_eks_addon" "eks_addon_vpc-cni_2" {
  cluster_name = aws_eks_cluster.istio_service_mesh_primary_2.identify
  addon_name   = "vpc-cni"
  depends_on = [
    aws_iam_role.eks_iam_role,
    aws_iam_role.eks_iam_node_role,
    aws_security_group.cluster_sg,
    aws_security_group.cp_sg,
    aws_security_group.wrkr_node,
    aws_eks_cluster.istio_service_mesh_primary_2
  ]
}

useful resource "aws_eks_node_group" "istio_service_mesh_primary_worker_group_1" {
  cluster_name    = aws_eks_cluster.istio_service_mesh_primary_1.identify
  node_group_name = "istio-service-mesh-primary-worker-group-1"
  node_role_arn   = aws_iam_role.eks_iam_node_role.arn
  subnet_ids      = var.subnet_ids

  remote_access {
    ec2_ssh_key               = var.ssh_key
    source_security_group_ids = [aws_security_group.wrkr_node.id]
  }

  scaling_config {
    desired_size = 2
    max_size     = 3
    min_size     = 2
  }
  instance_types = ["t3.medium"]

  update_config {
    max_unavailable = 1
  }
  depends_on = [
    aws_iam_role.eks_iam_role,
    aws_iam_role.eks_iam_node_role,
    aws_security_group.cluster_sg,
    aws_security_group.cp_sg,
    aws_security_group.wrkr_node,
    aws_eks_cluster.istio_service_mesh_primary_1,
    aws_eks_addon.eks_addon_vpc-cni
  ]

  timeouts {
    create = "15m"
  }
  tags = native.default_tags

}


useful resource "aws_eks_node_group" "istio_service_mesh_primary_worker_group_2" {
  cluster_name    = aws_eks_cluster.istio_service_mesh_primary_2.identify
  node_group_name = "istio-service-mesh-primary-worker-group-2"
  node_role_arn   = aws_iam_role.eks_iam_node_role.arn
  subnet_ids      = var.subnet_ids
  remote_access {
    ec2_ssh_key               = var.ssh_key
    source_security_group_ids = [aws_security_group.wrkr_node.id]
  }

  scaling_config {
    desired_size = 2
    max_size     = 3
    min_size     = 2
  }
  instance_types = ["t3.medium"]
  update_config {
    max_unavailable = 1
  }
  depends_on = [
    aws_eks_cluster.istio_service_mesh_primary_2
  ]

  timeouts {
    create = "15m"
  }
  tags = native.default_tags
}
After creating vital tf configuration. It is now time to use it.
First, Create a tf workspace.
terraform workspace new istio-service-mesh
Subsequent, Confirm in case your tf configuration is easy.
terraform init
terraform workspace choose istio-service-mesh
terraform fmt
terraform validate
terraform plan -out="plan.out"
Then, Apply it.
terraform apply 'plan.out'
It’s now provisioning:
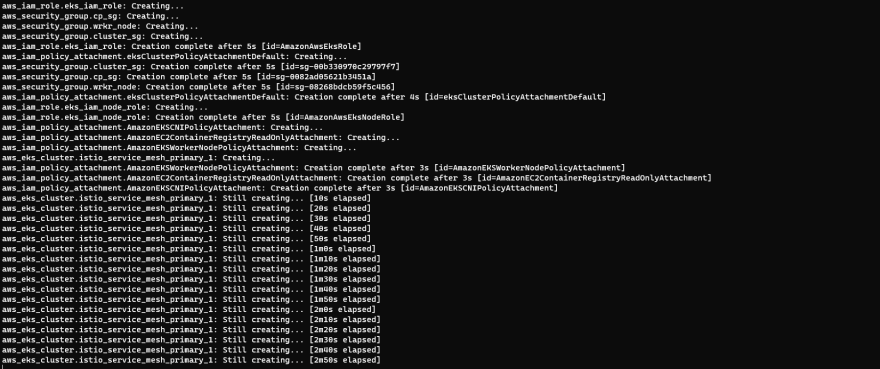
After 20 minutes or extra, Your cluster’s is prepared!

2. Istio Setup with Helm chart
It is now time to put in Istio on each clusters.
Required Charts
- Istio Base helm chart
- Istiod helm chart
- Istio ingress gateway helm chart
First, Add the helm istio repository through:
helm repo add istio https://istio-release.storage.googleapis.com/charts
helm repo replace
Cluster1
Putting in Istio Base helm chart through:
helm improve --install istio-base istio/base
    --create-namespace -n istio-system
    --version 1.13.2 --wait
Now, Istio primarily based is now put in. Subsequent one is the Istio Management Airplane.
Observe: You will need to specify the meshID, clusterName and community to uniquely establish your clusters when putting in Istio management Airplane.
helm improve --install istiod istio/istiod -n istio-system --create-namespace
    --wait --version 1.13.2
    --set world.meshID="cluster1"
    --set world.multiCluster.clusterName="cluster1"
    --set world.community="cluster1"
Now, It is time to expose the cluster with ingress or what so known as edge router by putting in istio ingressgateway. In my case, I put together to make use of ALB as an alternative of ready loadbalancer by Istio  .
.
kubectl create namespace istio-ingress
kubectl label namespace istio-ingress istio-injection=enabled

helm improve --install istio-ingressgateway istio/gateway
     -n istio-ingress --create-namespace
     --version 1.13.2 --set service.kind="NodePort"
Lastly, create an ingress useful resource then affiliate the ingress to istio-ingressgateway NodePort service.
ingress.yaml
apiVersion: networking.k8s.io/v1beta1
form: Ingress
metadata:
  identify: istio-alb-ingress
  namespace: istio-ingress
  annotations:
    kubernetes.io/ingress.class: alb
    alb.ingress.kubernetes.io/healthcheck-path: /healthz/prepared
    alb.ingress.kubernetes.io/healthcheck-port: traffic-port
    alb.ingress.kubernetes.io/certificate-arn: "<your-certificate-arn>"
    alb.ingress.kubernetes.io/listen-ports: '[{ "HTTP": 80 }, { "HTTPS": 443 }]'
    alb.ingress.kubernetes.io/security-groups: <your-security-group-id>
    alb.ingress.kubernetes.io/scheme: internet-facing
    #alb.ingress.kubernetes.io/target-type: occasion
    alb.ingress.kubernetes.io/actions.ssl-redirect: '{"Sort": "redirect", "RedirectConfig": { "Protocol": "HTTPS", "Port": "443", "StatusCode": "HTTP_301"}}'
    alb.ingress.kubernetes.io/tags: Surroundings=Check,Provisioner=Kubernetes
  labels:
    app:  "Istio"
    ingress: "Istio"
spec:
  guidelines:
    - http:
        paths:
          - path: /*
            backend:
              serviceName: ssl-redirect
              servicePort: use-annotation
          - path: /healthz/prepared
            backend:
              serviceName: istio-ingressgateway
              servicePort: 15021
          - path: /*
            backend:
              serviceName: istio-ingressgateway
              servicePort: 443
Cluster2
Similar steps utilized to cluster2. However you should change the meshID, clusterName and community values on Istio Management airplane chart.
Putting in Istio base chart through:
helm improve --install istio-base istio/base
    --create-namespace -n istio-system
    --version 1.13.2 --wait
Putting in Istio Management Airplane:
helm improve --install istiod istio/istiod
    -n istio-system --create-namespace
    --wait --version 1.13.2
    --set world.meshID="cluster2"
    --set world.multiCluster.clusterName="cluster2"
    --set world.community="cluster2"
On cluster2, We do not have to setup extra edge ingressgateway. Since, the connection can be began from cluster1. However, How can we distribute the visitors from cluster1 to cluster2 ?
Reply: By exposing cluster providers

On cluster1, Create extra Loadbalancer by putting in extra istio-ingressgateway.
helm improve --install istio-crossnetworkgateway istio/gateway
     -n istio-system --create-namespace --version 1.13.2
For cluster2:
helm improve --install istio-crossnetworkgateway istio/gateway
     -n istio-system --create-namespace --version 1.13.2
Exposing providers for each cluster. istio-exposeservice.yaml
apiVersion: networking.istio.io/v1alpha3
form: Gateway
metadata:
  identify: cross-network-gateway
  namespace: istio-system
spec:
  selector:
    app: istio-crossnetworkgateway
  servers:
    - port:
        quantity: 15443
        identify: tls
        protocol: TLS
      tls:
        mode: AUTO_PASSTHROUGH
      hosts:
        - "*.native"
Now, Companies are actually uncovered. However how does istio establish or uncover assets from the opposite cluster?
We have to allow Endpoint Discovery.
On cluster1, I assume that your kubeconfig file is pointed to cluster1 context. This manner, We will create istio secret file that may give entry on each clusters in ready for them to find assets.
Create an istio secret for cluster2. This command must be achieved on cluster1 context:
istioctl x create-remote-secret --name=cluster1 > cluster2-secret.yaml
On cluster2, Create an istio secret for cluster1. This command must be achieved on cluster2 context:
istioctl x create-remote-secret --name=cluster2 > cluster1-secret.yaml
If you happen to view the file, It is only a kubeconfig context from each cluster contexts enabling API Entry.
Subsequent, We should always apply the key to each clusters.
Cluster1:
kubectl apply -f cluster1-secret.yaml
Cluster2:
kubectl apply -f cluster2-secret.yaml
Final, however not least. Confirm in case your clusters has already a belief configuration.
diff
   <(export KUBECONFIG=$(pwd)/kubeconfig_cluster1.yaml && kubectl -n istio-system get secret cacerts -ojsonpath="{.information.root-cert.pem}")
   <(export KUBECONFIG=$(pwd)/kubeconfig_cluster2.yaml && kubectl -n istio-system get secret cacerts -ojsonpath="{.information.root-cert.pem}")
If there is not any certificates discovered on each clusters. You’ll be able to generate a self-signed root CA certificates.
Kindly, go to for more information: Producing self-signed root CA certificates
Generate Certificates
Istio gives primary safety by default in ready for the providers not being by accident uncovered publicly. Istio will mechanically drop consumer connection if the TLS handshake does not meet the necessities.
As a result of Istio verifies service-to-service communication by utilizing Belief Configurations.
Making a root-ca certificates.
cd istio-tool
mkdir -p certs
pushd certs
make -f ../Makefile.selfsigned.mk root-ca
Generate a cluster1 certificates.
make -f ../Makefile.selfsigned.mk cluster1-cacerts
Generate a cluster2 certificates.
make -f ../Makefile.selfsigned.mk cluster2-cacerts
Now, apply each the certificates on each cluster.
For Cluster1:
kubectl create secret generic cacerts -n istio-system
      --from-file=cluster1/ca-cert.pem
      --from-file=cluster1/ca-key.pem
      --from-file=cluster1/root-cert.pem
      --from-file=cluster1/cert-chain.pem
For Cluster2:
kubectl create secret generic cacerts -n istio-system
      --from-file=cluster2/ca-cert.pem
      --from-file=cluster2/ca-key.pem
      --from-file=cluster2/root-cert.pem
      --from-file=cluster2/cert-chain.pem
After making use of all the required steps. The cluster1 and cluster2 ought to now be capable of distribute visitors on each clusters.
3. Cross community gateway validation
After making use of the required steps. After all, it is advisable to confirm if it is truly working. I’ve created a primary software known as MetaPod that permits you to extract the pod data or metadata via the net. So you possibly can decide in case your visitors is definitely being forwarded to the 2nd cluster.
MetaPod pattern deployment manifest.
For Cluster1, Attempt to deploy the check deployment.
Observe: You will need to change the hosts values to make it work in your finish.
---
apiVersion: networking.istio.io/v1alpha3
form: Gateway
metadata:
  identify: metapod-gateway
spec:
  selector:
    istio: ingressgateway # use istio default controller
  servers:
  - port:
      quantity: 80
      identify: http
      protocol: HTTP
    hosts:
    - "metapod.instance.com"
    tls:
      mode: PASSTHROUGH
      httpsRedirect: true # sends 301 redirect for http requests
  - port:
      quantity: 443
      identify: http-443
      protocol: HTTP  # http solely since tls certificates is got here from upstream (LoadBalancer) Degree
    hosts:
    - "metapod.instance.com"
    tls:
      mode: PASSTHROUGH
---
apiVersion: networking.istio.io/v1alpha3
form: VirtualService
metadata:
  identify: metapod
spec:
  hosts:
  - "metapod.instance.com"
  - "metapod.default.svc.cluster.native"
  gateways:
  - metapod-gateway
  http:
  - route:
    - vacation spot:
        host: metapod.default.svc.cluster.native
        port:
          quantity: 80
    retries:
      makes an attempt: 5
      perTryTimeout: 5s

---
apiVersion: v1
form: Service
metadata:
  identify: metapod
  labels:
    app: metapod
    service: metapod
spec:
  ports:
  - identify: http
    port: 80
    targetPort: 8080
  selector:
    app: metapod
---
apiVersion: apps/v1
form: Deployment
metadata:
  identify: metapod
spec:
  replicas: 2
  selector:
    matchLabels:
      app: metapod
      model: v1
  template:
    metadata:
      labels:
        app: metapod
        model: v1
    spec:
      containers:
      - picture: docker.io/alfredvalderrama/metapod:v1
        imagePullPolicy: IfNotPresent
        identify: metapod
        ports:
        - containerPort: 8080
        env:
        - identify: NODE_NAME
          valueFrom:
            fieldRef:
              fieldPath: spec.nodeName
        - identify: POD_NAME
          valueFrom:
            fieldRef:
              fieldPath: metadata.identify
        - identify: POD_NAMESPACE
          valueFrom:
            fieldRef:
              fieldPath: metadata.namespace
        - identify: POD_IP
          valueFrom:
            fieldRef:
              fieldPath: standing.podIP
        - identify: POD_SERVICE_ACCOUNT
          valueFrom:
            fieldRef:
              fieldPath: spec.serviceAccountName
        - identify: POD_CPU_REQUEST
          valueFrom:
            resourceFieldRef:
              containerName: metapod
              useful resource: requests.cpu
        - identify: POD_CPU_LIMIT
          valueFrom:
            resourceFieldRef:
              containerName: metapod
              useful resource: limits.cpu
        - identify: POD_MEM_REQUEST
          valueFrom:
            resourceFieldRef:
              containerName: metapod
              useful resource: requests.reminiscence
        - identify: POD_MEM_LIMIT
          valueFrom:
            resourceFieldRef:
              containerName: metapod
              useful resource: limits.reminiscence
        - identify: CLUSTER_NAME
          worth: "Cluster1"
        - identify: GIN_MODE
          worth: "launch"
For Cluster2:
---
apiVersion: networking.istio.io/v1alpha3
form: VirtualService
metadata:
  identify: metapod
spec:
  hosts:
  - "metapod.instance.com"
  - "metapod.default.svc.cluster.native"
  gateways:
  - metapod-gateway
  http:
  - route:
    - vacation spot:
        host: metapod.default.svc.cluster.native
        port:
          quantity: 80
---
apiVersion: v1
form: Service
metadata:
  identify: metapod
  labels:
    app: metapod
    service: metapod
spec:
  ports:
  - identify: http
    port: 80
    targetPort: 8080
  selector:
    app: metapod
---
apiVersion: apps/v1
form: Deployment
metadata:
  identify: metapod
spec:
  replicas: 2
  selector:
    matchLabels:
      app: metapod
      model: v1
  template:
    metadata:
      labels:
        app: metapod
        model: v1
    spec:
      containers:
      - picture: docker.io/alfredvalderrama/metapod:v1
        imagePullPolicy: IfNotPresent
        identify: metapod
        ports:
        - containerPort: 8080
        env:
        - identify: NODE_NAME
          valueFrom:
            fieldRef:
              fieldPath: spec.nodeName
        - identify: POD_NAME
          valueFrom:
            fieldRef:
              fieldPath: metadata.identify
        - identify: POD_NAMESPACE
          valueFrom:
            fieldRef:
              fieldPath: metadata.namespace
        - identify: POD_IP
          valueFrom:
            fieldRef:
              fieldPath: standing.podIP
        - identify: POD_SERVICE_ACCOUNT
          valueFrom:
            fieldRef:
              fieldPath: spec.serviceAccountName
        - identify: POD_CPU_REQUEST
          valueFrom:
            resourceFieldRef:
              containerName: metapod
              useful resource: requests.cpu
        - identify: POD_CPU_LIMIT
          valueFrom:
            resourceFieldRef:
              containerName: metapod
              useful resource: limits.cpu
        - identify: POD_MEM_REQUEST
          valueFrom:
            resourceFieldRef:
              containerName: metapod
              useful resource: requests.reminiscence
        - identify: POD_MEM_LIMIT
          valueFrom:
            resourceFieldRef:
              containerName: metapod
              useful resource: limits.reminiscence
        - identify: CLUSTER_NAME
          worth: "Cluster2"
        - identify: GIN_MODE
          worth: "launch"
After just a few seconds, Attempt to go to the registered gateway in your finish.
In my case, https://metapod.instance.com and it ought to appear like this:
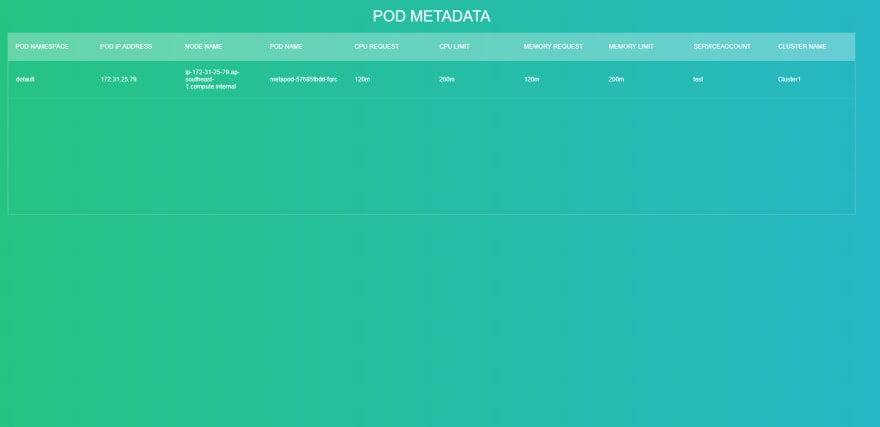
As you possibly can see beneath the CLUSTER NAME. Your visitors is forwarded to Cluster1. If you happen to always refresh your browser web page. You may discover that your visitors is being forwarded additionally to Cluster2. See beneath:

Alright! That is it. You might encounter a variety of issues throughout your journey. Nevertheless it’s price to strive.
You’ll be able to message me instantly right here or on my twitter account https://twitter.com/redopsbay for those who need assistance.
I’ll strive my greatest that will help you out to repair it. 
Hope you prefer it. Cheers!!! Thanks!!!
Fast References
