When you work on a number of initiatives, you may find yourself utilizing the identical ESLint and Prettier settings in every of them. Positive, utilizing the identical useful ESLint plugins and configurations is nice for consistency, however it’s important to copy and paste your dependencies out of your package deal.json, .eslintrc.js, and .prettierrc time and again:
With every new challenge, this strategy can more and more contribute to a upkeep drawback. If you’d like (or want) to vary your rule set frequently, it’s important to contact all initiatives and make manually positive that they don’t diverge from one another.
This isn’t a DRY strategy, which basically implies that every bit of knowledge ought to have a single supply of fact. Duplicated code (or different data) is taken into account an anti-pattern and must be refactored to a singular illustration.
On the subject of lowering the quantity it’s important to copy with ESLint and Prettier configs, bundling them in your personal customized npm package deal saves lots of effort and time. With this strategy, you solely need to make adjustments in a single place, publish a brand new model, and replace the dependency model in your initiatives. As well as, you’ll be able to add or override guidelines, or add configurations which might be project-specific.
On this put up, we’ll speak about bundle your ESLint and Prettier configs for simpler use throughout initiatives via the next sections:
Overview of the ESLint and Prettier setup
To comply with alongside, have a look the next GitHub initiatives:
The ESLint package deal is, on the one hand, the muse for this text, because it incorporates my most popular ESLint configurations that I’ve utilized in all my React initiatives for a very long time. This configuration deactivates all of the formatting guidelines of ESLint and makes positive that Prettier is used for code beautifying.
Monorepo setup for shared libraries
I purpose to offer two npm packages to supply out ESLint and Prettier configurations into particular person npm packages. Subsequently, I’m utilizing a monorepo challenge to facilitate particular person publishing of the packages, however it’s on no account required to make use of a monorepo setup. This text doesn’t clarify how npm workspaces for monorepos work, however in case you’re keen on that, you’ll be able to comply with alongside my in-detail information.
The folder construction of the npm challenge appears to be like like this:
.
├── packages/
│   ├── eslint-config/
│   │   ├── eslint-config.js
│   │   └── package deal.json
│   └── prettier-config/
│       ├── package deal.json
│       └── prettier-config.json
├── .gitignore
└── package deal.json
The basis package deal.json defines the placement of the workspaces eslint-config and prettier-config.
{
  "title": "Shared ESLint and Prettier config",
  "model": "1.0.0",
  "workspaces": [
    "packages/*"
  ],
  "scripts": {
    "publish-eslint-config": "npm publish --workspace @doppelmutzi/eslint-config-react",
    "publish-prettier-config": "npm publish --workspace @doppelmutzi/prettier-config"
  }
}
With the assistance of the scripts publish-eslint-config and publish-prettier-config, you’ll be able to publish every package deal to its respective public npm registry.
Talking of packages, let’s dive into the implementation of the package deal @doppelmutzi/eslint-config-react subsequent.
Shared ESLint configuration (@doppelmutzi/eslint-config-react)
This part offers with the workspace @doppelmutzi/eslint-config-react, which exposes our ESLint configuration.
The package deal.json
Let’s check out our eslint-config/package deal.json within the offered GitHub repo.
{
    "title": "@doppelmutzi/eslint-config-react",
    "model": "1.0.0",
    "principal": "./eslint-config.js",
    "peerDependencies": {
        "@babel/eslint-parser": "7.16.5",
        "eslint": "8.5.0",
        "eslint-config-prettier": "8.3.0",
        "eslint-config-standard": "16.0.3",
        "eslint-import-resolver-node": "0.3.6",
        "eslint-plugin-import": "2.25.3",
        "eslint-plugin-node": "11.1.0",
        "eslint-plugin-prettier": "4.0.0",
        "eslint-plugin-promise": "6.0.0",
        "eslint-plugin-react": "7.28.0",
        "eslint-plugin-react-hooks": "4.3.0",
        "prettier": "2.5.1"
    },
    "scripts": {
        "publish-manual": "npm publish"
    },
    "publishConfig": {
        "entry": "public"
    },
    // ...
}
Crucial half is the principal property, which references the file holding our ESLint configuration. We’ll check out it in a minute; the model property must be set earlier than you publish a brand new model.
The peerDependencies property defines the packages that you just’ll want set up in your challenge to make use of our shared library. I’ll go into extra element within the React instance challenge that makes use of this library.
The publishConfig property is restricted to npm and permits us to publish this challenge to the general public npm registry. The publish-manual script simply makes use of the inbuilt npm CLI command to publish this package deal. On the finish of this part, we’ll invoke this script to publish a model of this package deal.
The eslint-config.jsfile
eslint-config.js holds the ESLint configuration that we wish to reuse in our initiatives. We are able to title it nonetheless we like, however it must be referenced within the principal subject of our package deal.json.
To make it concrete, this file holds the content material you’d usually put into the ESLint configuration file (.eslintrc, .eslintrc.js, and many others.) in your challenge.
// .eslintrc.js
module.exports = {
  // ...
  extends: [
    "plugin:react/recommended",
    "standard",
    "plugin:prettier/recommended",
  ],
  parser: "@babel/eslint-parser",
  parserOptions: {
    ecmaFeatures: {
      jsx: true,
    },
    ecmaVersion: 12,
    sourceType: "module",
  },
  plugins: ["react"],
};
As I described within the intro, that is my most popular React setup.
Publish to npm
Let’s publish this to the general public npm registry. Within the packages/eslint-config/ folder, we will both execute $ npm run publish-manual or $ npm publish immediately. Moreover, with this npm workspaces setup, we will additionally use the script publish-eslint-config from the basis folder ($ npm run publish-eslint-config) to push it to the registry.
{
  // root package deal.json
  "description": "Shared ESLint and Prettier config",
  "workspaces": [
    "packages/*"
  ],
  "scripts": {
    "publish-eslint-config": "npm publish --workspace @doppelmutzi/eslint-config-react",
    "publish-prettier-config": "npm publish --workspace @doppelmutzi/prettier-config"
  }
}
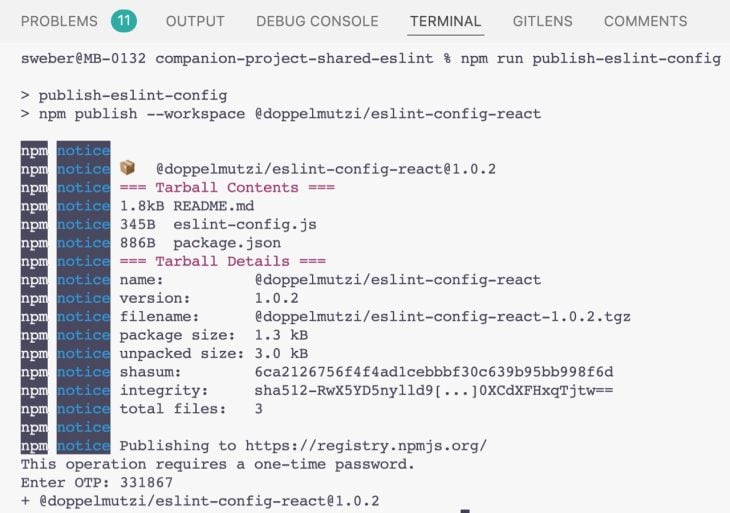
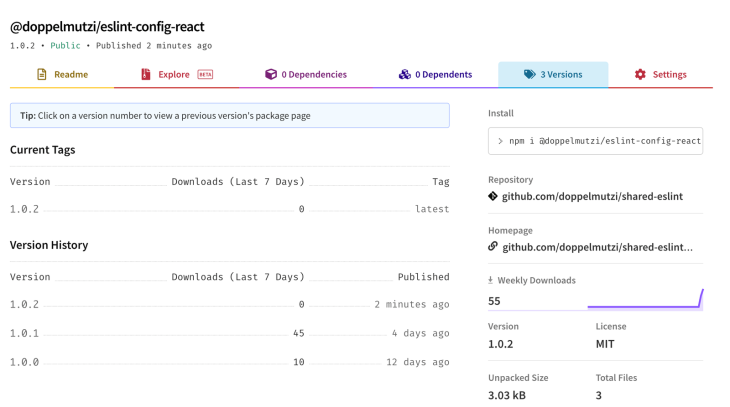
npm publish commandJust be sure you’ve adjusted the model quantity in packages/eslint-config/package deal.json to the brand new model; in any other case you’ll get a 403 error. If publishing works, one can find your new model on npm.
Shared Prettier configuration (@doppelmutzi/prettier-config)
On this part, I’ll clarify outsource your customized Prettier configuration right into a separate package deal, as I’ve finished with @doppelmutzi/prettier-config in my pattern GitHub repo.
The package deal.json
Let’s check out our present prettier-config/package deal.json.
{
    "title": "@doppelmutzi/prettier-config",
    "model": "1.0.0",
    "principal": "./prettier-config.json",
    "peerDependencies": {
        "prettier": "2.5.1"
    },
    "publishConfig": {
        "entry": "public"
    },
    "scripts": {
        "publish-manual": "npm publish"
    },
    // ...
}
Once more, essentially the most attention-grabbing half is the principal subject, which factors to the extracted Prettier configuration.
The opposite fields have the identical that means as we gave within the ESLint part; the one peer dependency is Prettier itself. It will develop into related within the subsequent part after we will embrace this library.
The prettier-config.json file
prettier-config.json constitutes the configuration file. We’ll use this to override Prettier’s default habits.
In our instance, we outline Prettier to make use of single quotes (singleQuote) and to keep away from parentheses round a sole arrow operate parameter (arrowParens).
{
    "singleQuote": true,
    "arrowParens": "keep away from"
}
Publish to npm
That is analogous to publishing the @doppelmutzi/eslint-config-react package deal. After adjusting the model subject, we simply invoke $ npm run publish-prettier-config within the root folder.
Utilizing shared libraries in React initiatives
The React instance challenge I constructed exhibits use our libraries. On this part, I’ll clarify step-by-step use it in your personal React initiatives.
Set up customized ESLint and Prettier packages
To introduce these libraries into your React challenge, it’s important to add them as dependencies first.
# add eslint-config-react as dev dependency
$ npm i -D @doppelmutzi/eslint-config-react
# add prettier-config as dev dependency
$ npm i -D @doppelmutzi/prettier-config
Set up peer dependencies
After this, now we have to put in the peer dependencies we outlined within the package deal.json recordsdata of every library. We are able to leverage the npm package deal install-peerdeps for this.
# set up eslint-config-react's peer dependencies as dev peerDependencies
$ npx install-peerdeps --dev @doppelmutzi/eslint-config-react
# set up prettier-config's peer dependencies as dev dependencies
$ npx install-peerdeps --dev @doppelmutzi/prettier-config
Instead, you’ll be able to copy the libraries outlined in peerDependencies fields into the devDependencies part of your package deal.json and invoke $ npm set up.
Ultimately, your package deal.json will seem like this:
{
  // ...
  "devDependencies": {
    "@babel/eslint-parser": "7.16.5",
    "eslint": "8.5.0",
    "eslint-config-prettier": "8.3.0",
    "eslint-config-standard": "16.0.3",
    "eslint-import-resolver-node": "0.3.6",
    "eslint-plugin-import": "2.25.3",
    "eslint-plugin-node": "11.1.0",
    "eslint-plugin-prettier": "4.0.0",
    "eslint-plugin-promise": "6.0.0",
    "eslint-plugin-react": "7.28.0",
    "eslint-plugin-react-hooks": "4.3.0",
    "prettier": "2.5.1",
    // your different dependencies
  }
}
Arrange configuration recordsdata
The final step is to arrange .eslintrc.js and .prettierrc, our config recordsdata. To make use of the ESLint configuration in @doppelmutzi/eslint-config-react, you want the next configuration:
module.exports = {
  extends: ['@doppelmutzi/eslint-config-react'],
};
You continue to have the choice to override or prolong this setup along with your project-specific configuration.
For the Prettier setup, you simply need to put the next content material into .prettierrc.
"@doppelmutzi/prettier-config"
Configure VS Code and IntelliJ
The final step is to configure your IDE appropriately. My most popular setup is to auto-fix ESLint points on save; due to this fact, I want to offer a configuration to allow save actions as a person or workspace configuration.
For a workspace configuration, it’s important to open the workspace settings, swap to the JSON editor, and paste the next into it.
  "editor.codeActionsOnSave": {
    "supply.fixAll": true,
    "supply.fixAll.eslint": true
  },
  "editor.formatOnSave": true,
  "javascript.format.allow": false,
  "[javascript]": {
    "editor.formatOnSave": false
  },
  "[javascriptreact]": {
    "editor.formatOnSave": false
  },
  // ...
VS Code generates a .vscode/settings.json file within the challenge’s root folder. This settings.json file from the companion challenge additionally contains the required configuration to allow the ESLint workflow with a Yarn Berry PnP challenge.
To search out out extra about ESLint and Yarn Berry, you’ll be able to learn my earlier LogRocket article on package deal managers.
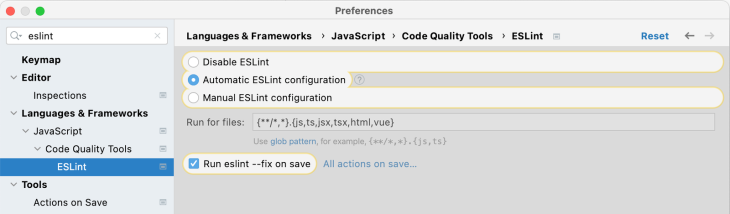
To configure IntelliJ, it’s important to go to the Code High quality Instruments part of the Preferences menu. Choose Automated ESLint configuration to let IntelliJ choose up the ESLint package deal from node_modules folder. As well as, it’s good to verify Run eslint --fix on save.
Conclusion
This text explains make ESLint and Prettier configurations accessible in a separate package deal. With this in place, you’ll have a singular place to deal with your code that help reusability and constitutes a single level of fact. This DRY strategy reduces upkeep effort as a result of adjustments solely need to be made as soon as to be able to be mirrored throughout apps.
If you wish to discover out extra about my strategy to utilizing ESLint and Prettier in my very own React initiatives, be happy to learn some articles I’ve printed on my private weblog on this matter:
Are you including new JS libraries to enhance efficiency or construct new options? What in the event that they’re doing the alternative?
There’s little doubt that frontends are getting extra advanced. As you add new JavaScript libraries and different dependencies to your app, you’ll want extra visibility to make sure your customers don’t run into unknown points.
LogRocket is a frontend utility monitoring answer that allows you to replay JavaScript errors as in the event that they occurred in your personal browser so you’ll be able to react to bugs extra successfully.

LogRocket works completely with any app, no matter framework, and has plugins to log further context from Redux, Vuex, and @ngrx/retailer. As a substitute of guessing why issues occur, you’ll be able to mixture and report on what state your utility was in when a difficulty occurred. LogRocket additionally screens your app’s efficiency, reporting metrics like shopper CPU load, shopper reminiscence utilization, and extra.
Construct confidently — Begin monitoring free of charge.
