
This yr I’m actively working with Google Cloud (GCP), and I’ll share methods to arrange the API Shopper with Python in WSL (Home windows Subsystem Linux) and Anaconda to execute BigQuery SQL queries from scratch.
For those who want extra details about WSL2 and Anaconda (Miniconda) set up, I’ll make it easier to with this earlier publish.
On this publish, we’re going to see methods to:
- Use WSL to create a brand new Anaconda setting.
- Set up the Google API Shopper Library utilizing PIP
- Create a Google Service Account utilizing the Internet Console
- Generate a Google Utility Credentials utilizing JSON KEY file
- Set the Google Utility Credential setting variable
- Add USA Names public dataset to BigQuery and take a look at a SQL question
- Setup Visible Studio Code to run on WSL
- Name a Python Script to execute a SQL question
- Bonus: Troubleshooting
- Thanks
- Conclusion
I like to recommend you test my earlier publish in case you don’t have Home windows Subsystem Linux (WSL) and Anaconda (Miniconda).
To not combine with current libraries, we’re going to arrange an area venture doing the next steps:
- Open a WSL2 terminal
- Go to your private folder a create a brand new folder gcp_projects
- Create an Anaconda setting with the identify gcp_prj
- Examine if the brand new setting was created
- Change to the brand new setting utilizing activate.
Use the next instructions:
mkdir gcp_projects
cd gcp_projects/conda create --name gcp_prj
conda information --envs
conda activate gcp_prj

We’re going to set up PIP within the new Anaconda setting after which set up the Google API Shopper library utilizing the next instructions:
sudo apt set up python3-pip
pip set up --upgrade google-cloud-bigquery


The following step is to create a brand new Challenge and Service Account by going to https://console.cloud.google.com/ > IAM & Admin > Service Account or https://console.cloud.google.com/iam-admin/serviceaccounts

Create a brand new venture with the identify MyBigQueryTest

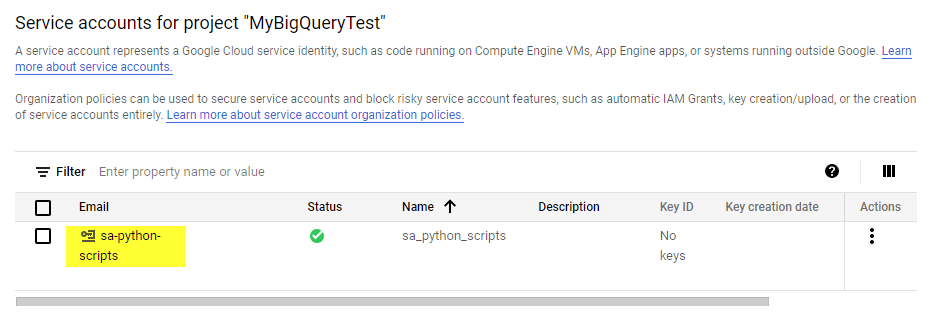
Create a brand new service account with the identify sa_python_scripts and choose the function to entry your venture.

For testing functions, I’ll use the Proprietor function with out granting customers entry to the service account. Bear in mind that the Proprietor function just isn’t really useful for the Manufacturing setting

Go to the Service Account and choose the MyBigQueryTest venture at https://console.cloud.google.com/iam-admin/serviceaccounts and click on the e-mail created for the service account to see the small print.
Create a brand new key and obtain it as a JSON file

Save the file as mybigquerytest.json, I’m utilizing the direct WSL path wsl$Ubuntuhomecsaavedraworkspace_linuxgcp_projects


Set the GOOGLE_APPLICATION_CREDENTIALS variable completely in your profile by enhancing the .bashrc file.
sudo nano ~/.bashrc

Add the export GOOGLE_APPLICATION_CREDENTIALS on the finish of the file:
export GOOGLE_APPLICATION_CREDENTIALS="/house/csaavedra/workspace_linux/gcp_projects/mybigquerytest.json"

Press Management + X and choose Y for Sure to avoid wasting the modified buffer (file)

and press Enter key to substantiate the file identify and the adjustments.

I’m reloading the profile and checking the trail with the echo and printenv command for the variable GOOGLE_APPLICATION_CREDENTIALS
supply ~/.bashrc
echo $GOOGLE_APPLICATION_CREDENTIALS
printenv GOOGLE_APPLICATION_CREDENTIALS

Go to the BigQuery Console at https://console.cloud.google.com/bigquery and Add Information Public Datasets as the next image:

Available in the market, search USA names and choose the U.S. Social Safety Administration dataset

Add the Dataset by clicking on the blue button known as VIA DATASET:

The USA Names dataset was added, however you can’t discover it within the explorer tasks tree.

So as to add it, you’ll want to search USA names and choose Broaden search to all tasks:

Then you’ll want to click on on the pin icon subsequent to the venture identify bigquery-public-data shifting your mouse near the three dots.

Now you may see the USA Names in your tree of tasks:

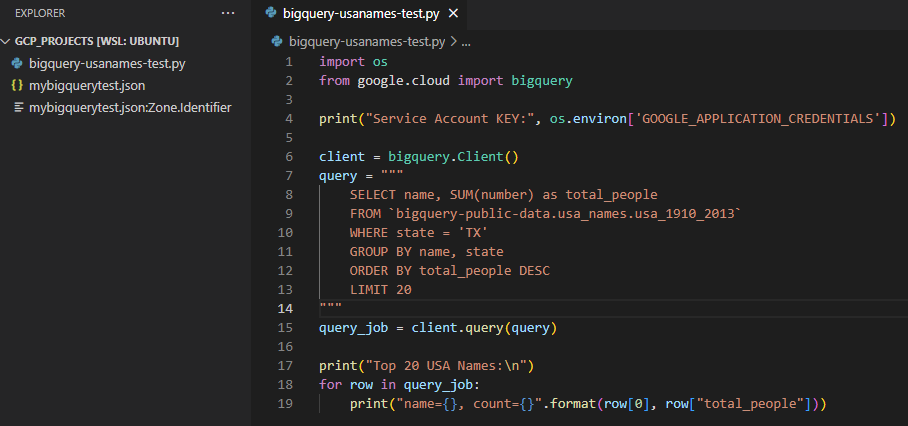
The following step is to make use of an editor window and execute the next SQL question:
SELECT identify, SUM(quantity) as total_people
FROM `bigquery-public-data.usa_names.usa_1910_2013`
WHERE state = 'TX'
GROUP BY identify, state
ORDER BY total_people DESC
LIMIT 20
The consequence we’re going to use to test that the Python Script is working:

After downloading and putting in Visible Studio Code from https://code.visualstudio.com/ go to extensions and set up
- Python Extension
- Distant – WSL Extension
As the next picture:

Then click on on the left backside nook inexperienced icon with
greater-than and less-than signal

And select New WSL Home windows to open a brand new occasion of Visible Studio linked to WSL remotely.

You may test seeing the distinction label within the left backside nook as with the textual content WSL: Ubuntu

Now you’re going to open the folder in WSL by going to file and open the folder:

Choose the trail /house/csaavedra/workspace_linux/gcp_projects/ and press the okay button.

We are able to discover the JSON KEY file there. Now create a brand new file by doing proper click on with the identify bigquery-usanames-test.py

No module named Google

For those who get the error No module named Google, test the set up of the google cloud library with the command:
pip set up --upgrade google-cloud-bigquery
Couldn’t mechanically decide credentials

For those who get the error: Couldn’t mechanically decide credentials. Please set GOOGLE_APPLICATION_CREDENTIALS or explicitly create credentials and re-run the appliance. For extra data, please see https://cloud.google.com/docs/authentication/getting-started
The issue is expounded to the GOOGLE_APPLICATION_CREDENTIALS export as an setting variable.
You may take a look at run the code os.environ or print the printenv within the terminal to see if return the variable.
import os
print(os.environ)
If not, you may export or reload the profile with the supply .bashrc and printenv.
export GOOGLE_APPLICATION_CREDENTIALS="/house/csaavedra/workspace_linux/gcp_projects/mybigquerytest.json"supply ~/.bashrc
echo $GOOGLE_APPLICATION_CREDENTIALS
printenv GOOGLE_APPLICATION_CREDENTIALS
Additionally, you may exit within the visible Studio terminal to pressure reload the session with the setting variable
To complete, I’m grateful to Chris von Csefalvay, who offers me the inspiration to maintain writing once more.
Connecting with Python to Google Cloud Providers (GCP) is simple to do utilizing the API Shopper and a Service Account. After doing this primary step, you are able to do a posh automatization like consuming a Human Excel file utilizing Python Pandas, loading and mixing in Google Huge Question, and refreshing a Tableau Dashboard.
