
Console logs are a vital idea to any JavaScript developer, and so they could even be extra necessary to React Native builders. When something goes fallacious in an app, console.log() is the one assertion we use to attempt to determine what’s fallacious in our code.
On the subject of debugging, console logs are actually insightful, serving to you look at the real-time information that an app is utilizing at any level of execution. Nevertheless, having too many console logs can confuse the developer to the purpose that no log is recognizable. Many builders don’t give a correct description to their logs, and their terminal seems to be one thing like this:
i'm right here
simply bought executed
brooo why this doesnt run
i hate programming
this could run
[Object object]
12345
iiiiiiiiiiiiiiii
Someday, your undertaking is perhaps transferred to a different developer, so it’s essential to have readable console logs that may assist the following developer perceive what’s occurring in any particular a part of the code.
On this article, we‘ll evaluate the alternative ways of implementing console logs in React Native to maintain issues extra organized and readable. To comply with together with this text, you’ll must have primary data of React Native, both on Expo or utilizing the React Native CLI. Let’s get began!
Desk of contents
Watching console logs
No matter whether or not you’re engaged on an emulator or a bodily gadget, your console logs will present up within the Metro Bundler terminal, which opens instantly once you run your app. For instance, think about you utilize the next console log in your code:
console.log("This can be a check console log in App.js");
It would present up in your terminal as follows:

Discover how React Native places LOG earlier than the precise console log textual content. You may alter this utilizing completely different console log varieties. Let’s have a look at how warnings are displayed on the console:
console.warn("This can be a check warning");
warn() is a technique much like log() within the console object. It ought to produce an identical output to a daily log, nonetheless, it ought to embrace a warning label:
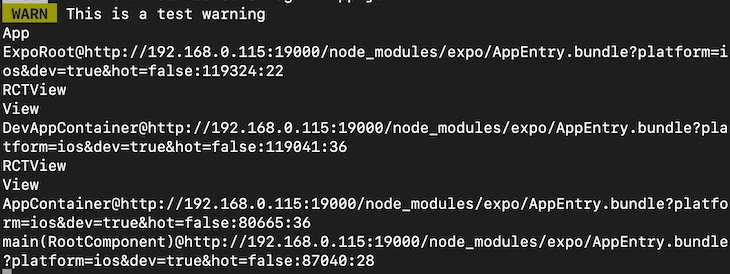
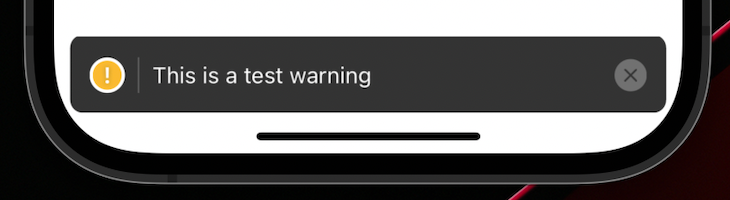
Together with the warning textual content itself, React Native additionally logs out the place precisely this warning was triggered. React Native additionally sends this warning to the linked gadget along with the warning on the console:
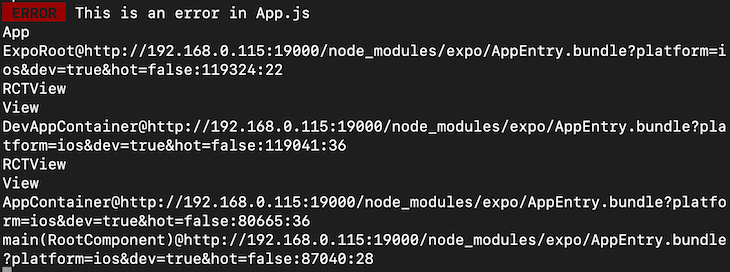
You are able to do the identical with errors:
console.error("That is an error in App.js");
This could output a log with the label ERROR within the logs:
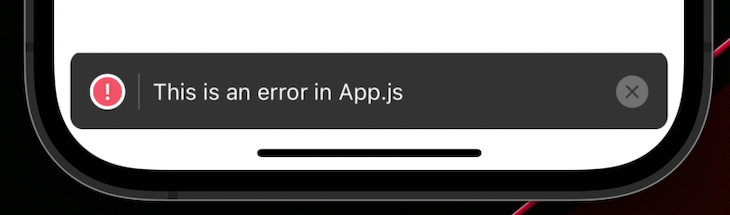
Equally, the error can also be displayed on the gadget as follows:
Utilizing packages for superior console logs
Aside from the common built-in console.log() technique, you’ll be able to set up customized packages that provide you with extra management over your console logs and make debugging simpler and extra organized. Let’s have a look at an instance; we’ll set up react-native-logs into our React Native app. Run the next command in your terminal:
#npm
npm set up react-native-logs

#yarn
yarn add react-native-logs
The command above will set up all of the dependencies wanted to make use of the react-native-logs bundle. Now, you’ll be able to import the bundle utilizing the next line:
import { logger } from "react-native-logs";
You may initialize the logger through the use of the next code snippet exterior of the element or in another file:
const log = logger.createLogger();
Now, you’ll be able to merely use the strategies supplied by the bundle to create a easy go browsing the console:
log.data("That is some check info");
This could present an output much like the next:

Discover that this bundle robotically provides the time for the log together with the message of the log itself. Now, let’s strive the identical factor for warnings and errors and see what the output is:
log.warn("That is some check warning in App.js");
log.error("That is some check error in App.js");
The code snippet above ought to give an output much like the next:

At the moment, there aren’t any colours right here as a result of that is the default logger configuration. We are able to additionally use customized logger configurations to provide these console logs some colour.
Configuring console log colours
Let’s add some configuration in our logger.createLogger() technique:
const log = logger.createLogger({
  transportOptions: {
    colours: {
      data: "blueBright",
      warn: "yellowBright",
      error: "redBright",
      debug: "white",
    },
  },
});
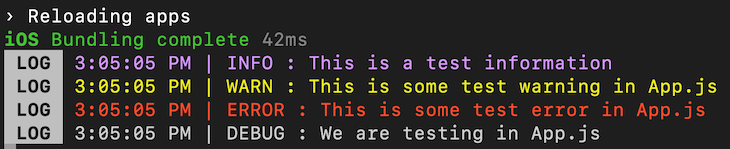
Within the code snippet above, we’re offering completely different colours for various ranges of console log severities. Let’s strive some console logs now:
log.data("This can be a check info");
log.warn("That is some check warning in App.js");
log.error("That is some check error in App.js");
log.debug("We're testing in App.js");
The code snippet above ought to give the next output:
Notice that the colours may fluctuate relying in your terminal configuration. In my case, blueBright is being proven as a purple colour.
Customized severity ranges
We are able to add customized severity ranges other than the default ones, like debug, data, warn, and error. To take action, we have to outline the degrees and the severities within the logger.createLogger() technique:
const log = logger.createLogger({
  ranges: {
    customized: 0,
    debug: 1,
    data: 2,
    warn: 3,
    error: 4,
    devNotice: 5,
  },
  transportOptions: {
    colours: {
      customized: "white",
      devNotice: "blue",
      data: "blueBright",
      warn: "yellowBright",
      error: "redBright",
      debug: "white",
    },
  },
});
Within the code above, now we have outlined our ranges and severity, with 0 being the least extreme. If you use customized ranges, you should outline the default severities if you happen to want to use them. Utilizing customized ranges overrides the default ranges.
Now, let’s put this to check:
log.customized("This can be a customized log");
log.data("This can be a check info");
log.warn("That is some check warning in App.js");
log.error("That is some check error in App.js");
log.debug("We're testing in App.js");
log.devNotice("The developer wants to have a look at this urgently");
The code above ought to present the next output:

Outputting logs to a file
In a manufacturing atmosphere, many builders output their app logs to a file. Due to this fact, if something goes fallacious, the person can present the developer with logs that they’ll use to resolve points within the app. When utilizing react-native-logs, it’s attainable to output your logs in a file.
Relying on whether or not you’re utilizing Expo or the React Native CLI, you should set up the file system bundle to entry the gadget file system:
# Expo
npm set up expo-file-system

# React Native CLI
npm set up react-native-fs
Then, you’ll be able to import the packages as follows:
// Expo
import * as FileSystem from "expo-file-system";

// React Native CLI
import FileSystem from "react-native-fs";
You should utilize the next configuration in your logger.createLogger() technique:
const log = logger.createLogger({
  transport: fileAsyncTransport,
  ranges: {
    customized: 0,
    debug: 1,
    data: 2,
    warn: 3,
    error: 4,
    devNotice: 5,
  },
  transportOptions: {
    FS: FileSystem,
    fileName: "logs.txt",
  },
});
Notice that fileAsyncTransport is imported from the react-native-logs bundle together with the createLogger() technique. Within the code snippet above, we’re specifying a file transport technique, that means that each one of our logs might be outputted in a file as a substitute.
In transportOptions, we specify a file system primarily based on whether or not we’re utilizing Expo or the React Native CLI. Lastly, we’re additionally offering a reputation for the logs file.
Now, within the file system of your gadget, it is best to get a textual content file with an output much like the next code relying on which OS you might be utilizing:
3:21:32 PM | DEVNOTICE : The developer wants to have a look at this urgently
3:22:49 PM | INFO : This can be a check info
3:22:49 PM | WARN : That is some check warning in App.js
3:22:49 PM | ERROR : That is some check error in App.js
3:22:49 PM | DEBUG : We're testing in App.js
This log can now be uploaded or shared with the developer to look at the applying movement and probably eradicate any bugs.
Conclusion
Console logs are crucial, and if used accurately, may also help the developer remedy quite a lot of issues shortly. Utilizing one thing like file logging may also assist post-deployment help for the app. I positively suggest taking part in round with the configuration and exploring extra concerning the bundle. I hope you loved this text, and comfortable coding!
LogRocket: Immediately recreate points in your React Native apps.

LogRocket is a React Native monitoring resolution that helps you reproduce points immediately, prioritize bugs, and perceive efficiency in your React Native apps.
LogRocket additionally helps you improve conversion charges and product utilization by displaying you precisely how customers are interacting along with your app. LogRocket’s product analytics options floor the explanation why customers do not full a specific movement or do not undertake a brand new function.
Begin proactively monitoring your React Native apps — strive LogRocket without cost.
