

Welcome to half 2 of our Raspberry Pi HAT tutorial collection written by our resident Pi builders, Dave ‘waveform’ Jones and William ‘jawn-smith’ Wilson.
On this put up, they educate us how you can construct a handheld micro-Pong machine with the Unicorn HAT Mini and observe it up with a system monitor on the Unicorn HAT HD.
Try half 1, the place William received us began with the Unicorn pHAT and Dave shared his piwheels challenge dashboard!
It is a visitor put up from William’s personal weblog, which he’s kindly allowed us to share right here. Try his web site for extra nice Pi tutorials in addition to some equally colourful 3D printing initiatives.
That’s sufficient from me, over to William and Dave.
As of Ubuntu 22.04, the Raspberry Pi Pimoroni Unicorn HATs are supported on Ubuntu out of the field. This consists of the usual Unicorn Hat, Unicorn pHAT, Unicorn HAT Mini, and Unicorn HAT HD.
To put in the libraries for every HAT, run the next instructions:
sudo apt set up python3-unicornhat
sudo apt set up python3-unicornhathd
sudo apt set up python3-unicornhatmini
Under are some examples of how you can use them!
Tutorial: Micro-Pong on the Unicorn HAT Mini
Part written by William Wilson
Whereas small, the Unicorn HAT Mini has extra pixels than the pHAT so it might show rather more. It additionally has 4 buttons, making issues like easy video games attainable. This instance is a quite simple recreation of Pong that I’ve created. Each time the ball hits a paddle, the colour of the ball modifications and the sport quickens a bit of.
import time
import math
import random
import colorsys

from gpiozero import Button
from unicornhatmini import UnicornHATMini

unicornhatmini = UnicornHATMini()
unicornhatmini.set_brightness(0.5)
width, peak = unicornhatmini.get_shape()

class Pong():
    def __init__(self):
        # begin the paddles roughly midway vertically
        self.l_paddle_y = 3
        self.r_paddle_y = 3
        self.delay = 0.3
        self.ball_x = 1
        self.ball_y = 1
        self.ball_horiz = 1
        self.ball_vert = 1
        self.game_on = True
        self.paddle_height = 3
        self.colours = (
            (255, 0, 0),
            (0, 255, 0),
            (0, 0, 255),
            (255, 255, 0),
            (255, 0, 255),
            (0, 255, 255),
            (255, 255, 255)
        )
        self.coloration = random.alternative(self.colours)

    def l_paddle_down(self):
        if self.l_paddle_y < peak - self.paddle_height:
            self.l_paddle_y += 1

    def l_paddle_up(self):
        if self.l_paddle_y > 0:
            self.l_paddle_y -= 1

    def r_paddle_down(self):
        if self.r_paddle_y < peak - self.paddle_height:
            self.r_paddle_y += 1

    def r_paddle_up(self):
        if self.r_paddle_y > 0:
            self.r_paddle_y -= 1

    def replace(self):
        # test if the sport is over
        if self.ball_x in (0, width - 1):
            self.game_on = False
            return

        # clear the board state
        unicornhatmini.clear()

        # set the place of the paddles
        for i in vary(3):
            unicornhatmini.set_pixel(0,
                    self.l_paddle_y + i,
                    255, 255, 255)
            unicornhatmini.set_pixel(width - 1,
                    self.r_paddle_y + i,
                    255, 255, 255)

        # calculate the subsequent place of the ball
        ball_x_next = self.ball_x + self.ball_horiz
        ball_y_next = self.ball_y + self.ball_vert

        # test if the ball must bounce off of a paddle
        if (
                (ball_x_next == 0 and ball_y_next in
                    (self.l_paddle_y + i for i in vary(3))) or
                (ball_x_next == width - 1 and ball_y_next in
                    (self.r_paddle_y + i for i in vary(3)))
            ):
            # the paddle has hit the ball, so change course
            self.ball_horiz = -self.ball_horiz
            # recalculate ball_x_next
            ball_x_next = self.ball_x + self.ball_horiz

            # for the reason that ball hit a paddle
            # scale back the delay to hurry up the sport
            self.delay -= 0.01

            # change the colour of the ball each time
            # the ball hits a paddle
            self.coloration = random.alternative(self.colours)

        # test if the ball must bounce off of an edge
        if (
                (self.ball_y == 6 and self.ball_vert == 1) or
                (self.ball_y == 0 and self.ball_vert == -1)
            ):
            self.ball_vert = -self.ball_vert
            ball_y_next = self.ball_y + self.ball_vert

        self.ball_x = ball_x_next
        self.ball_y = ball_y_next
        unicornhatmini.set_pixel(self.ball_x,
                self.ball_y,
                *self.coloration)

        # present the sport state
        unicornhatmini.present()

pong_game = Pong()

button_a = Button(5)   # left paddle up
button_b = Button(6)   # left paddle down
button_x = Button(16)  # proper paddle up
button_y = Button(24)  # proper paddle down

button_a.when_pressed = pong_game.l_paddle_up
button_b.when_pressed = pong_game.l_paddle_down
button_x.when_pressed = pong_game.r_paddle_up
button_y.when_pressed = pong_game.r_paddle_down

whereas pong_game.game_on:
    pong_game.replace()
    time.sleep(pong_game.delay)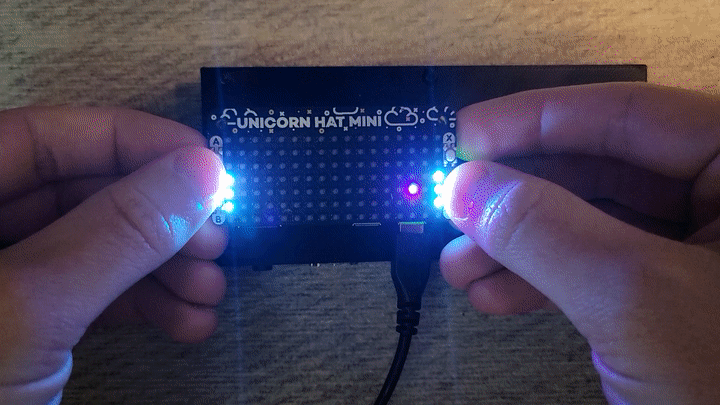
Pimoroni has many extra examples on their GitHub repo!
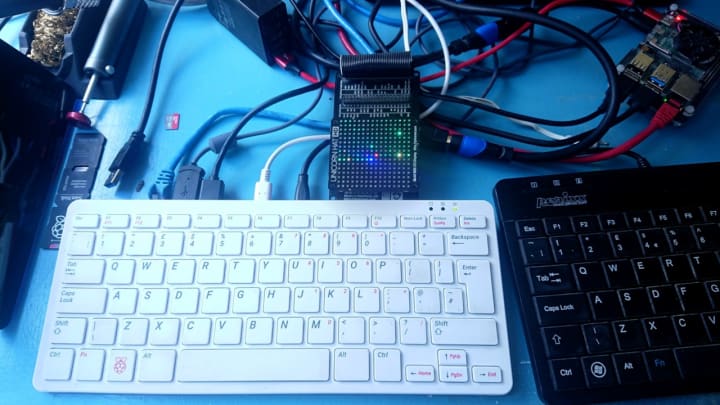
Tutorial: Unicorn HAT HD system monitor
Part written by Dave Jones
Moar Pixels!
The Unicorn HAT HD has an outrageous variety of neopixels, simply ready to spew rainbows at unsuspecting eyeballs. A lot so, it appears a disgrace to waste all of them on one thing as mundane as a two-tone monitoring service. Let’s strive for one thing extra … colourful!
Previous computer systems had big arrays of lights, now typically referred to (barely tongue in cheek) as blinkenlights. These typically visualized precise machine registers, bus addresses and the like. Lately, reminiscence is just too giant and too quick to make this convenient. Nevertheless, it’s pretty typical (on an Ubuntu for Raspberry Pi desktop picture operating a number of issues like a browser, terminal, and so forth.) to have various userland processes that will match fairly properly inside the 256 neopixels on the Unicorn HAT HD.
Let’s construct a contemporary blinkenlights variation that visualises the method desk. We’ll use crimson to characterize CPU utilization, inexperienced to characterize reminiscence utilization, and blue to characterize the inverted age of a course of (so model new processes will present up brilliant blue, then fade as they age).
We will use ps to question the method desk. We’ll exclude PID 2, which on Linux represents the kernel, and any course of underneath PID 2 (the kernel’s varied “threads” that are largely static and thus not very visually fascinating). We’ll ask ps for cp (per-mill CPU utilization), rss (resident set dimension, a measure of the quantity of precise RAM a course of is utilizing), and etimes (age of the method in seconds). Lastly, we’ll flip off the headers as a result of we don’t want them:
$ ps --pid 2 --ppid 2 --deselect -o cp,rss,etimes --no-headers
  1 10760   91980
  0 35128   91975
  0 23432   91975
  0  2916   91975
  0  3332   91971
  3  3364   91971
  0  7368   91970
  0  3868   91970
  0  3428   91969
  ....
This seems cheap, so let’s get coding. First, some imports:
#!/usr/bin/python3

import shlex
import subprocess as sp
from time import sleep
from threading import Thread, Occasion
from itertools import zip_longest

import unicornhathd
Subsequent, our foremost monitor perform:
def monitor():
    unicornhathd.rotation(0)
    unicornhathd.brightness(1.0)
    width, peak = unicornhathd.get_shape()

    processes = {
        # coord  CPU   mem   age
        (x, y): (None, None, None)
        for y in vary(peak)
        for x in vary(width)
    }
    limits = {'max-cpu': 0, 'max-mem': 0}
    updates = UpdateThread(processes, limits)
    updates.begin()
    strive:
        whereas True:
            if limits['max-cpu']:
                for (x, y), (cpu, mem, age) in processes.objects():
                    if cpu just isn't None:
                        r = min(255, int(255 * cpu / limits['max-cpu']))
                        g = min(255, int(255 * mem / limits['max-mem']))
                        b = max(0, min(255, int(255 * (10 - age) / 10)))
                        unicornhathd.set_pixel(y, x, r, g, b)
                    else:
                        unicornhathd.set_pixel(y, x, 0, 0, 0)
            unicornhathd.present()
            sleep(1/30)
    lastly:
        unicornhathd.off()
        updates.cease()
        updates.be part of()
That is pretty easy however let’s undergo it piece by piece. We begin off by initializing:
- The Unicorn HAT HD itself, with the unicornhathd module. We additionally seize its form (which ought to at all times be 16×16).
- processes – a dictionary mapping coordinates on the show to a three-tuple representing CPU utilization, RAM utilization, and course of age. These can be None by default (for any pixel not at present representing a course of).
- limits – a easy dictionary performing as a solution to go a few different values (the present most CPU and reminiscence utilization) between the replace thread and the primary thread.
- updates – an occasion of UpdateThread (which we’ll outline a bit in a while), which we begin earlier than coming into the primary loop.
The principle loop merely checks that now we have a sound max-cpu worth then updates the show from the values within the processes dictionary with some easy maths. All of the values are scaled to the utmost CPU and reminiscence utilization so we get a pleasant distribution of coloration.
Now the UpdateThread itself:
class UpdateThread(Thread):
    def __init__(self, processes, limits):
        tremendous().__init__(goal=self.replace, args=(processes, limits),
                         daemon=True)
        self._done = Occasion()

    def cease(self):
        self._done.set()

    def replace(self, processes, limits):
        cmdline = shlex.cut up(
            'ps --pid 2 --ppid 2 --deselect -o cp,rss,etimes --no-headers')
        whereas not self._done.wait(1/30):
            proc = sp.run(cmdline, capture_output=True, textual content=True)
            output = proc.stdout.splitlines()
            max_cpu = max_mem = 0
            for coord, line in zip_longest(processes, output):
                if not coord:
                    break
                elif line:
                    cpu, mem, age = (int(i) for i in line.cut up())
                    max_cpu = max(cpu, max_cpu)
                    max_mem = max(mem, max_mem)
                    processes[coord] = (cpu, mem, age)
                else:
                    processes[coord] = (None, None, None)
            limits['max-cpu'] = max_cpu
            limits['max-mem'] = max_mem
That is additionally pretty easy; the replace methodology simply calls ps and loops over the strains of output, sticking values into the processes dictionary and updating the limits dictionary with the largest CPU and reminiscence values discovered on the finish.
Grasp on a minute … how is that this protected? Certainly each the “foremost” thread, and our background replace thread are going to be bashing away at these constructions concurrently?! In most languages this may certainly be a no-no. In Python it’s protected, offered that the dictionary doesn’t develop or shrink whereas we’re iterating over it.
Observe: The limitation on not inserting into / deleting from dictionaries whereas iterating over them is the first motive for the construction of each these demo scripts. The mounted dimension of the dictionaries in each circumstances avoids the necessity for any express locking, maintaining the scripts each easy and fairly environment friendly.
For these inquisitive about what goes on underneath the covers, there may be nonetheless some locking happening: the Python GIL is making certain that each threads depart the constructions in a constant state between Python statements (really between bytecodes, however let’s not cut up hairs!).
It’s additionally price noting that, as there’s no locking, we will’t assure that the limits are literally correct when the primary show thread is iterating over the processes dictionary. That is why we’re utilizing min and max to clamp the calculation leads to the primary thread.
Lastly, we simply must kick issues off:
if __name__ == '__main__':
    monitor()
And we’re executed! Run the complete script (you don’t want sudo for this one because the Unicorn HAT HD has a really completely different management mechanism) and bask within the glow of das blinkenlights!
Strive stopping and beginning your net browser whereas it’s operating and see simply what number of processes a contemporary browser encapsulates.
You could be stunned to see processes showing and disappearing continuously on the “finish” of the desk. That is really fairly regular for a contemporary system. You may additionally,see that the top of the desk has one persistently crimson (CPU load) and one persistently blue (“new”) course of, when your system is idle. Have a take into consideration which processes these could be! Specifically, why is one course of at all times “new” …
Press Ctrl+C to exit the script.
In the event you want to run the script routinely on boot, place this service definition in /and so forth/systemd/system/das-blinkenlights.service (this assumes you’ve saved the script as /usr/native/bin/blinkenlights.py):
[Unit]
Description=Unicorn HAT HD primarily based course of desk monitor
After=local-fs.goal

[Service]
Kind=easy
Consumer=ubuntu
Restart=on-failure
ExecStart=/usr/bin/python3 /usr/native/bin/blinkenlights.py

[Install]
WantedBy=multi-user.goal
Then run the next and you need to discover that the monitor will begin routinely on the subsequent reboot:
$ sudo systemctl daemon-reload
$ sudo systemctl allow das-blinkenlights
Now, you may maintain monitor of your system efficiency with out digging round in your machine.
And that’s all for this collection! An enormous because of William and Dave for permitting us to breed their tutorials.
If these concepts have sparked the creativeness, don’t neglect you may share your HAT initiatives within the Raspberry Pi class on the Ubuntu Discourse!
For recommendations on getting began with the Raspberry Pi in addition to additional challenge concepts, try among the hyperlinks beneath.
