
Syncing backend API modifications to the shopper app is a standard drawback frontend builders face. When the backend API interface is modified, the shopper app might should be manually up to date to forestall an error or crash.
Phero is designed to resolve this drawback. Developed by Jasper Haggenburg and his staff in 2020, it was initially created to handle varieties and interfaces for his or her software program product, which consumes numerous API endpoints. Phero is developed utilizing TypeScript and works with any framework based mostly on TypeScript. It is going to course of the backend code and generate a type-safe shopper for the frontend.
Utilizing Phero, you may name the backend providers/features from the frontend simply as you’ll name an area perform. It’s been open supply since September 2022.
Let’s take a more in-depth have a look at Phero.
Leap forward:
What drawback does Phero clear up?
Let’s use a typical Node.js/Specific net API for instance. We expose an endpoint like beneath:
# API
export enum UserRole {
  ADMIN = "admin",
  USER = "person",
}
export interface Consumer {
  identify: string;
  age: quantity;
  function: UserRole;
}
export interface Customers {
  [key: number]: Consumer;
}
app.get("customers/:userId", (req, res) => {
  res.ship(
     {
      identify: "Jane",
      age: 30,
      function: UserRole.USER
    });
});
Within the shopper app, we have to create one other set of sort/interfaces after which forged the response JSON to get a typed response object.
# Shopper App
export enum UserRole {
  ADMIN = "admin",
  USER = "person",
}

export interface Consumer {
  identify: string;
  age: quantity;
  function: UserRole;
}

const response = await fetch(`${Root_URL}/customers/1`);
const person = await response.json() as Consumer;
There are just a few points with this sample. Firstly, there are duplicated varieties and interfaces on each the shopper and server sides. This duplication will make the app onerous to keep up.
Secondly, when the API modifications (i.e., a brand new UserType is added), the shopper app might crash if it’s not up to date — and even for those who did replace the shopper, the older model of the shopper app will nonetheless have the identical drawback. Thus, each the server and shopper should be up to date on the similar time, to make sure backward compatibility.
To beat the above points, one widespread observe is so as to add a JSON response to the shopper code. However the further validation requires further work and isn’t protected sufficient as a result of it will probably’t catch points at compile time.
Phero supplies a clear resolution to this drawback.
How does Phero work?
Underneath the hood, Phero makes use of distant process name (RPC). RPC is a communication protocol that permits a program on one machine to name a service on one other machine with out understanding it’s distant.
The beneath diagram exhibits the Phero shopper and repair communication utilizing RPC.
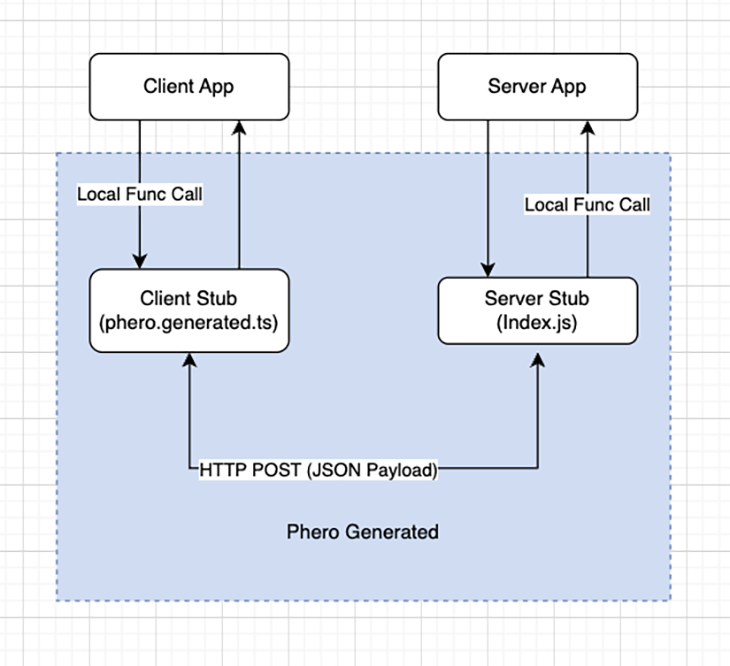
You need to use any TypeScript-based framework to construct your backend and frontend; in any other case, a Phero-enabled app includes three elements:
- The shopper app: Your shopper app simply must eat the generated Phero shopper file when interacting with the server
- The server app: The entry level of the server part is
Phero.ts; you even have the flexibleness to prepare the server venture construction so long as the Phero file exposes the features - Phero-generated code: The generated information are the glue between the backend and frontend, and embrace the client-side stub and server-side stub information. The stubs allow the server and shopper to speak through RPC, utilizing the HTTP protocol
Phero makes use of the TypeScript compiler API to investigate varieties and interfaces. It additionally generates the validator to parse the incoming and outgoing knowledge between the shopper and server. It exposes all of the area varieties and interfaces uncovered by the backend; thus, a compile-time error might be thrown if a typo or incorrect knowledge is returned.
Advantages of working with Phero
The advantages of Phero embrace:
- Pure TypeScript (no different dependencies required)
- Finish-to-end sort security
- Separate backend and frontend that act like they don’t seem to be separated
- Work with any TypeScript-based framework
Getting began with Phero
Let’s stroll by the method of constructing a Phero app. Since Phero is a pure TypeScript library, the one dependencies are npm and TypeScript.
Backend setup
Firstly, let’s initialize a Node.js app. We create an api listing beneath. It may be named something you want.
# bash script
# Create a Server folder
mkdir api
cd ./api
# Initialise the server app, and get TypeScript prepared
npm init -y
npm set up typescript --save-dev
npx tsc --init
# edit tsconfig.json file so as to add the next entries
# it's a non permanent workaround till the bug is mounted in Phero CLI
{
"compilerOptions": {
...
"rootDir": "src",
"outDir": "dist"
}
}
# Add Phero to your backend venture
npx phero init server
After the above instructions are accomplished efficiently, you should have a brand new phero.ts file within the api/src folder.
# api/src/phero.ts
import { createService } from '@phero/server'

async perform helloWorld(identify: string): Promise<string> {
  return `Hello there, ${identify}!`
}

export const helloWorldService = createService({
  helloWorld
})
The generated Phero.ts file exposes a helloWorld service and is able to be consumed by the shopper.
Frontend setup
Let’s run the next script to arrange the shopper. We create an app subfolder, however it may be named one thing else. The Phero CLI can decide whether or not the folder is for the shopper or server by scanning the phero.ts.
# bash script
# out of your venture root listing, create a app subfolder
mkdir app
cd ../app

# initialise a node app
npm init -y
npm set up typescript --save-dev
npx tsc --init

# Add Phero to your frontend venture:
npx phero init shopper
The phero init shopper command installs the @phero/shopper and generates a Phero.ts file.
# app/src/Phero.ts
import { PheroClient } from "./phero.generated";

const fetch = window.fetch.bind(this);
const shopper = new PheroClient(fetch);

async perform primary() {
  const message = await shopper.helloWorldService.helloWorld('Jim')
  console.log(message) // `Hello there, Jim!`
}

primary()
Run the CLI to begin the dev setting
Now we are able to run the Phero CLI to begin the event setting.
Extra nice articles from LogRocket:
# again to the venture root listing
cd ../
npx phero
The above command begins the server and generates an SDK for the frontend (or a number of frontends) on the similar time. You must see the next output within the console:

Within the frontend venture, a phero.generated.ts file might be generated. It’s the RPC shopper stub used to connect with the server stub. Because the identify signifies, it shouldn’t be manually up to date. It’s routinely synced with any server-side change when the CLI is operating.
Though the fundamental setup is accomplished now, we are able to’t run the shopper to show that it’s working as a result of we don’t have a correct shopper app to run in a browser but.
Let’s construct a React shopper app to check it end-to-end.
Making a React shopper app
Run the next command to generate a skeleton of a React app.
npx create-react-app react-app --template typescript
Then, you can begin the app as beneath.
cd react-app
npm begin
Now we now have a working React app, so the subsequent step is so as to add Phero to it.
# bash script
npx phero init shopper
cd .. # Again to venture root listing
# run Phero CLI to begin the dev setting
npx phero
The above command will generate the phero.generated.ts file within the React venture.
The final step is to open the src/App.tsx and substitute the unique code with the next code snippet:
import { PheroClient } from './phero.generated';
import { useCallback, useEffect } from "react";

const phero = new PheroClient(window.fetch.bind(this))

perform App() {
  const getHello = useCallback(async () => {
      const message = await phero.helloWorldService.helloWorld('Jim');
      console.log(message);
  }, [])

  useEffect(() => {
    getHello()
  }, [getHello])
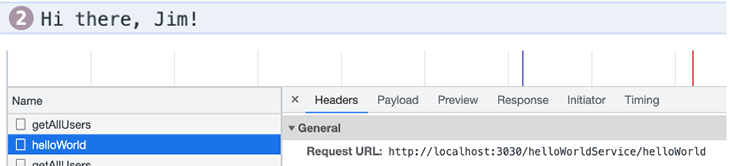
The above code snippet will initialize a PheroClient, and makes a name to the helloWorldService.helloWorld methodology.
To confirm the app is working, open http://localhost:3000/ and open Chrome DevTools. You possibly can see the console message and the client-to-server RPC name within the Community tab.
You’ll find the associated supply code in the GitHub repo.
Error dealing with with Phero
Utilizing Phero, we are able to deal with the customized server-side error in our frontend similar to we’d an area perform.
Let’s preserve going with the earlier API instance. if a person can’t be discovered by their given person ID, we wish to throw a UserNotExistException error on the backend.
class UserNotExistException extends Error {
  constructor(userId: quantity) {
    tremendous()
  }
}
app.get("customers/:userId", (req, res) => {
    const person = db.getById(userId);
    if(person === null) {
      throw new UserNotExistException(userId);
    }
    return person;
});
Then on the frontend, we are able to deal with the error as beneath. Please be aware that the UserNotExistException is uncovered within the shopper by the generated Phero file.
import {
 PheroClient,
 UserNotExistException,
} from "./phero.generated"

const fetch = window.fetch.bind(this)
const shopper = new PheroClient(fetch)
 attempt {
   const person = await shopper.userService.getUser(1)
 } catch (error) {
   if (error instanceof UserNotExistException ) {
     console.log("Consumer not discovered")
   } else {
     console.log("Surprising error")
   }
 }
Once more, we acquire type-safety in error dealing with with Phero.
Deploying to manufacturing
On the native growth setting, the default Phero server API runs at port 3030. When deploying to a better setting or manufacturing, you might want to make use of a special port quantity. Similar as any Node.js API, the port quantity is configurable by passing in an setting variable PORT at runtime or utilizing a .env file.
For instance, to run the server API at port 8080:
cd ./.construct
PORT=8080 node index.js
In a non-local setting, you might also must make the API URl configurable on the shopper aspect. We will retailer the URl in an setting variable and cross the URL to PheroClient as beneath.
import { PheroClient } from "./phero.generated"
const shopper = new PheroClient(fetch, `${API_ROOT}`)
To construct a bundle of server code for deployment, run the command beneath.
cd ./server
npx phero server export
This may generate the bundle information right into a .construct listing. The server might be began with an ordinary Node.js command.
In the intervening time, the Phero server can run on any Node-based server. Based on @kamil from the Phero staff, they plan to offer new export and deploy options for various cloud platforms.
Migrating an present app to make use of Phero
If you wish to migrate an present server app to make use of Phero, you might wish to restructure your Phero app first.
Phero doesn’t include a number of restrictions. You simply must outline the Phero.ts because the entry level of the backend app and export your providers from the Phero file. You possibly can design your providers and features utilizing any TypeScript-based framework.
Let’s say we have to migrate a Node.js/Specific API app to Phero. We have to outline clear “teams” of features that should be known as from the frontend. In Specific, you’ll sometimes group them in “Routers“. We will covert these teams into providers in Phero. All routes you at the moment have inside these routers might be migrated to common TypeScript features.
For example, this perform:
router.publish('/example-route', (req, res) => {
  const knowledge: MyData = req.physique

  res.ship({ output: 123 })
})
Would turn out to be the next after router migration:
async perform exampleFunction(knowledge: MyData): Promise<{ output: quantity }> {
  return { output: 123 }
}
When designing the brand new Phero service interface, it is best to take into consideration the kinds. For those who’re solely utilizing primitive varieties like string and quantity, the sort security that comes with Phero might be overkill for you. Defining well-constrained varieties within the Phero backend will assist you detect errors in compile time on the frontend.
Abstract
Phero is a type-safe glue between the backend and frontend. It’s a viable resolution for guaranteeing higher sort security in frontend growth. Utilizing Phero, you may name backend features or deal with backend errors from the frontend with end-to-end sort security. It is going to assist you to write down extra concise code and have peace of thoughts in refactoring.
I hope you discover this text helpful. Comfortable coding!
LogRocket: Full visibility into your net and cell apps

LogRocket is a frontend software monitoring resolution that allows you to replay issues as in the event that they occurred in your personal browser. As an alternative of guessing why errors occur, or asking customers for screenshots and log dumps, LogRocket helps you to replay the session to rapidly perceive what went unsuitable. It really works completely with any app, no matter framework, and has plugins to log further context from Redux, Vuex, and @ngrx/retailer.
Along with logging Redux actions and state, LogRocket information console logs, JavaScript errors, stacktraces, community requests/responses with headers + our bodies, browser metadata, and customized logs. It additionally devices the DOM to document the HTML and CSS on the web page, recreating pixel-perfect movies of even probably the most complicated single-page and cell apps.
