
You’ve in all probability interacted with a file add part, probably whenever you wish to replace your profile image throughout a number of apps or share media, or add paperwork to the cloud. All of them have completely different designs, some minimal and others extra superior.
On the desktop, nevertheless, file add elements that let you drag and drop information into particular zones (normally known as “drop zones”) and preview these information earlier than importing are typically extra intuitive.
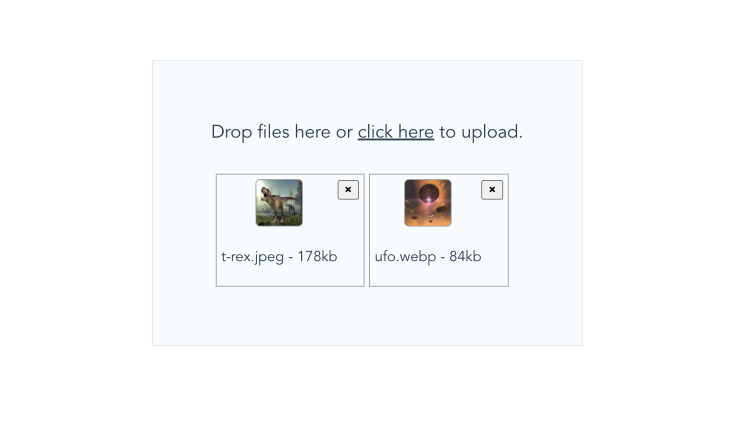
By way of this text, we’ll discover ways to create our personal drag-and-drop file add part with Vue.js; it’ll have the flexibility to preview chosen information and take away any file at any time earlier than lastly importing. Right here’s a sneak peek at what we’ll be constructing as soon as it’s all completed:
Constructing a easy drop zone with <enter kind=file>
Curiously, the native HTML <enter /> with kind file helps drag and drop however will solely settle for a single file by default. We might additionally simply add the a number of attribute (i.e., <enter kind = "file" a number of />) to simply accept a couple of file, stretch its width somewhat, add some border and padding, and we’d have all of it working:
Aesthetically, you’d agree that this isn’t ok. Nonetheless, our drag-and-drop file uploader will work in the same method in that we’ll nonetheless have a file enter however with its visibility hidden. Then we’ll add a visual label by means of which dragging to the aforementioned file enter might be doable. We’ll then add another customized occasion that’ll change the dragging standing and permit us to show and take away chosen information.
Creating a sophisticated drop zone
Let’s get began by creating a brand new Vue software. If you happen to haven’t already, set up the vue-cli, after which run the next command to create a brand new vue app:
vue create dropfile
Afterward, open the brand new venture in your favourite textual content editor, then create a brand new empty DropFile.vue file contained in the src/part listing.
Subsequent, let’s import this part into our entry file. Open App.vue and change its contents with the next:
<template>
  <div id="app">
    <DropFile />
  </div>
</template>

<script>
import DropFile from "./elements/DropFile.vue";
export default {
  title: "App",
  elements: {
    DropFile,
  },
};
</script>
Let’s transfer ahead by first organizing all CSS-related code; create a brand new dropfile.css file within the src/property listing and paste the next content material into it:
.most important {
    show: flex;
    flex-grow: 1;
    align-items: middle;
    peak: 100vh;
    justify-content: middle;
    text-align: middle;
}

.dropzone-container {
    padding: 4rem;
    background: #f7fafc;
    border: 1px stable #e2e8f0;
}

.hidden-input {
    opacity: 0;
    overflow: hidden;
    place: absolute;
    width: 1px;
    peak: 1px;
}

.file-label {
    font-size: 20px;
    show: block;
    cursor: pointer;
}

.preview-container {
    show: flex;
    margin-top: 2rem;
}

.preview-card {
    show: flex;
    border: 1px stable #a2a2a2;
    padding: 5px;
    margin-left: 5px;
}

.preview-img {
    width: 50px;
    peak: 50px;
    border-radius: 5px;
    border: 1px stable #a2a2a2;
    background-color: #a2a2a2;
}
Subsequent, change the content material within the DropFile.vue file with the next:
<template>
  <div class="most important">
    <div
      class="dropzone-container"
      @dragover="dragover"
      @dragleave="dragleave"
      @drop="drop"
    >
      <enter
        kind="file"
        a number of
        title="file"
        id="fileInput"
        class="hidden-input"
        @change="onChange"
        ref="file"
        settle for=".pdf,.jpg,.jpeg,.png"
      />

      <label for="fileInput" class="file-label">
        <div v-if="isDragging">Launch to drop information right here.</div>
        <div v-else>Drop information right here or <u>click on right here</u> to add.</div>
      </label>
    </div>
  </div>
</template>

<script>
export default {
  knowledge() {
    return {
      isDragging: false,
      information: [],
    };
  },
  strategies: {
    onChange() {
      this.information = [...this.$refs.file.files];
    },
    dragover(e) {
      e.preventDefault();
      this.isDragging = true;
    },
    dragleave() {
      this.isDragging = false;
    },
    drop(e) {
      e.preventDefault();
      this.$refs.file.information = e.dataTransfer.information;
      this.onChange();
      this.isDragging = false;
    },
  },
};
</script>
<type scoped src="https://weblog.logrocket.com/customizing-drag-drop-file-uploading-vue/@/property/dropfile.css"></type>
Right here, we created two reactive states: isDragging, to indicate the state if the consumer is attempting to pull a file into our drop zone; and information, an array to carry chosen or dropped information. We then connected a customized ref to the principle file enter to make it simply accessible in our Vue occasion. Moreover, we added an onChange occasion that mainly updates our information array with the information connected to our enter.
Afterward, we created a dragover, dragleave, and drop methodology, and connected them to the container holding our most important file enter. This manner, the drop occasion and methodology will seize the dropped file and bind it to our file enter, leveraging the customized ref we created earlier.
The dragover and dragleave strategies additionally allow us to alter the state of our isDragging as required. And eventually, we used conditional rendering (v-if and v-else) to examine the state of isDragging after which show a customized message for every state.
If we run our app at this level, we’ll have the next output:
Though the dropped information aren’t but seen to us, they’re truly there someplace within the background. To check this, log this.information to the console contained in the onChange() methodology. Everytime you drop or manually choose a file, the array needs to be logged to the console, with every file containing the file title, measurement, final modified date, and different file-related info.
Itemizing dropped information
Previewing chosen/dropped information is fairly easy: we’ll solely must loop by means of our array of information. To perform this, add the next code instantly after the </label> tag in our earlier code:
<!-- . . . -->
  </label>
      <!-- Word: Solely add the code block beneath -->
      <div class="preview-container mt-4" v-if="information.size">
        <div v-for="file in information" :key="file.title" class="preview-card">
          <div>
            <p>
              {{ file.title }}
            </p>
          </div>
          <div>
            <button
              class="ml-2"
              kind="button"
              @click on="take away(information.indexOf(file))"
              title="Take away file"
            >
              <b>×</b>
            </button>
          </div>
        </div>
      </div>
Right here, we used conditional rendering to examine if our information array had a sound size after which looped by means of all its content material whereas displaying every file title in a paragraph.
Eradicating file(s)
Within the earlier code block, you’d discover we additionally added a button to every iterable merchandise, calling a take away() methodology whereas passing the index of the present file as its parameter. If we run our app at this level, we must always see the chosen file names displayed as anticipated and in addition a button to take away them. Nonetheless, the take away button doesn’t work simply but.
To repair this, append all earlier strategies with a brand new take away() methodology like beneath:
// ..
take away(i) {
    this.information.splice(i, 1);
},
At this stage, every part ought to work as anticipated. We must always be capable of manually choose information, drag and drop information, see chosen information’ names, and in addition be capable of take away information. A preview of the output is proven beneath:
Previewing chosen picture information
One extra function that’ll make our drop zone part much more intuitive is the flexibility to preview chosen picture information. We will simply do that by producing an arbitrary URL utilizing the native URL.createObjectURL() methodology, passing our file object as its parameter. To implement, append a brand new generateThumbnail() methodology to the strategies listing like beneath:
// ..
generateURL(file) {
    let fileSrc = URL.createObjectURL(file);
    setTimeout(() => {
        URL.revokeObjectURL(fileSrc);
    }, 1000);
    return fileSrc;
},
It is suggested to all the time revoke a URL after creating one with the URL.createObjectURL() methodology in order to keep away from doable reminiscence loss; this is the reason we’ve added a further timeout to robotically do that after one second.
Subsequent, change the paragraph (<p> tag) displaying all chosen/dropped information’ names with the next code:
<!-- . . . -->
<img class="preview-img" :src="https://weblog.logrocket.com/customizing-drag-drop-file-uploading-vue/generateURL(file)" />
<p>
  {{ file.title }}
</p>
<!-- . . . -->
And, we received all of it working! We will now simply drop, choose, take away, and even preview chosen information:
Displaying file measurement
As defined within the earlier part, we even have direct entry to every chosen file measurement and their final modified date. The file measurement, by default, is proven in bytes. Nonetheless, we might simply divide by a thousand to transform to KB. Add the next replace to the a part of the file displaying the file title:
<p>
    {{ file.title }} -
    {{ Math.spherical(file.measurement / 1000) + "kb" }}
</p>
And every chosen file measurement might be proven together with its title:
Importing to the server
Importing chosen/dropped information to a server can also be a breeze since they’re connected to the information state; and whereas there are completely different methods to attain this, using FormData tends to be a extra widespread method.
Right here’s an instance of how we might leverage FormData and Axios to ship our information to an API or server for processing:
// . . .
uploadFiles() {
    const information = this.information;
    const formData = new FormData();
    information.forEach((file) => {
        formData.append("selectedFiles", file);
    });

    axios({
        methodology: "POST",
        url: "http://path/to/api/upload-files",
        knowledge: formData,
        headers: {
            "Content material-Sort": "multipart/form-data",
        },
    });
},
We might then use different inbuilt capabilities or frameworks on the backend to course of the information as desired.
Conclusion
We’ve lined find out how to create a minimalist but interactive drag-and-drop file uploader with Vue.js. Our file add part lets us look by means of chosen information’ names and measurement, preview picture information, and even take away information at will earlier than importing.
It’s very simple to make errors whereas following a code-along tutorial like this one. To save lots of you the difficulty, the entire code for this tutorial can also be out there on GitHub.
Thanks for studying!
Expertise your Vue apps precisely how a consumer does
Debugging Vue.js functions might be troublesome, particularly when there are dozens, if not a whole lot of mutations throughout a consumer session. If you happen to’re enthusiastic about monitoring and monitoring Vue mutations for your whole customers in manufacturing, strive LogRocket. 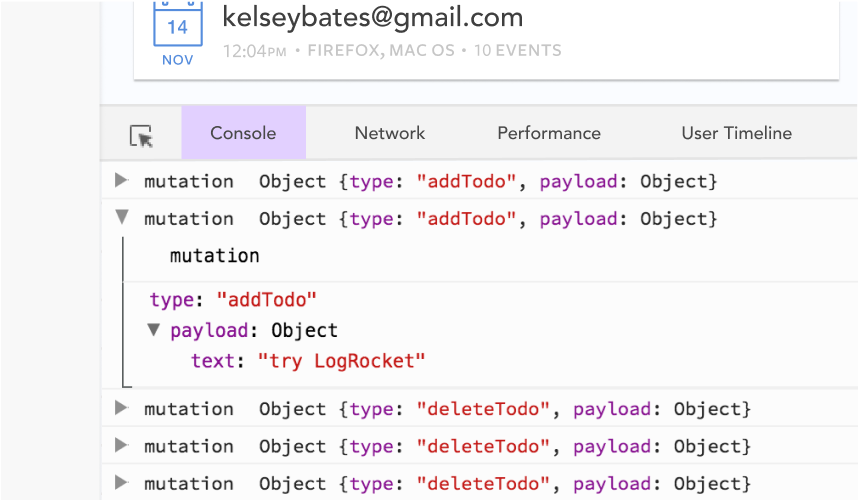 https://logrocket.com/signup/
LogRocket is sort of a DVR for net and cellular apps, recording actually every part that occurs in your Vue apps together with community requests, JavaScript errors, efficiency issues, and rather more. As a substitute of guessing why issues occur, you may combination and report on what state your software was in when a difficulty occurred.
The LogRocket Vuex plugin logs Vuex mutations to the LogRocket console, supplying you with context round what led to an error, and what state the appliance was in when a difficulty occurred.
Modernize the way you debug your Vue apps – Begin monitoring without cost.
