
The microservices structure is an more and more in style structure sample that follows the SOA (Service Oriented Structure) idea. It has a number of benefits and drawbacks, however one in all its most important advantages is that it permits for simpler scalability in comparison with different architectures.
This information will display the way to construct microservices utilizing NestJS with Kafka and TypeScript.
Soar forward:
Organising the undertaking workspace
Let’s begin by organising the undertaking workspace for our demo. Earlier than continuing, guarantee that you’ve got Apache Kafka put in and working in your native machine. You possibly can try this information for organising Kafka domestically.
You’ll create an authentication microservice to create and save person particulars. Together with the auth microservice, you’ll additionally want an API gateway to emit occasions from an HTTP API endpoint to the microservice.
Because you’ll be creating a number of backend companies, it’s finest to have a monorepo to allow code sharing. A monorepo is a single version-controlled code repository that features varied purposes and libraries.
Nx is a well-liked instrument for managing monorepos. This framework means that you can architect and scale internet purposes and companies in your monorepo.
Create an Nx workspace by working the next command:
> npx [email protected]
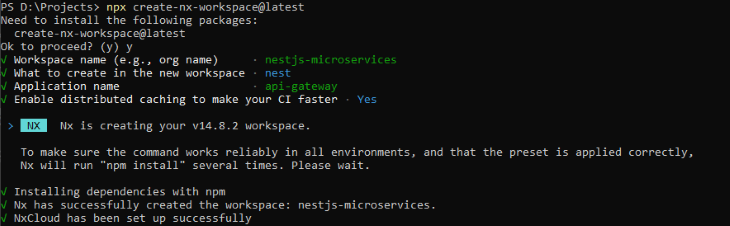
Specify the nest choice whereas creating the workspace and identify the applying api-gateway.
As soon as the workspace is created, set up the undertaking dependencies by working the next instructions:
> cd nestjs-microservices
> npm i @nestjs/microservices kafkajs class-validator class-transformer
Getting began with the API gateway
The API gateway is among the companies in a microservices structure that connects the client-side and exterior purposes to the inner companies. API gateway handles the routing, remodeling and aggregating request knowledge, and implementing shared logic like authentication and rate-limiters.
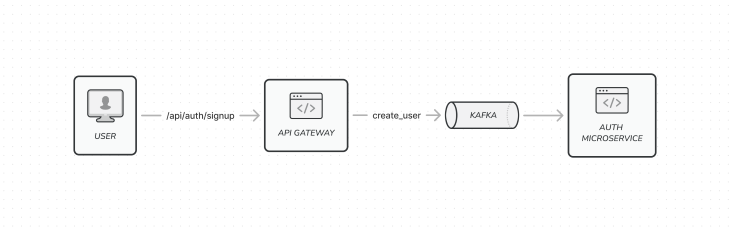
Usually, when the frontend app calls the signup API, the API gateway will emit the create_user occasion to the Kafka queue. The auth microservice will ballot the create_user occasion from the queue and create a person from the occasion payload.
The frontend app gained’t work together with the microservice straight on this architectural sample. Normally, in real-world eventualities, the API gateway additionally has extra functionalities like logging, analytics, and cargo balancing.
Within the api-gateway app, create the auth module chargeable for dealing with authentication-related requests like enroll. Configure the Kafka consumer utilizing ClientsModule from the @nestjs/microservices package deal within the auth module.
The ClientsModule exposes a static register() methodology that takes an array of objects describing microservice transporters as an argument. Every transporter object has a identify property, a transporter property, which on this case is Transport.Kafka, and a transporter-specific choices property. The identify property defines the injection token, which you should use later in your service class to publish occasions:
// apps/api-gateway/src/auth/auth.module.ts

import { Module } from '@nestjs/frequent';
import { ClientsModule, Transport } from '@nestjs/microservices';
import { AuthController } from './auth.controller';
import { AuthService } from './auth.service';

@Module({
  imports: [
    ClientsModule.register([
      {
        name: 'AUTH_MICROSERVICE',
        transport: Transport.KAFKA,
        options: {
          client: {
            clientId: 'auth',
            brokers: ['localhost:9092'],
          },
          producerOnlyMode: true,
          client: {
            groupId: 'auth-consumer',
          },
        },
      },
    ]),
  ],
  suppliers: [AuthService],
  controllers: [AuthController],
})
export class AuthModule {}
For the reason that transport is Kafka, the choices property will outline the Kafka consumer object, which incorporates the clientId, brokers, and a client object with the groupId. Right here, the groupId you specify is important as a result of customers with the identical groupId can solely learn the printed occasions.
For instance, customers with groupId auth-consumer can solely learn occasions printed with groupId: 'auth-consumer'. The producerOnlyMode choice will bypass client group registration for the api-gateway app and solely operate as a producer.
Code sharing amongst microservices
For the reason that HTTP request payload and the occasion payload for creating the person would be the similar, it’s higher to create a shared knowledge switch object (DTO) that each one the companies can entry within the monorepo.
Create a shared library by working the next command:
> nx g @nrwl/node:lib shared
Subsequent, create a dto folder; add CreateUserDto class with necessary identify and e-mail properties within the create-user.dto.ts file:
// libs/shared/src/lib/dto/create-user.dto.ts

import { IsEmail, IsNotEmpty, IsString } from 'class-validator';

export class CreateUserDto {
  @IsString()
  @IsNotEmpty()
  identify: string;

  @IsEmail()
  @IsNotEmpty()
  e-mail: string;
}
// libs/shared/src/lib/dto/index.ts

export * from './create-user.dto';
Now, add an entry within the paths object for resolving dto information within the tsconfig.base.json file:
{
  ...
  "paths": {
      ...
      "@nestjs-microservices/shared/dto": ["libs/shared/src/lib/dto/index.ts"]
  }
  ...
}
Coming again to the api-gateway app, create the AuthService to publish an occasion to the auth microservice.
Create an occasion of ClientKafka by utilizing the @Inject() decorator, and use the AUTH_MICROSERVICE injection token specified within the identify property of the Kafka transport. Utilizing the consumer occasion, you’ll be able to entry the emit() methodology to publish the create_user occasion together with the payload:
// apps/api-gateway/src/auth/auth.service.ts

import { Inject, Injectable } from '@nestjs/frequent';
import { ClientKafka } from '@nestjs/microservices';
import { CreateUserDto } from '@nestjs-microservices/shared/dto';

@Injectable()
export class AuthService {
  constructor(
    @Inject('AUTH_MICROSERVICE') personal readonly authClient: ClientKafka
  ) {}

  createUser(createUserDto: CreateUserDto) {
    this.authClient.emit('create_user', JSON.stringify(createUserDto));
  }
}
Subsequent, within the AuthController class, create an API endpoint for creating the person and name the createUser methodology of the AuthService:
// apps/api-gateway/src/auth/auth.controller.ts

import { Physique, Controller, Put up, ValidationPipe } from '@nestjs/frequent';
import { AuthService } from './auth.service';
import { CreateUserDto } from '@nestjs-microservices/shared/dto';

@Controller('auth')
export class AuthController {
  constructor(personal readonly authService: AuthService) {}

  @Put up('sign-up')
  createUser(@Physique(ValidationPipe) createUserDto: CreateUserDto) {
    return this.authService.createUser(createUserDto);
  }
}
Creating the auth microservice
Subsequent, you’ll create the auth microservice to eat the create_user message despatched by the API gateway.
To create the auth-microservice app, run the next command:
> nx g @nrwl/nest:app auth-microservice
Within the predominant.ts file of the auth-microservice app, take away the boilerplate code of the bootstrap() operate and exchange it with the NestFactory.createMicroservice() methodology.
Move the AppModule within the first argument and the Kafka transport object within the second argument of the createMicroservice() methodology. Within the groupId property of the client object, make sure you’ve specified the identical worth utilized in AuthModule of the api-gateway app:
// apps/auth-microservice/src/predominant.ts

async operate bootstrap() {
  const app = await NestFactory.createMicroservice<MicroserviceOptions>(
    AppModule,
    {
      transport: Transport.KAFKA,
      choices: {
        consumer: {
          brokers: ['localhost:9092'],
        },
        client: {
          groupId: 'auth-consumer',
        },
      },
    }
  );
  await app.hear();
}
Subsequent, create a Person entity within the shared library to signify person knowledge. Use this entity it within the UsersRepository class to carry out actions like saving person knowledge and retrieving a single person by id:
// libs/shared/src/lib/entities/person.entity.ts

export class Person {
  id?: quantity;
  identify: string;
  e-mail: string;
}
// libs/shared/src/lib/entities/index.ts

export * from './person.entity';
// apps/auth-microservice/src/app/customers.repository.ts

import { Injectable } from '@nestjs/frequent';
import { Person } from '@nestjs-microservices/shared/entities';

@Injectable()
export class UsersRepository {
  personal readonly customers: Person[] = [];

  save(person: Person) {
    this.customers.push({ ...person, id: this.customers.size + 1 });
  }

  findOne(id: quantity)
}
Normally, in NestJS purposes, TypeORM is used to handle the information utilizing a database, however for the sake of brevity on this demo, we’ll retailer the information in reminiscence.
Within the AppService, create the strategies createUser() and getUser() to create and discover a person, respectively, with the UsersRepository strategies:
// apps/auth-microservice/src/app/app.service.ts

import { CreateUserDto } from '@nestjs-microservices/shared/dto';
import { Person } from '@nestjs-microservices/shared/entities';
import { Injectable } from '@nestjs/frequent';
import { UsersRepository } from './customers.repository';

@Injectable()
export class AppService {
  constructor(personal readonly usersRepository: UsersRepository) {}

  createUser(knowledge: CreateUserDto): void {
    this.usersRepository.save(knowledge);
  }

  getUser(id: quantity): Person {
    return this.usersRepository.findOne(id);
  }
}
Now within the app.controller.ts file, create a way to deal with the create_user occasion. Use the @EventPattern() decorator to create an occasion handler and move the occasion identify. You possibly can entry the occasion knowledge utilizing the @Payload() decorator and, just like the @Physique() decorator, you should use the ValidationPipe to validate the payload object:
// apps/auth-microservice/src/app/app.controller.ts

import { CreateUserDto } from '@nestjs-microservices/shared/dto';
import { Controller, ParseIntPipe, ValidationPipe } from '@nestjs/frequent';
import { EventPattern, MessagePattern, Payload } from '@nestjs/microservices';

import { AppService } from './app.service';

@Controller()
export class AppController {
  constructor(personal readonly appService: AppService) {}

  @EventPattern('create_user')
  handleUserCreate(@Payload(ValidationPipe) knowledge: CreateUserDto) {
    this.appService.createUser(knowledge);
  }
}
Including the funds microservice
Now that the auth microservice is up and working, let’s add a funds microservice to course of funds for the person accounts and full the entire structure.
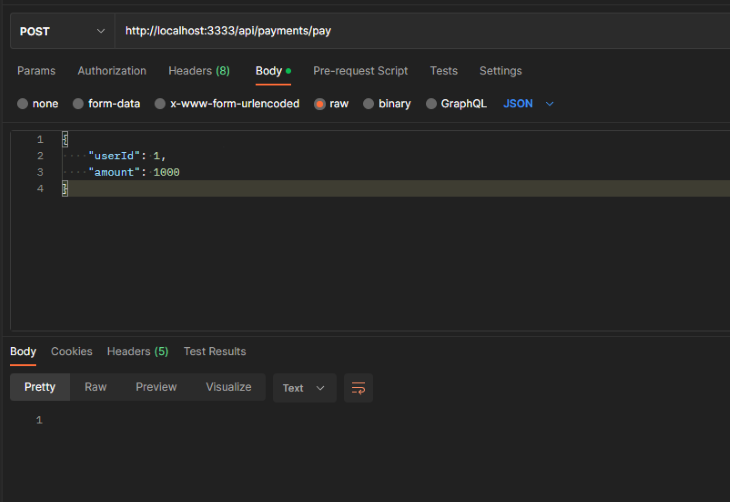
Step one is to create an API endpoint within the api-gateway app that the frontend app can name to provoke the cost. Within the request physique, you’ll want the userId and the cost quantity.
Extra nice articles from LogRocket:
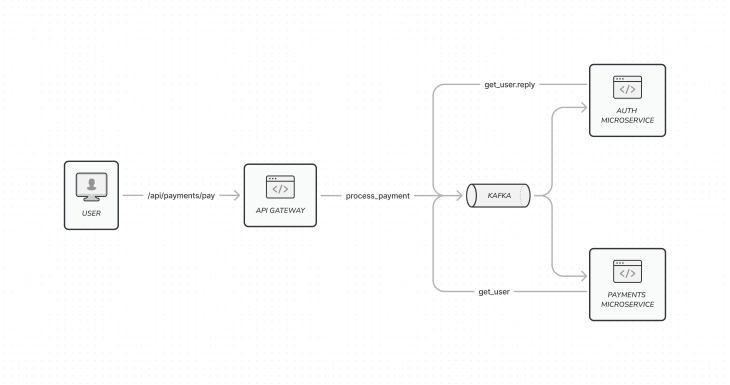
The API gateway will emit an occasion referred to as process_payment with the cost knowledge, which the cost microservice will learn. The cost microservice would require person particulars to course of the cost. Because you’re solely passing the userId, the remainder of the information can be retrieved from the auth service by publishing the get_user occasion.
Within the api-gateway app, you’ll create the funds module and register the Kafka consumer just like the way you set it up for the auth module. For the funds module, the groupId can be payment-consumer:
// apps/api-gateway/src/cost/funds.module.ts

import { Module } from '@nestjs/frequent';
import { ClientsModule, Transport } from '@nestjs/microservices';
import { PaymentController } from './cost.controller';
import { PaymentService } from './cost.service';

@Module({
  imports: [
    ClientsModule.register([
      {
        name: 'PAYMENT_MICROSERVICE',
        transport: Transport.KAFKA,
        options: {
          client: {
            clientId: 'payment',
            brokers: ['localhost:9092'],
          },
          client: {
            groupId: 'payment-consumer',
          },
        },
      },
    ]),
  ],
  suppliers: [PaymentService],
  controllers: [PaymentController],
})
export class PaymentModule {}
Then, create the MakePaymentDto within the shared library that can be used to signify the payload for processing the cost:
// libs/shared/src/lib/dto/make-payment.dto.ts

import { IsNotEmpty, IsNumber } from 'class-validator';

export class MakePaymentDto {
  @IsNotEmpty()
  @IsNumber()
  userId: quantity;

  @IsNotEmpty()
  @IsNumber()
  quantity: quantity;
}
Subsequent, within the PaymentController, add a POST API to create an entry level for publishing the process_payment occasion:
// apps/api-gateway/src/cost/cost.controller.ts

import { Physique, Controller, Put up, ValidationPipe } from '@nestjs/frequent';
import { PaymentService } from './cost.service';
import { MakePaymentDto } from '@nestjs-microservices/shared/dto';

@Controller('funds')
export class PaymentController {
  constructor(personal readonly paymentService: PaymentService) {}

  @Put up('pay')
  makePayment(@Physique(ValidationPipe) makePaymentDto: MakePaymentDto) {
    return this.paymentService.makePayment(makePaymentDto);
  }
}
Within the PaymentService, inject the ClientKafka utilizing the @Inject() decorator and the PAYMENT_MICROSERVICE because the injection token. Now, emit the process_payment occasion utilizing the Kafka consumer:
// apps/api-gateway/src/cost/cost.service.ts

import { Inject, Injectable } from '@nestjs/frequent';
import { ClientKafka } from '@nestjs/microservices';
import { MakePaymentDto } from '@nestjs-microservices/shared/dto';

@Injectable()
export class PaymentService {
  constructor(
    @Inject('PAYMENT_MICROSERVICE') personal readonly paymentClient: ClientKafka
  ) {}

  makePayment(makePaymentDto: MakePaymentDto) {
    this.paymentClient.emit('process_payment', JSON.stringify(makePaymentDto));
  }
}
The API gateway portion of the funds integration is full. Now, let’s construct with the microservice app.
Constructing the microservice app
Begin by working the next command to create the payments-microservice app:
> nx g @nrwl/nest:app payments-microservice
Much like the auth-microservice, exchange the content material of the predominant.ts file with the createMicroservice() methodology. Right here you’ll additionally outline groupId with the worth 'payment-consumer':
// apps/payments-microservice/src/predominant.ts

import { NestFactory } from '@nestjs/core';
import { MicroserviceOptions, Transport } from '@nestjs/microservices';

import { AppModule } from './app/app.module';

async operate bootstrap() {
  const app = await NestFactory.createMicroservice<MicroserviceOptions>(
    AppModule,
    {
      transport: Transport.KAFKA,
      choices: {
        consumer: {
          brokers: ['localhost:9092'],
        },
        client: {
          groupId: 'payment-consumer',
        },
      },
    }
  );
  await app.hear();
}

bootstrap();
Now, register a Kafka consumer for emitting occasions to the auth-microservice within the app.module.ts file:
// apps/payments-microservice/src/app/app.module.ts

import { Module } from '@nestjs/frequent';
import { ClientsModule, Transport } from '@nestjs/microservices';

import { AppController } from './app.controller';
import { AppService } from './app.service';

@Module({
  imports: [
    ClientsModule.register([
      {
        name: 'AUTH_MICROSERVICE',
        transport: Transport.KAFKA,
        options: {
          client: {
            clientId: 'auth',
            brokers: ['localhost:9092'],
          },
          client: {
            groupId: 'auth-consumer',
          },
        },
      },
    ]),
  ],
  controllers: [AppController],
  suppliers: [AppService],
})
export class AppModule {}
Within the AppService, inject the Kafka consumer for publishing occasions to the auth-microservice app. While you emit the get_user occasion, you’ll must hear for the response from the auth microservice; that is completely different from what you probably did for the create_user occasion.
With Kafka communication, an occasion’s response is returned in a reply occasion that NestJS handles out of the field. Nest robotically sends the reply again in a brand new occasion that ends with a .reply key phrase. This kind of communication between microservices is called the request-response sample.
To configure this communication within the AppService, you’ll must implement the onModuleInit interface and use the onModuleInit() lifecycle methodology to subscribe to the response of the get_user occasion utilizing the subscribeToResponseOf() methodology. You don’t need to manually add any handlers for the get_user.reply occasion since Nest takes care of that.
// apps/payments-microservice/src/app/app.service.ts

import { MakePaymentDto } from '@nestjs-microservices/shared/dto';
import { Person } from '@nestjs-microservices/shared/entities';
import { Inject, Injectable, OnModuleInit } from '@nestjs/frequent';
import { ClientKafka } from '@nestjs/microservices';

@Injectable()
export class AppService implements OnModuleInit {
  constructor(
    @Inject('AUTH_MICROSERVICE') personal readonly authClient: ClientKafka
  ) {}

  processPayment(makePaymentDto: MakePaymentDto) {
    const { userId, quantity } = makePaymentDto;
    console.log('course of cost');
    this.authClient
      .ship('get_user', JSON.stringify({ userId }))
      .subscribe((person: Person) => {
        console.log(
          `course of cost for person ${person.identify} - quantity: ${quantity}`
        );
      });
  }

  onModuleInit() {
    this.authClient.subscribeToResponseOf('get_user');
  }
}
As a substitute of utilizing the emit() methodology to publish the get_user occasion, use the ship() methodology. The ship() methodology lets you use a callback to subscribe to the reply of an occasion.
Now, end off the funds microservice by including the occasion handler for process_payment occasion within the cost AppController:
// apps/payments-microservice/src/app/app.controller.ts

import { MakePaymentDto } from '@nestjs-microservices/shared/dto';
import { Controller, ValidationPipe } from '@nestjs/frequent';
import { EventPattern, Payload } from '@nestjs/microservices';

import { AppService } from './app.service';

@Controller()
export class AppController {
  constructor(personal readonly appService: AppService) {}

  @EventPattern('process_payment')
  handleProcessPayment(@Payload(ValidationPipe) knowledge: MakePaymentDto) {
    this.appService.processPayment(knowledge);
  }
}
Subsequent, swap again to the AppController of the auth-microservice app and add the handler for the get_user occasion to finish the request-response communication. For the request-response messaging sample, you’ll want to make use of the @MessagePattern() decorator to eat the occasion:
// apps/auth-microservice/src/app/app.controller.ts


@Controller()
export class AppController {

  @MessagePattern('get_user')
  handleGetUser(@Payload('userId', ParseIntPipe) userId: quantity) {
    return this.appService.getUser(userId);
  }
}
Working and testing the companies
To check and see all of the companies in motion, you’ll must run the next instructions individually on separate terminals:
> nx serve api-gateway
> nx serve auth-microservice
> nx serve payments-microservice
Now that the microservices are up and working, let’s check them with Postman.
Choose the /api/auth/signup API to create the person:
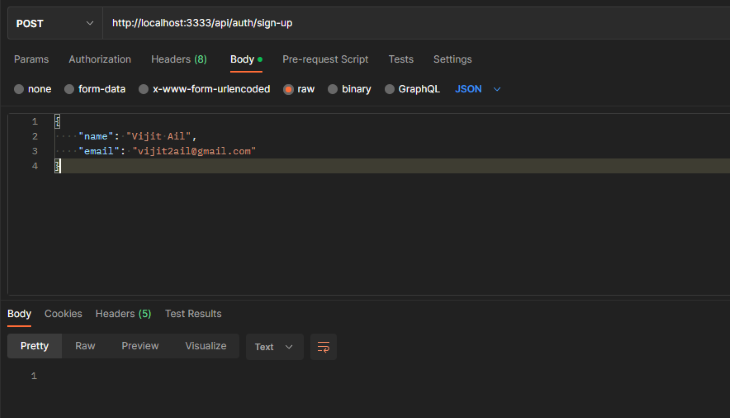
Subsequent, name the /api/funds/pay API to course of the cost with userId and the quantity:
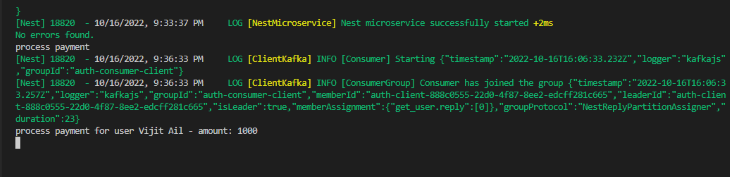
If the communication is about up appropriately between the microservices, it’s best to see a console message seem on the terminal like that proven above.
Conclusion
This text investigated constructing a strong software utilizing a microservices structure with NestJS and Kafka. We demonstrated how these applied sciences can be utilized collectively to create a scalable, dependable, and easy-to-maintain system. This stack is price contemplating in the event you’re on the lookout for a approach to construct microservices which are simple to develop and deploy.
You possibly can discover microservices additional by making a retry logic with Kafka communication in order that essential knowledge isn’t misplaced if a microservice is down.
To your reference, you will discover the whole code from this information on GitHub.
LogRocket: Full visibility into your internet and cell apps

LogRocket is a frontend software monitoring answer that allows you to replay issues as in the event that they occurred in your individual browser. As a substitute of guessing why errors occur, or asking customers for screenshots and log dumps, LogRocket helps you to replay the session to shortly perceive what went mistaken. It really works completely with any app, no matter framework, and has plugins to log extra context from Redux, Vuex, and @ngrx/retailer.
Along with logging Redux actions and state, LogRocket data console logs, JavaScript errors, stacktraces, community requests/responses with headers + our bodies, browser metadata, and customized logs. It additionally devices the DOM to document the HTML and CSS on the web page, recreating pixel-perfect movies of even probably the most complicated single-page and cell apps.
