
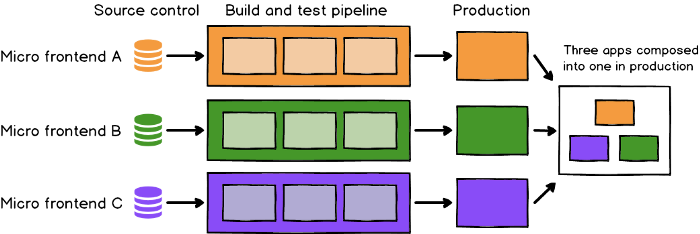
Engaged on a large-scale challenge and managing its codebase could be a huge problem for groups. Although micro-frontends have been within the image for some time now, they’re getting more and more widespread due to their distinctive options and usefulness.
Micro-frontends are significantly useful as a result of a number of groups can work on particular person modules of the identical challenge with out worrying about different modules. With micro-frontends, it doesn’t matter what number of modules will probably be added to a present system.
On this article, we’ll cowl the fundamentals of what a micro-frontend is and find out how to implement it utilizing Subsequent.js. We’ll additionally focus on some great benefits of utilizing micro-frontends in your purposes.
Introduction to micro-frontends
For starters, micro-frontends don’t comply with any explicit construction and haven’t any mounted boundaries.
So how small is a micro-frontend? That is nonetheless unanswered. The underside line is that it is best to break up your challenge up in order that the person expertise received’t be disturbed. This course of could also be painful as a result of it’ll possible embody a number of whiteboard revisions.
Your challenge will possible evolve as time passes and you might have to revise your micro-frontend as you go alongside.
React is a well-liked frontend tech stack identified for its usefulness and options. Utilizing micro-frontends with React is a cherry on high! And that’s the place Subsequent.js is available in.
Subsequent.js has a large variety of advantages, together with:
- Inbuilt router assist. No additional package deal wanted
- Inbuilt CSS and TypeScript assist
- Robotically set, page-based routes
- Simply constructed for manufacturing
- Picture optimization and internationalized SDKs
- Inbuilt serverless capabilities (API routes)
So now let’s see find out how to create a micro-frontend with Subsequent.js!
Implementing a micro-frontend with Subsequent.js
We are going to use module federation, which is technically a webpack v5 characteristic. It permits a number of builds of a single software and runs as a monolith.
Extra nice articles from LogRocket:
Some individuals might imagine module federation is a brand new JavaScript characteristic, nevertheless it’s truly simply an structure precept that dynamically masses code from different builders. That is nice if you wish to add a brand new micro-frontend to the present system; you are able to do so rapidly with out affecting what’s at the moment there.
Stipulations
Assuming you have already got Node put in in your machine, we’re going to construct three Subsequent.js micro-frontends. We are going to expose a element within the first micro-frontend and expose a standard operate within the second. We are going to then use these uncovered objects in our third micro-frontend, basically making it the patron of every exported module.
Your Subsequent.js app ought to be v10.2 or later as a way to assist webpack 5. In any other case, you should use an exterior package deal as a way to assist module federation. For this tutorial, I’m utilizing Subsequent.js v12.2.0.
Organising the micro-frontends
First, create three frontends in a single listing by working the given command:
> mkdir next_microfrontend
> npx create-next-app fe1
> npx create-next-app fe2
> npx create-next-app fe3
Within the first frontend, or fe1, we’ll create a Header element that will probably be uncovered. We’ll do that within the file src/element/Header.jsx:
import * as React from 'react'

const Header = () => {
  return (
    <div
      type={{
        background: 'black',
        width: '100%',
        top: '100px',
        shade: 'white',
        textAlign: 'heart',
        show: 'flex',
        justifyContent: 'left',
        alignItems: 'heart',
        fontSize: '24px',
        paddingLeft: '15px'
      }}>
      Identify
    </div>
  );
};

export default Header;
Now, to make it work, we have to add it to the index.js web page:
import types from '../types/Residence.module.css'
import Header from '../src/element/Header'

export default operate Residence() {
  return (
    <div className={types.container}>
      <foremost className={types.foremost}>
        <Header />
      </foremost>
    </div>
  )
}
If you wish to see an output, run npm run dev and go to http://localhost:3000/. It ought to appear to be this:

Now, now we have to show our element to make it globally obtainable for one more micro-frontend. To take action, we have to change subsequent.config.js as follows:
/** @sort {import('subsequent').NextConfig} */
const nextConfig = {
  reactStrictMode: true,
  webpack5: true, // Have to make it true for some variations of Subsequent JS
  distDir: 'construct', // Outlined construct listing
  webpack: (config, choices) => { // webpack configurations
    config.plugins.push(
      new choices.webpack.container.ModuleFederationPlugin({
        identify:"fe1",
        filename: "remoteEntry.js", // distant file identify which is able to used later
        remoteType: "var",
        exposes: { // expose all element right here.
          "./header": "./src/element/Header"
        },
        shared: [
          {
            react: {
              eager: true,
              singleton: true,
              requiredVersion: false,
            }
          },
          {
            "react-dom": {
              eager: true,
              singleton: true,
              requiredVersion: false,
            }
          },
        ]
      })
    )
    return config
  }
}

module.exports = nextConfig
Once we construct fe1, you will discover the JavaScript file utilized in one other micro-frontend on the location http://localhost:%5BPORTpercent5D/construct/remoteEntry.js.
Nice, we’ve created parts in fe1 and in fe2! We’ll now create a standard operate to show.
Let’s create one operate in fe2:
// utils/getSquareRoot.js
const squareRoot = (quantity) => {
  return Math.sqrt(quantity)
}

export default squareRoot;
Now let’s configure subsequent.config.js for a similar:
/** @sort {import('subsequent').NextConfig} */
const nextConfig = {
  reactStrictMode: true,
  distDir: 'construct',
  webpack: (config, choices) => {
    config.plugins.push(
      new choices.webpack.container.ModuleFederationPlugin({
        identify:"fe2",
        filename: "remoteEntry_2.js",
        remoteType: "var",
        exposes: {
          "./squareRoot": "./utils/getSquareRoot"
        },
        shared: [
          {
            react: {
              eager: true,
              singleton: true,
              requiredVersion: false,
            }
          },
          {
            "react-dom": {
              eager: true,
              singleton: true,
              requiredVersion: false,
            }
          },
        ]
      })
    )
    return config
  }
}

module.exports = nextConfig
As soon as we construct it, http://localhost:%5BPORTpercent5D/construct/remoteEntry_2.js will probably be prepared to make use of.
Let’s deal with fe3 as a shopper. We are going to use the exported element of fe1 and the operate of fe2.
First, let’s configure subsequent.config.js:
/** @sort {import('subsequent').NextConfig} */
const path = require('path');
const nextConfig = {
  reactStrictMode: true,
  distDir: 'construct',
  webpack: (config, choices) => {
    config.plugins.push(
      new choices.webpack.container.ModuleFederationPlugin({
        identify:"fe3",
        filename: 'static/consumerFile.js'
        remoteType: "var",
        remotes: {
            fe1: choices.isServer ? path.resolve(../fe1/construct/remoteEntry.js) : 'fe1',
            fe2: choices.isServer ? path.resolve(../fe1/construct/remoteEntry_2.js) : 'fe2',
        },
        shared: [
          {
            react: {
              eager: true,
              singleton: true,
              requiredVersion: false,
            }
          },
          {
            "react-dom": {
              eager: true,
              singleton: true,
              requiredVersion: false,
            }
          },
        ]
      })
    )
    return config
  }
}

module.exports = nextConfig
Right here, you’ll be able to see that we outlined distant within the webpack configuration. The job of distant is to devour from the given URL and make content material obtainable for that app. It’ll settle for distant or native dependencies primarily based on the situation that we specified.
To make use of that file, we have to replace the _document.js file listed underneath pages:
import { Html, Head, Essential, NextScript } from 'subsequent/doc'

export default operate Doc() {
  return (
    <Html>
      <script src="http://localhost:3000/construct/remoteEntry.js" />
      <script src="http://localhost:3001/construct/remoteEntry_2.js" />
      <Head />
      <physique>
        <Essential />
        <NextScript />
      </physique>
    </Html>
  )
}
Let’s import that module into the index.js file and use it.
import Head from 'subsequent/head'
import Picture from 'subsequent/picture'
import types from '../types/Residence.module.css'

// Importing modules
const Header = (await import('fe1/header')).default;
const squareRoot = (await import('app1/getSquareRoot')).default;

export default operate Residence() {
  return (
    <div className={types.container}>
      <Head>
        <Header />
      </Head>
      <foremost className={types.foremost}>
        <h1 className={types.title}>
           Sq. root of 4: {squareRoot(4)}
        </h1>
      </foremost>
    </div>
  )
}
Execution and outcomes
Now it’s time to test whether or not it’s working or not. First, construct and begin fe1 and fe2. Begin fe3 by working npm begin dev and go to its respective URL to test the output.
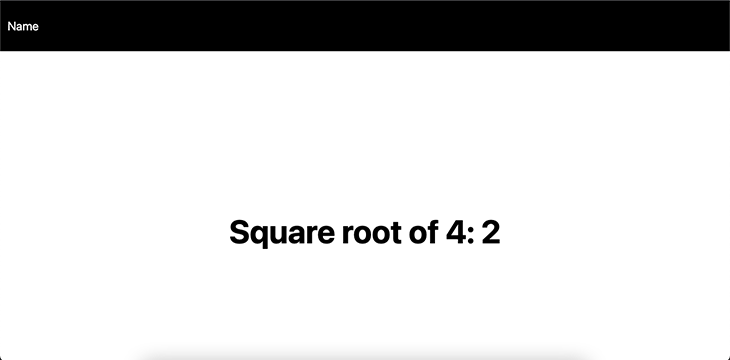
Woah! We simply consumed the content material of two frontend codes into our foremost frontend!
 Let’s do some magic.
Go to fe1 → src → element and alter the worth from identify to identify up to date. Then, rerun f2.
You possibly can see the brand new code that was up to date in fe1 with out doing something. Wonderful, proper?
Benefits of micro-frontends
Merely put, micro-frontends make net purposes extra maintainable. For those who’ve ever been half of a giant software, you realize it’s very tedious to handle the whole lot.
Micro-frontends work equally to the divide and conquer rule. Now, let’s perceive crucial and helpful facets of working with micro-frontends.
Deployment and safety
A major benefit of micro-frontend structure is you can separate a single physique into particular person items that may be deployed independently. When deploying alone, you’ll be able to preserve and construct with out engaged on different items.
Varcel helps a person repo of various frontends, no matter language and framework to deploy them collectively. Other than that, you need to use deployment companies like Netlify. As soon as it’s deployed, you need to use it as a person frontend solely.
When the frontend is utilized by a big viewers, it must be safe and strong. To make it protected, you need to use an SSL certificates like Wildcard or a single area, multi-domain, or SAN SSL certificates. One SAN or multi-domain SSL Certificates can safe a number of websites and subdomains.
Scalability
There are a number of frameworks constructed with JavaScript, however if you wish to align builders with totally different backgrounds on the identical challenge, will it even be potential? The reply is sure with micro-frontends!
You possibly can mix React, Vue, and Angular on a single challenge by making the most of micro-frontend structure. It generates the perfect consequence ultimately for my part.
Quicker improvement
Now you realize that your workforce can work independently. Nice, no extra pointless chaos!
Your workforce can develop and deploy their frontend each time they need. Releases might be performed rapidly as a result of there are zero dependencies related to particular person modules.
The principle aim of defining the micro-frontend is quicker iterations.
Simple testing
It’s higher to check particular person items of an software earlier than leaping into integration testing. That may be achieved right here!
Groups will take a look at the micro-frontend earlier than testing the appliance, thus lowering the probabilities of bugs going into the actual system.
Other than that, different benefits are a small code base that’s simply maintainable and the flexibility to rapidly add or take away any module from the system.
Conclusion
On this article, we mentioned the idea of micro-frontends and gave examples. Hopefully, now you realize that it’s simple to undertake and has some nice options!
Subsequent.js is fairly clear and follows easy micro-frontend structure. I’m excited to see what Subsequent brings sooner or later relating to microarchitecture and server-side rendering with micro-frontend.
Personally, I just like the micro-frontend coding type as a result of it’s simply maintained amongst groups. Other than that, frontend constructing and safety are additionally managed fairly elegantly. It’s a really thrilling alternative for a workforce as a result of sooner or later, this idea will possible develop past limitations!
Later, you received’t discover any variations between a micro-frontend and single skeletal system.
Full visibility into manufacturing React apps
Debugging React purposes might be troublesome, particularly when customers expertise points which are arduous to breed. For those who’re excited by monitoring and monitoring Redux state, routinely surfacing JavaScript errors, and monitoring gradual community requests and element load time, attempt LogRocket. 

LogRocket is sort of a DVR for net and cellular apps, recording actually the whole lot that occurs in your React app. As an alternative of guessing why issues occur, you’ll be able to combination and report on what state your software was in when a problem occurred. LogRocket additionally displays your app’s efficiency, reporting with metrics like shopper CPU load, shopper reminiscence utilization, and extra.
The LogRocket Redux middleware package deal provides an additional layer of visibility into your person periods. LogRocket logs all actions and state out of your Redux shops.
Modernize the way you debug your React apps — begin monitoring totally free.
