This submit will present you the best way to take delayed screenshots on Home windows 11/10 computer systems. The delay interval provides you time to arrange your pc display for the screenshot you need. You possibly can set a time delay (in seconds) earlier than you may seize the complete pc display, an energetic utility or window with a drop-down menu or right-click context menu, and so on. For that, now we have coated some greatest free software program that include a characteristic to seize delayed screenshots.

Methods to take Delayed Screenshots in Home windows 11/10
Here’s a record of instruments to take delayed screenshots on a Home windows 11/10 pc:
- HotShots
- ShareX
- PicPick
- Bug Taking pictures
- Screenpresso.
Let’s see the best way to use these instruments to take a timed screenshot.
1] HotShots

HotShots software has a user-friendly interface. All of the buttons and choices accessible on its interface are self-explanatory. This software allows you to seize all of the accessible screens, present display, an opened window, seize a particular area, or take a screenshot in freehand mode.
Pre-defined hotkeys are additionally offered by this software for display seize. For taking a delayed screenshot, you may set the time between 0 to 99 seconds which supplies you loads of time to arrange the display earlier than you may seize the required snapshot. When you get the screenshot, it may be saved as ICO, PNG, BMP, JPG, TIFF, PPM, or one other supported format.
Other than capturing and saving the screenshot, you can too use its built-in screenshot editor characteristic to annotate your screenshot utilizing numbering, textual content, arrow, highlighter, ellipse, and so on. However, the factor that you simply won’t like is the edited screenshot could be saved in its native format (*.sizzling) solely. If that doesn’t give you the results you want, then merely use it to seize the screenshot and reserve it to your pc.
To make use of this software, you may obtain it from sourceforge.internet. Set up and launch the software. On its predominant interface, set and use choices like screenshot seize mode, after snapshot course of, output folder, screenshot delay, and get the output.
2] ShareX

ShareX is a very talked-about and open-source software accessible free for Home windows OS. It’s an all-in-one screenshot seize, screenshot editor, colour picker, scrolling screenshot seize, and file-sharing software. It allows you to seize the monitor menu, full desktop display, customized area, an energetic window, monitor, and so on., as a PNG picture file. You can too present/cover the mouse cursor for screenshot seize.
Other than that, it will also be used to document display as GIF and video (FFmpeg is required), add picture results (textual content watermark, textual content font, border colour, background colour, and so on.), and edit photographs, and extra. Along with that, the characteristic to seize delayed screenshots can be there and you’ll set the time delay from 1 second to 5 seconds.
To make use of this software for capturing delayed screenshots, set up it, and open its predominant interface. After that:
- Entry its Seize menu accessible on the highest left half
- Go to the Screenshot delay part
- Beneath that part, you will note time delay choices. Choose a time delay.
Now proceed additional to make use of or set different choices accessible on the left part. Choices like setting customized hotkey to seize an energetic window, full display, choosing seize mode, setting after seize duties (use picture results, open screenshot within the picture editor, save the picture to file, and so on.), and extra could be accessed and set by you.
As soon as every part is prepared, press the hotkey, after which the related motion will set off for capturing the screenshot after the delay time. Based mostly on the after-capture duties set by you, the software will immediate you to take additional steps, and at last, it can save you the screenshot.
3] PicPick

PicPick (free for private use) software additionally brings options just like ShareX. It’s multipurpose software program that you should utilize to seize screenshots, edit a screenshot with a built-in screenshot editor, decide colour code from the display, take a scrolling screenshot, use a pixel ruler, magnifier, whiteboard, and so on.
For display seize, it supplies an energetic window, a selected area, a set area, full-screen, window management, and free-hand seize choices that you should utilize with or with no mouse cursor. You can too use default or set customized hotkeys for all these options.
With a view to take a delayed screenshot utilizing this software, seize its transportable or installer model, and open its residence display. The house display of this software appears a bit just like MS Phrase. After getting opened the house display:
- Click on on the Choices accessible within the left part. It’ll open the Program Choices window
- In that window, entry the Seize menu
- Add Delay earlier than seize worth within the given subject accessible beneath the Seize Choice part. This software allows you to set time delay from 0 to 9999 milliseconds
- As soon as the time delay is about, you may press the OK button.
You can too set different choices offered by this software.
Now press a hotkey for taking the screenshot and it’ll seize the screenshot based mostly on the delay time set by you. As soon as the screenshot is captured, it should open in its built-in picture editor, the place you may annotate the screenshot, after which reserve it as BMP, GIF, JPG, PNG, or PDF file.
Associated: Greatest free display seize software program for Home windows.
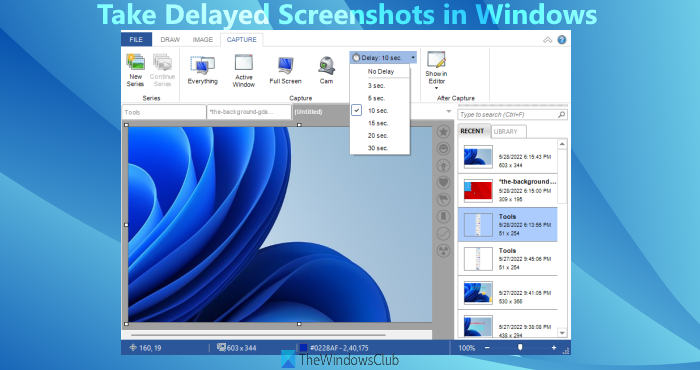
4] Bug Taking pictures

Bug Taking pictures is one other software that comes with a time delay screenshot seize characteristic. This software allows you to set the time delay for 15 seconds, 5 seconds, 10 seconds, 3 seconds, 20 seconds, and 30 seconds. You should use it to seize every part, a particular area, full desktop display, and energetic window together with or excluding the mouse cursor. The characteristic to seize photographs from the webcam can be there that you simply would possibly discover helpful.
Other than that, it has additionally a local screenshot editor that comes with stunning arrows of various colours, a textual content software, rectangle, ellipse, pen, highlighter, stamp, and different instruments. You should use all these instruments after you have captured the screenshot because the captured screenshot is opened to its screenshot editor robotically.
To make use of this software, seize its setup file from bugshooting.com. After operating this software, it should sit within the system tray of the taskbar silently. Now observe these steps:
- Proper-click on its system tray icon
- Click on on the Present Fast Bar possibility. The Fast Bar might be seen on the underside proper part of your pc display that continues to be on high of different opened purposes or home windows. This helps you simply take the required motion associated to screenshot
- Within the Fast Bar, click on on the Delay icon and you will note on a regular basis delay choices. Choose an possibility
- Now, within the Fast Bar, choose any possibility associated to screenshot seize akin to seize every part, full pc display, or seize an energetic window
- After this, anticipate the time delay and it’ll begin the motion to seize the screenshot
- As soon as the screenshot is captured, its picture editor might be in entrance of you. There you should utilize annotation instruments from the DRAW tab, flip the screenshot, flip your screenshot to greyscale, change canvas dimension from the IMAGE tab, and so on.
- When the screenshot is prepared, click on on the Save as possibility current within the File menu, and save your screenshot to a location of your alternative as JPG, PNG, GIF, BMP, or HTML file.
5] Screenpresso

Screenpresso is a screenshot seize and display recorder software program. The free model is sweet sufficient for each functions, however its display recording characteristic provides a watermark to the ultimate video. For screenshot seize and enhancing, there might be no watermark.
It comes with its personal picture editor to resize, crop the captured screenshot, draw ellipse, polygon, free-hand, add textual content, use arrow, rectangle, numbering, highlighter instruments, and so on. As soon as the screenshot is prepared, it can save you it as TIFF, PNG, GIF, BMP, or JPEG photographs. And, if you would like, you can too add your screenshot to OneDrive, Google Drive, Dropbox, and so on.
To make use of this software, obtain its EXE and execute it. After that, you should utilize it with or with out set up to seize full display, energetic window, a selected area, take a scrolling screenshot, earlier area, and so on. Hotkeys are additionally supported for all such choices and you’ll even set a customized hotkey for these choices.
For a delayed screenshot, it allows you to seize an energetic window, window menu, or a selected area. It doesn’t include a characteristic to set a time delay. It has already set the time delay to 5 seconds.
After opening its interface, you will note the Screenshot area, Report display, and Edit, and Publish menus on the underside half. You possibly can entry the Screenshot area for the delayed screenshot, full-screen seize, and so on. However, initially, it’s best to entry its Settings to arrange customized hotkeys for display seize and set different accessible choices.
After that, press the hotkey set by you to take a delayed screenshot. As soon as the timer is over, it should allow you to seize an energetic window or a selected area. The captured screenshot thumbnail is seen on its predominant interface. You possibly can double-click on that thumbnail after which its screenshot editor will open.
Lastly, you should utilize the annotation instruments to edit the screenshot or just use Save as button to retailer the screenshot.
How do you delay a screenshot on a PC?
If you wish to set a delay time for capturing a screenshot on a Home windows 11/10 pc, then there exist some useful and free screenshot seize instruments that present such a characteristic. These software program let you choose a delay time in seconds so that you could have every part prepared on the display to take the snapshot. You possibly can seize the complete display, a selected a part of the desktop display, or an energetic window. This submit additionally covers an inventory of such instruments. You possibly can test these instruments and begin utilizing the one which meets your necessities.
How do you do a delayed snip?
If you wish to do a delayed snip utilizing the Snipping software, then it is vitally easy to do. This software has a Delay possibility you can entry from its predominant interface. There, you may set snip delay for 3 seconds, 5 seconds, or 10 seconds. After that, when you attempt to begin a snip, the time delay will begin, after which the display seize menu will seem on the highest center a part of your desktop display. From that menu, you may choose a display seize mode to take a screenshot.
Hope that is useful.
Learn subsequent: Free Desktop Recorder & Display screen Recording Software program for Home windows.
