
More often than not, filling out types with plenty of fields might be cumbersome, and this will discourage customers from finishing the method. That is the place a multi-step type comes into play.
Multi-step types are simply because the title implies: a multi-step type is an extended type damaged down into brief items. They supply a much less daunting expertise to the customers of your utility.
Flutter comes prebundled with a Stepper widget that offers us the flexibility to interrupt our type into a listing of steps. On this article, we’ll be exploring what a Stepper widget actually is and methods to apply it in constructing a multi-step type in Flutter to boost person expertise. Additionally, you will learn to customise a Stepper widget to satisfy your cell app’s specs.
These are a few of the important properties of the Stepper widget. We’ll additionally present them in motion by means of the demo, however you may evaluation them right here earlier than we begin:
- kind (
StepperType.horizontalorStepperType.vertical) — This determines the orientation and the way every step could be positioned, relative to one another - steps — The steps of the stepper whose titles, subtitles, and icons are all the time seen. Right here’s an instance of the steps we’ll use for the demo:

currentStep— The index worth of the step (0, 1, 2, and so on.). Defines the energetic step within the typeonStepContinue()— A callback-when-continue button, to maneuver to the subsequent steponStepCancel()— A callback-when-cancel button, to maneuver to the earlier steponStepTapped(int index) — A callback for when the person faucets on steps, to maneuver to the chosen step in progress. The callback additionally offers us with the index of the step that the person clicks onChecklist<Step>— The steps of a stepper whose title and content material are proven when the respective step isLively
To drill down additional, the properties of a step itself are:
title— Use this property to title the step. This property is a required property and accepts a widget as a worth, normally a textual content widgetsubtitle— Use this property so as to add a subtitle to the step. It accepts a widget as a worth, normally a textual content widgetcontent material— We are going to use this property to supply content material for the step. It’s a required property and accepts any widget as a worthstate— Use this property to set the state of the step likeaccomplished,disabled,modifying,listed, orerror. Based mostly on the state, the icons for the steps will changeisActive— Use this property to point whether or not the step is energetic or inactive. It accepts a Boolean as a worth
Making a multi-step type in Flutter
Now, let’s create a brand new Flutter challenge that exhibits methods to apply the Stepper widget.
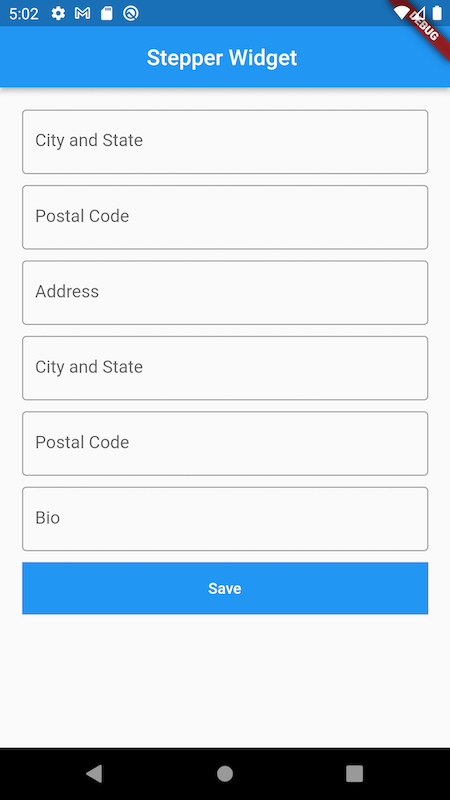
The preliminary state of our type would look one thing just like the picture now we have under. Nevertheless, we will likely be utilizing the Stepper widget to interrupt this into a number of steps so the person isn’t overwhelmed by the variety of fields they must fill in.
We’ve got the reusable customized widgets, which now we have created.
We’ve got our fundamental.dart file, which has the next contents:
Extra nice articles from LogRocket:
import 'bundle:flutter/materials.dart';
import 'bundle:stepper_widget/form_page.dart';

void fundamental() {
  runApp(const MyApp());
}

class MyApp extends StatelessWidget {
  const MyApp({Key? key}) : tremendous(key: key);

  @override
  Widget construct(BuildContext context) {
    return MaterialApp(
      title: 'Flutter Demo',
      theme: ThemeData(
        primarySwatch: Colours.blue,
      ),
      house: const FormPage(),
    );
  }
}
Our FormPage widget homes these contents:
import 'bundle:flutter/materials.dart';
import 'bundle:stepper_widget/widgets/custom_button.dart';
import 'bundle:stepper_widget/widgets/custom_input.dart';

class FormPage extends StatefulWidget {
  const FormPage({Key? key}) : tremendous(key: key);

  @override
  _FormPageState createState() => _FormPageState();
}

class _FormPageState extends State<FormPage> {
  @override
  Widget construct(BuildContext context) {
    return MaterialApp(
      house: Scaffold(
        appBar: AppBar(
          title: const Textual content(
            "Stepper Widget ",
          ),
          centerTitle: true,
        ),
        physique: Container(
          padding: const EdgeInsets.all(20),
          baby: ListView(
            kids: [
              const CustomInput(
                hint: "First Name",
                inputBorder: OutlineInputBorder(),
              ),
              const CustomInput(
                hint: "Last Name",
                inputBorder: OutlineInputBorder(),
              ),
              const CustomInput(
                hint: "Address",
                inputBorder: OutlineInputBorder(),
              ),
              const CustomInput(
                hint: "City and State",
                inputBorder: OutlineInputBorder(),
              ),
              const CustomInput(
                hint: "Bio",
                inputBorder: OutlineInputBorder(),
              ),
              const CustomInput(
                hint: "Bio",
                inputBorder: OutlineInputBorder(),
              ),
              CustomBtn(
                title: const Text(
                  "Save",
                  style: TextStyle(color: Colors.white),
                ),
                callback: () {},
              )
            ],
          ),
        ),
      ),
    );
  }
}
Our CustomInput:
import 'bundle:flutter/materials.dart';

class CustomInput extends StatelessWidget {
  closing ValueChanged<String>? onChanged;
  closing String? trace;
  closing InputBorder? inputBorder;
  const CustomInput({Key? key, this.onChanged, this.trace, this.inputBorder})
      : tremendous(key: key);

  @override
  Widget construct(BuildContext context) {
    return Container(
      margin: const EdgeInsets.solely(backside: 10),
      baby: TextField(
        onChanged: (v) => onChanged!(v),
        ornament: InputDecoration(hintText: trace!, border: inputBorder),
      ),
    );
  }
}
And lastly is our customized button, CustomBtn:
import 'bundle:flutter/materials.dart';

class CustomBtn extends StatelessWidget {
  closing Operate? callback;
  closing Widget? title;
  CustomBtn({Key? key, this.title, this.callback}) : tremendous(key: key);

  @override
  Widget construct(BuildContext context) {
    return Container(
      margin: const EdgeInsets.solely(backside: 10),
      baby: SizedBox(
        width: double.infinity,
        baby: Container(
          colour: Colours.blue,
          baby: TextButton(
            onPressed: () => callback!(),
            baby: title!,
          ),
        ),
      ),
    );
  }
}
Creating the steps for our type
With a purpose to use our Stepper widget, we’ll begin by creating a listing of steps.
As a result of we already outlined a few of the vital options of a Stepper widget, so we gained’t delve a lot into that right here. We will bounce proper in:
Checklist<Step> getSteps() {
  return <Step>[
    Step(
      state: currentStep > 0 ? StepState.complete : StepState.indexed,
      isActive: currentStep >= 0,
      title: const Text("Account Info"),
      content: Column(
        children: const [
          CustomInput(
            hint: "First Name",
            inputBorder: OutlineInputBorder(),
          ),
          CustomInput(
            hint: "Last Name",
            inputBorder: OutlineInputBorder(),
          ),
        ],
      ),
    ),
    Step(
      state: currentStep > 1 ? StepState.full : StepState.listed,
      isActive: currentStep >= 1,
      title: const Textual content("Deal with"),
      content material: Column(
        kids: const [
          CustomInput(
            hint: "City and State",
            inputBorder: OutlineInputBorder(),
          ),
          CustomInput(
            hint: "Postal Code",
            inputBorder: OutlineInputBorder(),
          ),
        ],
      ),
    ),
    Step(
      state: currentStep > 2 ? StepState.full : StepState.listed,
      isActive: currentStep >= 2,
      title: const Textual content("Misc"),
      content material: Column(
        kids: const [
          CustomInput(
            hint: "Bio",
            inputBorder: OutlineInputBorder(),
          ),
        ],
      ),
    ),
  ];
}
After creating the steps required for our Stepper widget, we will now exchange the ListView in our formpage.dart. However earlier than that, let’s take a look at what every discipline of our single step stands for.
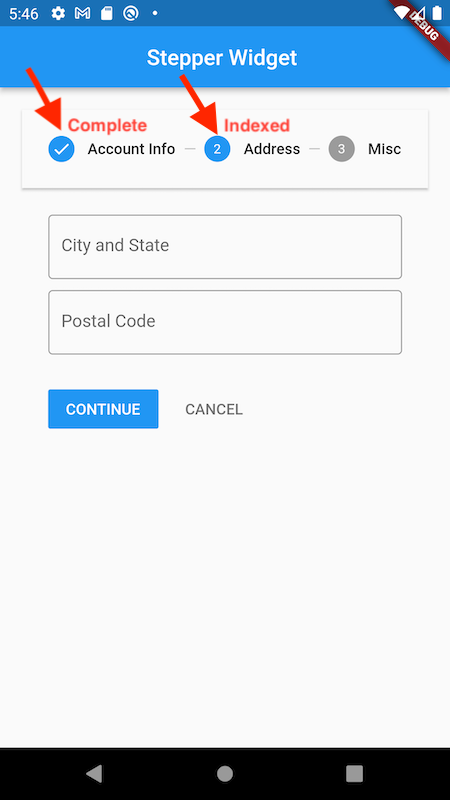
The primary property now we have for a single step is state: you might recall that this defines the main icon on the stepper as proven within the picture under. When a person is completed modifying the fields on a specific step and strikes to the subsequent step, the earlier step is marked as accomplished within the state property and the present step is marked listed, which merely means the person is actively modifying this step.
The isActive property is just used to point out which of the steps is at the moment being seen by the person. The title takes in a widget and exhibits it on the prime of every of the steps, whereas the content material of every step are the precise type widgets we would like the person to work together with.
After changing our earlier Listview widget with the Stepper, that is what our code seems like:
import 'bundle:flutter/materials.dart';
import 'bundle:stepper_widget/widgets/custom_input.dart';

class FormPage extends StatefulWidget {
  const FormPage({Key? key}) : tremendous(key: key);

  @override
  _FormPageState createState() => _FormPageState();
}

class _FormPageState extends State<FormPage> {
  int currentStep = 0;
  @override
  Widget construct(BuildContext context) {
    return MaterialApp(
      house: Scaffold(
        appBar: AppBar(
          title: const Textual content(
            "Stepper Widget ",
          ),
          centerTitle: true,
        ),
        physique: Container(
            padding: const EdgeInsets.all(20),
            baby: Stepper(
              kind: StepperType.horizontal,
              currentStep: currentStep,
              onStepCancel: () => currentStep == 0
                  ? null
                  : setState(() {
                      currentStep -= 1;
                    }),
              onStepContinue: () {
                bool isLastStep = (currentStep == getSteps().size - 1);
                if (isLastStep) {
                  //Do one thing with this data
                } else {
                  setState(() {
                    currentStep += 1;
                  });
                }
              },
              onStepTapped: (step) => setState(() {
                currentStep = step;
              }),
              steps: getSteps(),
            )),
      ),
    );
  }

  Checklist<Step> getSteps() {
    return <Step>[
      Step(
        state: currentStep > 0 ? StepState.complete : StepState.indexed,
        isActive: currentStep >= 0,
        title: const Text("Account Info"),
        content: Column(
          children: const [
            CustomInput(
              hint: "First Name",
              inputBorder: OutlineInputBorder(),
            ),
            CustomInput(
              hint: "Last Name",
              inputBorder: OutlineInputBorder(),
            ),
          ],
        ),
      ),
      Step(
        state: currentStep > 1 ? StepState.full : StepState.listed,
        isActive: currentStep >= 1,
        title: const Textual content("Deal with"),
        content material: Column(
          kids: const [
            CustomInput(
              hint: "City and State",
              inputBorder: OutlineInputBorder(),
            ),
            CustomInput(
              hint: "Postal Code",
              inputBorder: OutlineInputBorder(),
            ),
          ],
        ),
      ),
      Step(
        state: currentStep > 2 ? StepState.full : StepState.listed,
        isActive: currentStep >= 2,
        title: const Textual content("Misc"),
        content material: Column(
          kids: const [
            CustomInput(
              hint: "Bio",
              inputBorder: OutlineInputBorder(),
            ),
          ],
        ),
      ),
    ];
  }
}
Understanding the Stepper widget
Now let’s stroll by means of every of the properties now we have outlined in our Stepper widget.
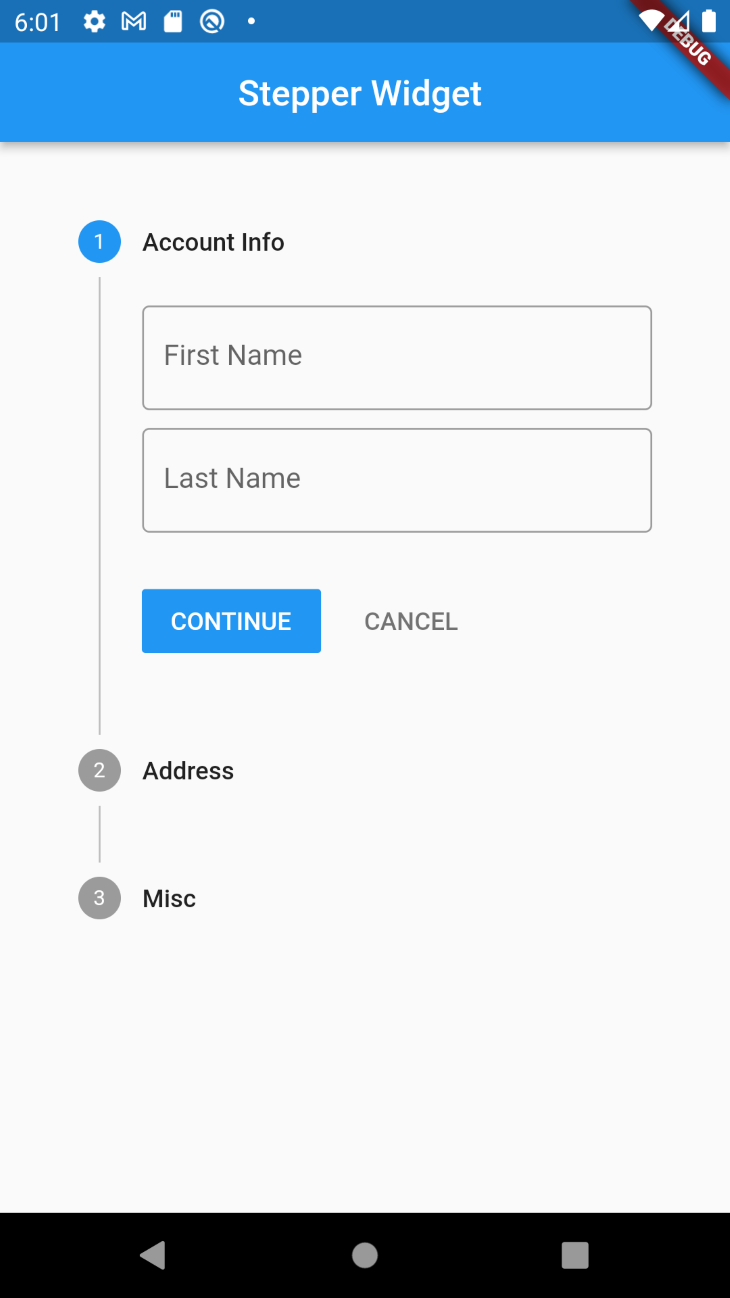
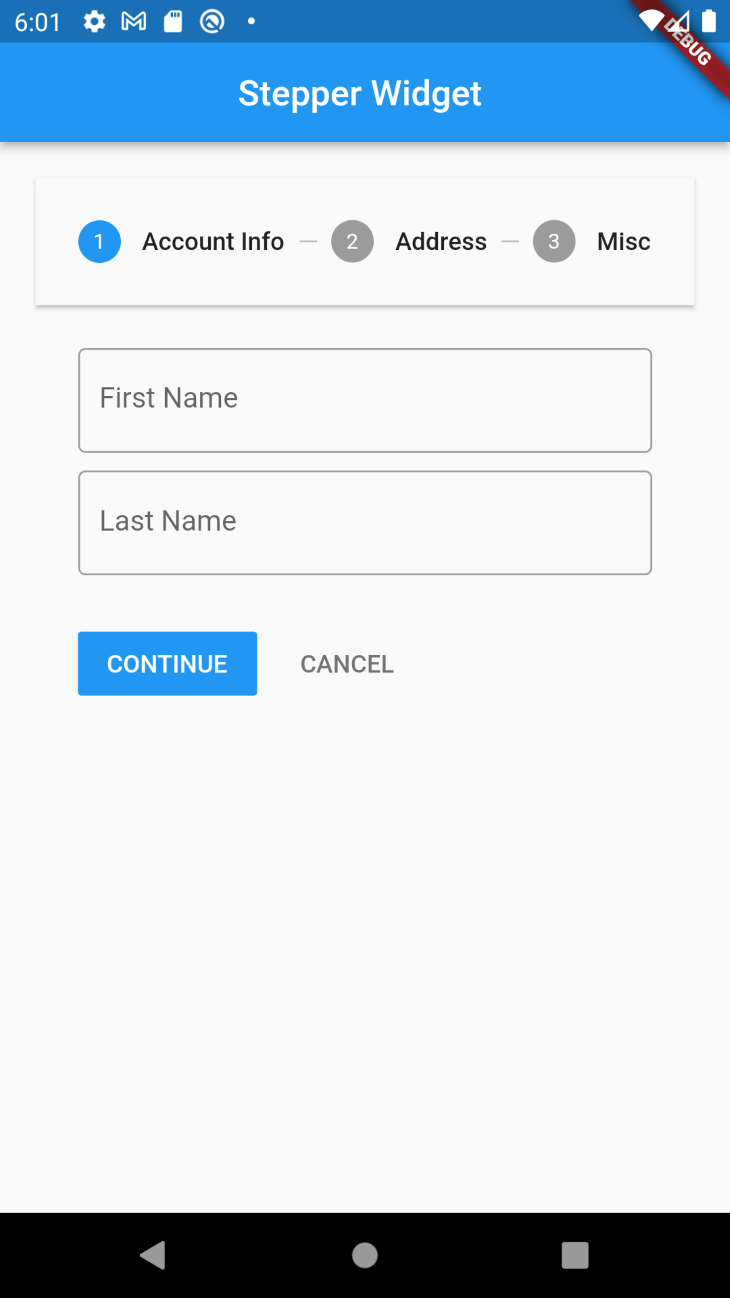
Beginning with the kind, we outline how the content material of our Stepper widget needs to be laid out contained in the stepper. For each vertical and horizontal step varieties, that is what our Stepper widget would appear to be:
CurrentStep merely takes within the worth of the index of the step that’s at the moment seen to the person.
OnStepCancel is the callback applied at any time when a person of our type clicks on the again button, and we’re at the moment doing a examine to forestall the button from being energetic on the very first step.
onStepContinue is the callback on our proceed button. Right here we even have a examine to know when the person is on the final step, and right here we will perform the required motion utilizing the data supplied to us.
OnStepTapped returns the step the person clicks on, and we will make this energetic by setting it as the worth of the present step.
Different issues that could possibly be accomplished to our Stepper widget to supply extra customizations embody including a customized theme or implementing our personal customized management buttons, that are the present Subsequent and Proceed buttons now we have. To do that, merely use the theme property and the controlsBuilder property of our Stepper widget.
Last ideas
Utilizing a multi-step type can considerably enhance person expertise and improve the visible attraction of our designs.
The Stepper widget in Flutter involves the rescue in conditions the place that is wanted and offers us with plenty of useful customizations to get the outcomes we need with out relying on third-party libraries.
LogRocket: Full visibility into your net and cell apps

LogRocket is a frontend utility monitoring resolution that permits you to replay issues as in the event that they occurred in your individual browser. As an alternative of guessing why errors occur, or asking customers for screenshots and log dumps, LogRocket permits you to replay the session to rapidly perceive what went fallacious. It really works completely with any app, no matter framework, and has plugins to log further context from Redux, Vuex, and @ngrx/retailer.
Along with logging Redux actions and state, LogRocket data console logs, JavaScript errors, stacktraces, community requests/responses with headers + our bodies, browser metadata, and customized logs. It additionally devices the DOM to file the HTML and CSS on the web page, recreating pixel-perfect movies of even probably the most advanced single-page net and cell apps.
