
Monorepo structure has change into a highly regarded development amongst devs creating trendy net apps.
Though the observe isn’t new by any means, giant firms like Google and Microsoft have utilized monorepos for a very long time to handle software program at scale, and it’s additionally utilized in in style open-source tasks like React, Subsequent.js, Jest, Babel, and lots of extra.
On this article, we are going to talk about what monorepos are and the instruments you want for working with them.
We’ll additionally discover how one can construct a monorepo for a Subsequent.js venture with a pattern use case to observe together with.
Leap forward:
What’s a monorepo?
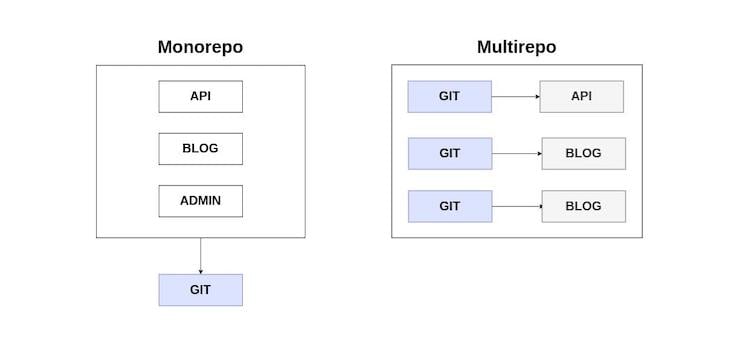
A monorepo is a single version-controlled repository that incorporates a number of remoted tasks with well-defined relationships.
This method differs from extra typical strategies of software program growth, the place every venture is often saved on a separate repository with its personal configuration for constructing, testing, and deployment.
Advantages of utilizing a monorepo in Subsequent.js
There are some key components which have brought about this shift in path concerning how software program tasks are structured (significantly these with giant codebases).
These components are:
Easy code sharing
Purposes inbuilt a monorepo can simply share reusable code and configurations, since they share the identical repository.
In distinction to a polyrepo, which means that there’s decreased code duplication, making certain sooner growth and ease of upkeep.
Moreover, builders don’t need to undergo the troublesome technique of publishing packages and resolving incompatibilities with tasks that depend on them.
Atomic commits
Massive-scale modifications affecting a number of purposes might be made in a single commit whereas making certain the appliance works as anticipated earlier than committing modifications.
A wonderful instance of an atomic commit is when a breaking change is made to a shared library that’s utilized by a number of apps, thereby forcing the developer to make sure the apps that depend upon it are up to date to be appropriate with the latest change.
Consistency
Monorepos provide higher consistency than polyrepos, because the codebase is multi functional place and every venture can simply share the identical coding model and instruments for testing, deployment, and code upkeep.
Monorepos are very helpful for managing tasks, however to get probably the most out of them, it is advisable work with the appropriate instruments to make sure your growth workflow is quick and efficient.
Accessible monorepo instruments differ based mostly on their options, language help, and barrier to entry when it comes to the experience required to make use of them.
The next is an inventory of monorepo instruments for working with JavaScript/TypeScript codebases:
- Turborepo: Sensible construct system for JavaScript/TypeScript monorepos
- Nx: Subsequent-generation construct system with first-class monorepo help and highly effective integrations
- Bazel: Quick, scalable, multi-language, and extensible construct system
- Lerna: Quick and trendy construct system for managing and publishing a number of JavaScript/TypeScript packages from the identical repository
Turborepo is the instrument of alternative for this tutorial. It’s an easy-to-use, quick, and efficient construct system for TypeScript/JavaScript codebases.
N.B., if you wish to see what else might be performed with Turborepo, we’ve got one other tutorial centered on constructing a full-stack TypeScript monorepo
Turborepo is constructed on workspaces, a characteristic supported by Yarn, npm, and pnpm for managing a number of packages inside a top-level root bundle.
Turborepo ships with the next options that make working with monorepos simple:
- Incremental builds: This ensures builds are executed when there are modifications in a workspace to forestall pointless computations
- Parallel execution: Executes duties in parallel whereas maximizing the usage of each obtainable core within the CPU to make sure fast executions
- Distant caching: That is a powerful characteristic Turborepo helps that lets you share the cache of job executions together with your dev group and CI/CD server to chop down execution time
- Dependency graph visualization: This helps producing a graph of a job execution plan to offer a high-level view of the steps taken to run it
Constructing the monorepo
For this tutorial, we’ll construct a monorepo for a pattern ecommerce utility that’s made up of two impartial Subsequent.js apps: an admin and a retailer.
We’ll additionally cowl leverage the numerous advantages monorepos present. These are primarily the next:
- Code sharing; to make a reusable element library that can be utilized by each Subsequent.js apps
- A shared configuration bundle for linting and formatting
Venture setup
In your terminal, enter the next command to create a brand new listing for the venture and arrange the bundle.json:
mkdir nextjs-monorepo
cd nextjs-monorepo
yarn init -y
This is step one in constructing the monorepo; now we should arrange the venture’s workspaces.
Extra nice articles from LogRocket:
Creating workspaces
Earlier on this article, I discussed that Turborepo is constructed on workspaces — all packages and apps within the monorepo will likely be saved on a separate workspace of their very own.
Open the bundle.json file on the root of the venture and insert the code under:
{
  "title": "nextjs-monorepo",
  "non-public": true,
  "model": "1.0.0",
  "workspaces": [
    "apps/*",
    "packages/config/*",
    "packages/shared/*"
  ],
  "engines": {
    "node": ">=14.0.0"
  },
  "packageManager": "[email protected]"
}
The workspaces subject within the bundle.json file is an array of paths that tells the bundle supervisor the place our workspaces are positioned.
apps/* is for all of the impartial Subsequent.js purposes; packages/config/* shops reusable packages for linting and formatting; and packages/shared/* incorporates reusable code that’s utilized by tasks in app/ — that is the place the UI element library will likely be saved.
Establishing the Subsequent.js purposes
On the root of the venture, create a brand new folder, apps/, to retailer the Subsequent.js apps we’re going to arrange:
mkdir apps
cd apps
Subsequent, let’s add the admin and retailer purposes:
yarn create next-app admin
yarn create next-app retailer
When it’s put in, open the bundle.json file of the admin utility, positioned at apps/admin/bundle.json. Then, change the worth of the dev script with the following dev — port 3001 — so it might run on a unique port.
As soon as that’s performed, run the event server for each tasks with yarn dev to make sure every thing works correctly.
Within the apps/admin/pages/index.js file, insert the next code:
export default perform House() {
  return (
    <div>
      <h1>Admin</h1>
      <button>Click on Me!</button>
    </div>
  );
}
We are going to do the identical within the apps/retailer/pages/index.js file, so insert the next code as soon as once more:
export default perform House() {
  return (
    <div>
      <h1>Retailer</h1>
      <button>Click on Me!</button>
    </div>
  );
}
Now, we’ve accomplished the fundamental setup vital for each Subsequent.js apps. Within the subsequent part, we’ll arrange Turborepo for working our growth duties.
Establishing Turborepo
Workspaces and duties are the constructing blocks of a monorepo.
Bundle managers like Yarn and npm work nicely for putting in packages and configuring workspaces, however they aren’t optimized for working duties in a posh venture setup like a monorepo, and that is the place Turborepo shines.
Putting in Turborepo
Let’s begin by putting in Turborepo for our venture. On the root of the monorepo, run the next script:
yarn add turborepo -DW
As soon as the set up is full, create a brand new file, turbo.json, on the root of the monorepo to retailer the configuration required for Turborepo to work. Then, enter the next code:
{
  "$schema": "https://turborepo.org/schema.json",
}
Working duties
Let’s configure Turborepo to run the Subsequent.js purposes in apps/. Open the turbo.json file and enter the code under:
{
  "$schema": "https://turborepo.org/schema.json",
  "pipeline": {
    "dev": {
      "cache": false
    }
  }
}
Let’s take a second to look at the contents of the turbo.json file:
- The
pipelinesubject defines the duties that Turborepo will run on the monorepo; each property within thepipelineobject is a job that corresponds to a script within thebundle.jsonfile of a workspace - The
devsubject contained in thepipelineobject defines a workspace’s dev job;"cache": falsetells Turborepo to not cache the outcomes of this job
N.B., Turborepo will solely run duties which might be outlined within the
scriptspart of the workspace’sbundle.jsonfile
We’ll must outline a script within the scripts subject of the bundle.json file on the root of the monorepo to run the dev server of the Subsequent.js purposes.
Insert the next code within the bundle.json file on the root of the monorepo:
{
  "scripts": {
    "dev": "turbo run dev --parallel"
  }
}
The --parallel flag tells Turborepo to run the dev job of the workspaces in parallel.
Enter yarn dev in your terminal on the root of the monorepo to start out the event server for the Subsequent.js purposes.
If that was profitable, you need to have an output just like the picture under:

Now that Turborepo is up and working, the following step is to arrange a reusable configuration bundle for linting and formatting.
Linting and formatting
Monorepos allow the usage of a unified code commonplace for all tasks inside it to make sure consistency all through the codebase.
An automatic code linting and formatting instrument like ESLint might be configured to increase a shared configuration that each workspace within the venture can use.
Arrange ESLint
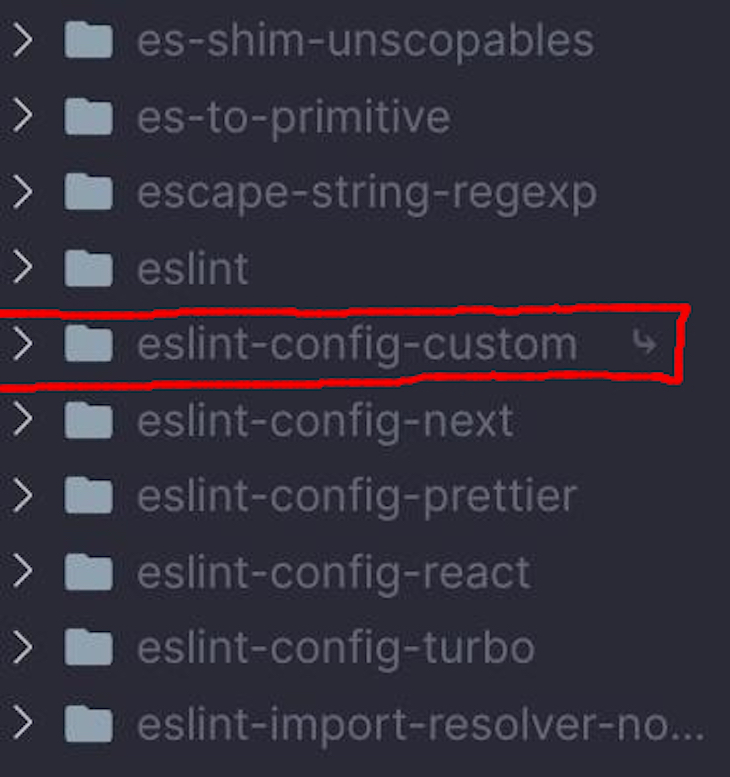
We’ll must create a brand new workspace for the shared ESLint config bundle that will likely be used throughout the workspaces in apps/.
Enter the next script to create a brand new workspace for the ESLint config bundle:
mkdir -p packages/config/eslint-config-custom
cd packages/config/eslint-config-custom
Create a bundle.json file in packages/config/eslint-config-custom and insert the next code:
{
  "title": "eslint-config-custom",
  "model": "1.0.0",
  "important": "index.js",
}
"important": "index.js" specifies the entry level of this bundle and index.js incorporates the ESLint configuration that will likely be imported by the modules that may use it.
Set up ESLint and the plugins related to this venture with the next:
yarn add eslint eslint-config-next eslint-config-prettier eslint-config-react eslint-config-turbo
Create a brand new file, index.js, in packages/config/eslint-config-custom and enter the next code:
module.exports = {
  extends: ["next", "turbo", "prettier"],
};
Now we’re performed with organising the reusable ESLint configuration bundle for this venture, the following step is utilizing it in our Subsequent.js apps.
To make use of the eslint-config-custom bundle within the admin and retailer workspaces, we’ll want so as to add it as a dependency.
Within the bundle.json file of the admin and retailer workspaces, take away each ESLint bundle and plugin and insert the next code:
{
  "devDependencies": {
   "eslint-config-custom": "*"
  }
}
Replace the .eslintrc.json file within the apps/retailer and apps/admin workspaces with the next code:
{
  "root": true,
  "extends": ["custom"] // Tells ESLint to make use of the "eslint-config-custom" bundle
}
Lastly, run yarn set up on the root of the monorepo to replace the dependencies within the node_modules folder.
If you happen to adopted the earlier steps accurately, you need to discover the native eslint-config-custom bundle within the root node_modules folder.
Working linting and formatting duties
Earlier than we begin working duties for linting and formatting, we’ll want so as to add the mandatory scripts within the bundle.json file of the admin and retailer apps.
Open the bundle.json file of the admin and retailer apps and insert the next within the scripts subject:
{
  "lint": "eslint .",
  "format": "eslint --fix --ext .js,.jsx ."
}
Subsequent, we’ll must create the duties for linting and formatting the workspaces within the monorepo. Within the turbo.json file on the root of the monorepo, add the next code within the pipeline subject:
{
  "lint": {
    "outputs": []
  },
  "format": {
    "outputs": []
  }
}
The outputs subject within the lint and format duties shops an array of globs — any file that matches the sample of the glob is handled as an artifact that will likely be cached.
The worth of the output within the lint and format duties is ready to an empty array, which tells Turborepo to cache the logs to stdout and stderr of this job. Because of this, every time this job is re-run and there aren’t any modifications within the workspace, Turborepo replays the cached logs, which implies the execution time of a job may be very quick.
To run the brand new duties, we’ll must replace the scripts subject of the bundle.json file on the root of the monorepo with the next code:
{
  "lint": "turbo run lint",
  "format": "turbo run format"
}
As soon as that’s full, now you can run the lint and format duties by coming into the next command:
yarn lint
yarn format
Right here’s a pattern output of the execution of yarn lint:

Constructing a reusable element library
In trendy frontend growth, elements are the constructing blocks of each utility, no matter the scale of the venture.
The breaking down of advanced UIs into reusable elements and their abstraction to a shared element library is a typical growth observe right now — it makes codebases simpler to take care of whereas nonetheless following software program growth finest practices like DRY.
We are going to construct our personal reusable element library that tasks in apps/ could make use of. To get began, we’ll must create a brand new workspace.
Enter the next command on the root of the monorepo to create a brand new workspace for the element library:
mkdir -p packages/shared/ui
cd packages/shared/ui
In packages/shared/ui, create a brand new bundle.json file and insert the next:
{
  "title": "ui",
  "model": "1.0.0",
  "important": "index.js",
  "license": "MIT",
  "scripts": {
    "lint": "eslint .",
    "format": "eslint --fix --ext .js,.jsx ."
  },
  "devDependencies": {
    "eslint": "^7.32.0",
    "eslint-config-custom": "*",
    "react": "^18.2.0"
  }
}
Subsequent, let’s create a reusable button element that can be utilized by the Subsequent.js purposes. Within the packages/shared/ui workspace, create a brand new file, Button.jsx, and enter the next code:
import * as React from "react";

export const Button = ({ youngsters }) => {
  return <button>{youngsters}</button>;
};
To make use of the Button element in our Subsequent.js apps, we’ll want so as to add the ui bundle as a dependency within the workspace’s bundle.json file.
Add the ui bundle by inserting the next code within the dependencies subject throughout the bundle.json file of the admin and retailer workspaces, respectively:
{
  "dependencies": {
    "ui": "*"
  }
}
As soon as that’s full, run yarn set up to replace the dependencies within the node_modules folder.
Subsequent, within the pages/index.js file of the Subsequent.js apps, change the prevailing code with the next:
// apps/admin/pages/index.js
import { Button } from "ui";
export default perform House() {
  return (
    <div>
      <h1>Admin</h1>
      <Button>Click on Me!</Button>
    </div>
  );
}

// apps/retailer/pages/index.js
import { Button } from "ui";
export default perform House() {
  return (
    <div>
      <h1>Retailer</h1>
      <Button>Click on Me!</Button>
    </div>
  );
}
Restart the event server, go to every utility, and you’ll observe an error just like the next picture:
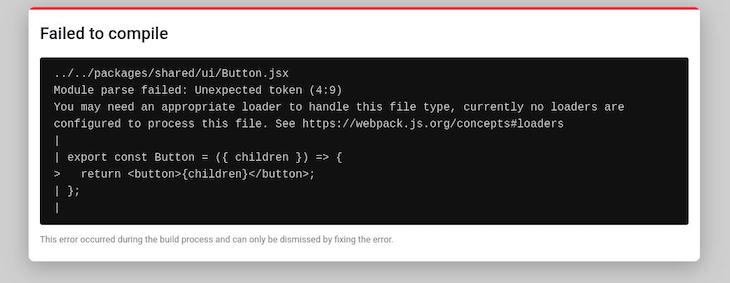
The explanation for this error is that we haven’t configured our Subsequent.js apps to deal with the transpilation of native packages, just like the ui bundle in packages/shared.
There’s a pleasant bundle on npm that solves this drawback: next-transpile-modules. It allows the transpilation of native packages with a Subsequent.js/Babel configuration.
Let’s set up the next-transpile-modules bundle within the admin and retailer workspaces by coming into the next command:
yarn workspace admin add -D next-transpile-modules
yarn workspace retailer add -D next-transpile-modules
Within the subsequent.config.js file of the admin and retailer workspaces, enter the next code to make use of the next-transpile-modules bundle to transpile the element library bundle:
/** @kind {import('subsequent').NextConfig} */
const withTM = require("next-transpile-modules")(["ui"]);
module.exports = withTM({
  reactStrictMode: true,
  swcMinify: true,
});
Since we’ve made modifications to the subsequent.config.js file, we’ll need to restart the event server for the modifications to take impact. After restarting the server, navigate to localhost:3000 and the error needs to be resolved, with every thing now working as anticipated.
Conclusion
Monorepos will proceed to develop in reputation within the net growth neighborhood due to their quite a few advantages and the development of instruments that make working with them simpler for builders.
I hope you discovered this information to constructing a monorepo in Subsequent.js helpful — let me know of your individual experiences within the feedback under.
LogRocket: Full visibility into manufacturing Subsequent.js apps
Debugging Subsequent purposes might be troublesome, particularly when customers expertise points which might be troublesome to breed. If you happen to’re interested by monitoring and monitoring state, routinely surfacing JavaScript errors, and monitoring sluggish community requests and element load time, attempt LogRocket. 

LogRocket is sort of a DVR for net and cell apps, recording actually every thing that occurs in your Subsequent.js app. As an alternative of guessing why issues occur, you may mixture and report on what state your utility was in when a difficulty occurred. LogRocket additionally displays your app’s efficiency, reporting with metrics like consumer CPU load, consumer reminiscence utilization, and extra.
The LogRocket Redux middleware bundle provides an additional layer of visibility into your person classes. LogRocket logs all actions and state out of your Redux shops.
Modernize the way you debug your Subsequent.js apps — begin monitoring at no cost.
