
Efficiency, efficiency, efficiency! That’s the entire level of caching.
Caching particularly helps velocity up an software’s efficiency, thereby considerably bettering its effectivity.
This text will have a look at how you can add caching performance to a NestJS app with Redis. We’ll speak about what caching is, about Redis, and go over the implementation course of.
So seize a cup of espresso (or no matter it’s you all drink as of late). That is going to be an attention-grabbing one!
What’s caching?
In computing, a cache is a ceaselessly queried, non permanent retailer of duplicate information. The information is stored in an simply accessed location to cut back latency.
Let me type an analogy to assist clarify this idea higher…
Let’s say you probably did get that cup of espresso in any case! Think about that every time you drink a little bit of it, you need to head again to your espresso machine. You replenish your cup, take a sip, and go away it there to go again to your workstation and proceed studying this text.
As a result of you need to hold going backwards and forwards to your espresso machine and cup, it takes you many hours to complete your espresso (and this text). That is what occurs with out caching.
Let’s think about a special state of affairs. Let’s say while you head over to your espresso machine on your first sip of espresso, as an alternative of taking a sip and heading again to your workspace, you replenish your cup and head again to your workstation with it in hand.
As you proceed studying this text, you all the time have your espresso at your desk. You’ll be able to shortly take a sip (decrease latency) so you’ll be able to consider this text and end it a lot quicker. That is what occurs when caching is applied.
If we’re to carry this analogy to the actual world, the espresso machine is the net server and the espresso itself is the information that’s ceaselessly queried.
What’s Redis?
In accordance with the official Redis web site, “Redis is an open supply, in-memory information construction retailer used as a database, cache, message dealer, and streaming engine.”
It’s vital to notice that Redis doesn’t deal with caching alone. It supplies information buildings like hashes, units, strings, lists, bitmaps, and sorted units with vary queries, streams, HyperLogLogs, and geospatial indexes.
Implementing Redis cache in a NestJS App
Conditions
To comply with together with this text, you’ll want the next:
- Node.js put in in your pc
- Fundamental information of JavaScript and Node.js
- NestJS Command Line Interface (CLI) put in in your pc
- Fundamental understanding of how Nest works
In the event you don’t have NestJS put in, this can show you how to rise up to hurry.
After you’ve put in the NestJS CLI in your machine, let’s go forward and arrange the Redis cache for our software.
Establishing Redis cache for our NestJS app
First, let’s create a brand new undertaking. We’ll name it redis-setup. Open the terminal after putting in NestJS and run the under line of code:
nest new redis-setup
After that, we need to choose our most well-liked package deal supervisor.
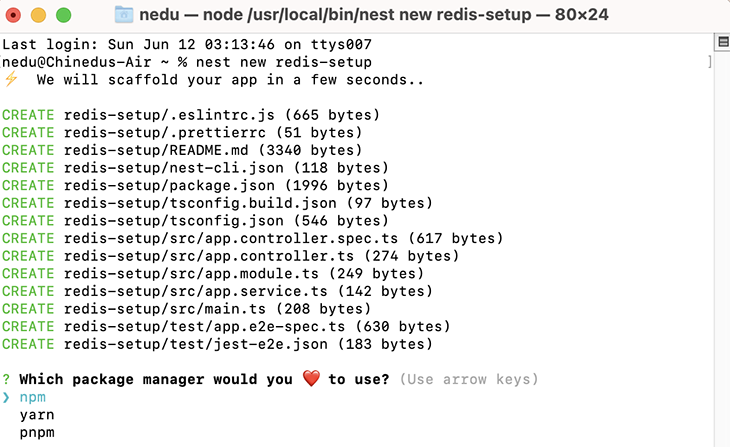
In my case, I selected npm however please decide whichever works for you! After that, the set up will proceed.
As soon as the set up is completed, we’ll see one thing just like the under screenshot. We’ve to cd into our app by operating cd redis-setup.

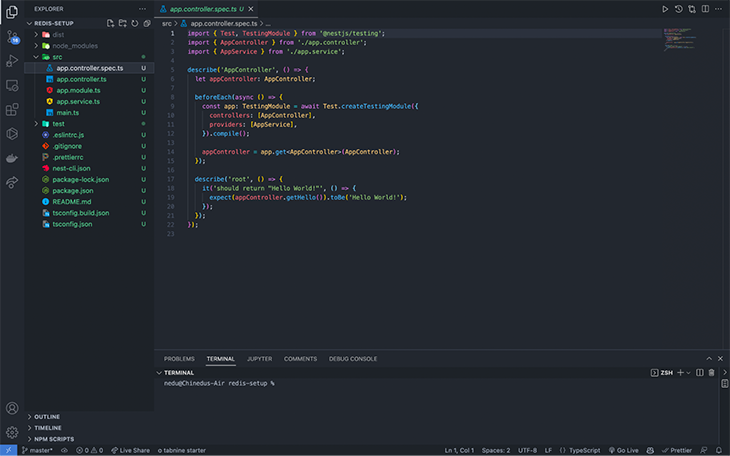
As soon as contained in the undertaking listing, we’ll run code within the terminal. This may robotically open the undertaking in VS Code, supplied that it’s put in.

Under is what our redis-setup undertaking seems to be like.
Earlier than we proceed our setup, there are 4 major packages we have to set up in our software.
Putting in packages
The primary package deal we have to set up is node-cache-manager. The Node cache module supervisor permits for straightforward wrapping of features in cache, tiered caches, and a constant interface. Set up this by operating npm set up cache-manager within the terminal.
Subsequent, we have to set up @sorts/cache-manager, the TypeScript implementation of node-cache-manager. Set up this by operating npm i @sorts/cache-manager within the terminal.
Third, we’ll set up cache-manager-redis-store. This package deal supplies a very simple wrapper for passing configuration to the node_redis package deal. Set up this by operating npm set up cache-manager-redis-store --save within the terminal
Lastly, we have to set up @sorts/cache-manager-redis-store. That is the TypeScript implementation of the cache-manager-redis-store package deal. Set up this by operating npm i --save-dev @sorts/cache-manager-redis-store within the terminal.
After we’re finished with the set up, we will proceed to configure redis-cache for our app.
Configuring redis-cache
Step one to configuring redis-cache is importing the CacheModule and calling its methodology register(). This methodology will take our Redis configurations.
//import CacheModule from @nestjs/widespread'

import { Module, CacheModule } from '@nestjs/widespread';
In our register(), which takes an object, we are going to create a property referred to as retailer and assign redisStore to it. The redisStore will signify the cache-manager-redis-store library that we put in.
//import CacheModule from '@neskjs/widespread/cache';
import { Module, CacheModule } from '@nestjs/widespread';

//import redisStore from 'cache-manager-redis-store';
import * as redisStore from 'cache-manager-redis-store';

import { AppController } from './app.controller';
import { AppService } from './app.service';

@Module({
  imports: [CacheModule.register({ store: redisStore })],
  controllers: [AppController],
  suppliers: [AppService],
})
export class AppModule {}
Subsequent, we’ll arrange one other property within the register() methodology object. We’ll add one other property referred to as host and set its worth to the default localhost. We’ll set the port to the default worth of 6379.
//import CacheModule from '@neskjs/widespread/cache';
import { Module, CacheModule } from '@nestjs/widespread';

//import redisStore from 'cache-manager-redis-store';
import * as redisStore from 'cache-manager-redis-store';

import { AppController } from './app.controller';
import { AppService } from './app.service';

@Module({
  imports: [CacheModule.register({
    store: redisStore,
    host: 'localhost', //default host
    port: 6379 //default port
  })],
  controllers: [AppController],
  suppliers: [AppService],
})
export class AppModule {}
With the above, we’ve arrange a easy, primary configuration between Redis and our NestJS software!
The second step is to inject the performance into our controller. That is so our controllers can talk with the Redis retailer. We have to inject CacheManager.
In our undertaking listing, head over to app.controller.ts. On this file, we’ll import Get, Inject, and CACHE_MANAGER from @nestjs/widespread.
//importing Get, Inject, Inject, and CACHE_MANAGER from nestjs/widespread
import { Controller, Get, Inject, CACHE_MODULE } from '@nestjs/widespread';
After that, we’ll cross in Inject and the CACHE_MANAGER token. Subsequent, we’ll import Cache from cache-manager and cross it to our cacheManager.
//importing Get, Inject, Inject, and CACHE_MANAGER from nestjs/widespread
import { Controller, Get, Inject, CACHE_MANAGER } from '@nestjs/widespread';
//import the cache supervisor
import Cache from 'cache-manager';
import { AppService } from './app.service';

@Controller()
export class AppController {
  constructor(@Inject(CACHE_MANAGER) personal cacheManager: Cache{}

  @Get()
  getHello(): string {
    return this.appService.getHello();
  }
}
N.B., The Cache class is imported from the cache-manager library, whereas the CACHE_MANAGER token is imported from @nestjs/widespread.
The CACHE_MANAGER injects the redis-cache-store, whereas Cache supplies the default methodology for Cache communication and likewise works with every other retailer.
Let’s perceive the get and set strategies of the Redis retailer.
get and set strategies
The Cache occasion has the get methodology, which we’ve got from the cache-manager package deal. This methodology allows us to get objects from the cache. null is returned if the cache is empty.
let val = await this.cacheManager.get('key');
We use the get methodology for including an merchandise to the cache. The default caching time is 5 seconds, however we will manually set the time to dwell (TTL) to anytime we want. It’s going to depend upon the app’s specs.
await this.cacheManager.set('key', 'worth', {ttl: 2000});
In our get methodology, we’ll cross the URL for checking our Redis retailer.
@Get('get-number-cache')
Subsequent, in our app.controller.ts, we’ll create a technique that will get a quantity. We’ll examine if our quantity is offered within the Redis retailer utilizing the string quantity.
const val = await this.cacheManager.get('quantity')
    if(val) {
      return {
        information: val,
        FromRedis: 'that is loaded from redis cache'
      }
    }
If so, we are going to return the information to our endpoint. However, if the information doesn’t exist in redis-store, we retailer it utilizing the important thing quantity and set the TTL to any desired worth. In our case, we’ll use 1000.
Lastly, we’ll return the saved information from our dummy database randomNumDbs. On this case, we’re producing the quantity randomly. We might use a string, however in a real-world manufacturing software, that is the place we’d get the information from the database for each first request.
if(!val){
      await this.cacheManager.set('quantity', this.randomNumDbs , { ttl: 1000 })
      return {
        information: this.randomNumDbs,
        FromRandomNumDbs: 'that is loaded from randomNumDbs'
    }
Under is the whole code:
@Controller()
export class AppController {
  //This could be our dummy database since we cannot be connecting to a database within the article
  randomNumDbs = Math.ground(Math.random() * 10)
  constructor(@Inject(CACHE_MANAGER) personal cacheManager: Cache) {}

  @Get('get-number-cache')
  async getNumber(): Promise<any> {
    const val = await this.cacheManager.get('quantity')
    if(val) {
      return {
        information: val,
        FromRedis: 'that is loaded from redis cache'
      }
    }

    if(!val){
      await this.cacheManager.set('quantity', this.randomNumDbs , { ttl: 1000 })
      return {
        information: this.randomNumDbs,
        FromRandomNumDbs: 'that is loaded from randomNumDbs'
    }
  }
}
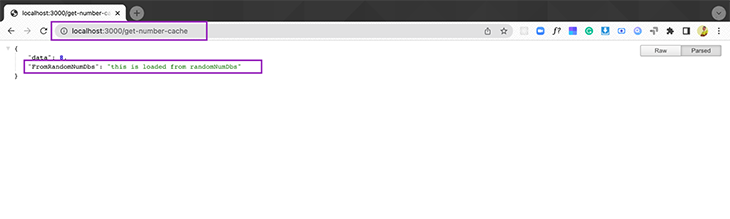
Now it’s time to run our software and check what we’ve got finished to this point. To do that within the terminal, run npm begin and go to the URL http://localhost:3000/get-number-cache within the browser.
On our first load, our request will probably be taken from our dummy, random quantity database.
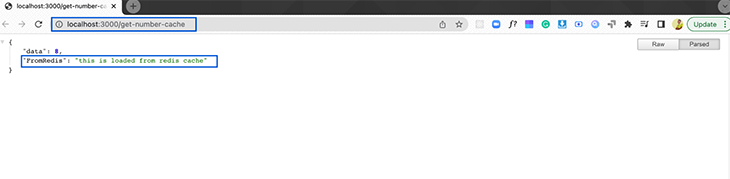
The second request (and others) will load from the Redis retailer till the cached information expires.
Redis cache additionally has two different strategies: del and reset.
del and reset strategies
If it’s not already self-explanatory, the del methodology helps us take away an merchandise from the cache.
await this.cacheManager.del('quantity');
The reset methodology, alternatively, clears the whole Redis retailer cache
await this.cacheManager.reset();
Establishing automated caching utilizing Interceptor
Auto cache allows cache for each Get motion methodology within the controller utilizing the CacheInterceptor.
In our app.module.ts file, we are going to import CacheInterceptor. Configure the expiration globally for our auto cache, utilizing the TTL property. To allow CacheInterceptor, we have to import it into the array suppliers.
//import CacheModule from '@neskjs/widespread/cache';
import { Module, CacheModule, CacheInterceptor } from '@nestjs/widespread';

//import redisStore from 'cache-manager-redis-store';
import * as redisStore from 'cache-manager-redis-store';

import { AppController } from './app.controller';
import { AppService } from './app.service';
import { APP_INTERCEPTOR } from '@nestjs/core';

@Module({
  imports: [CacheModule.register({
    store: redisStore,
    host: 'localhost', //default host
    port: 6379, //default port
    ttl: 2000, //ttl
  })],
  controllers: [AppController],
  suppliers: [
    {
      provide:APP_INTERCEPTOR,
      useClass: CacheInterceptor
    },
    AppService],
})
export class AppModule {}
Subsequent, in app.controller.ts, we import the UseInterceptor and CacheInterceptor from @nestjs/widespread.
import { Controller, Get, Inject, CACHE_MANAGER, UseInterceptors, CacheInterceptor } from '@nestjs/widespread';
We use the UseInterceptors decorator straight underneath our @controller() and cross CacheInterceptor to it. This may allow auto caching for all our Get endpoints contained in the controller.
//importing Get, Inject, Inject, and CACHE_MANAGER from nestjs/widespread
import {Controller, Get, Inject, CACHE_MANAGER, UseInterceptors, CacheInterceptor} from '@nestjs/widespread';
//import the cache supervisor
import {Cache} from 'cache-manager';
import { AppService } from './app.service';
//import Profile.ts
import {Consumer} from './shared/mannequin/Consumer';

@UseInterceptors(CacheInterceptor)
@Controller()
export class AppController {
  fakeModel:Consumer = {
    id: 1,
    title: 'John Doe',
    e-mail: '[email protected]',
    telephone: '123456789',
    deal with: '123 Essential St',
    createdAt: new Date(),
  }

  @Get('auto-caching')
  getAutoCaching() {
    return this.fakeModel;
  }
}
For auto caching, the key is the route worth. That is what will be saved in our cache, proven within the screenshot under.
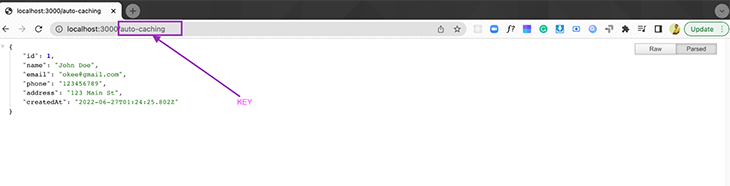
We are able to verify this in our CLI by inputting the keys * command.
In circumstances the place we need to retailer information for a selected route, we received’t use the globally outlined time and key. We are able to customise our methodology to have a special time.
In app.controller.ts, we use a decorator referred to as @CacheTTL(). For the distinctive key, we use one other decorator @CacheKey(), imported from @nestjs/widespread.
//importing Get, Inject, Inject, and CACHE_MANAGER from nestjs/widespread
import {Controller, Get, Inject, CACHE_MANAGER, UseInterceptors, CacheInterceptor, CacheKey, CacheTTL} from '@nestjs/widespread';
Specify a string that can save the information into the Redis retailer and a non-public time for our controller.
@Get('auto-caching')
  @CacheKey('auto-caching-fake-model')
  @CacheTTL(10)
  getAutoCaching() {
    return this.fakeModel;
  }
The entire code for the app.controller.ts file auto caching code is under.
//importing Get, Inject, Inject, and CACHE_MANAGER from nestjs/widespread
import {Controller, Get, Inject, CACHE_MANAGER, UseInterceptors, CacheInterceptor, CacheKey, CacheTTL} from '@nestjs/widespread';
//import the cache supervisor
import {Cache} from 'cache-manager';
import { AppService } from './app.service';
//import Profile.ts
import {Consumer} from './shared/mannequin/Consumer';

@UseInterceptors(CacheInterceptor)
@Controller()
export class AppController {
  fakeModel:Consumer = {
    id: 1,
    title: 'John Doeeee',
    e-mail: '[email protected]',
    telephone: '123456789',
    deal with: '123 Essential St',
    createdAt: new Date(),
  }

  @Get('auto-caching')
  @CacheKey('auto-caching-fake-model')
  @CacheTTL(10)
  getAutoCaching() {
    return this.fakeModel;
  }
}
Conclusion
That’s it! On this article, we went over how you can add Redis cache to a NestJS software.
Redis allows decrease software latency and really excessive information entry. This has allowed software program engineers to construct extremely performant, dependable options.
For my part, the benefits of Redis outweigh the disadvantages (if there are any). I hope I’ve shared some in-depth info on how NestJS and the Redis retailer work!
In the event you beloved this text, please remark within the remark part! Thanks for staying with me to the top of this one. Bye!!!
LogRocket: Full visibility into your net and cell apps

LogRocket is a frontend software monitoring answer that allows you to replay issues as in the event that they occurred in your individual browser. As a substitute of guessing why errors occur, or asking customers for screenshots and log dumps, LogRocket helps you to replay the session to shortly perceive what went unsuitable. It really works completely with any app, no matter framework, and has plugins to log further context from Redux, Vuex, and @ngrx/retailer.
Along with logging Redux actions and state, LogRocket data console logs, JavaScript errors, stacktraces, community requests/responses with headers + our bodies, browser metadata, and customized logs. It additionally devices the DOM to document the HTML and CSS on the web page, recreating pixel-perfect movies of even essentially the most complicated single-page net and cell apps.
