Do you wish to add a Google Maps retailer locator to your WordPress web site?
A retailer locator is a map pointing to your corporation location. If you happen to run an area enterprise, it would assist your customers to search out you on the map, get driving instructions, and share your location.
On this article, we’ll present you the right way to simply add a Google Maps retailer locator in WordPress.
Why Add Google Maps Retailer Locator in WordPress?
Loads of WordPress customers run small enterprise web sites that serve a selected city or area. This consists of companies like eating places, actual property brokers, plumbers, upkeep service suppliers, small shops, salons, and extra.
Including a Google Maps retailer locator to your web site will assist your customers to search out you. They’ll be capable to get driving instructions to your retailer and share the placement with their buddies.
It could possibly additionally assist enhance your web site’s search engine visibility and entice extra web site guests.
Let’s check out the right way to add a Google Maps retailer locator in your WordPress web site. We’ll present you each free and paid strategies with their execs and cons, then you’ll be able to select the one which most accurately fits your wants.
Technique 1: Including a Easy Retailer Locator to WordPress (Free)
This methodology is free and simple as a result of it doesn’t require the additional effort of making a Google Maps API key. It’s really useful for customers who wish to add a easy map of their retailer location.
First, it’s essential to go to the Google Maps web site in your laptop. Subsequent, enter your retailer’s handle within the search subject and Google Maps will present it on the map with a pinned marker.
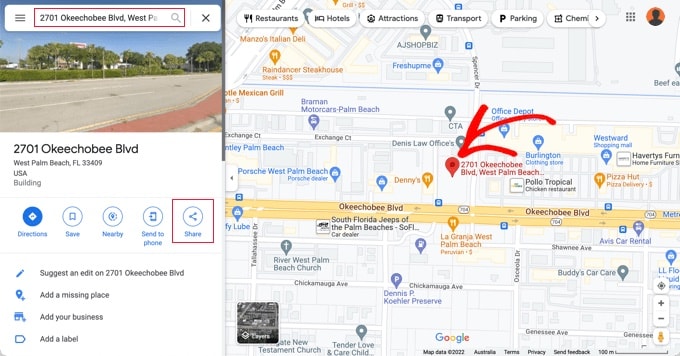
Guarantee that the marker is positioned within the right location. You may choose a zoom stage by clicking the zoom buttons within the backside proper nook.
As soon as you’re glad with how the map appears, it’s essential to click on on the share button from the left column. This may carry up a popup the place it’s essential to change to the ‘Embed a Map’ tab.
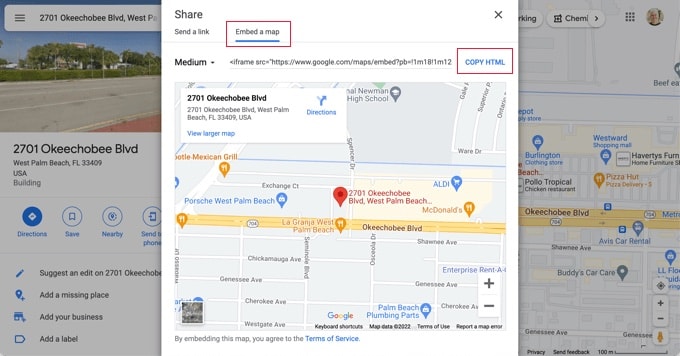
You’ll now see your searched location on the map with HTML code. You need to click on the ‘Copy HTML’ hyperlink to get the embed code.
Now head over to the admin space of your WordPress web site and edit the submit or web page the place you wish to show the shop locator map.
Usually, customers add a retailer locator map on their contact kind web page with their enterprise telephone quantity and open hours.
On the submit edit display, it’s essential to add a ‘Customized HTML’ block.

You need to paste the code you copied from Google Maps into the textual content space of the ‘Customized HTML’ block.
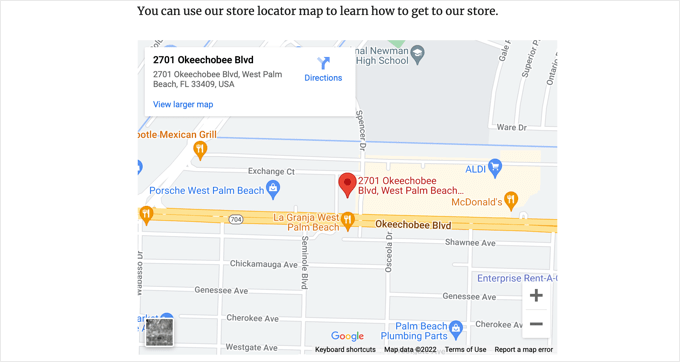
Now you can preview the web page to see Google Maps embedded into your web page. It can present your retailer location marked on the map with hyperlinks to get instructions there or to avoid wasting the placement.
This methodology works for rapidly embedding Google maps, nevertheless it doesn’t provide you with most website positioning advantages. In different phrases, it gained’t assist you to to rank increased and get extra site visitors from engines like google or Google map searches.
If you happen to’re a small enterprise, restaurant, or on-line retailer in a number of bodily areas, then we advocate utilizing the following answer to enhance your native website positioning rankings.
Technique 2: Including a Retailer Locator With Native website positioning (Beneficial)
Practically 46% of all searches on Google have native intent. All in One website positioning (AIOSEO) is the finest WordPress website positioning plugin available on the market and helps you carry extra free site visitors from engines like google to your web site.
With AIOSEO, you’ll be able to enter your retailer areas, contact particulars, and enterprise hours utilizing schema markup in order that data is displayed on search engine outcomes pages.
For instance, while you search Google for ‘Mcdonald’s areas in Florida,’ you can be proven a featured snippet with the completely different locations and a map with pinned areas.

This may assist enhance your web site’s website positioning rankings and improve your click on fee in search.
Word: You’ll want at the least the AIOSEO Plus plan to entry the Native website positioning function wanted for this tutorial.
First, it’s essential to set up and activate the AIOSEO for WordPress plugin. For extra particulars, see our step-by-step information on the right way to set up a WordPress plugin.
Upon activation, the plugin will run a setup wizard. If you happen to need assistance configuring the plugin, then please check out our information on the right way to arrange AIOSEO for WordPress.

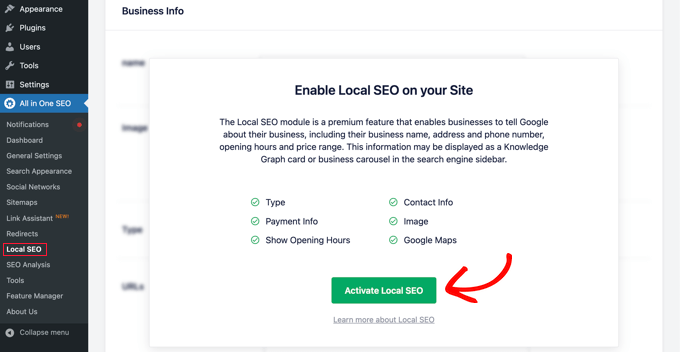
As soon as the setup course of is full, you’ll want to move over to All in One website positioning » Native website positioning in your WordPress dashboard.
You may click on the ‘Activate Native website positioning’ button to get began configuring the native settings.
Subsequent, it’s essential to click on the ‘Maps’ tab on the high Native website positioning web page.
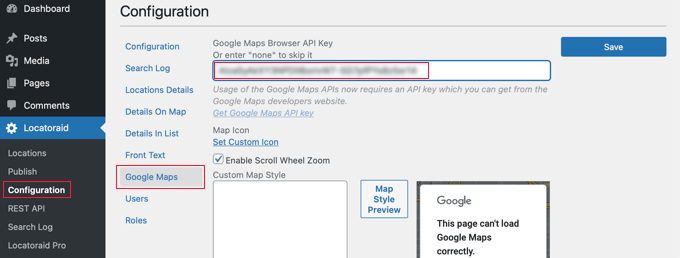
On the Maps web page, it’s best to see the ‘API Key’ subject.
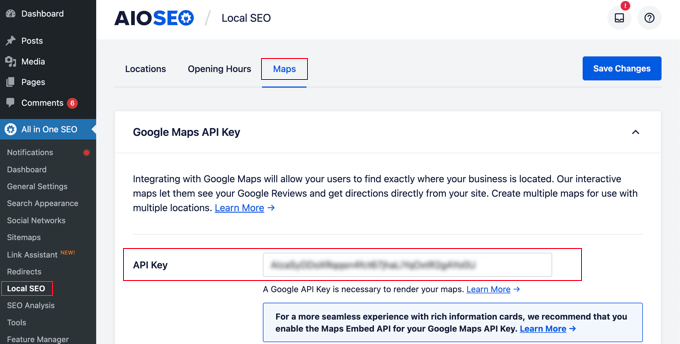
You may receive an API key for Google Maps by going to the Google Maps Platform and logging in along with your Google account.
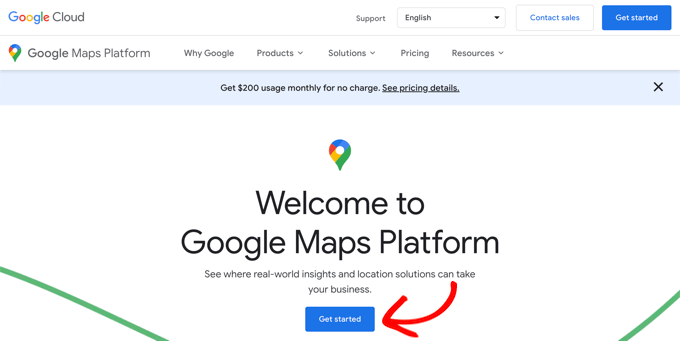
After that, it’s best to click on the ‘Get Began’ button.
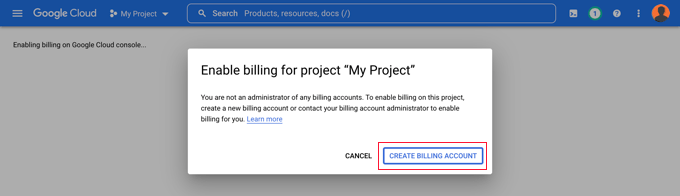
Google Cloud sources are organized by challenge. If you happen to don’t have already got a challenge, then one will probably be created for you mechanically.
Word that you will want to allow billing for the challenge as a way to use the Google Maps API. Nevertheless, it’s unlikely you’ll ever pay something.
Map embed requests are free with limitless utilization as detailed in Google’s documentation, and also you’re additionally given $200 of month-to-month credit score every month.
That you must click on the ‘Create Billing Account’ button.
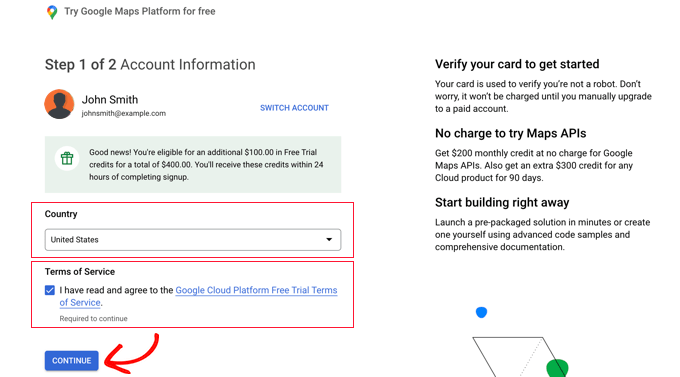
You’ll now see the Account Data web page. You need to choose your nation from the drop-down menu and conform to the phrases of service.
Whenever you’re prepared, click on the ‘Proceed’ button.
Now it’s essential to choose an present funds profile or create a brand new one.
The profile will probably be both for a person or a enterprise and can embrace the title of the person or enterprise, a fee methodology, and an handle.
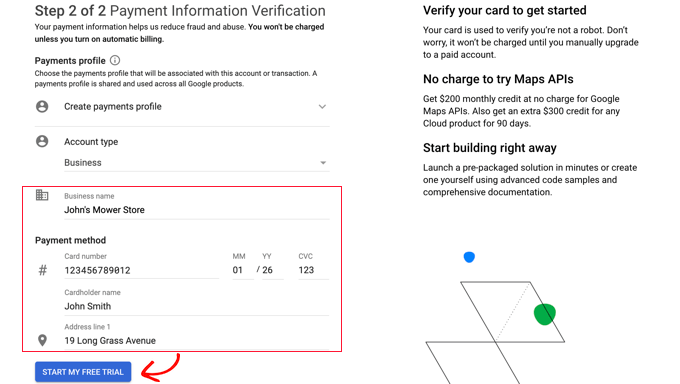
When you’ve entered that data, it’s essential to click on the ‘Begin My Free Trial’ button.
Don’t fear concerning the ‘Free Trial’ wording. Map embed requests stay free even when the free trial has ended, and your bank card won’t ever be charged till you manually improve to a paid account.
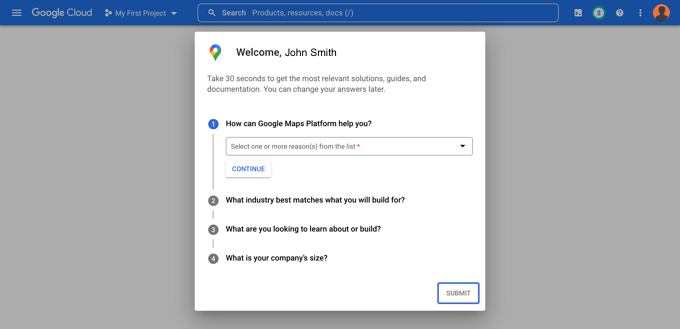
You may additionally be requested to fill in a 30-second survey of your corporation to be sure you are given essentially the most related data.
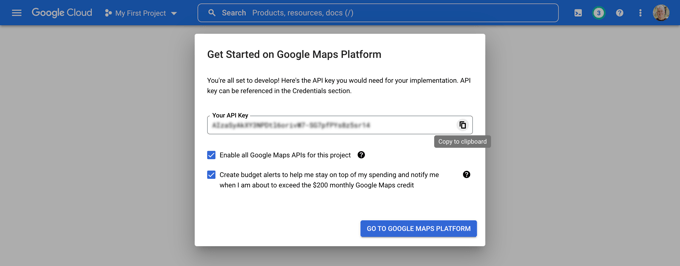
Whenever you click on the ‘Submit’ button, your Google Maps API key will probably be displayed. You’ll need to enter this key into the plugin settings for Strategies 2 and three.
Then, you’ll be able to click on the ‘Copy to Clipboard’ icon on the finish of the ‘Your API Key’ subject. When you’ve finished that, simply dismiss the popup by clicking the ‘Go to Google Maps Platform’ button.
Limiting Your Google Maps API Key
We advocate that you simply prohibit the important thing in order that it might probably’t be utilized by others.
After you create your API key, Google will present a ‘Shield your API key’ popup the place you’ll be able to prohibit your key so it solely works by yourself web site.
Within the ‘Choose restriction sort’ drop down, it’s essential to choose ‘HTTP referrers (internet sites).’ Then within the subsequent subject, it’s best to sort your web site area title into the ‘New merchandise’ subject utilizing the sample *instance.com/*.
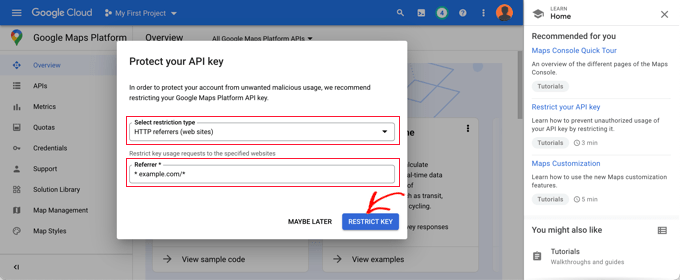
You need to see a message saying, ‘Efficiently restricted your API key.’ Now the important thing will solely work for Google Maps embedded in your particular web site.
Again in your web site, it’s best to enter your API key within the subject. Subsequent, you’ll be able to scroll right down to edit the map settings.
AIOSEO enables you to show Google Maps utilizing a Gutenberg (WordPress editor) block, shortcode, widget, or PHP code. It additionally enables you to select completely different map kinds and add a customized marker to your map.

For this tutorial, be sure the ‘Gutenberg Block’ setting is chosen. Don’t overlook to click on the ‘Save Modifications’ button while you’re finished.
Now you’ll be able to create your retailer locator map. The way you do that is dependent upon whether or not your corporation has only one retailer or a number of areas.
Including a Map for a Single Location
If your corporation operates out of a single bodily location, then the map will use the data you present on All in One website positioning’s ‘Places Settings’ web page.
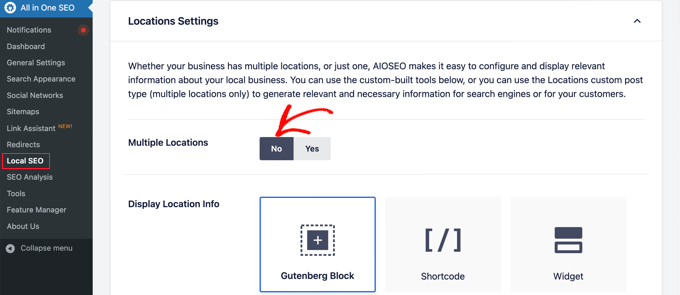
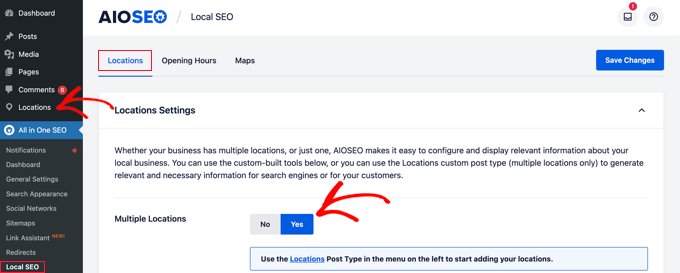
Go forward now and change to the ‘Places’ tab of the All in One website positioning » Native website positioning web page.
Since you have got a single bodily location, it’s best to make it possible for the ‘A number of Places’ possibility is ready to ‘No’.
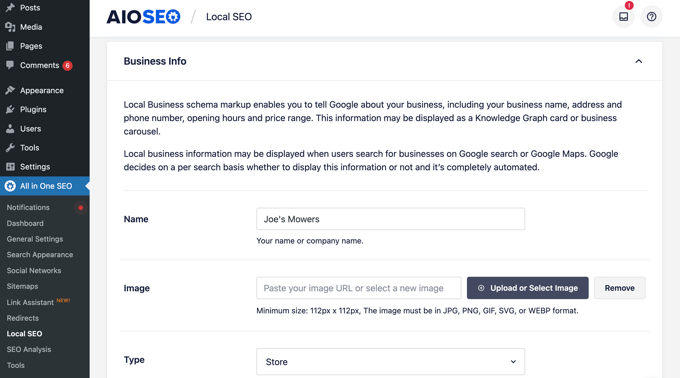
Subsequent, it’s best to scroll right down to the ‘Enterprise Data’ part and fill in as a lot details about your corporation as potential.
That is essential as a result of the data could also be displayed when somebody searches for your corporation utilizing Google search or Google Maps.
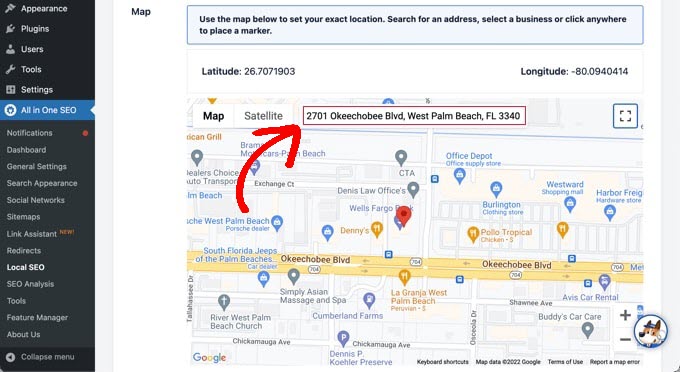
After that, scroll right down to the ‘Maps’ part to pin your actual location.
Merely enter your handle within the ‘Enter a question’ subject. A pin will probably be added at that location, and you may transfer the pin by dragging it to a brand new location if mandatory.
Whenever you’re completed, it’s essential to scroll to the highest or backside of the web page and click on the ‘Save Modifications’ button to retailer your settings.
Now you’ll be able to add your retailer locator map to any WordPress submit or web page. To begin, merely edit or add a brand new submit or web page in your web site.
When you’re within the block editor, click on the ‘+’ button on the high and add the ‘AIOSEO Native – Map’ block anyplace on the web page. Be sure to click on the ‘Replace’ or ‘Publish’ button while you’re completed.
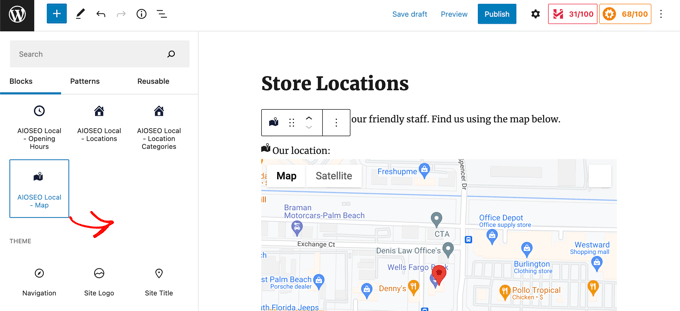
Congratulations, you have got efficiently added a Google Maps retailer locator to your web site.
Including Maps for A number of Places
So as to add a map for a unique location, it’s essential to navigate to the Places tab of the All in One website positioning » Native website positioning web page. As soon as there, it’s essential to click on the ‘Sure’ possibility for A number of Places, after which click on the ‘Save Modifications’ button on the high of the display.
When you save your modifications, you’ll discover {that a} new Places customized submit sort has been added to the admin sidebar. That is the place you’ll enter your corporation areas.
Go forward and navigate to Places » All Places after which click on the ‘Add New’ button.

This may take you to the Places editor. You’ll need so as to add a title for the placement you’re including, such because the title of the shop or the city.
Now it’s best to scroll right down to the ‘AIOSEO Native Enterprise’ part of the web page, underneath the submit content material.
Be sure to enter as a lot data as potential as a result of it could be displayed when somebody searches for your corporation in Google search or Google Maps.
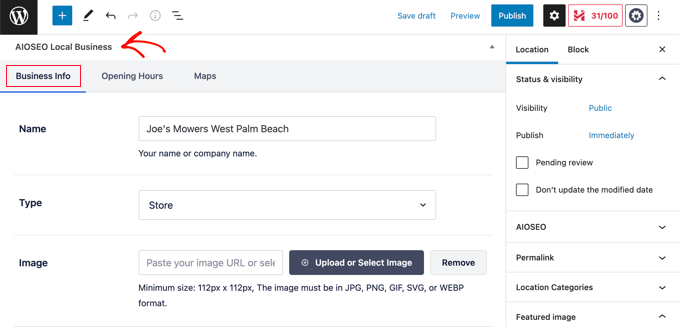
After that, it’s best to discover the ‘Maps’ part and enter your handle within the ‘Enter a question’ subject.
A pin will probably be displayed at that location.

After getting into your location on the map and including location data, go forward and click on the ‘Publish’ button.
Now you can repeat this step and add your different enterprise areas.
When you’ve completed, you’ll be able to add a retailer locator map to your web site for every location by utilizing the ‘AIOSEO Native – Map’ block within the WordPress editor.
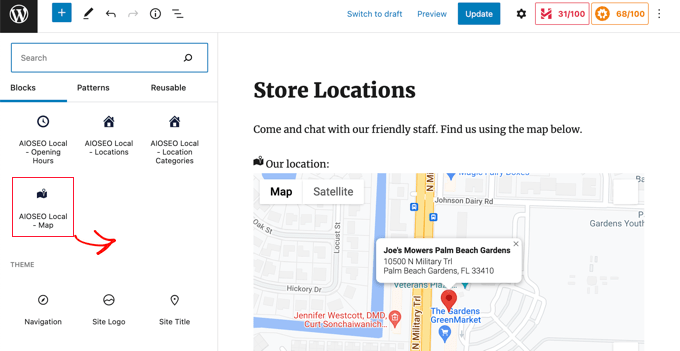
Now you’ll need to decide on which location to show on the map.
To do this, have a look at the block settings pane on the appropriate of the display, and select the shop you want to show from the ‘Location’ drop-down menu.
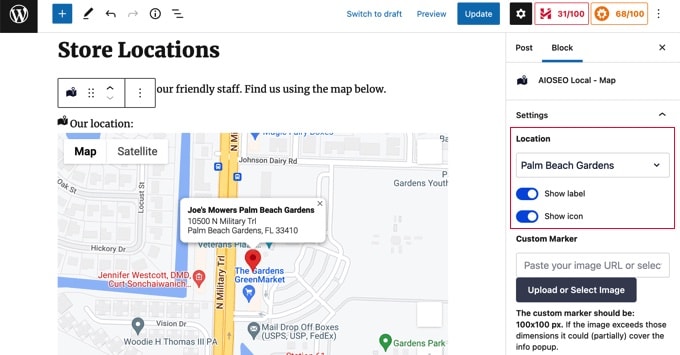
Merely add extra native map blocks for every other areas. Don’t overlook to click on the ‘Publish’ or ‘Replace’ button on the high of the web page to show the maps in your web site.
Technique 3: Displaying A number of Retailer Places on a Single Map
The primary two strategies allow you to add retailer locator maps with a single location. When you have a number of areas, then it’s essential to add a separate map for every one.
Alternatively, you should use our third methodology to show a number of areas on a single map.
The very first thing it’s essential to do is set up and activate the Locatoraid Retailer Locator plugin. For extra particulars, see our step-by-step information on the right way to set up a WordPress plugin.
On activation, it’s essential to go to Locatoraid » Configuration and arrange the plugin.
Within the ‘Google Maps’ tab, you’ll want to stick a Google Maps API key. You may observe the strategy above in Technique 2 to create one.
Then it’s essential to click on the ‘Save’ icon to retailer the important thing. You need to discover that Google Maps is ready to load accurately within the ‘Map Type Preview’ window.
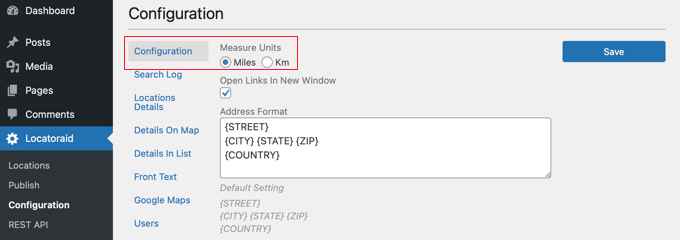
Subsequent, you’ll be able to go to the ‘Configuration’ tab and select whether or not to show miles or kilometers on the map.
You may also verify the opposite choices, such because the handle format, the main points you wish to show on the map, and which customers can use the plugin.
As soon as you’re pleased with the plugin’s settings, be sure you click on the ‘Save’ button to retailer your settings.
Now you’re prepared so as to add your retailer areas. You need to navigate to Locatoraid » Places. As soon as there, it’s essential to click on the ‘Add New’ button.
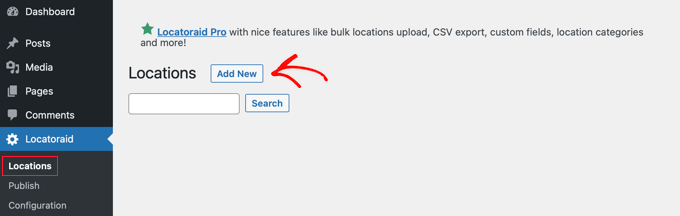
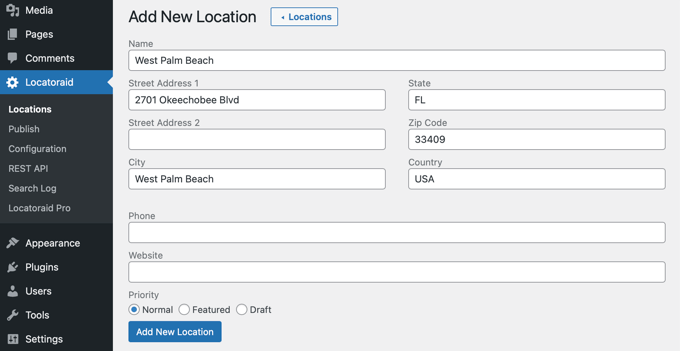
This may take you to the ‘Add New Location’ web page. Right here you’ll be able to sort the shop title, location, and different particulars.
Whenever you end, it’s best to click on the ‘Add New Location’ button on the backside of the web page.
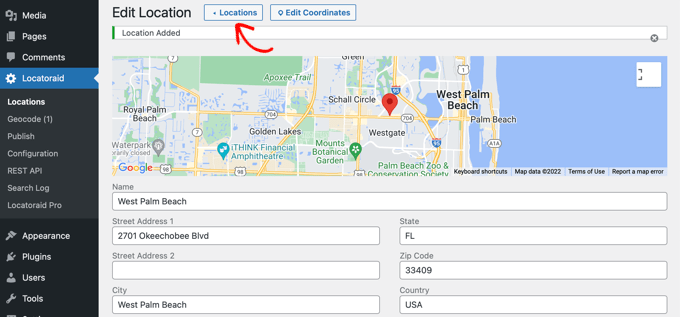
You may be taken to the ‘Edit Location’ web page the place you’ll be able to see the shop location on a map.
If every thing appears good, then it’s best to click on the ‘< Location’ button on the high of the display to return to the Locatoraid » Places web page in your dashboard.
You may add extra areas by clicking the ‘Add Location’ button and repeating these steps.
As soon as your entire retailer areas have been created, you’ll be able to add the map to your web site.
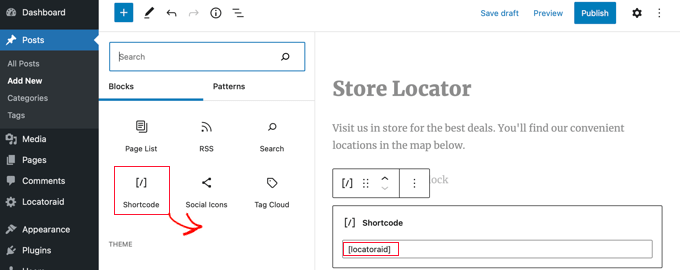
Merely add or edit a web page and click on the blue ‘+ Add Block’ icon. You need to drag a Shortcode block onto the web page after which enter the shortcode [locatoraid] into the sector.
This default shortcode will work effectively for many web sites. Nevertheless, you’ll be able to customise the map by utilizing a unique shortcode. Go to the Locatoraid » Publish web page to study extra.
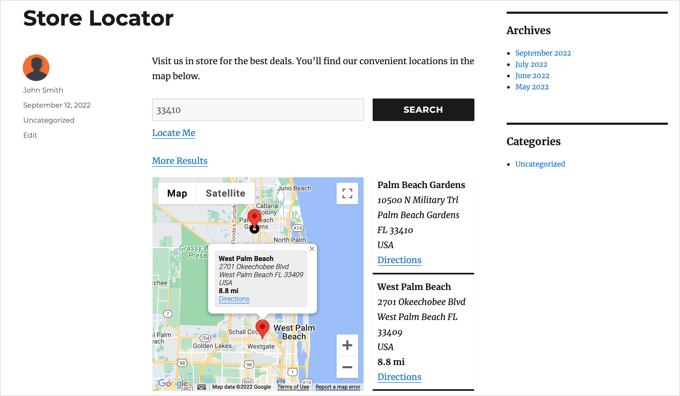
Now you’ll be able to publish or replace the web page and go to your web site to see your retailer locator map.
Your entire retailer areas will probably be displayed on the identical map. In case your customers sort their handle or click on the ‘Find Me’ hyperlink, then they’ll discover the closest shops and get instructions.
We hope this tutorial helped you learn to add a Google Maps retailer locator in WordPress. You may additionally wish to study the right way to create a free enterprise e mail handle or take a look at our checklist of the perfect AI chatbots to your web site.
If you happen to preferred this text, then please subscribe to our YouTube Channel for WordPress video tutorials. You may also discover us on Twitter and Fb.


