
For a very long time, JavaScript has been the dominant language in frontend growth as a result of its capability to run natively within the browser and work together with HTML and CSS by means of the DOM API. With the appearance of WebAssembly, issues have began to vary slowly. Languages similar to Go, Rust, C, C++, and plenty of others can now run within the browser at near-native speeds, and Python hasn’t been left behind.
With the introduction of PyScript, frontend builders can now construct wealthy frontends with Python. Moreover, they will additionally faucet into the Python ecosystem, which has helpful scientific modules similar to NumPy, Matplotlib, and plenty of extra.
On this tutorial, we’ll cowl the next:
Conditions
To get essentially the most of this tutorial, you’ll want:
- A fundamental understanding of HTML, CSS, and JavaScript
- Familiarity with Python syntax
- An internet server. We’ll create a easy server utilizing Python, so be sure you have Python put in in your system
- An internet browser; PyScript documentation at the moment recommends Chrome
What’s PyScript?
PyScript is an open supply internet framework that permits you to create frontend internet purposes utilizing Python. With PyScript, you may both embed Python code in HTML, or hyperlink to a Python file and the code will execute within the browser — with out operating Python within the backend.
PyScript was created by Anaconda and was publicly introduced on April 30 at PyCon US 2022. On the time of writing, PyScript is in an alpha state and is actively being developed, so breaking modifications and newer options are to be anticipated because it hasn’t been stably launched but.
How does PyScript work?
PyScript builds upon Pyodide, which ports CPython to WebAssembly. WebAssembly is a low-level binary format that permits you to write applications in different languages, that are then executed within the browser. With CPython in WebAssembly, we will set up and run Python packages within the browser, whereas PyScript abstracts a lot of the Pyodide operations, permitting you to deal with constructing frontend apps with Python within the browser.
Establishing your challenge folder for PyScript
Earlier than we begin utilizing PyScript, let’s create the listing the place our code will reside.
To do this, open your terminal and create the challenge listing utilizing the mkdir command within the location of your selecting:
mkdir pyscript_demo
Subsequent, transfer into the listing you simply created utilizing the cd command:
Extra nice articles from LogRocket:
cd pyscript_demo
Typically, frontend builders use auto-formatting instruments like Prettier of their textual content editors to format code on save. Whereas this works effectively for HTML, CSS, and JavaScript, this may trigger points in Python code as a result of Python is strict about indentation.
At the moment, auto-formatting instruments like Prettier don’t acknowledge PyScript syntax, which is nearly two months previous as of this writing. These instruments auto-format Python code like JavaScript, which breaks the code indentation. To treatment this, we’ll disable auto-formatting for this listing for now.
Assuming you’re utilizing VSCode, we will disable auto-formatting as follows.
In your challenge listing, create a .vscode listing and navigate into the listing with the next command.
mkdir .vscode && cd .vscode
Subsequent, create a settings.json file and add the next contents:
{
  "editor.formatOnSave": false
}
With that, the auto-format on save function for this listing has been disabled in VSCode and we are actually prepared to begin utilizing PyScript.
Getting began
Now that our listing is ready up for PyScript, we’ll first add hyperlinks to the PyScript belongings comprising of a CSS file and JavaScript file within the <head> part of an HTML web page.
As soon as the belongings have been added, you should utilize PyScript in an HTML file in both of two methods:
- Inside PyScript: You’ll be able to write and place your Python code inside the
<py-script>tag in an HTML file. The<py-script>tag will be added within the<head>or<physique>tag relying in your process at hand - Exterior PyScript: That is the place you write your Python code in a file ending with
.pyextension, which you’ll then reference within the<py-script>tag utilizing thesrcattribute
Inside PyScript
The best and quickest solution to begin utilizing PyScript is to embed Python code within the HTML file. Let’s try this!
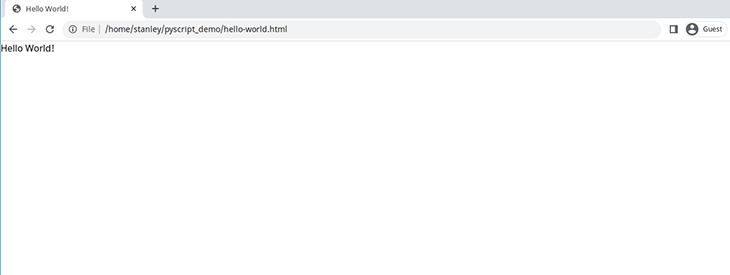
Open your most popular textual content editor, create the hello-world.html file and add the next contents:
<!DOCTYPE html>
<html lang="en">
  <head>
    <meta charset="utf-8" />
    <meta title="viewport" content material="width=device-width, initial-scale=1" />
    <title>Howdy World!</title>
    <!-- linking to PyScript belongings -->
    <hyperlink rel="stylesheet" href="https://pyscript.web/alpha/pyscript.css" />
    <script defer src="https://pyscript.web/alpha/pyscript.js"></script>
  </head>
  <physique>
  <!-- Put Python code contained in the the <py-script> tag -->
    <py-script>print("Howdy World!")</py-script>
  </physique>
</html>
Within the <head> part, we hyperlink to the pyscript.css file, which incorporates kinds for PyScript visible elements, REPL, the PyScript loader, and so on. After that, we hyperlink to the pyscript.js file, which units up the required options for utilizing PyScript, similar to creating tags like <py-script> the place you may write your Python code.
Within the <physique> tag, you embed Python code within the <py-script> tag. We’re maintaining issues easy for now, so we simply print Howdy World to the consumer.
Be certain that to save lots of your file within the root of your challenge listing and open the hello-world.html file in Chrome. It would take a few seconds to load, and as soon as the web page has been loaded, it is going to look much like this:
Exterior PyScript
Whereas placing Python code within the <py-script> tag works, a a lot better and extra scalable method is so as to add the code in an exterior file and reference it within the HTML file as you create extra HTML pages or your scripts get bigger.
The next are a few of the the reason why it is best to think about using PyScript code in an exterior file:
- The file will be cached by the browser, resulting in sooner efficiency
- You’ll be able to reference the file in a number of pages, lowering duplication
- Your Python code will be formatted with instruments like black or Python linters. These instruments don’t at the moment work on Python code embedded in an HTML file
To make use of PyScript externally, we’ll create an index.html file, a Python file ending with .py extension containing our Python code, and at last reference the Python file within the index.html file.
Creating the index.html file
Create an index.html file and hyperlink to the PyScript belongings:
<!DOCTYPE html>
<html lang="en">
  <head>
    <meta charset="utf-8" />
    <meta title="viewport" content material="width=device-width, initial-scale=1" />
    <title>Greetings!</title>
    <!-- linking to PyScript belongings -->
    <hyperlink rel="stylesheet" href="https://pyscript.web/alpha/pyscript.css" />
    <script defer src="https://pyscript.web/alpha/pyscript.js"></script>
  </head>
  <physique>
  </physique>
</html>
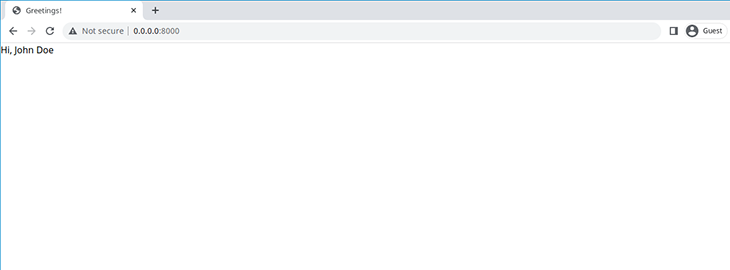
The file isn’t doing a lot; we’re simply linking to the PyScript assets. To make it extra helpful, we’ll create a essential.py file the place our Python code will reside.
Creating the essential.py file
Let’s create a Python perform that prints a greeting message.
In your textual content editor, create the essential.py file and add the code under:
def greetings(title):
    print(f'Hello, {title}')

greetings('John Doe')
The greetings() perform takes a title parameter and prints a greeting message with the title saved within the title parameter. After we name the greetings() perform with John Doe as an argument, it prints hello, John Doe.
Linking the essential.py file within the HTML file
Now that you simply’ve created the Python code, you’ll reference the essential.py file within the index.html file.
Open the index.html and add the road contained in the <physique> tag:
<!DOCTYPE html>
<html lang="en">
  <head>
    <meta charset="utf-8" />
    <meta title="viewport" content material="width=device-width, initial-scale=1" />
    <title>Greetings!</title>
   <hyperlink rel="stylesheet" href="https://pyscript.web/alpha/pyscript.css" />
    <script defer src="https://pyscript.web/alpha/pyscript.js"></script>
  </head>
  <physique>
  // add the next line
  <py-script src="https://weblog.logrocket.com/pyscript-run-python-browser/./essential.py"></py-script>
  </physique>
</html>
The <py-script> tag has a src tag, which accepts file path of the Python file.
Opening the index.html file within the browser
Now that every little thing is in place, we’ll open the index.html within the browser.
Nevertheless, browsers will refuse to load and execute the exterior Python file as a result of Cross-Origin Useful resource Sharing (CORS) coverage error. To resolve this, we might want to use a server. Good factor Python ships with an online server that we will use! The server doesn’t must be created by Python, you should utilize live-server or any server of your selecting.
To create a server, open the terminal within the root listing of your challenge and run the next command:
python -m http.server
Subsequent, open Chrome and go to http://0.0.0.0:8000/. The server will mechanically load the index.html file and you will notice the next:
For the remainder of this tutorial, we will probably be referencing an exterior Python file, which would require us to make use of a server to keep away from CORS errors, and typically we’ll embed Python code in HTML for brevity sake.
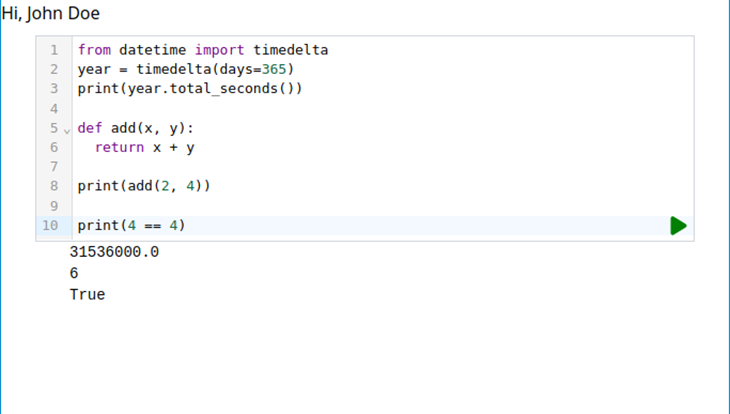
Utilizing the PyScript REPL
PyScript comes with a Learn-Eval-Print Loop (REPL), which you should utilize to experiment and check out Python code.
To make use of the REPL, add the <py-repl> tag within the <physique> tag in your index.html file:
<!DOCTYPE html>
  ...
  <physique>
  <py-script src="https://weblog.logrocket.com/pyscript-run-python-browser/./essential.py"></py-script>
  // add the next tag
  <py-repl></py-repl>
  </physique>
</html>
With the server nonetheless operating, go to http://0.0.0.0:8000/. You will note a brand new part the place you may enter Python code.
You’ll be able to import modules, consider expressions, create capabilities, and do many extra issues. To see what an expression evaluates to, you have to click on the inexperienced Play icon.
The next image exhibits a few of the operations you are able to do:
Now that we now know the best way to use a REPL, subsequent we’ll discover ways to create and use modules in PyScript.
Utilizing Python modules in PyScript
On this part, we’ll create a customized Python module and use it in our code. We may even use modules from the Python commonplace library, in addition to third-party modules.
To make use of modules, we’ll introduce a brand new tag, <py-env>, which permits us to reference modules or module file paths.
Creating customized modules
Let’s create a neighborhood module containing two capabilities.
Create a mathslib.py file in your challenge listing and add the code under:
def add(num1, num2):
    return num1 + num2

def subtract(num1, num2):
    return num1 - num2
Right here we created two capabilities that do addition and subtraction operations.
Subsequent, create a modules.html file and add the next contents:
<!DOCTYPE html>
<html lang="en">
  <head>
    <meta charset="utf-8" />
    <meta title="viewport" content material="width=device-width, initial-scale=1" />
    <title>native modules</title>
    <!-- linking to PyScript belongings -->
    <hyperlink rel="stylesheet" href="https://pyscript.web/alpha/pyscript.css" />
    <script defer src="https://pyscript.web/alpha/pyscript.js"></script>
  </head>
  <physique>
 <py-env>
    - paths:
        - mathslib.py
  </py-env>
  <py-script>
from mathslib import subtract
print(subtract(8, 4))
  <py-script>
  </physique>
</html>
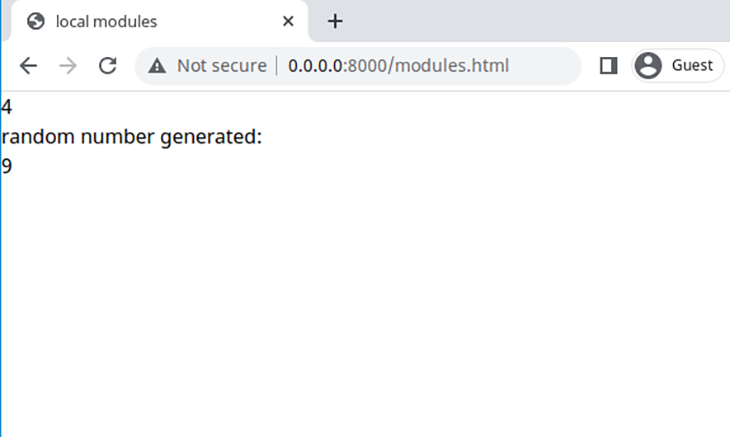
Within the <physique> tag, we use the <py-env> tag, which accepts a YAML checklist that has paths as its key. The mathslib.py is the file path of the customized module relative to the modules.html file. As soon as the trail to the customized module is specified, PyScript will import the module within the file.
With the module loaded, within the <py-script> tag, we import the subtract() perform from mathslib.py and invoke the perform with the arguments 8 and 4.
With the server operating, go to http://0.0.0.0:8000/modules.html and you will notice a web page much like this:

Importing modules from the Python commonplace library
PyScript, with the assistance of Pyodide, gives entry to plenty of modules obtainable within the Python commonplace library which might be prepared so that you can use, aside from the next:
Go to the Pyodide documentation to see a complete checklist. Additionally, be aware of the modules which might be included however not purposeful, such because the multiprocessing, threading, and sockets modules.
The modules in the usual library can be found within the PyScript namespace by default; you solely must import them to make use of them within the file.
Nonetheless within the modules.html file, modify the Python code within the <py-script> tag to generate a random quantity utilizing the random module:
from mathslib import subtract
import random
print(subtract(8, 4))
print("random quantity generated: ")
print(random.randint(1, 12))
Now go to the http://0.0.0.0:8000/modules.html web page and you will notice a random quantity generated every time you refresh the web page:
Utilizing third-party packages
Other than utilizing inbuilt Python modules, it’s also possible to use third-party libraries shipped in Pyodide, similar to:
For a full checklist of supported third-party packages, go to the Pyodide documentation or preserve an in depth eye on the Pyodide GitHub repo.
So as to add a third-party bundle, create a brand new HTML file, third-party.html, and add the next code:
<!DOCTYPE html>
<html lang="en">
<head>
<meta charset="utf-8" />
<meta title="viewport" content material="width=device-width, initial-scale=1" />
<title>native modules</title>
<!-- linking to PyScript belongings -->
<hyperlink rel="stylesheet" href="https://pyscript.web/alpha/pyscript.css" />
<script defer src="https://pyscript.web/alpha/pyscript.js"></script>
</head>
<physique>
<!-- thirdparty dependencies added right here -->
<py-env>
- numpy
- matplotlib
</py-env>
<py-script>
import numpy as np
import matplotlib.pyplot as plt
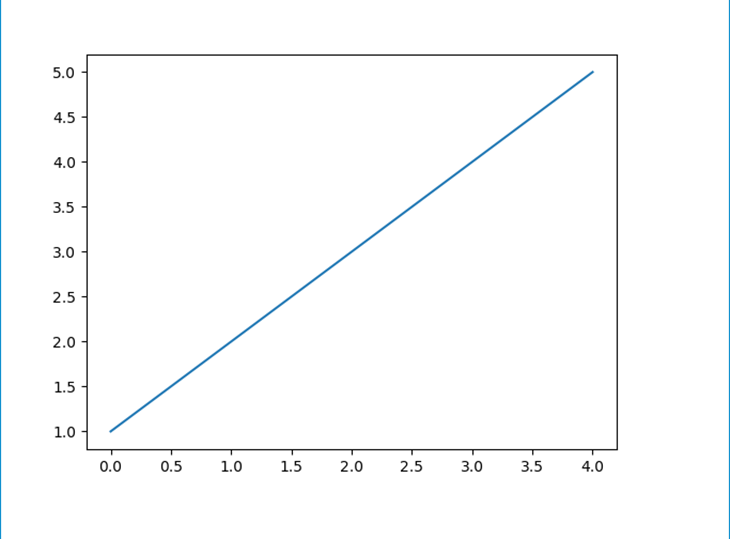
arr = np.array([1, 2, 3, 4, 5])
plt.plot(arr)
plt
<py-script>
</physique>
</html>
Within the <py-env> tag, we add an inventory of third-party packages we need to use in our challenge, that are the NumPy and Matplotlib packages. Subsequent, within the <py-script> tag, we import NumPy as np and Matplotlib as plt. Following this, we name NumPy’s array technique, which creates an array that’s then saved within the arr variable. After that, we name the Matplotlib’s plot technique with the array arr as an argument to plot a graph.
Be certain that your file is saved and go to the http://0.0.0.0:8000/third-party.html web page. It is best to see a graph much like the next:
Now that you simply perceive the best way to use customized, inbuilt modules and third-party packages, we’ll discover ways to entry and manipulate HTML components within the subsequent part.
Accessing and manipulating HTML components utilizing PyScript
On this part, we’ll discover ways to choose an HTML factor utilizing an ID or a CSS class, modify a component, connect occasions to a component, and create new components utilizing PyScript.
Utilizing the Component class
PyScript ships with the Component class, which lets you choose an HTML factor utilizing its ID.
To see the way it works, create an components.html file and insert the next contents:
<!DOCTYPE html>
<html lang="en">
<head>
<meta charset="utf-8" />
<meta title="viewport" content material="width=device-width, initial-scale=1" />
<title>Component class</title>
<hyperlink rel="stylesheet" href="https://pyscript.web/alpha/pyscript.css" />
<script defer src="https://pyscript.web/alpha/pyscript.js"></script>
</head>
<physique>
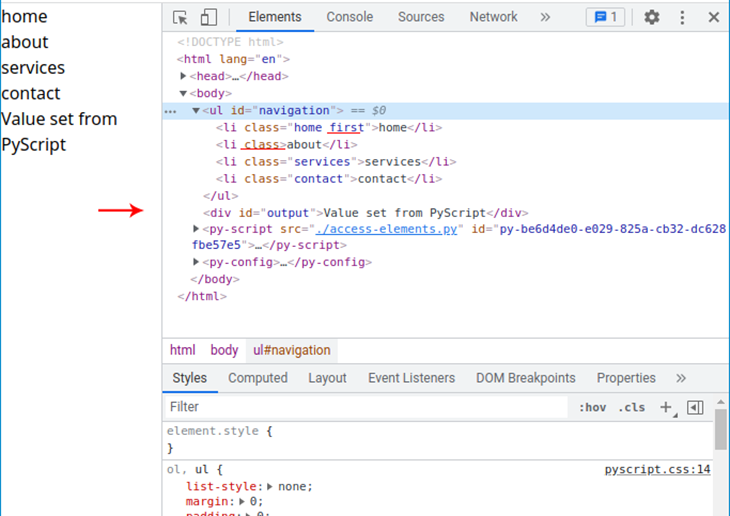
<ul id="navigation">
<li class="house">house</li>
<li class="about">about</li>
<li class="companies">companies</li>
<li class="contact">contact</li></ul>
</div>
<div id="output"></div>
<py-script src="./access-elements.py"></py-script>
</physique>
</html>
Within the <physique> tag, we’ve got a <ul> factor with an ID of navigation. We’ll use the ID to pick this factor utilizing the Component class. The chosen occasion will give us strategies that we will use to pick the descendants and manipulate them.
One other tag we’ll use is the <div> with an ID of output. We’ll modify its innerHTML to put in writing a brand new worth. Lastly, after the <div> tag, we hyperlink to the access-elements.py file that can comprise our Python code. It doesn’t exist but, so let’s go forward and create it.
When you create the access-elements.py file, add the next code to it:
ul_element = Component("navigation")
first_element = ul_element.choose('.house').add_class('first')
second_element = ul_element.choose('.about').remove_class('about')
div_element = Component("output")
div_element.write("Worth set from PyScript")
Within the previous code, we use the Component class to entry the <ul> factor utilizing the navigation ID.
When a component is chosen utilizing the Component class, you may reap the benefits of a few of the following strategies:
write(): Units theinnerHTMLworthchoose(): Makes use of a CSS selector to search out descendant componentsadd_class(): Provides a number of courses to a componentremove_class(): Removes a number of courses from a component
Within the second line, we use the choose() technique to pick the primary baby factor of the <ul> factor utilizing its class title, house. After deciding on the kid, we name the add_class() technique so as to add a brand new class first to the <li> factor.
Within the third line, we entry the second baby factor by its class title, about, after which take away its class about utilizing the remove_class() technique.
Subsequent, we name the Component class with the ID output, which gives a reference to the <div> factor that resides after the ul factor within the components.html file. Lastly, we name the write() technique with the string Worth set from PyScript. The strategy will set <div> factor innerHTML worth to the string argument.
With the server nonetheless up, go to http://0.0.0.0:8000/components.html and examine the <ul> factor. You will note the primary <li> factor now has an additional class (first), the second factor has no class, and the div factor now has the textual content we set in Python.
Attaching occasions to components
We are able to now choose HTML components and do some fundamental manipulations. On this part, we’ll connect a click on occasion to a component and have Python code execute when the factor has been clicked.
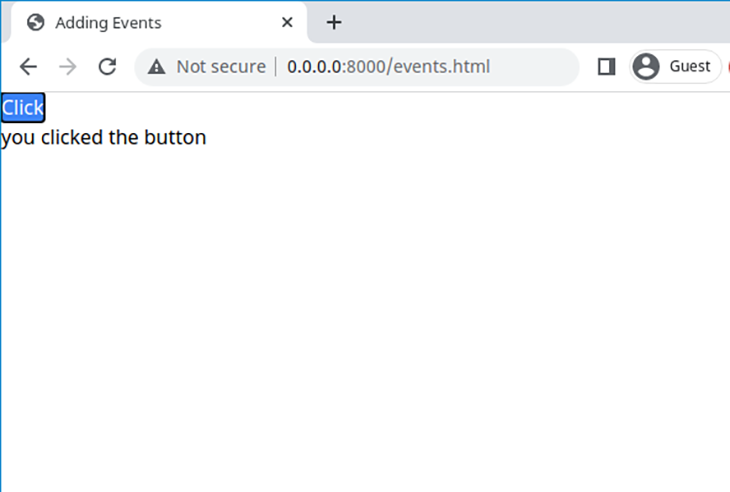
Create an occasions.html file and write the code under:
<!DOCTYPE html>
<html lang="en">
  <head>
    <meta charset="utf-8" />
    <meta title="viewport" content material="width=device-width, initial-scale=1" />
    <title>Including Occasions</title>
    <hyperlink rel="stylesheet" href="https://pyscript.web/alpha/pyscript.css" />
    <script defer src="https://pyscript.web/alpha/pyscript.js"></script>
  </head>
  <physique>
  <button id="click-btn" class="bg-blue-500 text-white" pys-onClick="handle_click">Click on</button>
  <div id="output"></div>
  <py-script src="./event-handlers.py"></py-script>
  </physique>
</html>
Within the <physique> tag, we’ve got a <button> with a class attribute containing some courses which might be a part of the pyscript.css file. The <button> tag additionally has a pys-onclick attribute, which attaches a click on occasion to the button. The pys-onclick attribute accepts the perform title handle_click, which would be the perform that runs when the button is clicked.
Subsequent, we’ve got the div factor with an ID of output. We’ll modify the factor in innerHTML with the handle_click perform we outline.
Lastly, we hyperlink to the event-handlers.py file, which is able to comprise the occasion handler perform.
Let’s outline the event-handlers.py and add the next:
def handle_click(e):
    pyscript.write("output", "you clicked the button")
The handle_click perform has a parameter, e, which is an occasion object handed mechanically to the perform whenever you click on the button. Contained in the perform, we invoke the PyScript’s write() technique, which takes two arguments: the factor ID output and the worth we need to write, in our case, you clicked the button.
Be certain that your server is operating:
python -m http.server
Then go to the URL http://0.0.0.0:8000/occasions.html in Chrome. When the web page hundreds, click on the button, and a message studying “you clicked the button” will seem:
Utilizing JavaScript to entry and manipulate the DOM
PyScript ships with a js module that provides you entry to JavaScript strategies, like querySelector(), createElement(), appendChild(), and so on., to entry and manipulate HTML components. With these, you’ll have the ability to combine JavaScript and Python to do some cool DOM manipulation. Right here is an instance:
import js

print(js.window.innerHeight)

nav = js.doc.createElement("div")
js.doc.physique.prepend(nav)

js.console.log("nav factor created")
As you may see, we’re mixing Python code strategies like print() along with JavaScript window or doc properties.
On this part, we’ll principally deal with doc strategies, and conveniently, PyScript makes it obtainable within the Python scope mechanically. We received’t even must import the js module to make use of the doc strategies.
Create a dom.html file and add the next code:
<!DOCTYPE html>
<html lang="en">
  <head>
    <meta charset="utf-8" />
    <meta title="viewport" content material="width=device-width, initial-scale=1" />
    <title>Mixing JavaScript and Python</title>
    <hyperlink rel="stylesheet" href="https://pyscript.web/alpha/pyscript.css" />
    <script defer src="https://pyscript.web/alpha/pyscript.js"></script>
  </head>
  <physique>
  <ul id="navigation">
  </ul>
  <py-script src="./js-dom.py"></py-script>
  </physique>
</html>
Within the <physique> tag, we solely have an empty <ul> factor with an ID of navigation. Subsequent, we reference the js-dom.py that can comprise our Python code.
Create the js-dom.py file and add the next contents:
nav_parent = doc.querySelector('#navigation')
nav_texts = ["home", "about", "services", "contact"]
for textual content in nav_texts:
    nav_item = doc.createElement("li")
    nav_item.textContent = textual content
    nav_item.className = "nav_element"
    nav_parent.appendChild(nav_item)
Within the first line, we name the querySelector() technique of the doc module with #navigation as its argument. The strategy will discover and return a component with an ID of navigation, which is the <ul> factor within the dom.html file.
Within the second line, we create an inventory of navigation textual content and retailer it within the nav_texts variable. After that, we iterate over the nav_texts checklist. On every iteration, we invoke the createElement() technique with a string li to create an <li> factor.
Following this, we add textual content to the <li> factor utilizing the textContent property, and add a category title nav_element to the <li> factor utilizing the className property. Lastly, we append the <li> factor to the <ul> factor by calling the appendChild() with the nav_item factor because the argument.
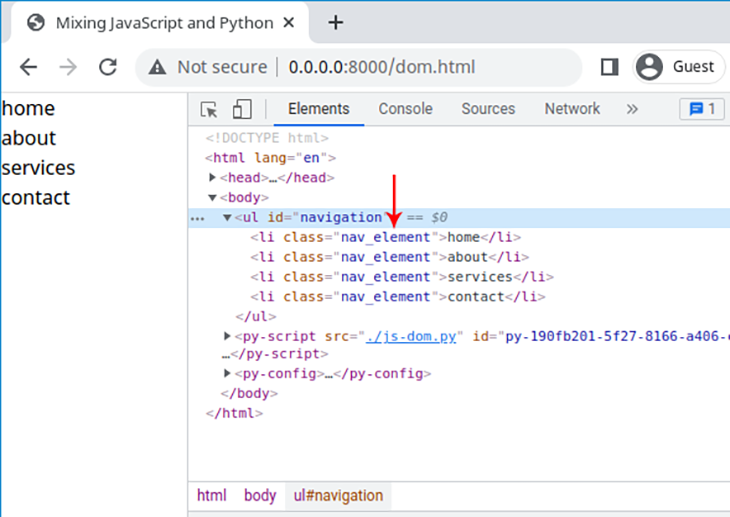
Be certain that your file is saved and the server continues to be operating. Go to http://0.0.0.0:8000/dom.html, and you will notice a web page that resembles the next:
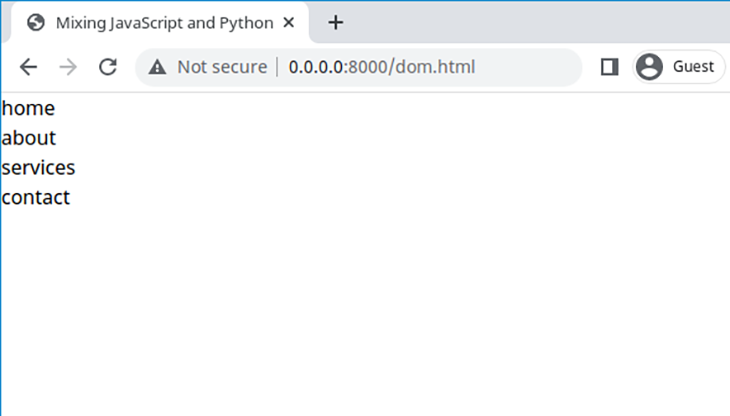
In the event you dig additional and examine the weather, you will notice that the <li> components have been created with the category title nav_element, which we set in Python:
We are able to now entry and manipulate the DOM utilizing the Component class, connect occasions to components, and use JavaScript to question and modify the DOM. Subsequent, we’ll fetch information from an API utilizing PyScript.
Fetching and rendering information from an API
On this part, we’ll use PyScript to ship a GET request to an API to retrieve information. The API we’ll use is the Random Knowledge API. We’ll create a button with a click on occasion that runs a perform that calls the API each time the button is clicked.
Create a fetch_data.html file in your listing and add the next contents:
<!DOCTYPE html>
<html lang="en">
  <head>
    <meta charset="utf-8" />
    <meta title="viewport" content material="width=device-width, initial-scale=1" />
    <title>Fetch information from API</title>
    <hyperlink rel="stylesheet" href="https://pyscript.web/alpha/pyscript.css" />
    <script defer src="https://pyscript.web/alpha/pyscript.js"></script>
  </head>
  <physique>
  <button id="get-name" class="bg-green-600 text-white" pys-onClick="get_random_name">Generate Random Title</button>
  <div id="output"></div>
  <py-script src="./fetch.py"></py-script>
  </physique>
</html>
The code must be acquainted at this level. Crucial half is the <button> tag, which has the pys-onClick attribute that accepts the get_random_name() perform. The perform will reside within the fetch.py file linked on the backside. Let’s go forward and create the file.
In your textual content editor, create a brand new file named fetch.py with the next contents:
from pyodide.http import pyfetch
import asyncio

async def get_random_name(e):
    response = await pyfetch(url="https://random-data-api.com/api/title/random_name", technique="GET")
    information = await response.json()
    first_name = information.get('first_name')
    middle_name = information.get('middle_name')
    last_name = information.get('last_name')
    output =  f"Random title: {first_name} {middle_name} {last_name}"
    pyscript.write('output', output)
Within the first line, we import the pyfetch() technique from the pyodide.http module, which permits us to make asynchronous community requests. Within the second line, we import the asyncio module, which is a part of the Python commonplace library and gives the async and await key phrases which might be helpful for creating asynchronous capabilities.
Subsequent, we outline an asynchronous perform get_random_name() by prefixing it with the async key phrase from the asyncio module. Throughout the perform, we invoke the pyfetch() technique that accepts two arguments:
URL: The API endpointtechnique: Species the HTTP technique you need to use, which is theGETtechnique right here.
When pyfetch() runs, it returns an object, which is then saved within the response variable. Within the line that follows, we name the json() on the response object to parse the JSON and return a Python dictionary, which is then saved within the information variable.
Within the subsequent few strains, you extract the primary title, center title, and final title from the information dict and retailer them of their respective variables. Lastly, we concatenate the names utilizing Python’s f-strings and invoke the pyscript.write() technique to put in writing the info within the <div> factor with an ID of output.
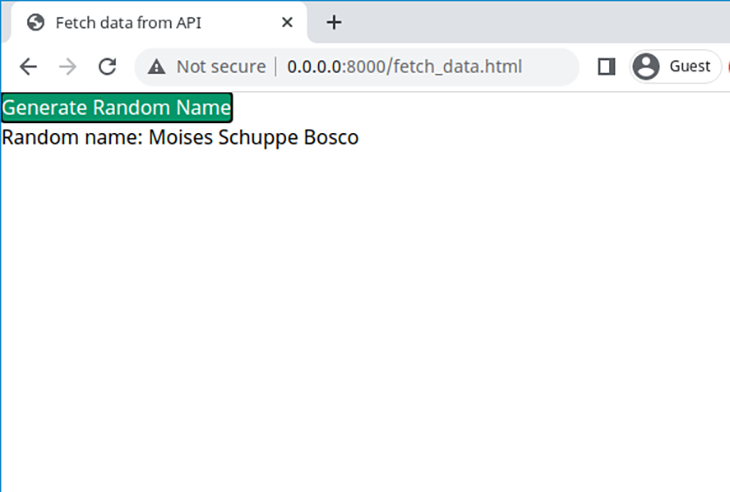
Be certain that your server is operating and go to the http://0.0.0.0:8000/fetch_data.html web page. As soon as the web page hundreds, click on the Generate Random Title button. You will note {that a} new title is generated every time the button is clicked:
Persisting information utilizing localStorage
On this part, we’ll use native storage to save lots of and retrieve information. Native storage is an object within the internet browser that may retailer information with out an expiration date. Python can use native storage by importing it from the js module.
To make use of native storage, we’ll create a textual content space that enables customers to sort in feedback. In the event that they need to save the remark, they are going to click on a save button that can run a perform that saves the info in native storage. Each time the web page is visited, the info will probably be retrieved from native storage and the textual content space will probably be set to the info.
Create a storage.html file and add the next contents:
<!DOCTYPE html>
<html lang="en">
  <head>
    <meta charset="utf-8" />
    <meta title="viewport" content material="width=device-width, initial-scale=1" />
    <title>Retailer information in native storage</title>
    <hyperlink rel="stylesheet" href="https://pyscript.web/alpha/pyscript.css" />
    <script defer src="https://pyscript.web/alpha/pyscript.js"></script>
  </head>
  <physique>
  <textarea id="remark" class="block border"></textarea>
  <button id="save" class="bg-green-600 text-white"
   pys-onClick="save_comment">Save</button>
  <py-script src="./local-storage.py"></py-script>
  </physique>
</html>
Within the <physique> tag, we create a <textarea> tag with an ID remark. We’ll use this ID to get a reference of the textual content space factor in Python. Subsequent, we’ve got a button that has save as its ID and a click on occasion that can invoke the perform save_comment, which we haven’t outlined but. Lastly, we reference the local-storage.py, which is able to comprise our Python code. Let’s create the file now.
Create local-storage.py and add the next:
from js import localStorage

def save_comment(e):
    textual content =  Component("remark").worth
    localStorage.setItem("remark", textual content)

if localStorage.getItem("remark"):
    text_area =  Component("remark")
    text_area.write(localStorage.getItem("remark"))
First, we import the localStorage object from the js module. Subsequent, we outline the save_comment() perform, which takes e because the parameter. Contained in the perform, we invoke the Component class with the ID remark to get a reference of textual content space. As soon as the strategy finds the textual content space, we use the worth property to get the textual content space contents and retailer the worth within the textual content variable. Within the subsequent line, we invoke the setItem() technique of the localStorage object to save lots of the remark textual content within the localStorage object below the remark key.
Now, the save_comment() perform will solely run when the save button is clicked. Nevertheless, continuing outdoors the save_comment() perform, the strains that observe the perform will execute solely in the course of the web page load.
When the web page is first loaded, we use the if assertion to test if the localStorage object has information below the remark key. If true, we reference the textual content space utilizing the Component class and retailer its occasion within the text_area variable. Subsequent, we invoke the write() technique of the text_area occasion to replace the textual content space contents with the info from native storage.
Be certain that your server is operating and go to http://0.0.0.0:8000/storage.html. Enter any textual content you want and click on the Save button.

Subsequent, refresh the URL, and you will notice that the textual content space incorporates the textual content you saved on the preliminary go to.

With that, you now know the best way to leverage localStorage utilizing PyScript. Subsequent, we’ll learn a file within the file system utilizing PyScript.
Interacting with the file system
On this part, we’ll use PyScript to learn information from a plaintext file within the native file system and append its contents into the DOM.
First, let’s create a file containing the info we need to learn. In your essential challenge listing, run the next command to create and transfer into a brand new listing:
mkdir information && cd information
Subsequent, create a names.txt file and add the next contents, that are names of Python internet frameworks:
Django
Flask
FastAPI
web2p
Save the file and return to the basis of your challenge listing:
cd ..
With the file created, create a file-system.html file in your textual content editor with the next:
<!DOCTYPE html>
<html lang="en">
  <head>
    <meta charset="utf-8" />
    <meta title="viewport" content material="width=device-width, initial-scale=1" />
    <title>Learn information from file system</title>
    <hyperlink rel="stylesheet" href="https://pyscript.web/alpha/pyscript.css" />
    <script defer src="https://pyscript.web/alpha/pyscript.js"></script>
  </head>
  <physique>
   <py-env>
    - paths:
        - /information/names.txt
  </py-env>
  <ul id="frameworks">
  </ul>
  <py-script src="./read-file.py"></py-script>
  </physique>
</html>
Within the <py-env> tag, we specify the trail to the names.txt, which is relative to the file-system.html path. Subsequent, we create an empty <ul> tag with a frameworks ID. Lastly, we reference the read-file.py, which we’ll outline quickly.
Create a read-file.py with the next contents:
ul_element = doc.querySelector("#frameworks")
with open("names.txt") as f:
    for line in f:
        li_element = doc.createElement("li")
        li_element.innerText = line
        ul_element.appendChild(li_element)
Within the first line, we invoke the querySelector() technique with an ID selector #frameworks, which will get a reference of the <ul> factor. Within the second line, we name the open() technique with the filename names.txt and retailer the file object as f.
Throughout the with assertion, we iterate over every line saved within the file object f. Throughout every iteration, we create an <li> factor utilizing the doc object’s createElement() technique. Subsequent, we set the <li> textual content content material to the worth within the line variable utilizing the innerText property of the li_element occasion. Lastly, we append the <li> factor to the <ul> factor by calling the appendChild() with the li_element because the argument.
Begin the server once more (should you stopped it earlier than):
python -m http.server
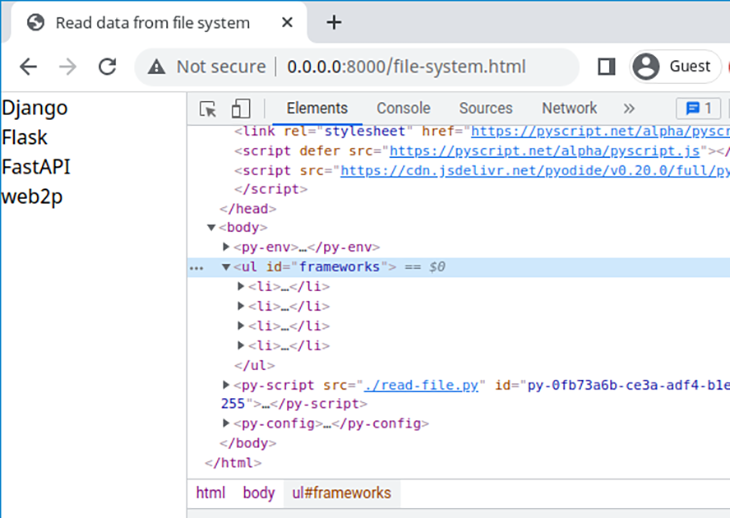
Go to the http://0.0.0.0:8000/file-system.html URL and you will notice the contents from the plaintext file are displayed on the web page:
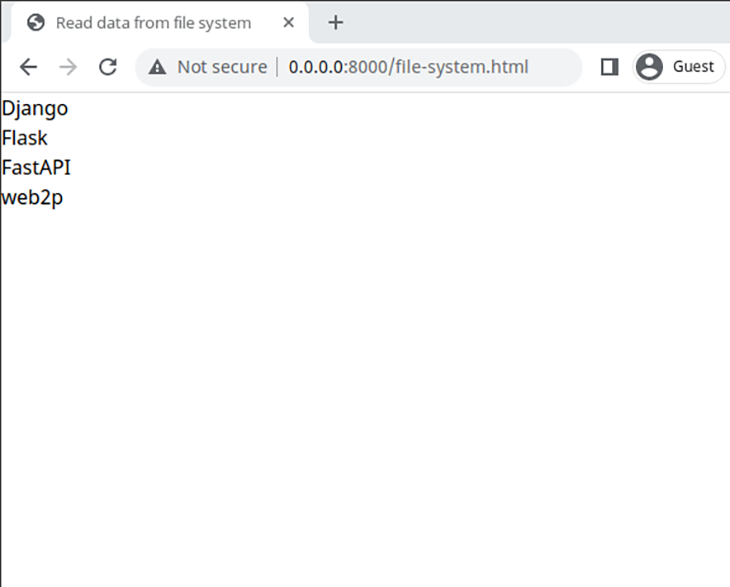
In the event you examine the weather, you’ll see that there are 4 <li> components that have been appended to the <ul> factor.
With that, now you can learn information within the file system. You need to use the identical method to learn CSV information and plenty of different file codecs.
Conclusion
On this tutorial, we discovered the best way to use the PyScript REPL, create customized modules, use modules from the Python commonplace library, and import third-party modules. We additionally discovered the best way to entry and manipulate components utilizing PyScript, make API requests, use localStorage, and browse a plaintext file from the file system.
To discover PyScript additional, go to the PyScript homepage. As well as, see the Pyodide documentation web page to study extra in regards to the potentialities it allows within the browser.
Are you including new JS libraries to enhance efficiency or construct new options? What in the event that they’re doing the alternative?
There’s little question that frontends are getting extra advanced. As you add new JavaScript libraries and different dependencies to your app, you’ll want extra visibility to make sure your customers don’t run into unknown points.
LogRocket is a frontend software monitoring resolution that allows you to replay JavaScript errors as in the event that they occurred in your personal browser so you may react to bugs extra successfully.

LogRocket works completely with any app, no matter framework, and has plugins to log further context from Redux, Vuex, and @ngrx/retailer. As a substitute of guessing why issues occur, you may combination and report on what state your software was in when a problem occurred. LogRocket additionally screens your app’s efficiency, reporting metrics like consumer CPU load, consumer reminiscence utilization, and extra.
Construct confidently — Begin monitoring at no cost.
