
Hey there!
In the present day, we are going to look into implementing kinds in Flask. We are going to begin with fast rendering of kinds and look into particulars of customising the shape.
Background
Flask is fashionable internet improvement framework carried out in python.
Kinds are vital a part of creating any web sites and are used closely to take inputs from customers.
We might see the utilization of wtform module for flask. For frontend, we are going to use jinja2 templating.
Pre-requisites
A primary understanding of python and flask is required. It’s anticipated that you know the way a flask server is began and have it working.
With all of the above data, let’s get began –
Setup
We want following issues earlier than we will render a type to frontend –
- A primary flask app working
- A python type class carried out
- A controller which might render the shape
It’s assumed that you have already got (1) working. For (2), add the next code to your kinds.py
# kinds.py
from flask_wtf import FlaskForm
from wtforms import StringField, IntegerField, TextField, SubmitField
from wtforms.fields.html5 import IntegerRangeField
from wtforms.validators import DataRequired, Non-compulsory, NumberRange


class SampleForm(FlaskForm):
    identify = StringField('Identify', validators=[DataRequired()])
    age = IntegerField('Age', validators=[DataRequired()])
    moto = TextField('moto', validators=[Optional()])
    vary = IntegerRangeField('vary', default=10, validators=[DataRequired(), NumberRange(min=1, max=50)])

    submit = SubmitField('Submit')
You’ll be able to learn extra particulars about wtf at https://wtforms.readthedocs.io/en/3.0.x/ and extra about validators at https://wtforms.readthedocs.io/en/3.0.x/validators/
For 3, add following code to create controller
# routes.py
from flask import Blueprint, url_for, redirect, render_template

from app.pattern.kinds import SampleForm

pattern = Blueprint('pattern', __name__)


@pattern.route("/sample-form", strategies=["GET", "POST"])
def sample_controller():
    type = SampleForm()

    if type.validate_on_submit():
        return redirect(url_for('pattern.sample_controller'))

    return render_template('pattern/sample_form.html', type=type)
To connect the path to your app, add following to the create_app technique
# app/__init__.py
from app.pattern.routes import pattern

app.register_blueprint(pattern)
Fast type rendering
First, we’ll take a look at the quickest method to render stunning kinds.
create pattern/sample_form.html in templates/ folder
{% extends 'base.html' %}
{% import 'bootstrap/wtf.html' as wtf %}

{% block app_content %}
<div class="container-fluid">
    {{ wtf.quick_form(type, button_map={'submit': 'success'}) }}
</div>
{% endblock %}
When you reload the server the output ought to appear like
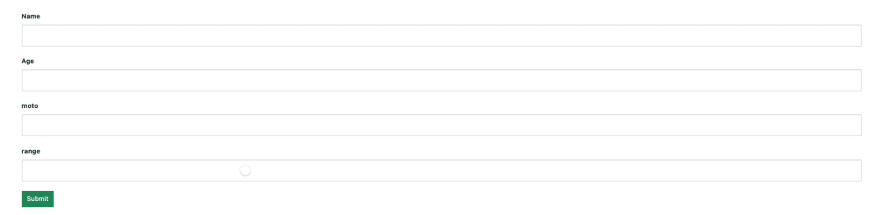
Voila! You could have your stunning type rendered with only one line of html code. Observe that, button_map maps the sector to bootstrap styling class (btn-success on this case). One other factor to notice, the flask setup is utilizing bootstrap on this case so your styling could fluctuate relying on whether or not you might be utilizing bootstrap or not.
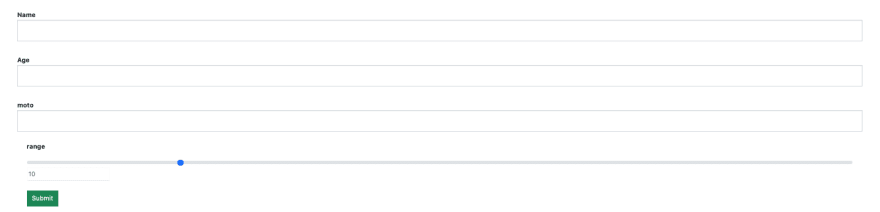
Discipline sensible type rendering
Change your pattern html to following
{% extends 'base.html' %}
{% import 'bootstrap/wtf.html' as wtf %}

{% block app_content %}
<div class="container-fluid">
    <type class="type form-horizontal" technique="submit" position="type">
        {{ type.hidden_tag() }}
        {{ wtf.form_field(type.identify) }}
        {{ wtf.form_field(type.age) }}
        {{ wtf.form_field(type.moto) }}
        {{ wtf.form_field(type.vary, class="form-range") }}
        {{ wtf.form_field(type.submit, class="btn btn-success") }}
    </type>
</div>
{% endblock %}
This offers extra management over dealing with fields, as we will render area by area and supply customized styling. The tip outcome ought to appear like following –

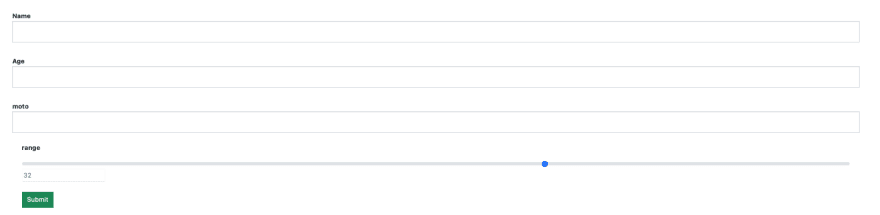
Additional customising
That is essentially the most attention-grabbing half for me as I used to be not in a position to find any corresponding docs on-line simply.
Take into account that within the vary area, we additionally wish to present the worth that’s presently chosen and we additionally wish to present the default worth be default.
Here is how we will obtain this. Change html file to following –
{% extends 'base.html' %}
{% import 'bootstrap/wtf.html' as wtf %}

{% block app_content %}
<div class="container-fluid">
    <type class="type form-horizontal" technique="submit" position="type">
        {{ type.hidden_tag() }}
        {{ wtf.form_field(type.identify) }}
        {{ wtf.form_field(type.age) }}
        {{ wtf.form_field(type.moto) }}
{#        {{ wtf.form_field(type.vary, class="form-range") }}#}
        <label for="vary" class="form-label">{{ type.vary.label }}</label>
        {{ type.vary(min='1', max='50', oninput="r_value.worth = this.worth", class="form-range") }}
        <enter sort="textual content" id="r_value" worth="{{ type.vary.information }}" disabled></enter><br/><br/>

        {{ wtf.form_field(type.submit, class="btn btn-success") }}
    </type>
</div>
{% endblock %}
Discover the code for vary enter, we’ve got individually accessed label and enter area and we’ve got added a buyer oninput to replace worth of the brand new enter added.
The tip outcome seems like this –
That is all this time!
