
Constructed-in reactivity is one among Observable JavaScript’s greatest worth provides. In my two earlier articles, I’ve launched you to utilizing Observable JavaScript with R or Python in Quarto and studying Observable JavaScript with Observable notebooks. On this article, we get to the enjoyable half: creating interactive tables and graphics with Observable JavaScript and the Observable Plot JavaScript library.
Create a primary Observable desk
I normally consider a desk as an “output”—that’s, a useful strategy to view and discover information. In Observable, although, a primary desk can be thought of an “enter.” That’s as a result of Observable tables have rows which are clickable and selectable by default, and people chosen values can be utilized to have an effect on plots and different information in your web page. This helps clarify why the perform Inputs.desk(your_dataset) generates a desk.
The default desk is sortable when you click on column headers, and reveals a number of rows together with a scroll bar.
To specify the variety of rows you need seen within the scrollable window, add the rows argument. The argument proven right here shows the primary 20 rows within the scrollable window:
Inputs.desk(mydata, {
rows: 20
})
Observe that desk choices are enclosed in curly braces, even when there’s just one choice.
To decide on particular columns to seem in a desk, add a columns choice to Inputs.desk() with the syntax:
Inputs.desk(mydata, {
 columns: ["column_name_1", "column_name_2", "column_name3"]
 })
Observe that columns: is adopted by a JavaScript array, which is created by [] brackets just like Python and never c() as in R. Column names should be in citation marks.
To rename columns, use header: with the next syntax:
header: {
   original_name1: "NewName1",
   original_name2: "NewName2"
}
To mix choosing and renaming columns, use each columns: and header::
Inputs.desk(mydata, {
  columns: [
    "column_name_1",
    "column_name_2"
  ],
header: {
   original_name1: "NewName1",
   original_name2: "NewName2"
}
})
The ensuing default will look one thing like this, utilizing information for US states and their populations:
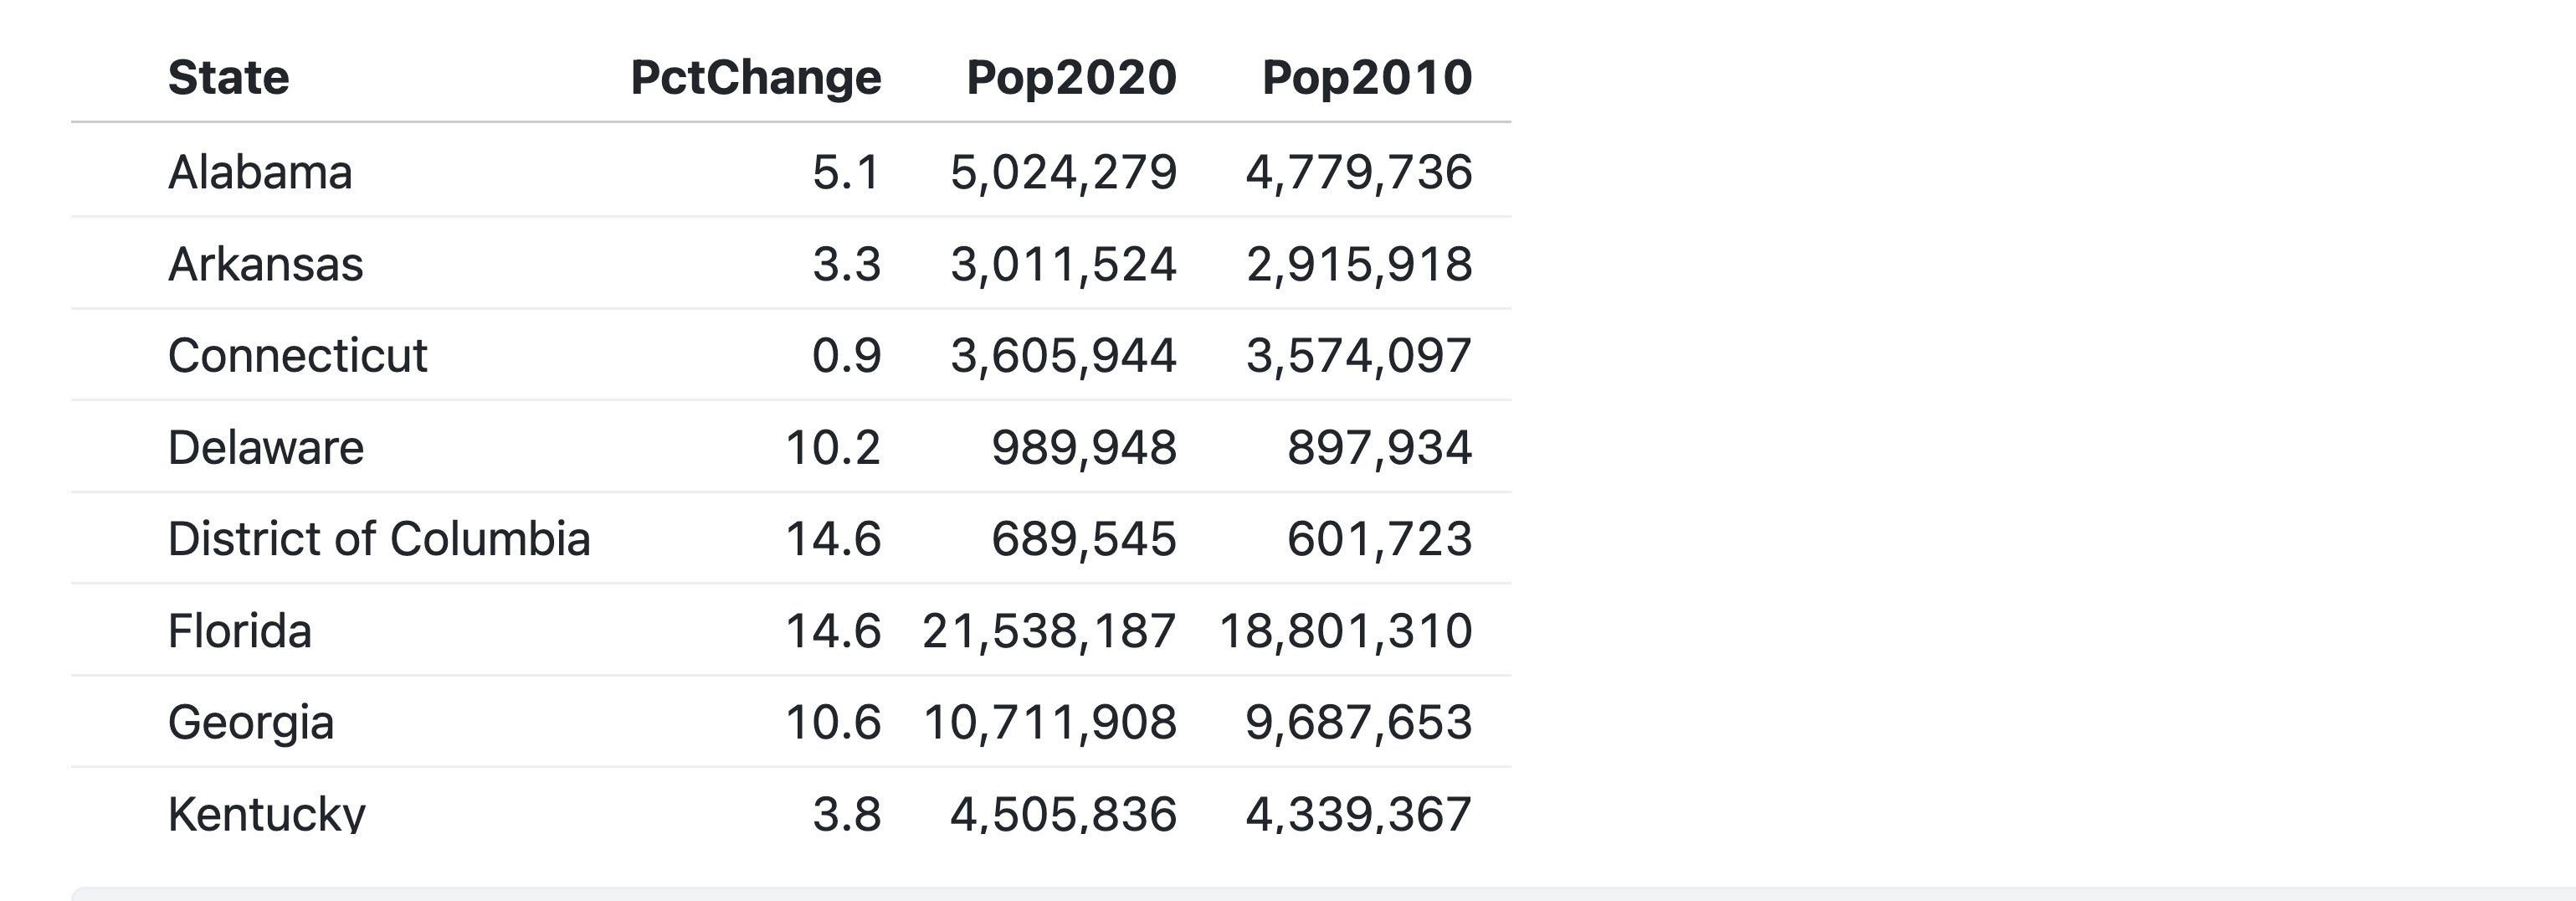 Sharon Machlis, Foundry
Determine 1. An Observable default desk utilizing Inputs.desk().
A number of different choices can be found for Inputs.desk(), together with sorting and reverse-sorting, which you are able to do with the syntax: kind: "ColumnName", reverse: true.
When you’re coding in a hosted pocket book on ObservableHQ.com, you will see that there are different built-in desk sorts obtainable for a cell, akin to Information Desk cells. A few of these sorts are a part of the Observable net platform. They aren’t normal JavaScript capabilities and you will not be capable of use them in a Quarto doc. How will you inform? When you don’t see a line of code pop up after you create a desk, it’s in all probability not obtainable off-platform except you code it your self.
Create interactive filters for information in Observable
Considered one of Observable’s greatest worth provides is its built-in reactivity. To create an interactive filter, the syntax is normally alongside the traces of
viewof new_variable_name = Inputs.the_filter_type()
the place the_filter_type is without doubt one of the built-in Observable filter sorts.
Filter sorts embody checkbox, radio, vary (for a slider), choose (for a dropdown menu), search, and textual content (for free-form single-line textual content). Arguments for the Inputs filter perform rely upon the filter kind.
viewof makes the filter reactive. In his pocket book A short Introduction to viewof, Mike Bostock, CTO and founding father of Observable, Inc., writes: “The best way to consider viewof foo is that, along with the viewof foo that shows the enter aspect, viewof creates a second hidden cell foo that exposes the present worth of this enter aspect to the remainder of the pocket book.”
Inputs.search()
Inputs.search() creates each a textual content search field and a reactive information set that’s robotically filtered and subsetted primarily based on what a person sorts into the field. For R Shiny customers, it’s as if a single perform created each the textual content subject UI and the server-side code for the reactive information set.
The syntax is:
viewof my_filtered_data = Inputs.search(mydata)
To use the reactive information set elsewhere in your code, merely seek advice from my_filtered_data as an alternative of mydata, akin to:
Inputs.desk(my_filtered_data)
The above code generates a desk from my_filtered_data. The info set and desk will replace at any time when a person sorts one thing into the search field, in search of matches throughout all of the columns.
You should use that filtered information set a number of instances on a web page in varied sorts of plots or in different methods.
Inputs.choose()
Inputs.search() is considerably of a particular case as a result of it’s designed to filter an information set in a particular manner, by wanting throughout all columns for a partial match. That is easy however might not be what you need, since you might want to look just one column or create a numerical filter.
Most different Observable Inputs require two steps:
- Create the enter.
- Write a perform to filter information primarily based on the worth of that enter.
For instance, if you would like a dropdown checklist to show attainable values from one column in your information and filter the information by that choice, the code to create that dropdown must specify what values to show and which column needs to be used for subsetting. The code beneath creates a dropdown checklist primarily based on sorted, distinctive values from the my_column column within the mydata information set:
viewof my_filtering_value =
  Inputs.choose(my_initial_data.map(d => d.my_column), {kind: true, distinctive: true, label: "Label for dropdown:"})
As you would possibly conclude from the variable title my_filtering_value, this each creates the dropdown checklist and shops no matter worth is chosen, because of viewof.
map() applies a perform to every merchandise in an array, on this case getting all of the values in my_initial_data’s my_column.
The above code makes use of JavaScript’s newer “arrow” (=>) format for writing capabilities. You could possibly write the identical code with JavaScript’s older perform and return syntax, as nicely:
viewof my_filtering_value2 =
  Inputs.choose(mydata.map(perform(d) {return d.my_column}), {kind: true, distinctive: true, label: "Label for dropdown:"})
As soon as once more, don’t overlook the viewof earlier than defining Inputs if you would like the code to be reactive.
Not like Inputs.search(), which robotically acts upon a whole information set, Inputs.choose() solely returns values from the dropdown. So, you continue to want to write down code to subset the information set primarily based on these chosen values and create a brand new, filtered information set. That code is identical as when you have been filtering a static information set.
As defined in Quarto’s Observable documentation: “We do not want any particular syntax to seek advice from the dynamic enter values, they ‘simply work’, and the filtering code is robotically re-run when the inputs change.” You do not want viewof earlier than the assertion that defines the information set; use it solely earlier than the Inputs.
my_filtered_data2 =
  mydata.filter(perform(d) {return d.my_column === my_filtering_value2})
When you choose, you should use JavaScript’s older syntax with perform() and return:
my_filtered_data2 =
  mydata.filter(perform(d) {return d.my_column === my_filtering_value2})
You should use the filtered information set as you’ll a static information set, akin to:
Inputs.desk(my_filtered_data2)
Numerical and date filters work equally to Enter.choose().
Take a look at the Hey Inputs and Observable Inputs notebooks for extra about Inputs.
Embody a variable’s worth in a textual content string
Together with the worth of a variable in a textual content string to generate dynamic textual content might be helpful if you wish to create a graph headline or abstract paragraph that adjustments along with your information. If a variable is outlined in an ojs code chunk, you’ll be able to embody that variable’s worth inside a Quarto ojs code chunk by enclosing the variable title with ${}, akin to:
md`You will have chosen ${my_filtering_value2}.`
Right here, md signifies that what’s contained inside the backticks needs to be evaluated as Markdown textual content, not JavaScript code. You may as well use html earlier than the backticks if you wish to write HTML that features a variable worth, akin to:
html <p>The worth of x is <sturdy>${x}</sturdy>.
Observe that md and html are solely wanted in Quarto paperwork. In case you are utilizing a hosted pocket book at ObservableHQ.com, you’ll be able to select Markdown or HTML for the cell mode so that you don’t want to suggest md or html.
You need to use backticks on ObservableHQ.com to suggest that the contents are textual content and never code in case you are storing textual content in a variable inside a pocket book’s JavaScript cell.
