
The scope of this text will cowl the exploration of the Three.js library and the Animated API. You must have fundamental information of JavaScript and React Native to observe alongside; to be taught extra about all of the fantastic issues that may be performed in React Native, the React Native archives on the LogRocket weblog is a good place to brush up.
We’ll cut up this text into two. Within the first half, we discover the creation of superior 3D animations in React Native. We’ll depend on the Three.js library, which is a cross-platform JavaScript 3D library for the creation of 3D content material, reminiscent of graphics and animation, in net environments. Three.js incorporates WebGL enhancement behaviors to render 3D fashions on the internet and TweenMax to reinforce animation high quality.
The second a part of the article will discover the Animated API, which lets us make our animations fluid.
Soar forward:
Set up and conditions
To get began, we have to create our React Native software. Set up the Expo CLI to serve our undertaking; it really works hand-in-hand with the Expo GO library, which is a cell shopper app that we’ll use to open our undertaking in iOS or Android platforms.
As soon as the Expo CLI is put in, proceed to run the next command within the terminal. This software will use the TypeScript template.
expo init reactNative3D
cd reactNative3D
yarn begin
Earlier than continuing, we have to set up some core dependencies. Opening up the terminal window, run the next command.
yarn add three expo-three expo-gl
yarn add --dev @varieties/three
Let’s evaluation these dependencies:
- expo-gl: This offers a
Viewthat acts as an OpenGL ES render goal, which is beneficial for rendering 2D and 3D graphics alike. As soon as mounted, an OpenGL context is created that accepts theonContextCreate prop, which has a WebGL RenderingContext interface - expo-three: Serves as a bridge between Three.js and ExpoGL; it additionally offers a WebGL interface for native OpenGL-ES in React Native, which helps to summary the DOM away from Three.js
- three: The 3D library for creating 3D content material on a webpage
How rendering 3D fashions with Three.js works
When rendering 3D fashions with Three.js, we first create a scene to function the set for the mannequin to render in. The picture beneath illustrates the essential construction of a Three.js app, the place it’s required to create objects and join them collectively.
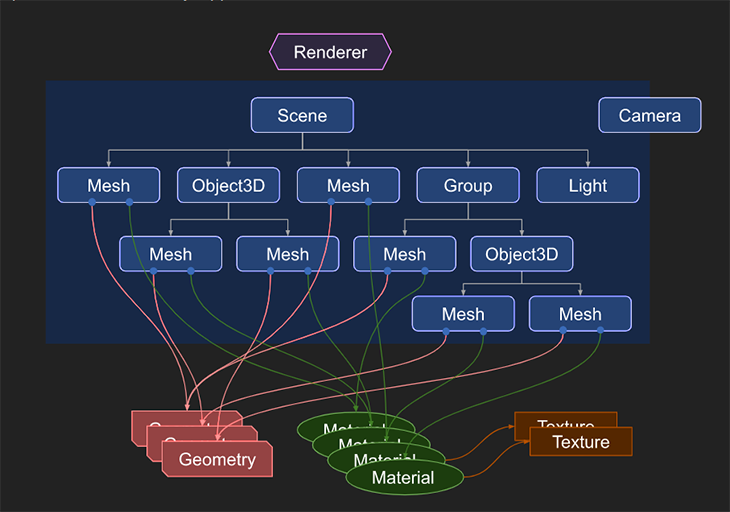
Let’s discover the diagram illustrated above.
- The important thing half is the
renderer, the principle object of Three.js. Our createdsceneanddigicamare handed to the renderer, which renders (attracts) the portion of the 3D scene - The
sceneis an object that defines the foundation of thescenegraphand comprises some properties, just like the background colour Meshare objects that symbolize the drawing of a particularGeometrywith a particularMaterialsclass- The vertex information of a chunk of
Geometry(sphere, dice) is represented by theGeometryobject. Three.js offers inbuilt geometry primitives - The floor properties used to attract the geometry are represented by the
Materialsobject. It accepts values reminiscent ofcolourandtexture Textureobjects symbolize photos loaded from picture information
Within the following sections, we’ll use every of those constructions to create a 3D animation.
Create a scene with a 3D dice
Within the App.tsx part on the root of our undertaking listing, we’ll create a fundamental React Native part. Import the required packages into the App.tsx part.
code App.tsx
import React from 'react';
import { View } from 'react-native';
import Expo from 'expo';
import {Scene, Mesh, MeshBasicMaterial, PerspectiveCamera} from 'three';
import ExpoTHREE, {Renderer} from 'expo-three';
import { ExpoWebGLRenderingContext, GLView } from 'expo-gl';
Continuing to create a scene, the GLView exported from expo-gl offers a view that acts as an OpenGL ES render goal. That is very helpful for rendering the 3D objects we’re creating.
Within the App.tsx part, create a purposeful part.
const App = () => {
  const onContextCreate = async (gl: Object) => {}
  return (
    <View>
      <GLView
      onContextCreate={onContextCreate}
      />
    </View>
  )
}

export default App;
The fundamental skeleton of our software is full. The onContextCreate prop is being handed into the GLView with a single argument, gl, which has a WebGL RenderingContext interface.
Shifting our focus, let’s create the onContextCreate operate.
  const onContextCreate = async (gl: any) => {
    // three.js implementation.
    const scene = new Scene();
    const digicam = new PerspectiveCamera(
      75,
      gl.drawingBufferWidth / gl.drawingBufferHeight,
      0.1,
      1000
    );
    gl.canvas = {
      width: gl.drawingBufferWidth,
      peak: gl.drawingBufferHeight,
    };

    // set digicam place away from dice
    digicam.place.z = 2;

    const renderer = new Renderer({ gl });
    // set measurement of buffer to be equal to drawing buffer width
    renderer.setSize(gl.drawingBufferWidth, gl.drawingBufferHeight);

    // create dice
    // outline geometry
    const geometry = new BoxBufferGeometry(1, 1, 1);
    const materials = new MeshBasicMaterial({
      colour: "cyan",
    });

    const dice = new Mesh(geometry, materials);

    // add dice to scene
    scene.add(dice);

    // create render operate
    const render = () => {
      requestAnimationFrame(render);
      // create rotate performance
      // rotate round x axis
      dice.rotation.x += 0.01;

      // rotate round y axis
      dice.rotation.y += 0.01;

      renderer.render(scene, digicam);
      gl.endFrameEXP();
    };

    // name render
    render();
  };
With the completion of the onContextCreate operate, our 3D dice is full.
Extra nice articles from LogRocket:
Your App.tsx file ought to seem like this:
import React from "react";
import { View } from "react-native";
import Expo from "expo";
import {
  Scene,
  Mesh,
  MeshBasicMaterial,
  PerspectiveCamera,
  BoxBufferGeometry,
} from "three";
import ExpoTHREE, { Renderer } from "expo-three";
import { ExpoWebGLRenderingContext, GLView } from "expo-gl";
import { StatusBar } from "expo-status-bar";

const App = () => {

  const onContextCreate = async (gl: any) => {
    // three.js implementation.
    const scene = new Scene();
    const digicam = new PerspectiveCamera(
      75,
      gl.drawingBufferWidth / gl.drawingBufferHeight,
      0.1,
      1000
    );
    gl.canvas = {
      width: gl.drawingBufferWidth,
      peak: gl.drawingBufferHeight,
    };

    // set digicam place away from dice
    digicam.place.z = 2;

    const renderer = new Renderer({ gl });
    // set measurement of buffer to be equal to drawing buffer width
    renderer.setSize(gl.drawingBufferWidth, gl.drawingBufferHeight);

    // create dice
    // outline geometry
    const geometry = new BoxBufferGeometry(1, 1, 1);
    const materials = new MeshBasicMaterial({
      colour: "cyan",
    });

    const dice = new Mesh(geometry, materials);

    // add dice to scene
    scene.add(dice);

    // create render operate
    const render = () => {
      requestAnimationFrame(render);
      // create rotate performance
      // rotate round x axis
      dice.rotation.x += 0.01;

      // rotate round y axis
      dice.rotation.y += 0.01;

      renderer.render(scene, digicam);
      gl.endFrameEXP();
    };

    // name render
    render();
  };

  return (
    <View>
      <GLView
        onContextCreate={onContextCreate}
        // set peak and width of GLView
        model={{ width: 400, peak: 400 }}
      />
    </View>
  );
};

export default App;
Cease the Metro server to make sure that all new information have been added and begin it up once more.
ctrl c
yarn begin
Open up the applying with the Expo app.

Exploring the Animated API
On this part, we’ll create a 3D carousel utilizing a FlatList and the Animated API. Let’s first create the carousel with out the 3D impact.
Within the App.tsx, remark out the earlier code and begin the brand new implementation from scratch. We start by putting in the dependencies we’ll want within the undertaking.
Set up the react-native-uuid library and @expo/vector-icons.
yarn add react-native-uuid @expo/vector-icons
Now, import the libraries wanted into the part.
import * as React from "react";
import {
  FlatList,
  Picture,
  Textual content,
  View,
  Dimensions,
  TouchableOpacity,
  StyleSheet,
  Animated,
} from "react-native";
import { SafeAreaView } from "react-native";
import { AntDesign } from "@expo/vector-icons";
import uuid from "react-native-uuid";
import { StatusBar } from "expo-status-bar";
const { width, peak } = Dimensions.get("display");
When creating a picture carousel, specifying the width and peak properties of the photographs within the carousel allows a greater view. The Spacing variable allows reusability throughout completely different styling wants.
const IMAGE_WIDTH = width * 0.65;
const IMAGE_HEIGHT = peak * 0.7;
const SPACING = 20;
Utilizing the Pexels Photos API, we will generate an array of photos to populate our software.
const photos = [
  "https://images.pexels.com/photos/1799912/pexels-photo-1799912.jpeg?auto=compress&cs=tinysrgb&dpr=1&w=500",
  "https://images.pexels.com/photos/1769524/pexels-photo-1769524.jpeg?auto=compress&cs=tinysrgb&dpr=1&w=500",
  "https://images.pexels.com/photos/1758101/pexels-photo-1758101.jpeg?auto=compress&cs=tinysrgb&dpr=1&w=500",
  "https://images.pexels.com/photos/1738434/pexels-photo-1738434.jpeg?auto=compress&cs=tinysrgb&dpr=1&w=500",
  "https://images.pexels.com/photos/1698394/pexels-photo-1698394.jpeg?auto=compress&cs=tinysrgb&dpr=1&w=500",
  "https://images.pexels.com/photos/1684429/pexels-photo-1684429.jpeg?auto=compress&cs=tinysrgb&dpr=1&w=500",
  "https://images.pexels.com/photos/1690351/pexels-photo-1690351.jpeg?auto=compress&cs=tinysrgb&dpr=1&w=500",
  "https://images.pexels.com/photos/1668211/pexels-photo-1668211.jpeg?auto=compress&cs=tinysrgb&dpr=1&w=500",
  "https://images.pexels.com/photos/1647372/pexels-photo-1647372.jpeg?auto=compress&cs=tinysrgb&dpr=1&w=500",
  "https://images.pexels.com/photos/1616164/pexels-photo-1616164.jpeg?auto=compress&cs=tinysrgb&dpr=1&w=500",
  "https://images.pexels.com/photos/1799901/pexels-photo-1799901.jpeg?auto=compress&cs=tinysrgb&dpr=1&w=500",
  "https://images.pexels.com/photos/1789968/pexels-photo-1789968.jpeg?auto=compress&cs=tinysrgb&dpr=1&w=500",
  "https://images.pexels.com/photos/1774301/pexels-photo-1774301.jpeg?auto=compress&cs=tinysrgb&dpr=1&w=500",
  "https://images.pexels.com/photos/1734364/pexels-photo-1734364.jpeg?auto=compress&cs=tinysrgb&dpr=1&w=500",
  "https://images.pexels.com/photos/1724888/pexels-photo-1724888.jpeg?auto=compress&cs=tinysrgb&dpr=1&w=500",
];
We’ll use the react-native-uuid library to seed random information into the applying.
const DATA = [...Array(images.length).keys()].map((_, i) => {
  return {
    key: uuid.v4(),
    picture: photos[i],
  };
});
Now it’s time to implement our carousel view.
export default () => {
  return (
    <View model={{ backgroundColor: "#A5F1FA", flex: 1 }}>
      <StatusBar hidden />
      <SafeAreaView model={{ marginTop: SPACING * 1 }}>
        <View model={{ peak: IMAGE_HEIGHT * 2.1 }}>
          <FlatList
            information={DATA}
            keyExtractor={(merchandise) => merchandise.key}
            horizontal
            pagingEnabled
            bounces={false}
            model={{ flexGrow: 0, zIndex: 9999 }}
            contentContainerStyle={{
              peak: IMAGE_HEIGHT + SPACING * 2,
              paddingHorizontal: SPACING * 4,
            }}
            showsHorizontalScrollIndicator={false}
            renderItem={({ merchandise, index }) => {
              return (
                <View
                  model={{
                    width,
                    paddingVertical: SPACING,
                  }}
                >
                  <Picture
                    supply={{ uri: merchandise.picture }}
                    model={{
                      width: IMAGE_WIDTH,
                      peak: IMAGE_HEIGHT,
                      resizeMode: "cowl",
                    }}
                  />
                </View>
              );
            }}
          />
        </View>
      </SafeAreaView>
    </View>
  );
};

The picture carousel has efficiently been created.
Creating 3D results with the Animated API
The subsequent step is to make use of the Animated API to create the 3D impact. With the intention to make use of the Animated API, we’ll want to alter our FlatList to an Animated.FlatList and add an onScroll occasion, wherein we’ll move in a NativeEvent.
A variable scrollX shall be outlined as the worth for our x-axis. We’ll move in a useRef() Hook to allow React to maintain monitor of the animation. This persists the scrollX worth even after re-renders.
export default () => {
  const scrollX = React.useRef(new Animated.Worth(0)).present;
  return (
    <View model={{ backgroundColor: "#A5F1FA", flex: 1 }}>
      <StatusBar hidden />
      <SafeAreaView model={{ marginTop: SPACING * 1 }}>
        <View model={{ peak: IMAGE_HEIGHT * 2.1 }}>
          <Animated.FlatList
            information={DATA}
            keyExtractor={(merchandise) => merchandise.key}
            horizontal
            pagingEnabled
            onScroll={Animated.occasion(
              [
                {
                  nativeEvent: { contentOffset: { x: scrollX } },
                },
              ],
              {
                useNativeDriver: true,
              }
            )}
Now we will interpolate values whereas counting on scrollX to create animations. Within the renderItem of our FlatList, create an inputRange. We’ll use the enter vary figures for the interpolation. Then, create an opacity variable contained in the renderItem.
           renderItem={({ merchandise, index }) => {
              const inputRange = [
                (index - 1) * width, // next slide
                index * width, // current slide
                (index + 1) * width, // previous slide
              ];
              const opacity = scrollX.interpolate({
                inputRange,
                outputRange: [0, 1, 0],
              });
         const translateY = scrollX.interpolate({
                inputRange,
                outputRange: [50, 0, 20] // create a wave
              })
Shifting on, we’ve transformed the view in our undertaking to an Animated.View, and the opacity variable we created earlier shall be handed in as a mode.
             return (
                <Animated.View
                  model={{
                    width,
                    paddingVertical: SPACING,
                    opacity,
                    remodel: [{ translateY }]
                  }}
                >
                  <Picture
                    supply={{ uri: merchandise.picture }}
                    model={{
                      width: IMAGE_WIDTH,
                      peak: IMAGE_HEIGHT,
                      resizeMode: "cowl",
                    }}
                  />
                </Animated.View>
              );
Now when swiping, the opacity is utilized primarily based on the enter vary.
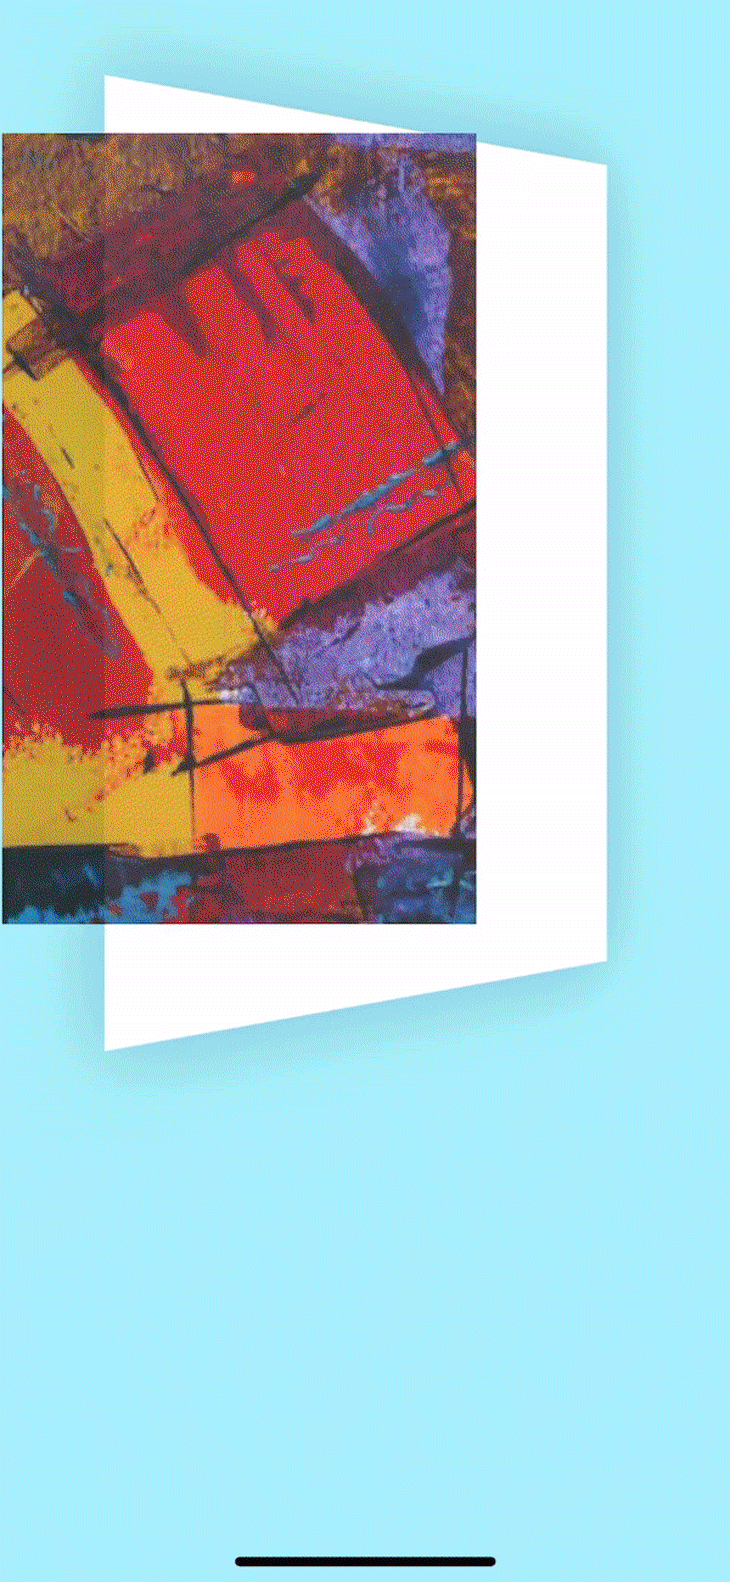
Including backgrounds
Let’s add a white background to intensify the 3D animation after we swipe the picture.
Beneath the View, paste the beneath code block.
 <View
            model={{
              width: IMAGE_WIDTH + SPACING * 4,
              peak: 450,
              place: "absolute",
              backgroundColor: "white",
              backfaceVisibility: true,
              zIndex: -1,
              high: SPACING * 1,
              left: SPACING * 1.7,
              backside: 0,
              shadowColor: "#000",
              shadowOpacity: 0.2,
              shadowRadius: 24,
              shadowOffset: {
                width: 0,
                peak: 0,
              },
            }}
          />
        </View>
The subsequent step is to animate the white background so that it’s going to rotate in a 3D view. However earlier than we try this, let’s work out a option to view the inputRange between 0 and 1.
On the high of our Carousel part, create a progress variable utilizing the strategies divide() and modulo() from the Animated API, which allow us to modify and get the values between 0 and 1. The progress variable allows us to clamp our values to be between 0 and 1.
export default () => {
  const scrollX = React.useRef(new Animated.Worth(0)).present;
  const progress = Animated.modulo(Animated.divide(scrollX, width), width);
We at the moment are prepared to begin modifying the View part that holds our white background. As we did beforehand, convert the View part into an Animated.View.
A remodel enter is handed into the Animated.View part; the remodel receives a perspective and a rotateY.
          <Animated.View
            model={{
              width: IMAGE_WIDTH + SPACING * 4,
              peak: 450,
              place: "absolute",
              backgroundColor: "white",
              backfaceVisibility: true,
              zIndex: -1,
              high: SPACING * 1,
              left: SPACING * 1.7,
              backside: 0,
              shadowColor: "#000",
              shadowOpacity: 0.2,
              shadowRadius: 24,
              shadowOffset: {
                width: 0,
                peak: 0,
              },
              remodel: [
                {
                  perspective: IMAGE_WIDTH * 4,
                },
                {
                  rotateY: progress.interpolate({
                    inputRange: [0, 0.5, 1],
                    outputRange: ["0deg", "90deg", "180deg"],
                  }),
                },

              ],
            }}
          />
The repo for this undertaking is out there on GitHub.
Conclusion
On this article, we’ve explored utilizing Three.js to create 3D content material in React Native. Three.js allows the rendering of 3D fashions in React Native environments. When coupled with the Animated API, these instruments can present us with further flexibility that allows us to construct smoother and extra engaging views for our customers. That is only a style of the superb animations that may be carried out with the Animated API.
Hopefully, this text serves as an exploratory information for future builders to create nice consumer experiences.
LogRocket: Immediately recreate points in your React Native apps.

LogRocket is a React Native monitoring answer that helps you reproduce points immediately, prioritize bugs, and perceive efficiency in your React Native apps.
LogRocket additionally helps you enhance conversion charges and product utilization by displaying you precisely how customers are interacting along with your app. LogRocket’s product analytics options floor the the explanation why customers do not full a specific movement or do not undertake a brand new characteristic.
Begin proactively monitoring your React Native apps — strive LogRocket free of charge.
