
TL;DR
Via this text you’ll be able to study
- the essential technique of React part testing
- how we check Semi Design react part with Jest/ Cypress.io/ Chromatic.
- easy methods to mix check report of a number of check instruments
Estimated studying time: 25 ~ 30 min
Associated Introduction
Semi Design is maintained by the Douyin front-end and UED groups. It’s dedicated to effectively connecting designers and builders, linking DesignOps & DevOps, and offering a contemporary design system with excessive customization capabilities,  Present greater than 2,300+ Design Tokens and highly effective DSM instruments, straightforward to make Semi Design to Any Design
At current, Semi Design (@douyinfe/semi-ui) gives 60+ frequent parts for Enterprise venture. These embrace easy parts resembling Button, Enter, Card, and complicated parts resembling Kind, Desk, TreeSelect, Cascader. These parts comply with Semi’s design language by default, and customers may also customise the bundle based mostly on software situations.
With the intention to preserve the consistency of UI and interplay for every part throughout model iterations, the testing of part libraries is especially necessary. On this article, we’ll share the next content material across the theme of “How We Check Semi Design React Part”:
- Why ought to we check the part library?
- Methods to consider the check impact?
- Methods to implement part library testing?
- Methods to mix CI for testing?

1.1 Why
Semi ui gives basic and customizable React parts. We have to be sure that the essential interplay of the parts can work usually, for instance, clicking a button can set off a button click on occasion, and clicking a selector can set off an choice choice occasion, and so forth.
As well as, Semi parts have a set of normal design language by default, together with textual content, coloration, dimension, spacing, and so forth. We have to be sure that the part show conforms to Semi’s design specs.
1.2 The place
// Semi Github Repository Listing
├── semi-animation          # js animation
├── semi-animation-react    # react animation
├── semi-animation-styled   # model animation
├──  semi-basis      # basis
│   ├── button
│   ├── ...
├── semi-icons              # icon
├── semi-illustrations      # illustrations
├── semi-theme-default      # theme
├──  semi-ui              # react adapter
│   ├── button
│   ├── ...
├── ...                     # Packaging associated

// https://github.com/DouyinFE/semi-design/tree/foremost/packages
semi-basis # basis
│ ├── button
│ ├── ...
├── semi-icons # icon
├── semi-illustrations # illustrations
├── semi-theme-default # theme
├── semi-ui # react adapter
│ ├── button
│ ├── ...
├── ... # Packaging associated
// https://github.com/DouyinFE/semi-design/tree/foremost/packages
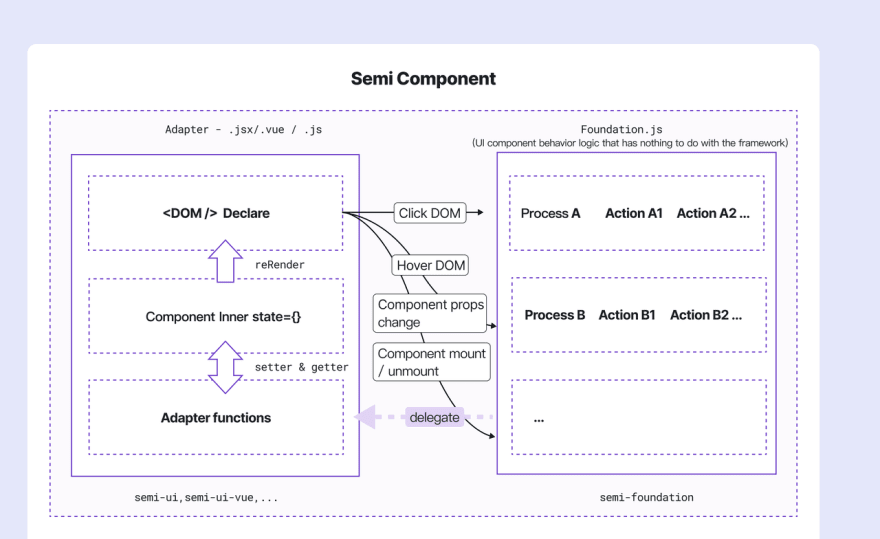
Semi part library is a React part library based mostly on the inspiration + adapter structure. The muse layer contains TypeScript code that has nothing to do with front-end frameworks resembling React, Vue, and so forth. The adapter layer is a React implementation based mostly on basis. Our check scope is these two layers associated code.
-
basis:
@douyinfe/semi-foundation, contains framework-agnostic TS code, which is transformed to JavaScript code when the part is revealed -
adapter:
@douyinfe/semi-ui, contains React UI code
As well as, the animation of Semi parts depends on semi-animation associated packages, which aren’t in our testing scope resulting from much less dynamic modifications and excessive testing complexity.
Check analysis contains two points: check go fee and check protection. The check go fee is the underside line, which ensures that the examined capabilities won’t be affected by model iterations, and the check protection fee measures whether or not the check code is complete.
Through the improvement of the part, we’ll use the handbook check technique to verify whether or not the part perform can run usually, and within the iteration of the model, we have to use the automated check to assist us check.
2.1 Guide testing
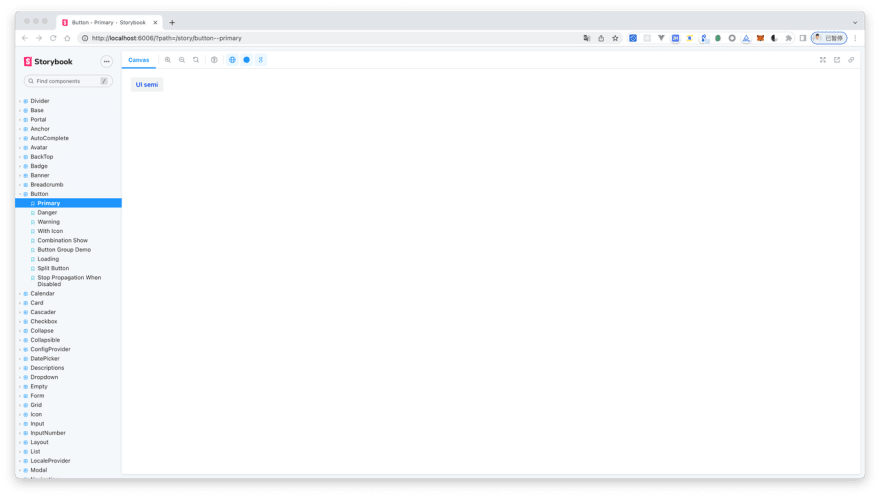
In Semi’s part improvement course of, we’ll first begin a Storybook venture, develop part based mostly on Storybook, and write use instances equivalent to our part API by means of tales. With these use instances we are able to browse part kinds and check part interactions
For instance, within the picture under, we create a narrative for the first kind of the Button part, and manually verify whether or not the background coloration and font coloration are appropriate.
export const Major = () => <Button kind="main">UI semi</Button>;
2.2 Computerized testing
Guide testing is just appropriate for the event part, and there’s no assure that the part will preserve the consistency of UI and interplay throughout the iteration course of. Subsequently, we have to introduce check instruments to assist check. Semi Groups usually writes check instances after part improvement is full. We check the performance of the part by writing check instances, after which verify whether or not the UI show and interplay conduct of the part meet expectations in line with the go fee and code protection of the check instances.
2.3 Code protection
Along with the go fee of handbook and automatic checks, code check protection can also be an necessary criterion for check analysis. In accordance with Wikipedia’s definition,”Code protection is a measure in software program testing that describes the proportion and extent to which the supply code in a program is examined. The ensuing proportion is named code protection”. Code protection contains perform protection, assertion protection, situation protection, judgment protection, and line protection.
- Operate protection: are there calls to each perform in this system? Whether or not the perform has been known as.
- Assertion protection: is there a name to every assertion? In JS, values, operators, expressions, key phrases, and feedback are all statements.
- Situation Protection: is every situation in every logical expression (logical expression that can’t be decomposed any extra) executed?
- Judgment protection: is there a name to each department within the logical expression? The “if instruction” is true or not.
- Line Protection:has this line been executed? A line could comprise a number of statements and branches.
There are three testing strategies for Semi part library, particularly unit testing, E2E testing and Visible testing. The next describes the check situations of those three and easy methods to use them to check parts.
3.1 Unit testing by Jest
What’s unit testing? In accordance with the definition of Wikipedia, “In pc programming, unit testing, also called module testing, is a check work for correctness verification of program modules (the smallest unit of software program design).” From the attitude of the Semi part library, unit testing is the testing of parts.
3.1.1 Technical options
Semi unit testing technical options:
- Check framework: Jest, which gives capabilities resembling runnable atmosphere, check construction, check report, assertion, mocking, and so forth.
- Auxiliary testing library: Enzyme, primarily used for React part render
- Auxiliary check library: JSDOM, which gives a DOM operation atmosphere within the Node atmosphere and is used along side Enzyme’s Full DOM Rendering scene
- Auxiliary check library: Sinon, gives spy, stub, mock for occasion testing and callback perform testing
3.1.2 Check content material
Semi unit checks primarily embrace:
- the right DOM tree the part must be rendered in
- Whether or not the properties of the part are handed appropriately (whether or not the tactic is named appropriately, and so forth.)
- Whether or not the person behaviors inside the part reply appropriately
3.1.3 Frequent API Examples
 For instance, we need to check whether or not the className or model of the Button part is appropriately rendered:
import Button from '../index';
describe('Button', () => {
    it('button with customized className & model', () => {
        // Mount a Button with className and elegance
        const wrapper = mount(<Button className="check" model={{ coloration: 'pink' }} />);
        anticipate(wrapper.hasClass('check')).toEqual(true);
        anticipate(wrapper.discover('button').getDOMNode().model.coloration).toBe('pink');
    });
});
Or check {that a} Button with an icon renders the icon appropriately:
it(`button with icon`, () => {
    const iconType = `semi-icon-edit`;
    const elem = mount(<Button icon={<IconEdit />} />);
    anticipate(elem.discover(`.${iconType}`).size).toBe(1);
});
Check that the part’s properties are handed appropriately:
it('enter', () => {
    const enter = mount(<Enter  />);
    anticipate(enter.state().disabled).toEqual(false); // learn state straight
    anticipate(enter.props().disabled).toEqual(false); // learn props
 })
Modify the state and props to check whether or not the part UI state has modified appropriately:
// Simulate the exterior state modifications of the part by means of the setState and setProps interfaces
// check whether or not the UI responds appropriately when the part state modifications dynamically
it('change props & state', () => {
    const enter = mount(<Enter />);
    enter.setProps({ disabled: true }) ;
    enter.setState({ worth: 1 })
    enter.replace();
    anticipate(enter.props().disabled).toEqual(true);
    anticipate(enter.state().worth).toEqual(1);
}
Check that the part’s occasion callback is named:
 it('enter ought to name onChange when worth change', () => {
     let inputValue = 'semi';
     let occasion = { goal: { worth: inputValue } };
     let onChange = () => {};
     // Use sinon.spy to encapsulate callback capabilities
     // Operate name info will be collected after spy
     let spyOnChange = sinon.spy(onChange);
     const enter = mount(<Enter onChange={spyOnChange} />);
     // Discover the native enter component, set off the simulation occasion
     // simulate the worth change of the enter
     enter.discover('.semi-input').simulate('change', occasion);
     anticipate(spyOnChange.calledOnce).toBe(true); // onChange callback is executed as soon as
 })
3.1.4 Some Ideas of jest / enzyme
- 3.1.4.1 Mount a part with a popup layer, however cannot discover the DOM equivalent to the popup layer?
Enzyme’s default mount will solely mount the part itself to a div container, to not the doc. The pop-up layer is inserted into doc.physique by way of appendChild, so the container of the portal can’t be discovered. If it’s not inserted, there will likely be no pop-up layer.
Use attachTo to mount the container to a particular div within the physique. Word that you just additionally must create and destroy in beforeEach and afterEach.
// mount(part, { attachTo: container })

describe('AutoComplete', () => {
    beforeEach(() => {
        // Keep away from `attachTo: doc.physique` Warning
        const div = doc.createElement('div');
        div.setAttribute('id', 'container');
        doc.physique.appendChild(div);
    });

    afterEach(() => {
        const div = doc.getElementById('container');
        if (div) {
            doc.physique.removeChild(div);
        }
    });

    it('customized className & model', () => {
        let props = {
            className: 'check',
            model: {
                coloration: 'pink'
            }
        };
        const wrapper = mount(<AutoComplete {...props} />, { attachTo: doc.getElementById('container') })
    });
})
- 3.1.4.2 JSDOM doesn’t comprise a Format engine, so when calling the getBoundingClientRect perform and getting the offsetWidth, it all the time returns 0?
We will use getComputedStyle to get CSS properties, #135
- 3.1.4.3 Error when import es module in jest
For instance, once we import { get } from lodash-es. Error reporting By default, modules in node_modules won’t go to babel-jest, whereas lodash-es exports ES modules, and CommonJS is required within the Node atmosphere.
Resolution:Put all packages beneath node_modules that must be compiled with babel-jest, Configure the corresponding module path in transformIgnorePatterns
// The modules in node_modules that must be processed by babel-jest are declared right here
let ModuleNeedCompile2Cjs = [
    'lodash-es',
    'react-dnd',
    'dnd-core',
    'react-dnd-html5-backend'
].be a part of('|');

jestConfig.transformIgnorePatterns: [`<rootDir>/node_modules/(?!(${ModuleNeedCompile2Cjs}))`]
3.1.5 Benefit & drawback
 Unit testing is a check from the programmer’s standpoint. When writing, it’s extra to check whether or not the return results of every perform within the part is identical because the anticipated worth. It’s appropriate for testing the state of React parts, the invocation of callback capabilities, and the switch of parameters and properties. Mounting and rendering of parts, and so forth.
 Nevertheless, this check technique has some flaws. It depends extra on the belief within the state of the part, quite than testing the true interplay of the person. For some interplay operations which might be strongly associated to the person, resembling scrolling, delay or web page leaping, subsequently, we additionally want a check technique that may simulate person conduct – E2E check.
3.2 E2E testing by Cypress
E2E is the abbreviation of “Finish to Finish”. It checks whether or not the part behaves as anticipated by simulating the person’s actions within the browser.
3.2.1 Plan choice
Semi has performed analysis on numerous check platform instruments within the business (resembling TestCafe, Testim.io, Cypress, CrossBrowserTesting, Webdriver.io, Nightwatch…), after complete comparability of a number of dimensions resembling ecological perfection, characteristic richness, GUI ease of use, the feasibility of secondary improvement of plug-ins, we lastly adopted Cypress as our E2E testing device and Chromatic as our UI testing device.
3.2.2 Check content material
Within the early stage of the Semi part library, we used unit testing, which may fulfill most check situations, however with the iteration of parts, we discovered that there are some untestable situations in unit testing, such because the calculation of Tooltip pop-up place, Slider dragging transfer a distance, and so forth. We urgently want a way to complement these untested and extra complicated situations. After analysis, we launched Cypress for E2E testing. Cypress enhances present unit checks, and its implementation price will likely be a lot lower than unit checks within the following two situations:
- The primary one is to make use of unit checks to jot down tedious check instances for lengthy operation paths;
- The second is a few operations that aren’t straightforward to implement by means of unit testing.
It primarily contains (however will not be restricted to) the next working situations:
- scrolling conduct:Anchor、BackTop、Desk、ScrollList、DatePicker、TimePicker
- DOM location:Tooltip(The situation of the popup is at present untestable with Enzyme + JSDOM)
- kind submission:Kind
- async delay conduct:Notification、Toast
- hyperlink bounce:Navigation
- complicated use case:Tree、TreeSelect、Desk
JSDOM is a pure JS implementation of net requirements like DOM and HTML for Node.js. When used with Enzyme, JSDOM emulates the DOM manipulation atmosphere for Enzyme.
However there are some limitations like no navigation and format. JSDOM will return 0 when utilizing format associated capabilities like getBoundingClientRects and properties like offsetTop .
3.2.3 Frequent API examples
Check the scrolling conduct of the Anchor:
 it('scroll', () => {
      // go to storybook
      cy.go to('http://127.0.0.1:6006/iframe.html?id=anchor--target-offset&args=&viewMode=story');
      cy.get('#field').scrollTo('backside');
      // Examine whether or not the anchor title of the at present chosen state after scrolling is doc1
      cy.get('.semi-anchor-link-title-active').comprises('doc1');
      cy.get('#field').scrollTo('prime');
      // See if the highest header no matter seems within the web page, i.e. efficiently scrolled to the highest
      cy.get('h1').comprises('no matter').click on();
  });
Check the Tooltip’s popup conduct:
it('leftTopOver autoAdjustOverflow', () => {
    const viewportWidth = 1200;
    const viewportHeight = 660;
    const triggerWidth = 200;
    const triggerHeight = 32;
    const leftTopPosition = { offset: { prime: 0, left: 0 } };
    const rightBottomPosition = { offset: { prime: -viewportHeight + triggerHeight, left: -viewportWidth + triggerWidth } };
    cy.go to('http://127.0.0.1:6006/iframe.html?id=tooltip--left-top-over-auto-adjust-overflow&args=&viewMode=story');

    // Management viewport dimension
    cy.viewport(viewportWidth, viewportHeight);
    const dataSelector = `[data-cy=leftTopOver]`;
    cy.get(dataSelector).scrollIntoView(leftTopPosition);
    cy.get(dataSelector).click on({ pressure: true });

    // Decide whether or not the tooltip pop-up place is appropriate
    cy.get('[x-placement="leftTopOver"]').ought to('have.size', 1);

    // After altering the offset place of the scroll bar, decide whether or not the pop-up place of the tooltip is appropriate
    cy.get(dataSelector).scrollIntoView(rightBottomPosition);
    cy.get('[x-placement="rightBottomOver"]').ought to('have.size', 1);
});
Check that the autoplay of the carousel is as anticipated:
it('auto play interval', () => {
    cy.go to('http://127.0.0.1:6006/iframe.html?id=carousel--auto-play-example&args=&viewMode=story');
    cy.get('.semi-carousel-content-item-active h3').comprises('1');
    cy.wait(1300); // Autoplay interval is 1300ms
    cy.get('.semi-carousel-content-item-active h3').comprises('2');
    cy.wait(1300);
    cy.get('.semi-carousel-content-item-active h3').comprises('3');
});
3.2.4 Benefit & drawback
Cypress utilized by Semi makes up for the inadequacy of the Jest unit check and is appropriate for testing the true API of the browser. We will use the browser’s getBoundingClientRects to acquire the DOM place info, or go in pageX and pageY within the mouseover occasion to attain Drag to the required location. However it’s exactly as a result of the check is an actual browser, its check case execution time will likely be considerably better than the execution time of Jest + Enzyme.
3.3 Visible testing by Chromatic
Chromatic is a static part visible comparability check device that detects the visible variations of tales by evaluating snapshots (pictures rendered by parts, or snapshots). Snapshot checks are run in parallel and may run 2000+ checks in 1 minute.
Chromatic can present us with the next companies to make sure the consistency of our UI library:
- Shared workspace. With every code push motion, Chromatic publishes a Storybook of the code to its CDN, whereas offering the workforce with a shared workspace to touch upon and evaluation UI modifications collectively. It really works with the Github motion utilized by Semi.
- Gives visible regression in check parts. Chromatic turns tales into benchmarks. Every story is concurrently rendered in Chrome, Firefox and Web Explorer 11, then in comparison with a “final recognized good” snapshot to detect bugs.
- View visible changesets for parts affected by every PR. Chromatic compares new and up to date parts on a given department to the goal department to generate UI changesets.
Use Chromatic for UI testing, no want to jot down extra check case code, every story is its snapshot use case.
The next is a short introduction to the use means of Chromatic.
3.3.1 Technique of UI diff
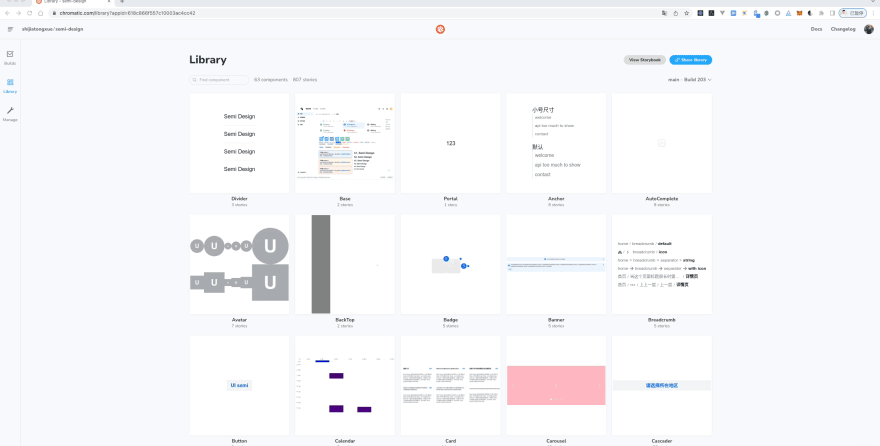
- Step 1: Construct Storybook, publish to Chromatic Cloud

In Chromatic testing, every PR (rebuild after replace) is a construct course of. At present Semi Design has created 807 tales for 63 parts, every story comprises use instances of a number of parts, and every construct will evaluate the snapshots created by these 807 tales.
- Step 2: UI regression testing, evaluating modifications, updating baseline
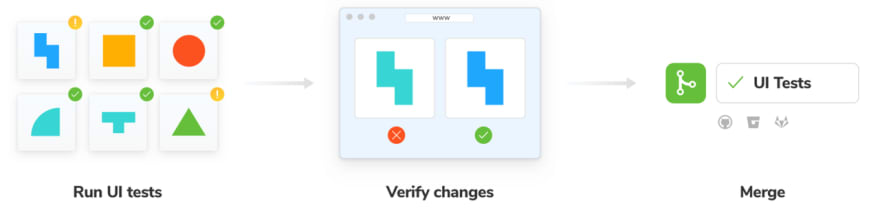
On the Chromatic platform, we are able to click on the construct particulars to see if the modifications are as anticipated. Settle for for conforming modifications and deny for non conforming modifications.
- Settle for:Replace the baseline of the story. When a snapshot is accepted, except it modifications, it doesn’t must be re-accepted (even by way of git department or git merge)
- Deny:Marked as “rejected”, this construct is instantly up to date to fail standing. A construct can reject a number of modifications.
Settle for Instance: The Enter password button has modified. The left is the baseline, and the correct is the brand new construct change. You’ll be able to see that the password button within the non-disabled state on the correct facet of the image has grow to be a everlasting show, which was displayed when the hover or focus enter field was used earlier than. Nevertheless, this replace was anticipated, so we selected to simply accept this variation.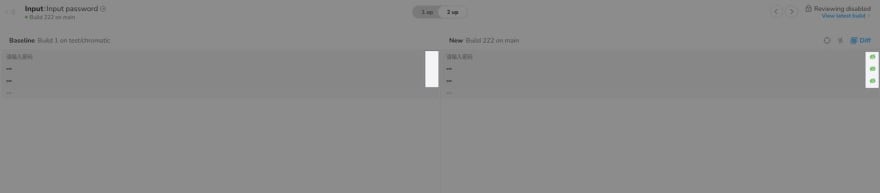
Deny Instance: Breadcrumb gives the power to show ellipses when the textual content exceeds the set width. The brand new construct on the correct under doesn’t present ellipsis, right here we anticipate no change, so select to reject this variation.。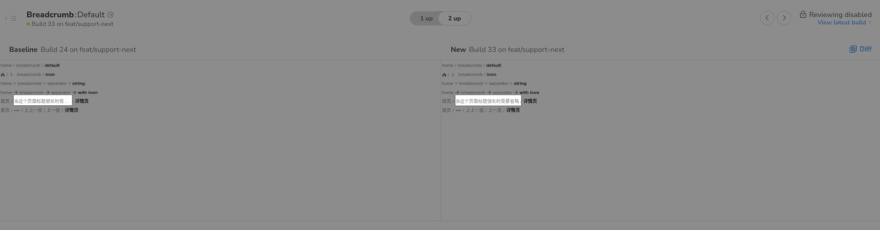
After we discover an surprising change within the model, we first must reject the change, after which modify our model code. After pushing the code to the Github repository, Chromatic will rebuild it, and eventually we evaluation the change once more.
3.3.2 Benefit & drawback
Chromatic is appropriate for UI regression testing of static parts. It could evaluate snapshots of parts between completely different builds, lowering the price of handbook regression testing of part kinds. It gives event-triggered hooks that may be fired at completely different phases of the check.
Via this hook, a message will be despatched to the developer after the check is accomplished to tell the standing of the part check.
After all, Chromatic additionally has some limitations. At present, it will possibly solely check static parts. The variety of snapshot checks varies in line with completely different companies. The open supply free plan solely gives 35,000 snapshot checks monthly. So we have to select the timing to set off the diff comparability extra exactly. ( That is affordable, as a result of we can’t occupy the check assets infinitely)
We wrote related unit check and E2E check code for the part API. And which line or perform within the supply code has not been examined, we have to verify the code protection.
Semi makes use of Jest and Cypress to jot down our check code, each of them can get corresponding code protection.
For instance, in Jest, we wrote check code resembling part callback capabilities, and in Cypress, we wrote check code for scroll occasions, and the check report generated by them solely contains the code protection equivalent to the check code.
Nevertheless, for the part library, what we want is to acquire the general code protection of the repository, which will be examined in any method, so we have to mix the check stories of those two components collectively when counting the code protection.
4.1 The precept of protection statistics
The statistics of code protection contains two core steps. Step one is to insert a counter in every line of the supply code. The second step is to run the check code, and rely the execution of the supply code throughout the operating course of, and accumulate the counters.
There are corresponding instruments for these two steps, and we briefly present the method under.
Take a easy rely perform for instance:
module.exports = perform rely(a, b) {
    return a + b;
}
Step one is to insert a counter into the supply code. We use nyc to course of the rely perform. After nyc processing, the perform will grow to be:
nyc is a bundle for statistical code protection.
// cov_1mo7xf3ci8 is a perform title randomly generated
// by nyc
// Calling it returns a world object that holds a reference // to the counter
const counters = cov_1mo7xf3ci8();
module.exports = perform rely(a, b) {
  // When the code executes to this line
  // the rely perform is named as soon as,
  // and the counter f[1] will likely be incremented by 1
  counters.f[0]++;
  // When the code executes to this line
  // it signifies that return a+b is named as soon as
  // and the counter s[1] will likely be incremented by 1
  counters.s[1]++;
  return a + b;
};
our check code:
const rely = require('../src/index');
const assert = require('assert');

// A quite simple check code that checks rely(1,2)=3
describe('check', () => {
    it("rely", () => {
        assert.equal(rely(1, 2), 3);
    });
});
After operating, nyc will generate a code protection report of the rely perform in line with the statistics of the counter.
======= Protection abstract ===============
Statements   : 100% ( 2/2 )
Branches     : 100% ( 0/0 )
Capabilities    : 100% ( 1/1 )
Traces        : 100% ( 2/2 )
========================================
Comparable to the statistics of Semi Design code protection, in step one, we have to convert the semi-ui and semi-foundation supply code and insert the counter;
The second step runs our Enzyme and Cypress check code to generate a check protection report for the supply code. As a result of Enzyme and Cypress check frameworks are completely different, we have to generate two check stories and merge the check stories.
4.2 Testing report
4.2.1 Jest + Enzyme
Jest gives the --coverage parameter. When operating a unit check, we are able to generate a check report for the unit check by passing this parameter on the command line.
We put Jest’s code protection report within the check/protection listing beneath the basis listing by setting the Jest configuration.
NODE_ENV=check kind=unit ./node_modules/.bin/jest --coverage
4.2.2 Cypress
Producing code protection for Cypress is a little bit trickier.
We have to customise insert counters and generate protection stories.
Cypress gives documentation for getting code protection.
- Step 1: Insert the counter
We have to first remodel the Semi supply code and insert the counters wanted to generate code protection. The supply code will be remodeled utilizing the nyc or babel plugins.
Semi selected the babel plugin  . The reason being that the babel plugin connects seamlessly with Storybook’s Webpack configuration. If utilizing nyc must generate a short lived listing, we additionally want to alter the supply listing referenced by Storybook, so this answer will not be adopted.
We insert the babel-plugin-istanbul plugin into the Storybook Webpack configuration, and the corresponding configuration is as follows.
const nycConfig = require('../../nyc.config');

// storybook webpack config
module.exports = {
  // ...,
  babel: (choices) => {
    const istanbulPluginOption = [
      'babel-plugin-istanbul',
      {
        "include": nycConfig.include,
        "exclude": nycConfig.exclude
      }
    ];

    // If it's a check atmosphere, insert the istanbul babel plugin
    if (utils.isTest()) {
      choices.plugins.unshift(istanbulPluginOption);
    }

    return ({
      ...choices,
    })
  }
 }
babel-plugin-istanbul set exclude to filter out Semi supply code that doesn’t must be examined, resembling story information and packaging associated information.
We create a brand new nyc.config.js within the root listing, configure the variables associated to code protection statistics, and seek advice from the related configuration within the Storybook above.
module.exports = {
    // cypress's code protection statistics file is right here
    "report-dir": "cypress/protection",
    "reporter": ["text", "json", "lcov"],
    "all": true,
    "embrace": [
        "packages/semi-ui/**/*.{js,jsx,ts,tsx}",
        "packages/semi-foundation/**/*.{js,jsx,ts,tsx}"
    ],
    "exclude": [
        "**/*.test.js",
        "**/*.stories.js",
        "packages/**/scripts/**",
        "packages/**/types/**",
        "packages/**/__test__/**",
        "packages/**/_story/**",
        "packages/**/getBabelConfig.js",
        "packages/**/gulpfile.js",
        "packages/**/webpack.config.js"
    ]
};
- Step 2: Acquire code protection stories
We comply with the Cypress documentation to configure the Semi supply code protection when operating Cypress check instances.
First, set up@cypress/code-coveragebecause the dev dependency of the venture and introduce the dependency inplugin/index.js.
module.exports = (on, config) => {
    require('@cypress/code-coverage/process')(on, config);
    return config;
};
Second, add a reference to help/index.js.
import '@cypress/code-coverage/help';
@cypress/code-coverage merges Cypress’s particular person checks and produces merged check outcomes. (Really, it additionally calls nyc to generate the corresponding check report)
4.2.3 Mixed testing report
After producing the 2 code coverages, we use the instanbul-combine bundle to merge the code protection stories of Enzyme and Cypress, and generate a merged report. These information saved in:
- Enzyme: check/protection/coverage-final.json
- Cypress: cypress/protection/coverage-final.json
- Mixed: check/merged
Run the command to merge the code protection:
npx istanbul-combine -d check/merged -p element -r lcov -r json cypress/protection/coverage-final.json check/protection/coverage-final.json
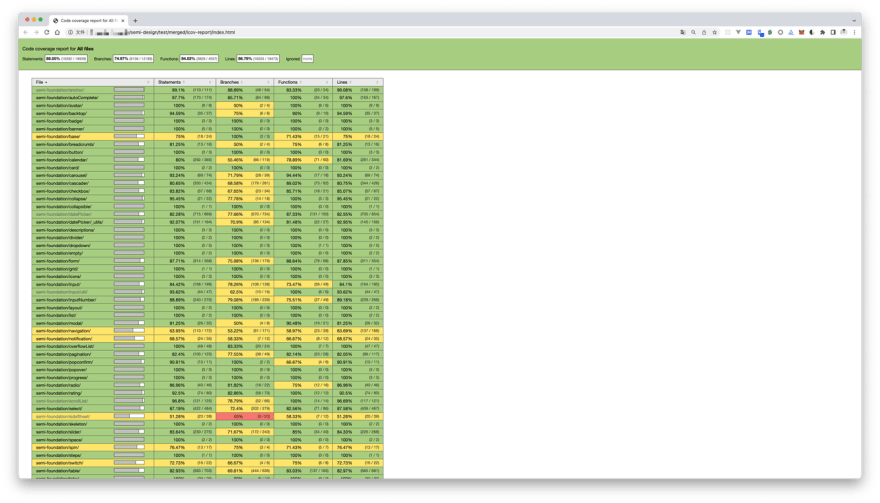
You’ll be able to see that the mixed code protection is:
- Assertion Coverages:86.5%
- Branches Coverages:74.9%
- Capabilities Coverages:84%
- Line Coverages:86.7%
Working check instructions manually and getting check stories is just too tedious.
We at the moment are automating this course of with CI (Steady Integration) instruments.
5.1 Github motion
Github motion gives steady integration capabilities. We hope to routinely run the check course of and merge check stories when pushing code to the repository or when there’s a pull request to the repository.
Now we add the check.yml file beneath workflows within the repository.
title: check

on:
  push:
    branches: [ main, release, test-code-coverage ]
  pull_request:
    branches: [ main, release ]

  workflow_dispatch:

jobs:
  jest:
    runs-on: ubuntu-latest
    steps:
      - makes use of: actions/checkout@v2
      - makes use of: actions/setup-node@v2
        with:
          node-version: '14'
      - title: Run set up
        run: npm i -g lerna && npm run bootstrap
      - title: Run Jest check
        run: npm run check:protection
      - title: Archive Jest protection
        makes use of: actions/upload-artifact@v3
        with:
          if-no-files-found: error
          title: jest
          path: check/protection/coverage-final.json
  cypress:
    runs-on: ubuntu-latest
    steps:
      - makes use of: actions/checkout@v2
      - makes use of: actions/setup-node@v2
        with:
          node-version: '14'
      - title: Run set up
        run: |
          npm i -g lerna
          npm run bootstrap
      - title: Construct storybook
        run: |
          npm run pre-story
          TEST_ENV=check npm run build-storybook
      - title: Serve storybook
        run: nohup npx http-server -p 6006 storybook-static &
      - title: Run Cypress check
        run: npx wait-on http://127.0.0.1:6006 && ./node_modules/.bin/cypress run
      - title: Archive Cypress protection
        makes use of: actions/upload-artifact@v3
        with:
          if-no-files-found: error
          title: cypress
          path: cypress/protection/coverage-final.json
  protection:
    runs-on: ubuntu-latest
    wants: [jest, cypress]
    steps:
      - makes use of: actions/checkout@v2
      - makes use of: actions/setup-node@v2
        with:
          node-version: '14'
      - title: Obtain Jest protection
        makes use of: actions/download-artifact@v3
        with:
          # add jest and cypress protection to output dir
          path: output
      - title: Code protection merge
        run: |
          tree output
          npx istanbul-combine -d check/merged -p element -r lcov -r json output/cypress/coverage-final.json output/cypress/coverage-final.json
          tree check/merged
      - title: Run codecov
        run: npx codecov --token=${{ secrets and techniques.CODECOV_TOKEN }} --file=check/merged/coverage-final.json
This workflow first installs the venture’s dependencies, then runs the check instances, merges the check stories, and eventually uploads the check outcomes to Codecov.
5.2 Codecov
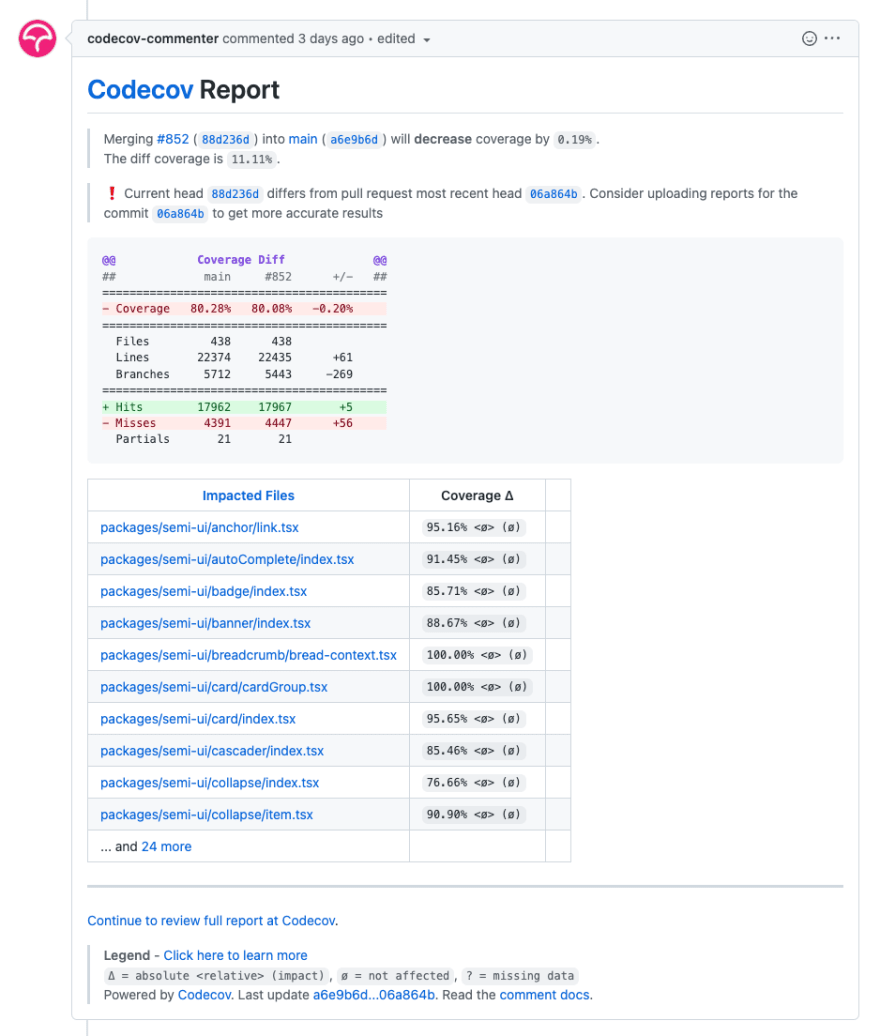
Within the workflow above, we lastly uploaded the code protection report back to the Codecov platform.
Codecov.io gives protection on-line viewing, PR remark check protection reporting, and badge technology.
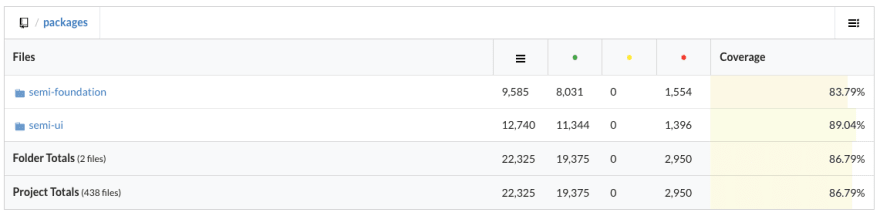
On the Codecov platform we are able to view the code protection of every file.
On the Github PR web page, after operating the check workflow, Codecov will touch upon the code protection modifications for the present PR.
The feedback will present which file’s protection has modified by how a lot.
Codecov.io may also generate a badge displaying the present code protection of the repository.
We open Codecov’s settings and replica the badge’s hyperlink to the repository’s README.md.

Lastly, we get a badge like this.

The testing answer of the Semi Design used Jest + Enzyme within the early stage. Because the venture iterated, we discovered that it couldn’t meet our testing wants. After evaluating the favored E2E testing frameworks in the neighborhood, we selected Cypress, which may complement the situations that Jest can’t check and additional enhance our testing scope and code protection.
The 2 instruments have their very own utilization situations, and so they can be utilized together to check the part library within the venture.
Finally, Semi achieved ~90% line protection with Jest and Cypress. Along with this, we additionally visible testing the UI with Chromatic to keep away from surprising UI modifications to parts.
Going ahead, along with testing the interplay and UI of the part, the efficiency of the part can also be a difficulty that we have to take note of.
Sooner or later, Semi can even add checks associated to part efficiency, in order that maintainers can understand the efficiency loss brought on by part modifications and keep away from main efficiency issues throughout part iteration.
