
As one of many most generally used FTP purchasers, FileZilla serves as a typical go-to answer for transferring information between computer systems over the web. FileZilla achieves this transferring functionality by linking a shopper with a server so the consumer can ship information backwards and forwards between the 2.
Though there are many different FTP purchasers (with extra fashionable interfaces) to select from, FileZilla maintains its recognition because it’s dependable, simple to make use of, and quick. In brief, it’s simple to get began with FileZilla as a newbie, and skilled customers see this FTP shopper as a trusty companion that at all times will get the job accomplished.
As probably the most extensively used FTP purchasers, FileZilla serves as a typical go-to answer for transferring information between computer systems over the web.  Study extra on this information!
On this article, we’ll speak about the best way to use FileZilla for importing information to your web site and accessing websites information for additional administration.
What Is FileZilla?
FileZilla is an FTP (File Switch Protocol) program or “shopper” that enables customers to maneuver information between computer systems utilizing the web. This implies folks use FileZilla to perform a number of duties, corresponding to:
- Importing information
- Downloading information
- Copying information
- Transferring information
- Renaming information
- Deleting information
FileZilla provides multi-platform assist for sharing information on nearly each kind of laptop. You possibly can set up it on Mac, Home windows, and Linux computer systems.
Why Ought to You Use FileZilla?
The primary query is why would you might want to use FileZilla for FTP within the first place?
Listed here are the primary causes:
- To safe your content material: Customers typically want to maneuver information that incorporates delicate info or information that require a dependable supply with none intruders. Customary FTP isn’t encrypted, however there are different protocols like FTPS and SFTP (each supported in FileZilla) that encrypt information to guard all of it throughout transit.
- For catastrophe restoration: Web site information, irrespective of how safe, have the potential for corruption, deletion, and a wide selection of different issues. Subsequently, it’s clever to make use of FileZilla to switch backups of your website information to different places, like cloud storage or your individual laptop. You possibly can then re-upload broken or lacking information if one thing goes mistaken.
- For transferring giant information: You’ll typically encounter file measurement sending limits with electronic mail, cloud storage instruments, and different file-sharing software program. Customers typically must ship huge information unexpectedly as an alternative of zipping up the information or separating them into smaller information. FTP applications like FileZilla assist the transferring of enormous information for these organizations, like when you’re sending or receiving cumbersome video information or a set of RAW pictures. For better file management: FileZilla supplies consumer permission and entry controls to find out who can share, edit, add, and obtain information by way of the system.
- To enhance your general workflow: FileZilla makes organizations extra environment friendly by permitting them to not solely ship giant information but in addition run different transfers on the identical time. Which means you’ll be able to proceed engaged on one other add or obtain as an alternative of sitting round and ready for every course of. As well as, FTP supplies a uniform customary for sharing information inside a company, as an alternative of leaving everybody to decide on their very own information sharing technique (most of which can be much less efficient). Lastly, all of these information find yourself being saved in a single location, serving to you rapidly discover the information and reduce lack of information.
10 Causes Why You Ought to Contemplate FileZilla Over Different FTP Purchasers
Though there are a number of glorious alternate options, we’re keen on FileZilla for the next causes:
- Accessible: FileZilla provides an intuitive interface that’s acquainted sufficient for all customers and supported on most main working techniques. Subsequently, you shouldn’t have any issues getting located, and also you don’t have to fret about whether or not or not it’s suitable along with your OS.
- Properly documented: The FileZilla web site, and your complete web, are crammed with tutorials on the best way to use FileZilla, get snug with it, and make the most of its many options. This makes it ultimate each for learners and for superior customers needing a function reference. There’s additionally a discussion board to speak with different FileZilla customers.
- Strong and quick: FileZilla is thought for its reliability and pace. These are the 2 principal benefits you need from an FTP shopper, particularly when transferring website information, delicate information, or giant information.
- A number of switch protocols: It helps varied protocols for transferring information, with choices corresponding to FTP, SFTP (SSH File Switch Protocol), and FTP over SSL/TLS (FTPS).
- Multilingual: The software program is on the market in a number of languages.
- Search function: There’s a distant file search function for rapidly finding information. You may as well edit these information from their distant location relying on permissions.
- Simple to make use of: It provides a drag-and-drop interface for quickly transferring round information, together with visible indicators that your information have transferred efficiently.
- Limitless file sizes: You possibly can ship giant information. Technically, FileZilla has no cap on file sizes. But, you’ll have limits out of your internet hosting firm.
- Easy to navigate: The tabbed consumer interface and bookmarking permit for straightforward navigation and discovering of options and information.
- Free: It’s open supply and fully free (except you choose to improve to the Professional model).
Total, it’s precious to learn to use FileZilla for the needs of sharing giant information, managing information extra effectively, and — from a broader perspective — caring for your web site. Even non-technical web site homeowners ought to learn to faucet into the FileZilla FTP so as to change a broken or lacking file. Accessing your information in bulk may imply the distinction between a standard day and the lack of many gross sales.
Basic data of the best way to use FileZilla additionally brings your workflow and firm safety into a greater place. There’s no purpose to ship giant or delicate information in unencrypted emails, and all companies ought to make the most of a safe, quick, and unified file storage and sending system for improved productiveness.
But many website homeowners and builders contemplate FTP an antiquated expertise, particularly in the event that they’re utilizing an internet host with a GUI (graphical consumer interface). We encourage these folks to nonetheless learn to use FileZilla FTP since sticking completely with a GUI places them within the place of relying completely on their internet hosting firm. What when you can’t entry your information from the GUI when your website goes down? What if that host doesn’t have backups otherwise you discover the backups aren’t working correctly?
FTP offers you full management, and that’s what you need in the case of your important information.
A Step-by-Step Information on How To Set up and Use FileZilla
Putting in FileZilla is much like downloading and putting in any piece of software program in your Home windows, Mac, or Linux laptop: You click on the Obtain button, save the set up file to your exhausting drive, then run that file to put in it.
Let’s go over precisely the best way to set up FileZilla.
First, open an internet browser and go to the official FileZilla web site (filezilla-project.org). This homepage supplies two apparent Obtain buttons so that you can select from. Choose the one that claims Obtain FileZilla Consumer (not the Server possibility).
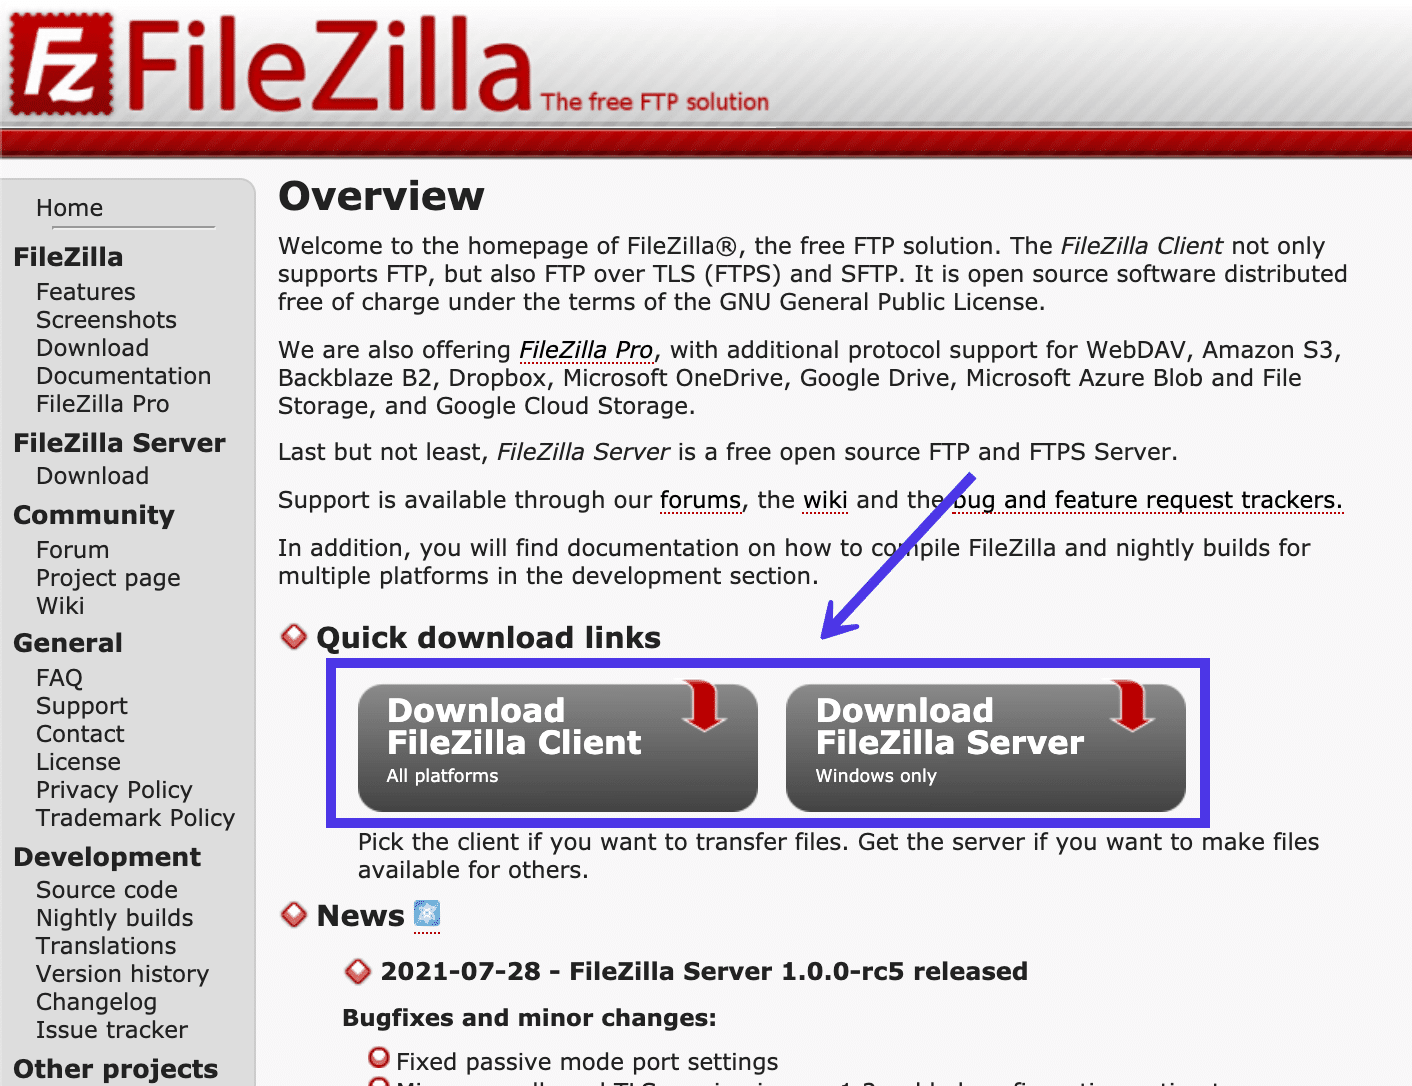
By default, your browser and the FileZilla web site ought to detect which working system is in use in your laptop.
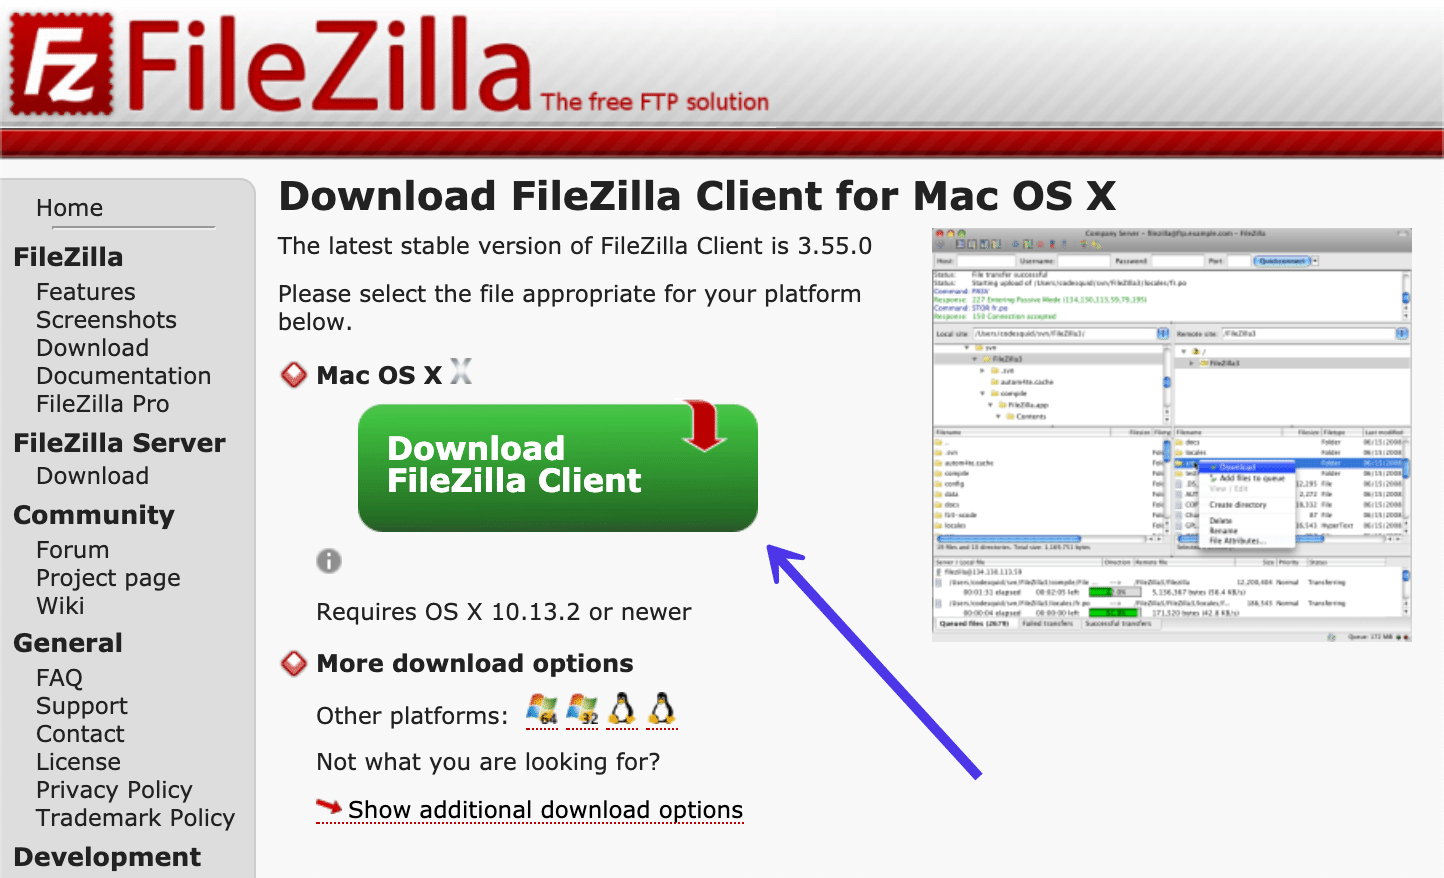
Should you’re not seeing the fitting model to your OS, or when you’d slightly obtain an older model of FileZilla, you’ll be able to look under the massive Obtain button to see different obtain choices.
The small icons symbolize the first working techniques, exhibiting FileZilla variations for:
- Home windows 64 bit
- Home windows 32 bit
- Linux 64 bit
- Linux 64 bit
You may as well choose the Present Further Obtain Choices hyperlink to see the choice, much less generally used variations of FileZilla.
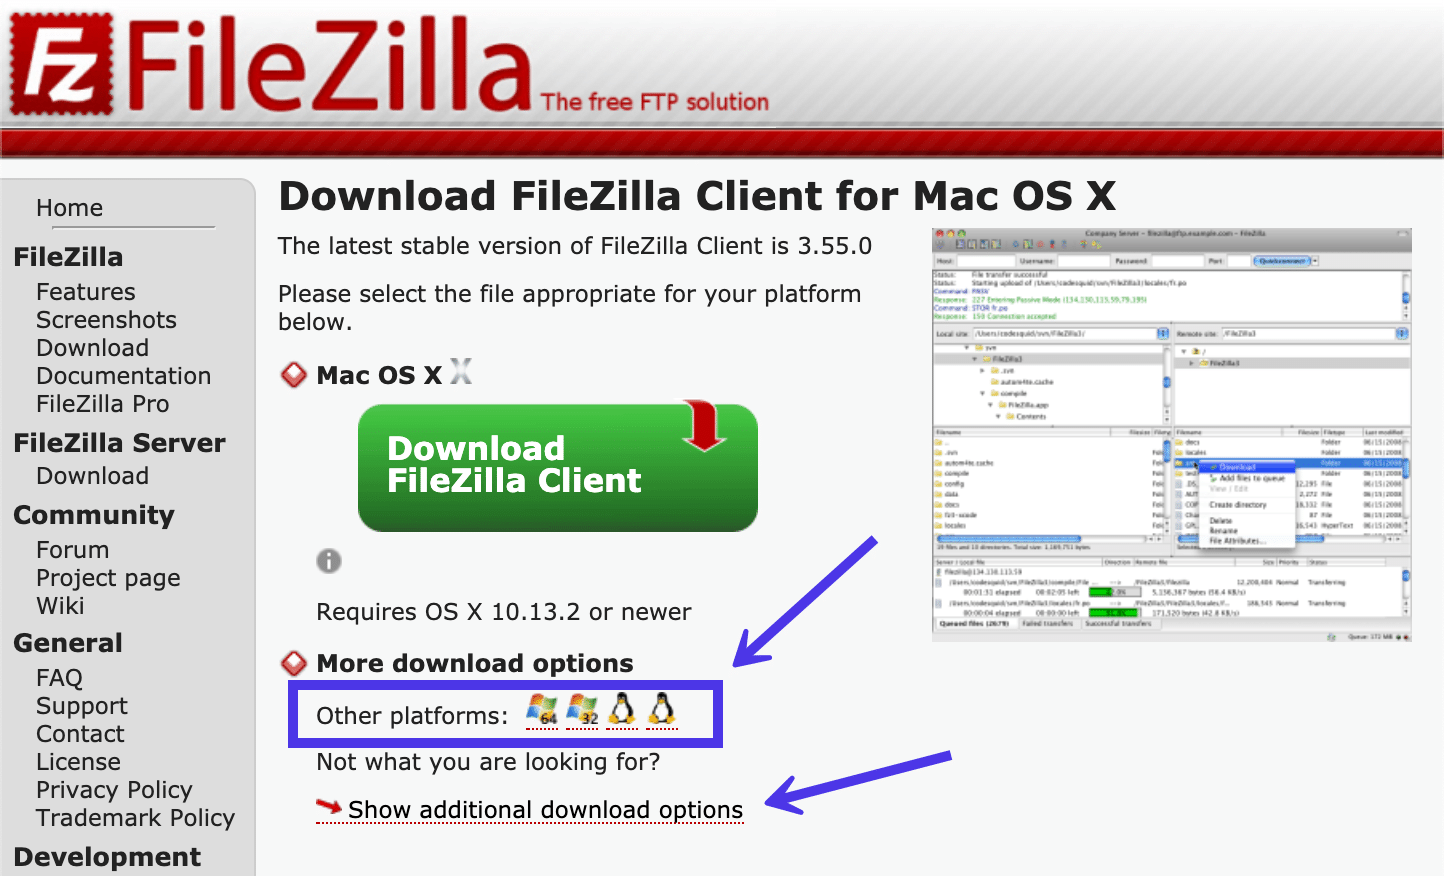
You possibly can view FileZilla variations for different platforms.
You may as well choose the Present Further Obtain Choices hyperlink to see the choice, much less generally used variations of FileZilla.
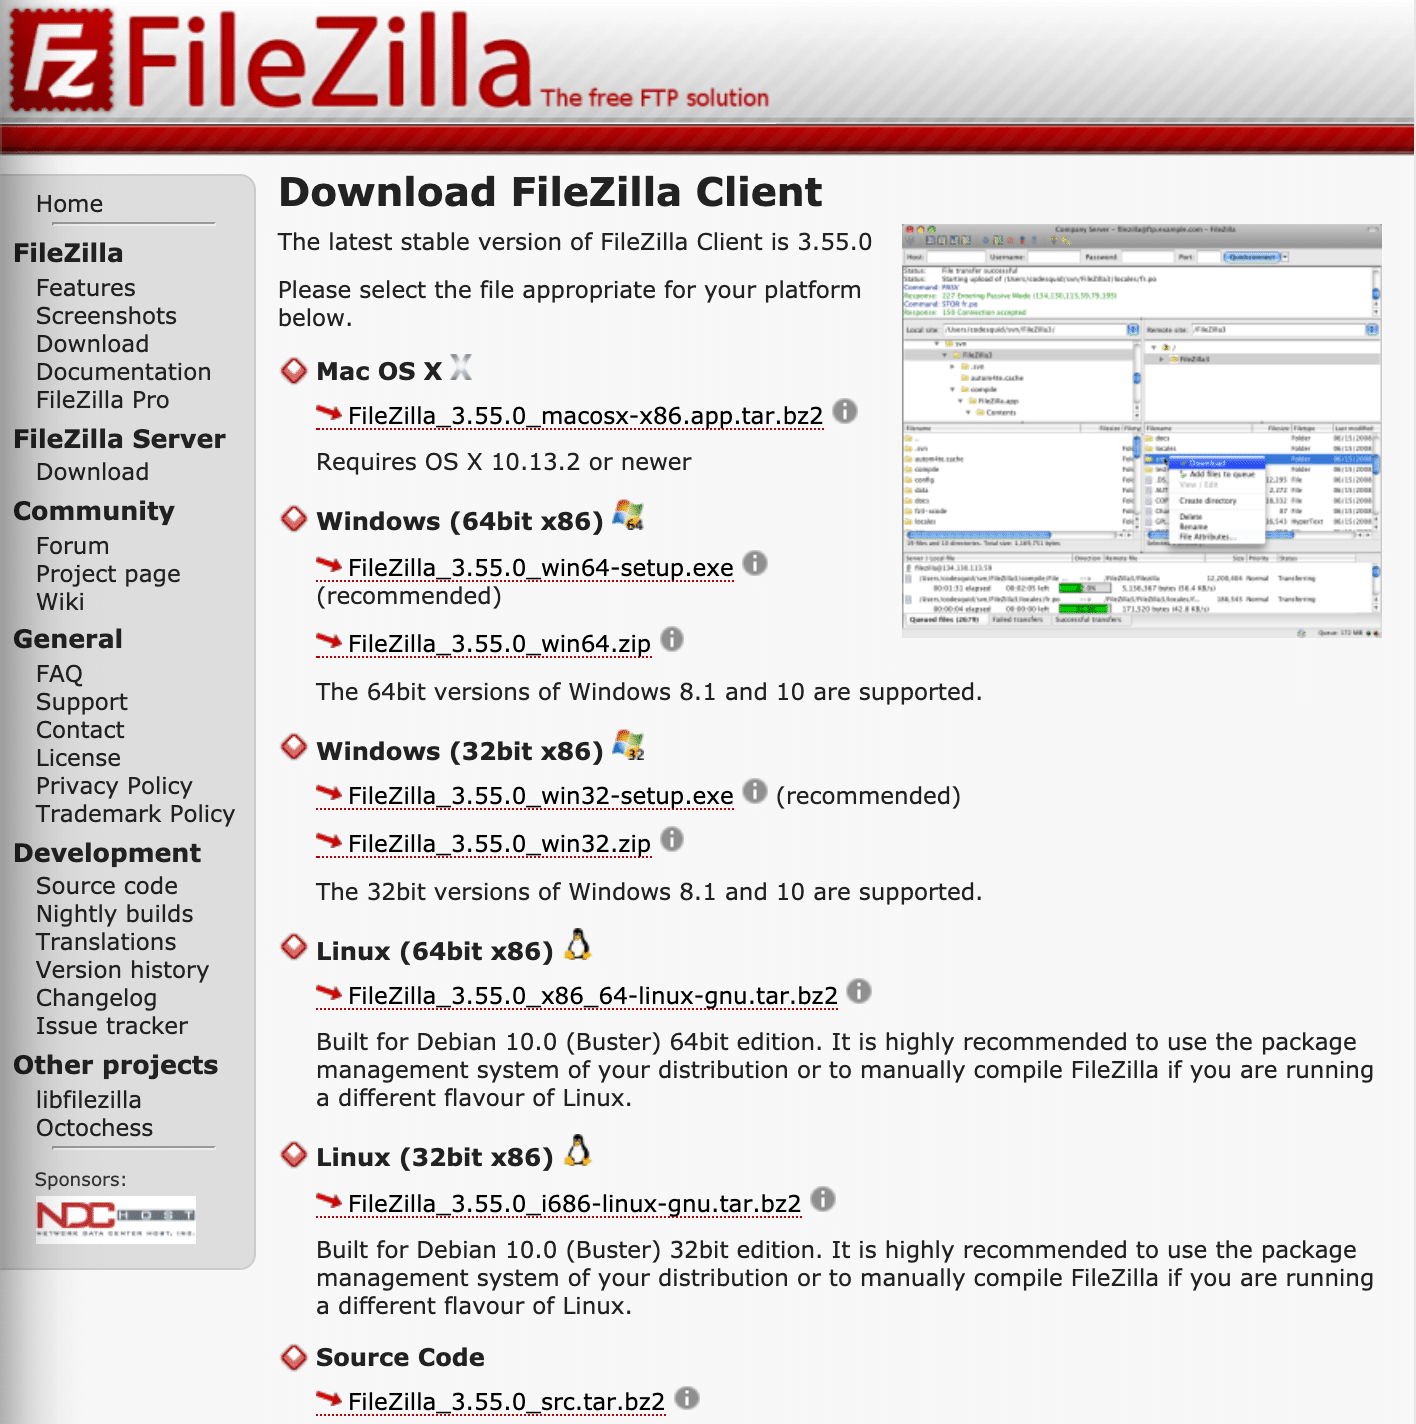
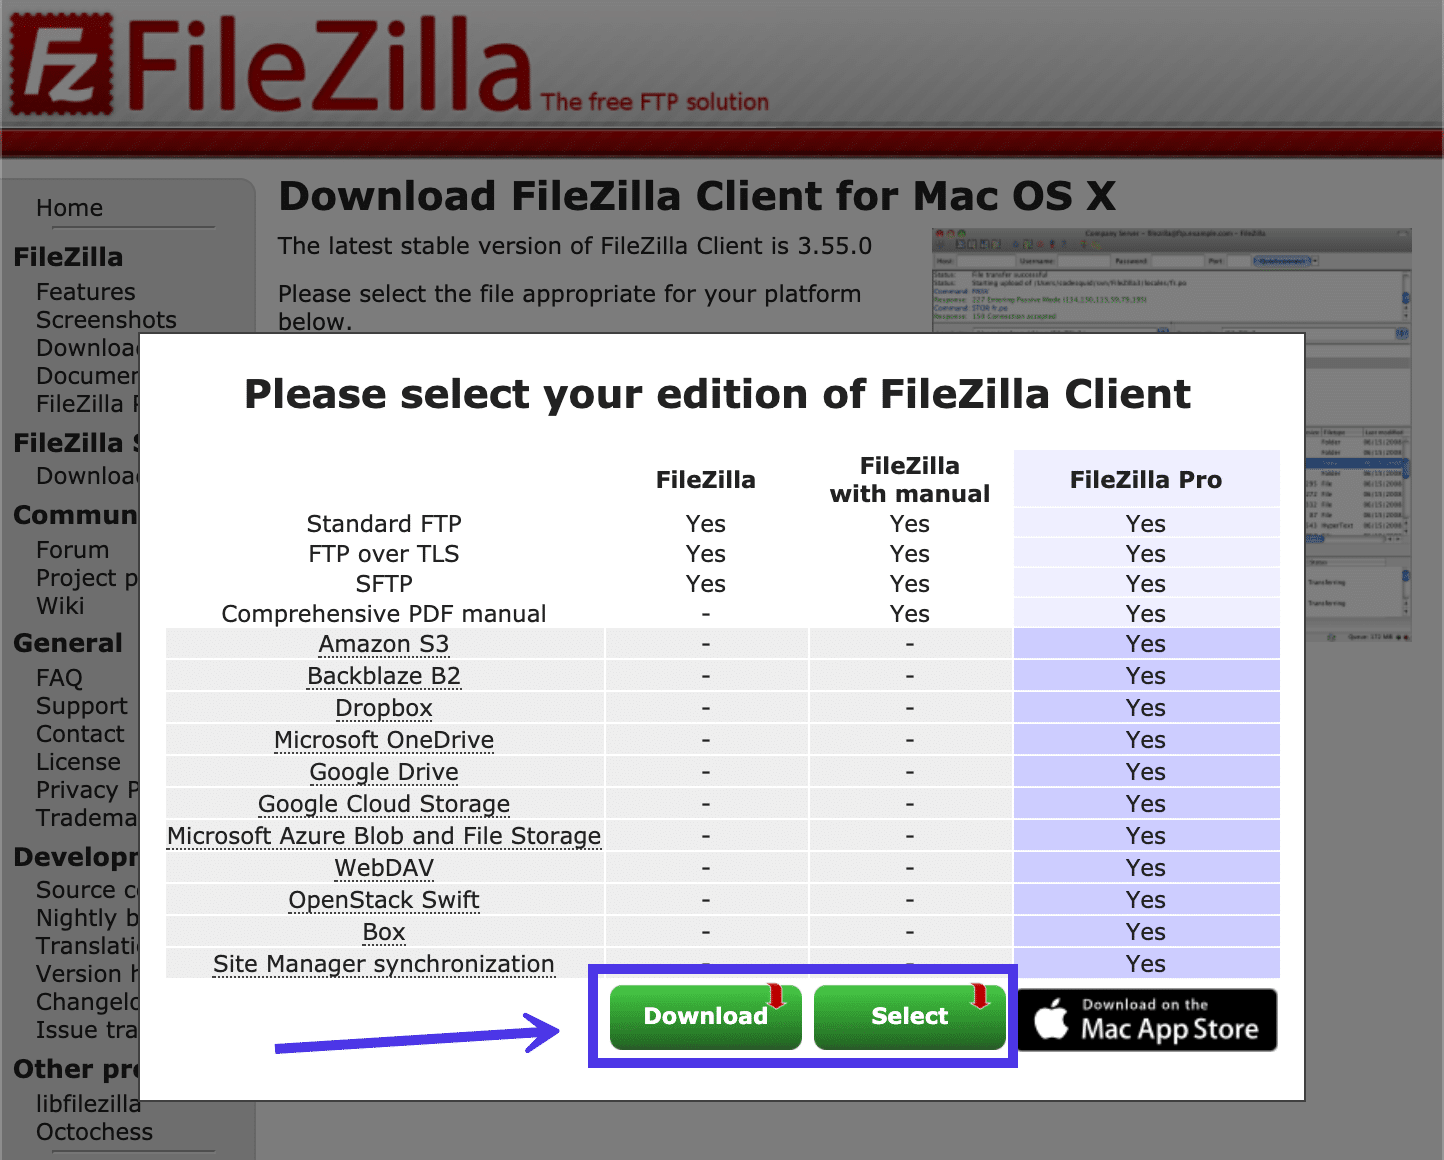
After clicking your chosen Obtain button, a popup window seems asking you to resolve which bundle of FileZilla to obtain. You possibly can merely obtain FileZilla with none documentation, or you’ll be able to decide to obtain a complete PDF handbook along with your obtain information.
The opposite possibility right here is to obtain FileZilla Professional, which incorporates all kinds of different options (primarily for linking to cloud storage companies). We’ll cowl FileZilla Professional in a piece additional down on this article. For now, the usual FileZilla program is what you’ll want.
Subsequently, click on on the Obtain button under the column titled FileZilla or the one titled FileZilla with Handbook.
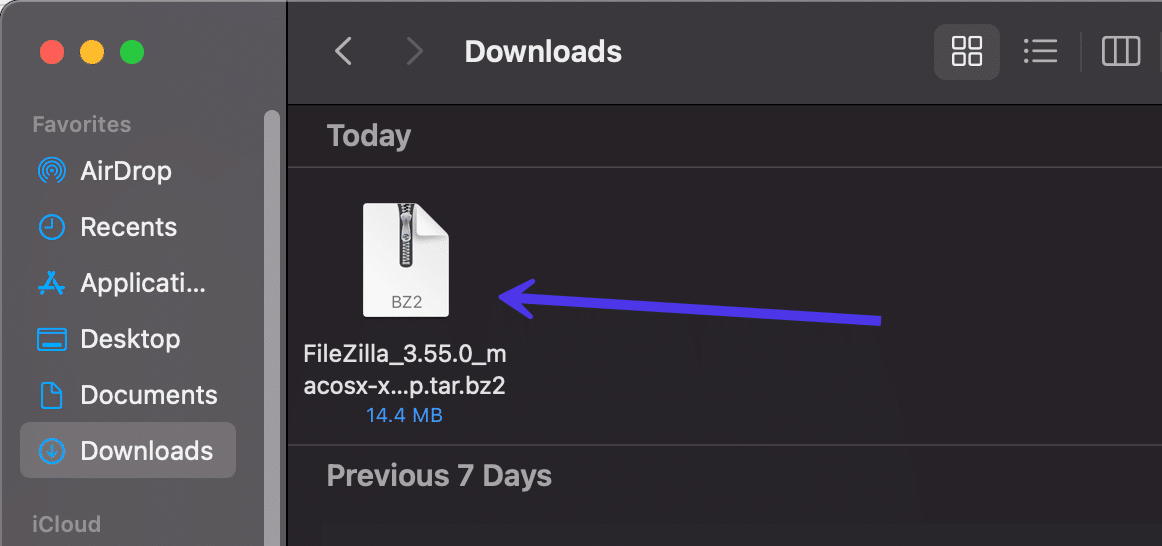
Save the file in a memorable place in your laptop, then go to that location and click on on this system file to finish the set up. All working techniques are totally different, so you’ll have the Run the file, merely click on on it, or select an Set up possibility.
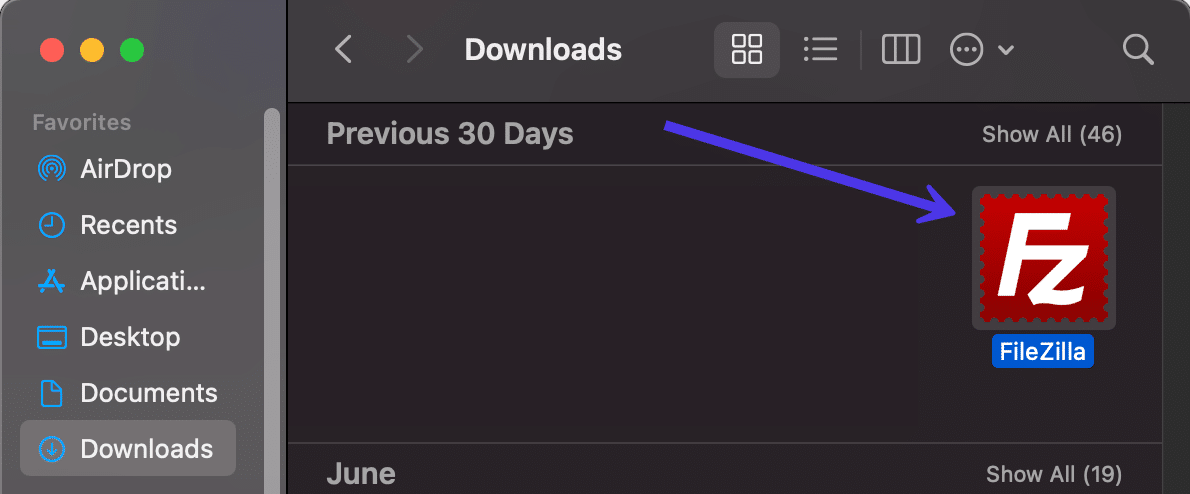
As soon as energetic and put in in your laptop, discover and click on on the FileZilla emblem shortcut to run this system. You possibly can transfer this to a extra appropriate location to make it accessible for your self.
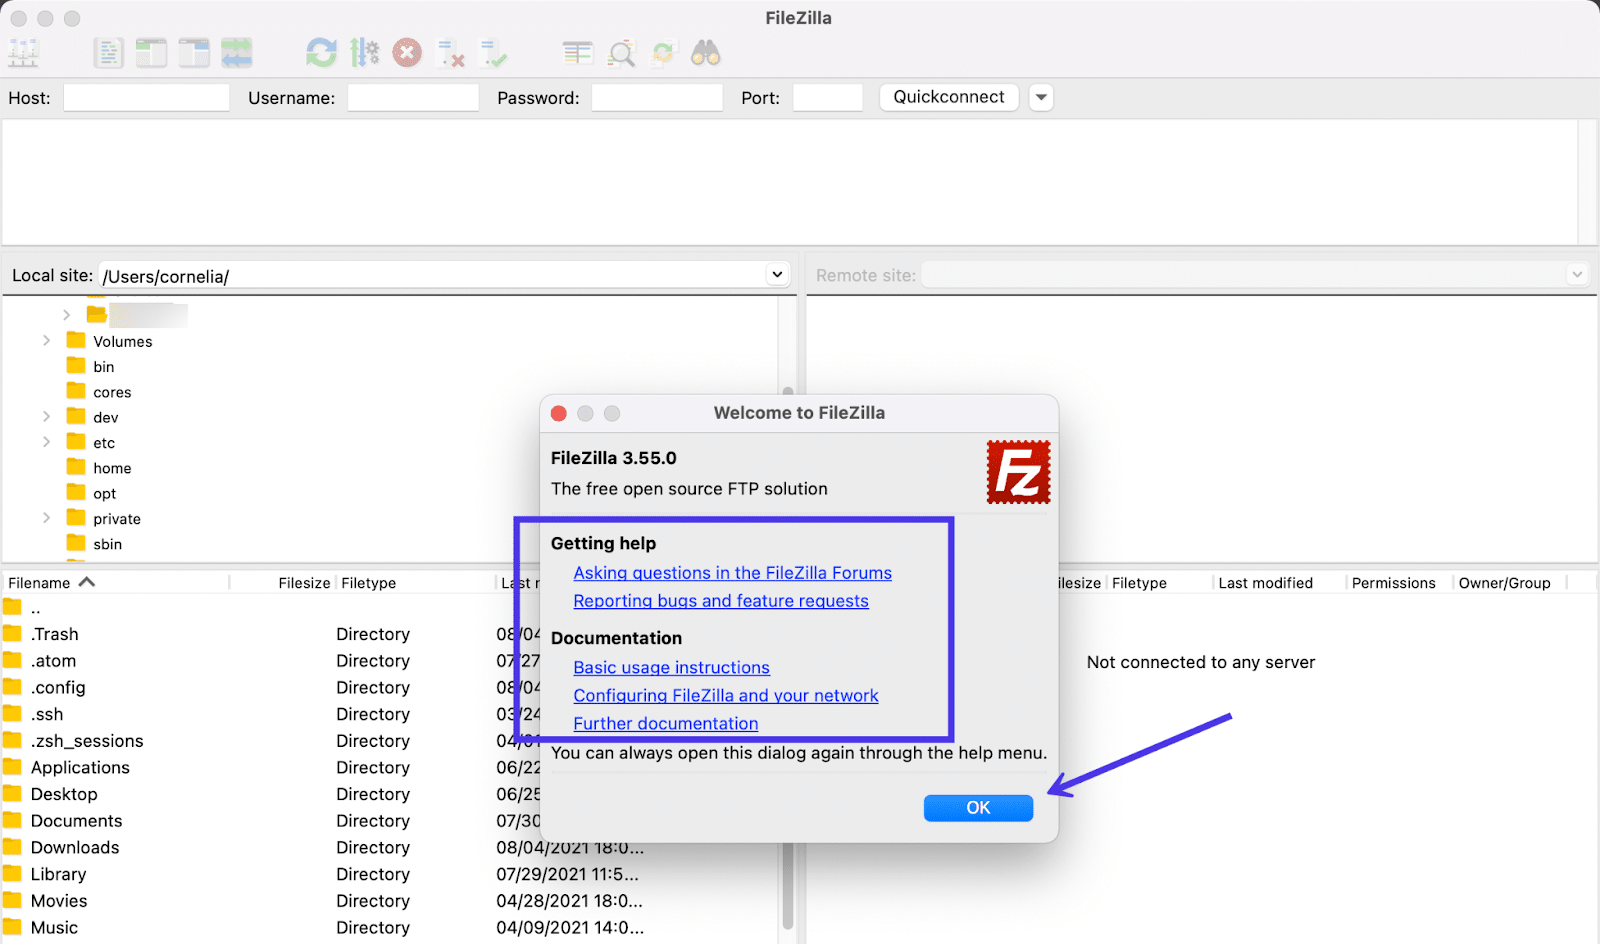
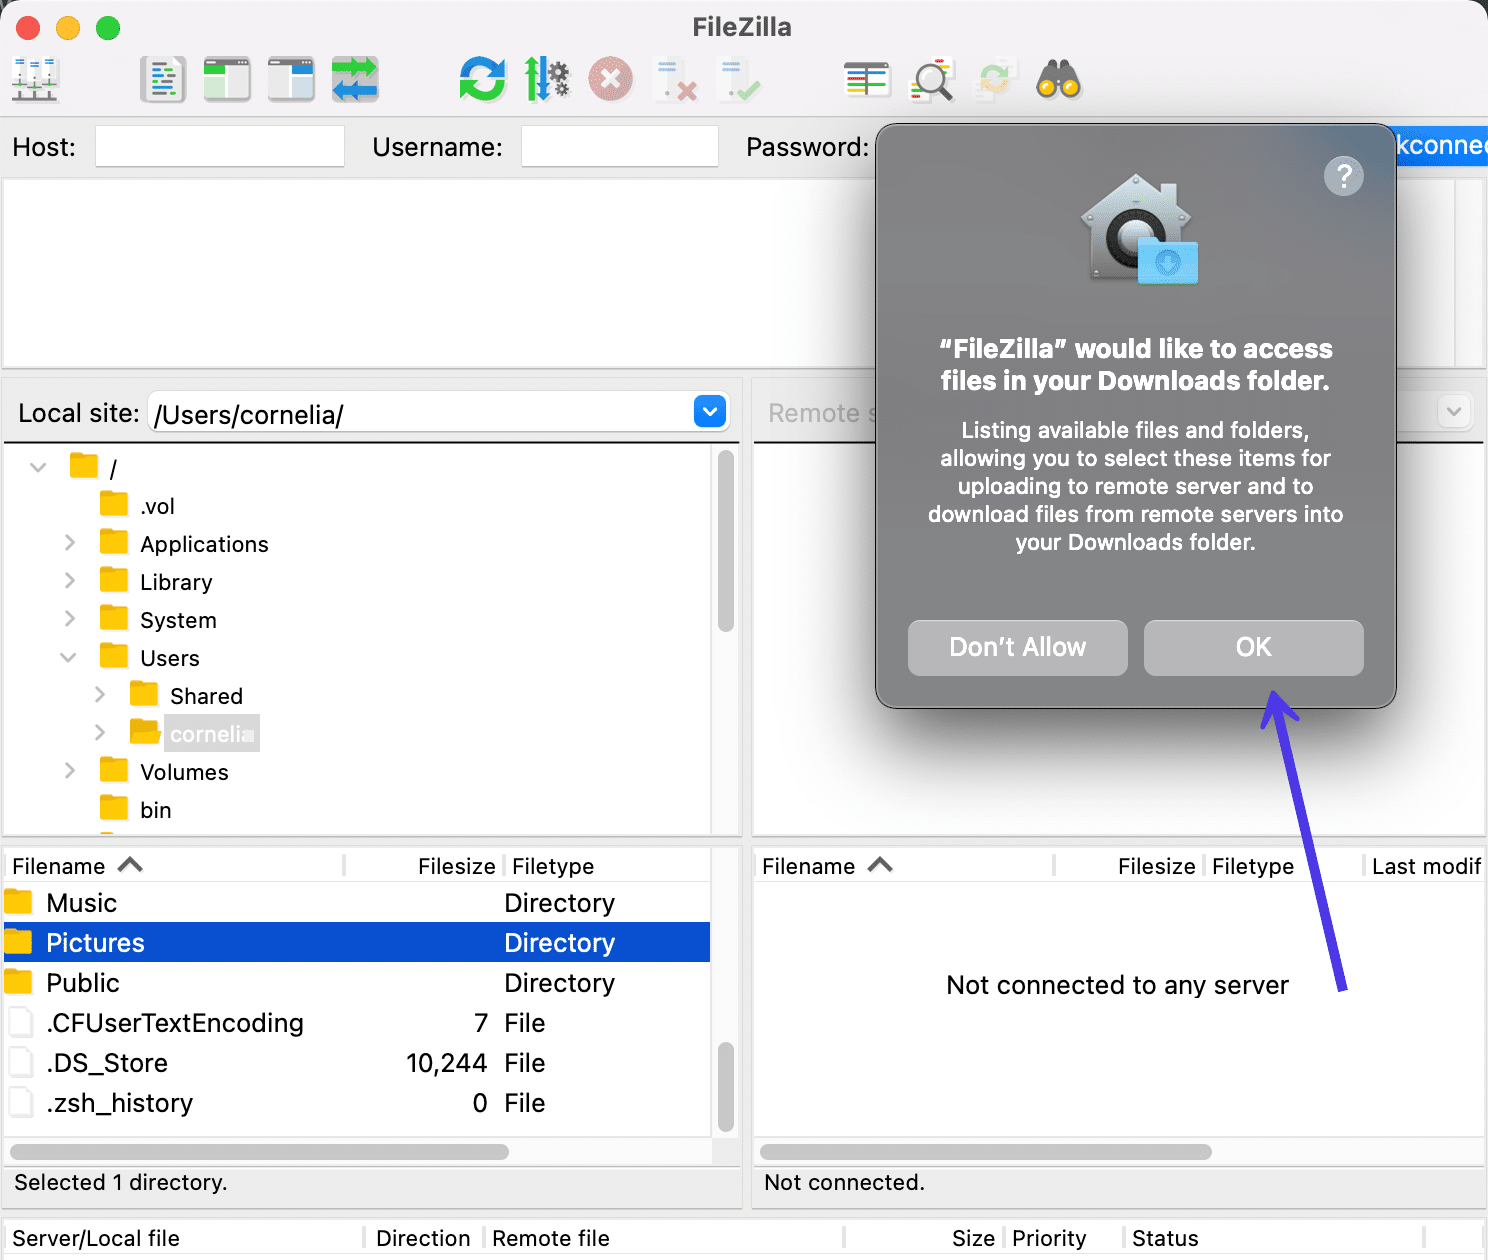
FileZilla now opens in your laptop with a welcome popup window in entrance of the shopper software program.
As you’ll be able to see, a number of hyperlinks can be found so that you can discover assist throughout your use of FileZilla. For example, there are hyperlinks for asking questions and reporting bugs, together with documentation hyperlinks for fundamental utilization directions, configuring FileZilla and your community, and additional documentation.
To take away the popup window, click on on the OK button.
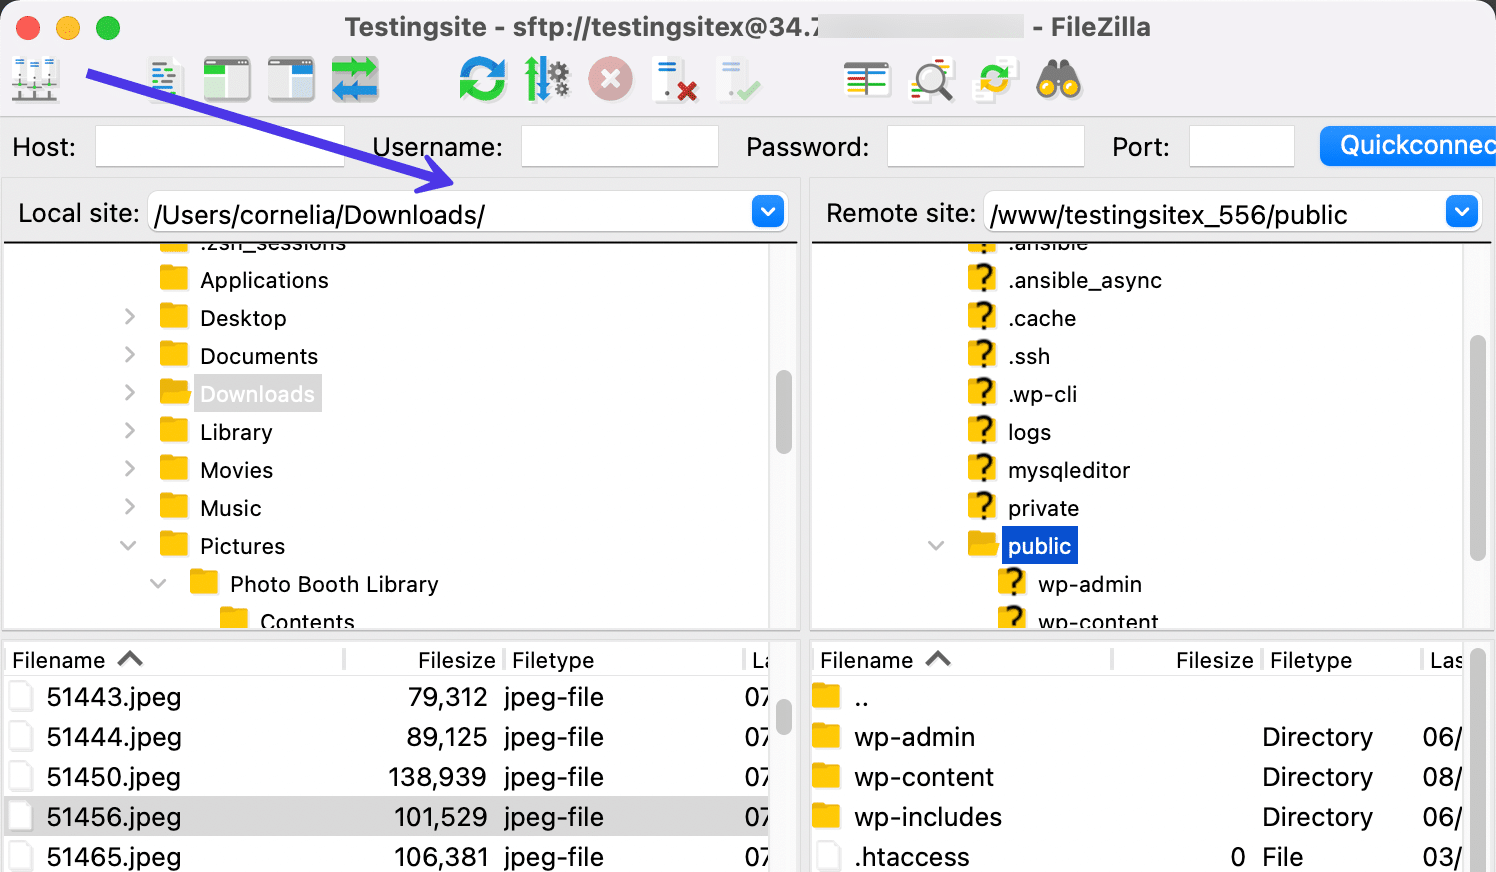
It is best to now see the usual residence display for FileZilla, with fields to kind in host credentials (to connect with your web site server), info on the backside about file transfers, and extra.
Right here’s what you’re seeing at a look:
- The Native Website part, located on the left aspect, reveals the information you will have in your native machine (your laptop).
- The higher part exhibits the file directories and permits you to navigate all through the information in your laptop.
- The decrease part presents information inside a folder in your laptop.
Within the following sections, you’ll learn to join your host server (like Kinsta), carry up information from that server on the right-side panel, and switch information from both your native laptop or the distant server with using drag-and-drop instruments in FileZilla.

Remember the fact that you’ll have to permit entry to your native information relying in your present permissions and working system.
How To Add Host Credentials to FileZilla and Connect with Your Website
The primary order of enterprise with FileZilla is to make a hyperlink between your native laptop and the distant server information to your web site. This course of doesn’t merge the 2 in any means, however slightly opens a connection for sharing information between them.
Utilizing the FileZilla Quickconnect Software
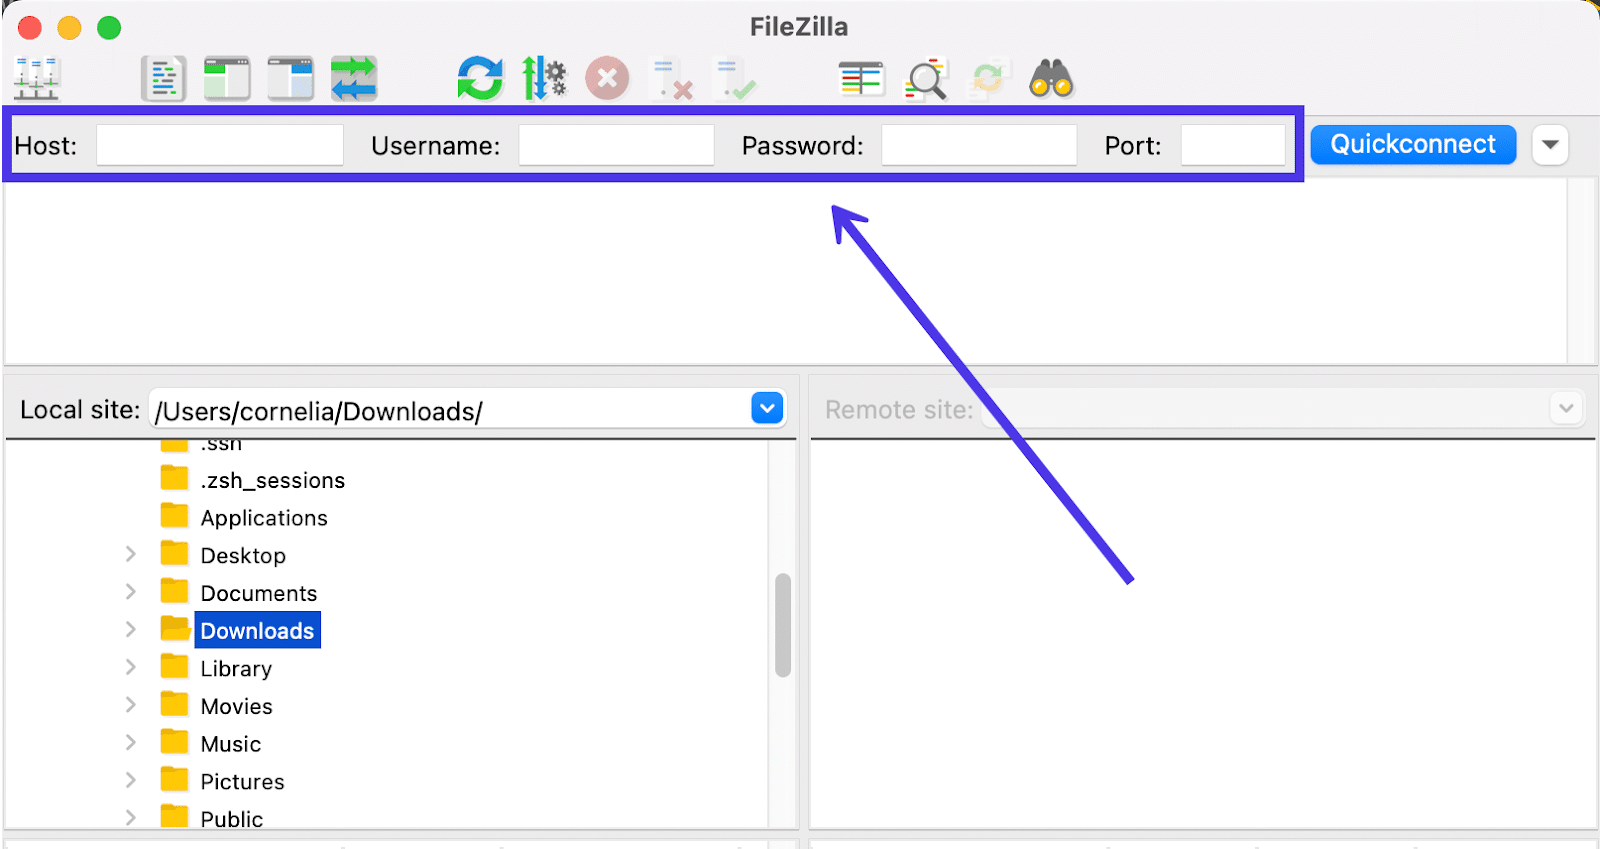
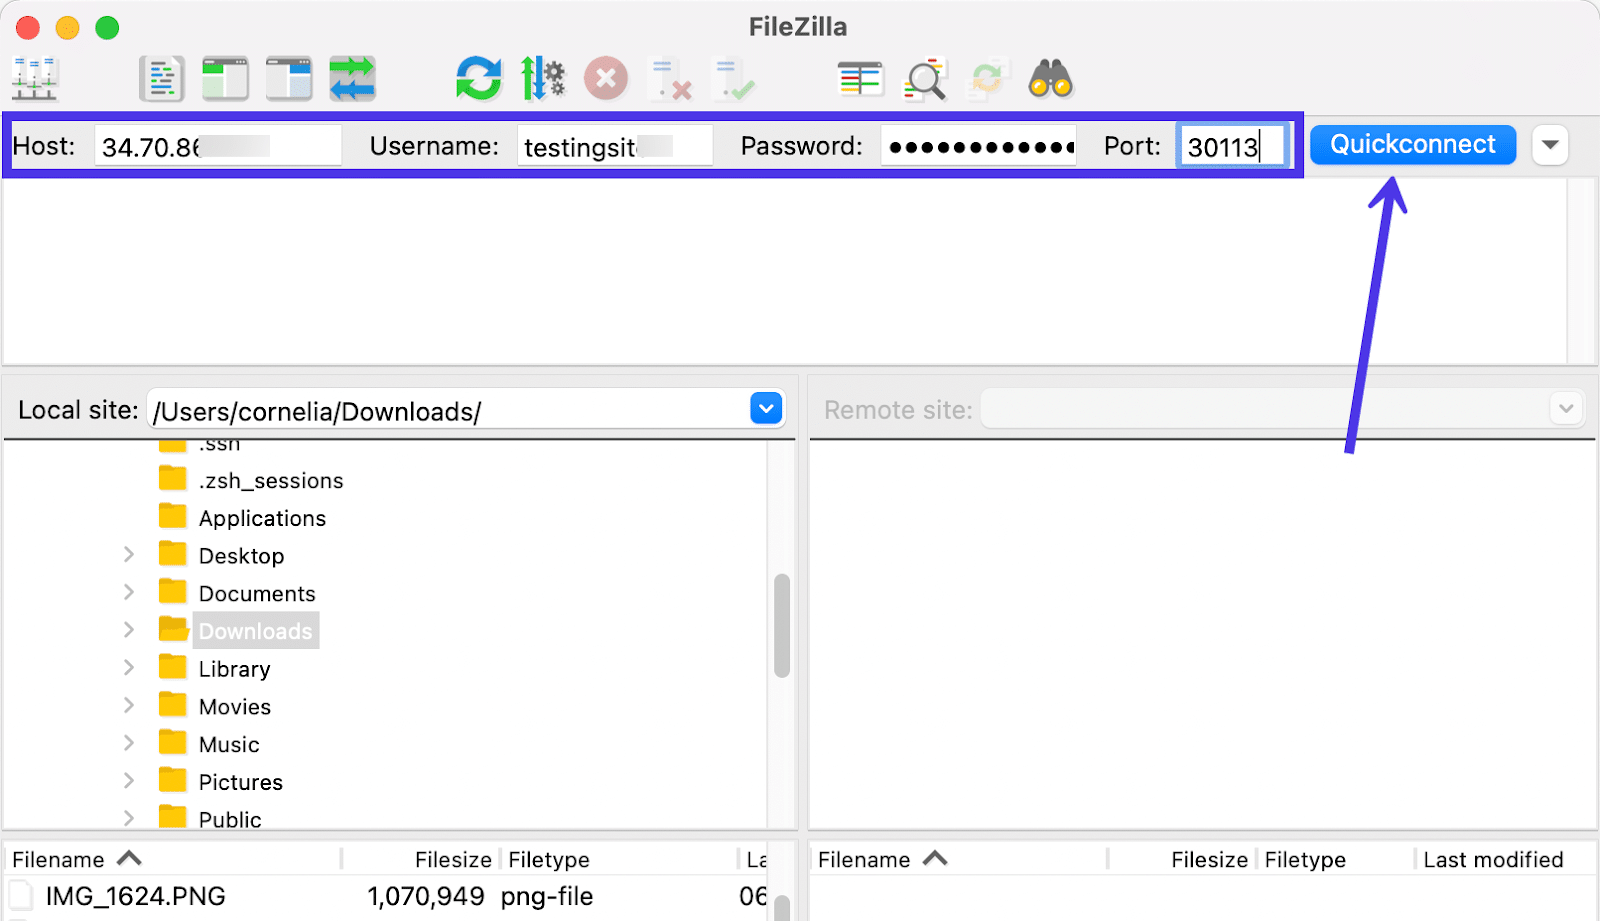
The simplest solution to open up sharing out of your laptop to the server is by including host credentials within the a number of enter fields on the prime of the FileZilla window.
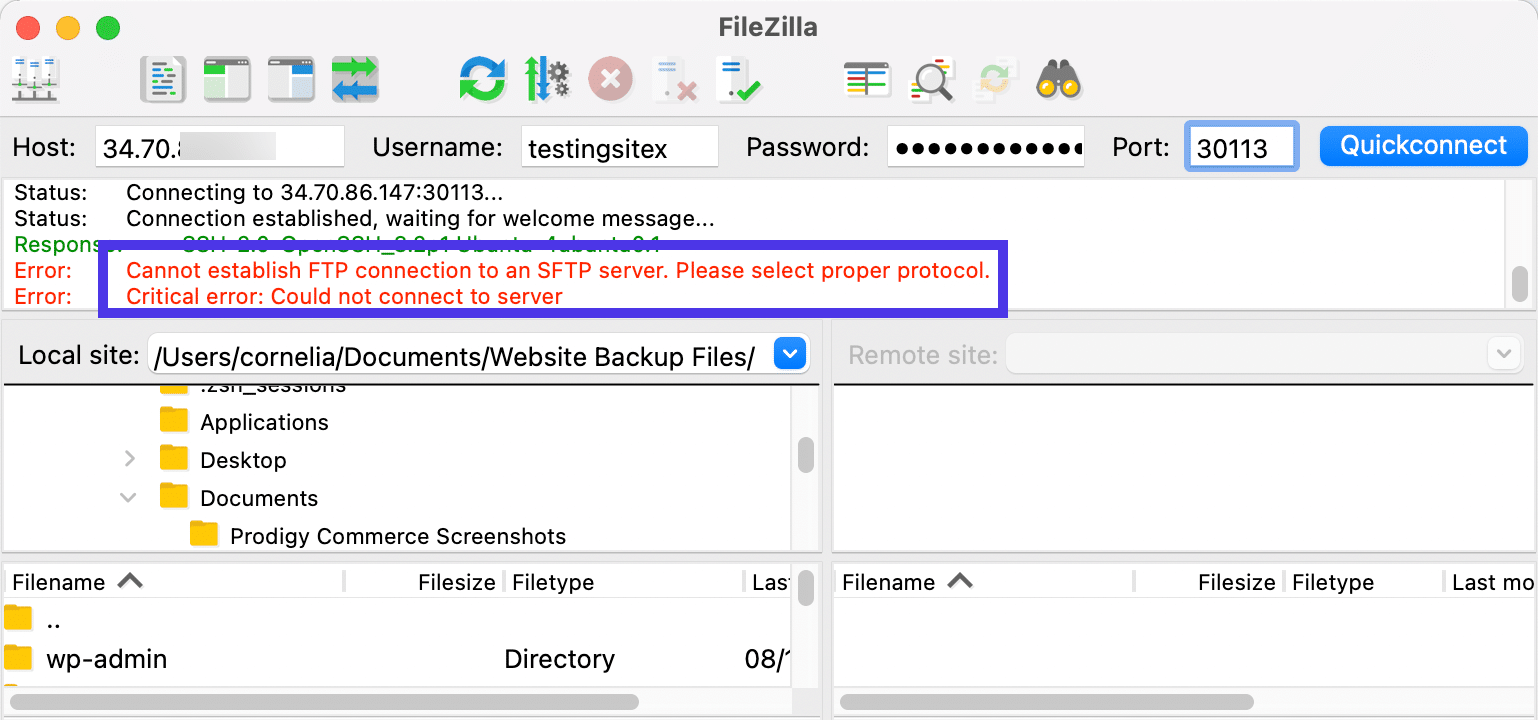
That is known as the Quickconnect part, because it provides a solution to kind in host server credentials from the primary display. Nevertheless, it defaults to an FTP connection, so you might even see an error if an SFTP connection or different kind of protocol is required.
Regardless, it’s price making an attempt out the Quickconnect fields first to see if it really works for you.
Listed here are the fields you might want to fill:
- Host
- Username
- Password
- Port
So, the place do you go about discovering the credentials to kind into these fields?
As a rule, you might want to both go into your internet hosting dashboard or cPanel to find the distinctive host credentials to your web site’s server. Generally you’ll have to contact your host or web site developer to determine the fitting login info.
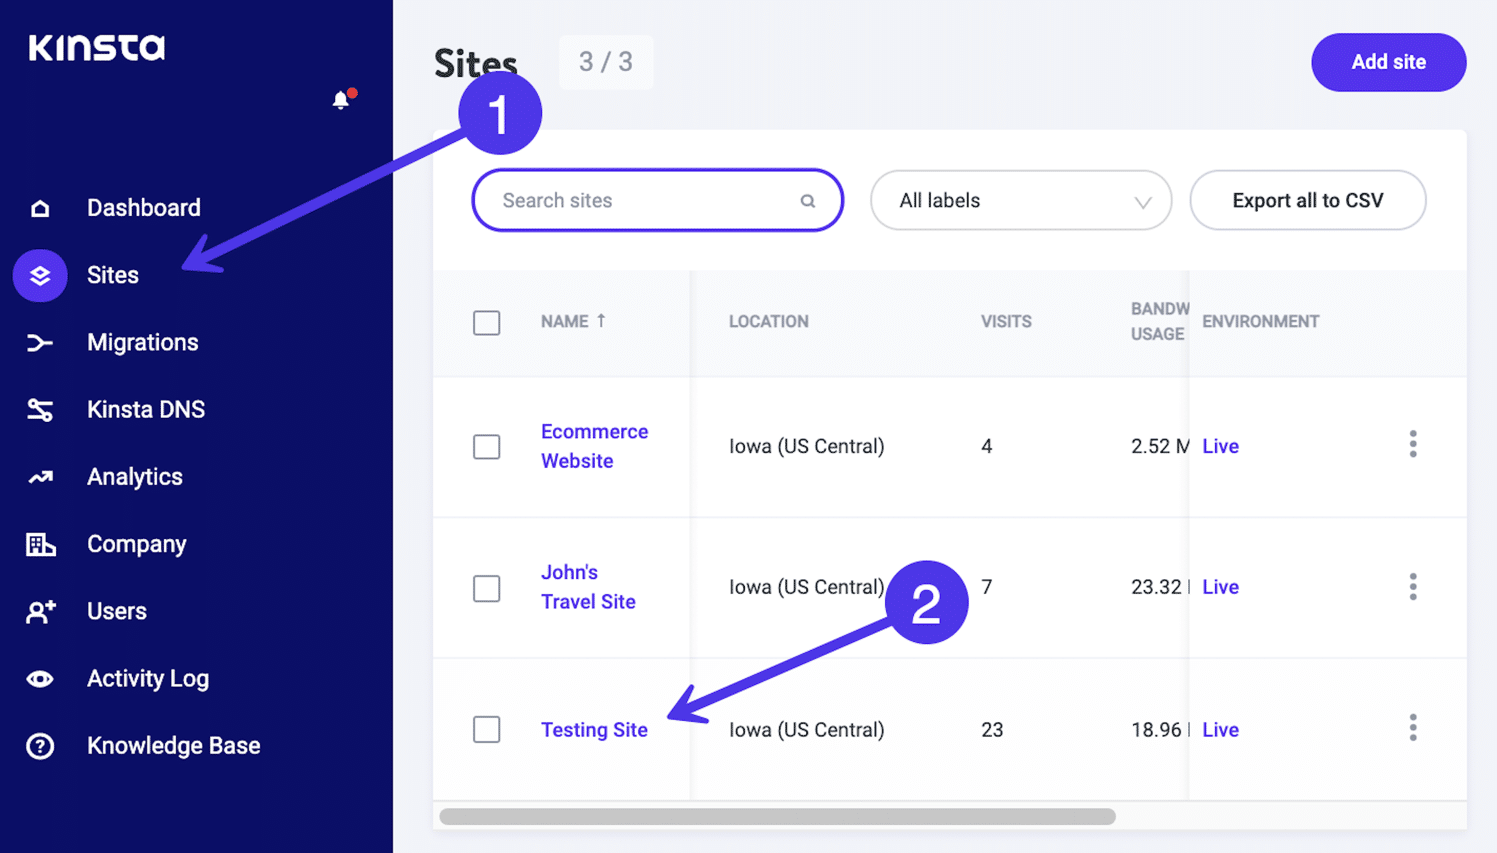
For Kinsta clients, these credentials are conveniently proven within the MyKinsta dashboard. Merely navigate to MyKinsta, log into your account, and click on on the Websites button within the menu. Then click on on the positioning for which you’re looking for the server login credentials.
Select the Data tab (which ought to already be chosen by default) and scroll to the SFTP/SSH part.
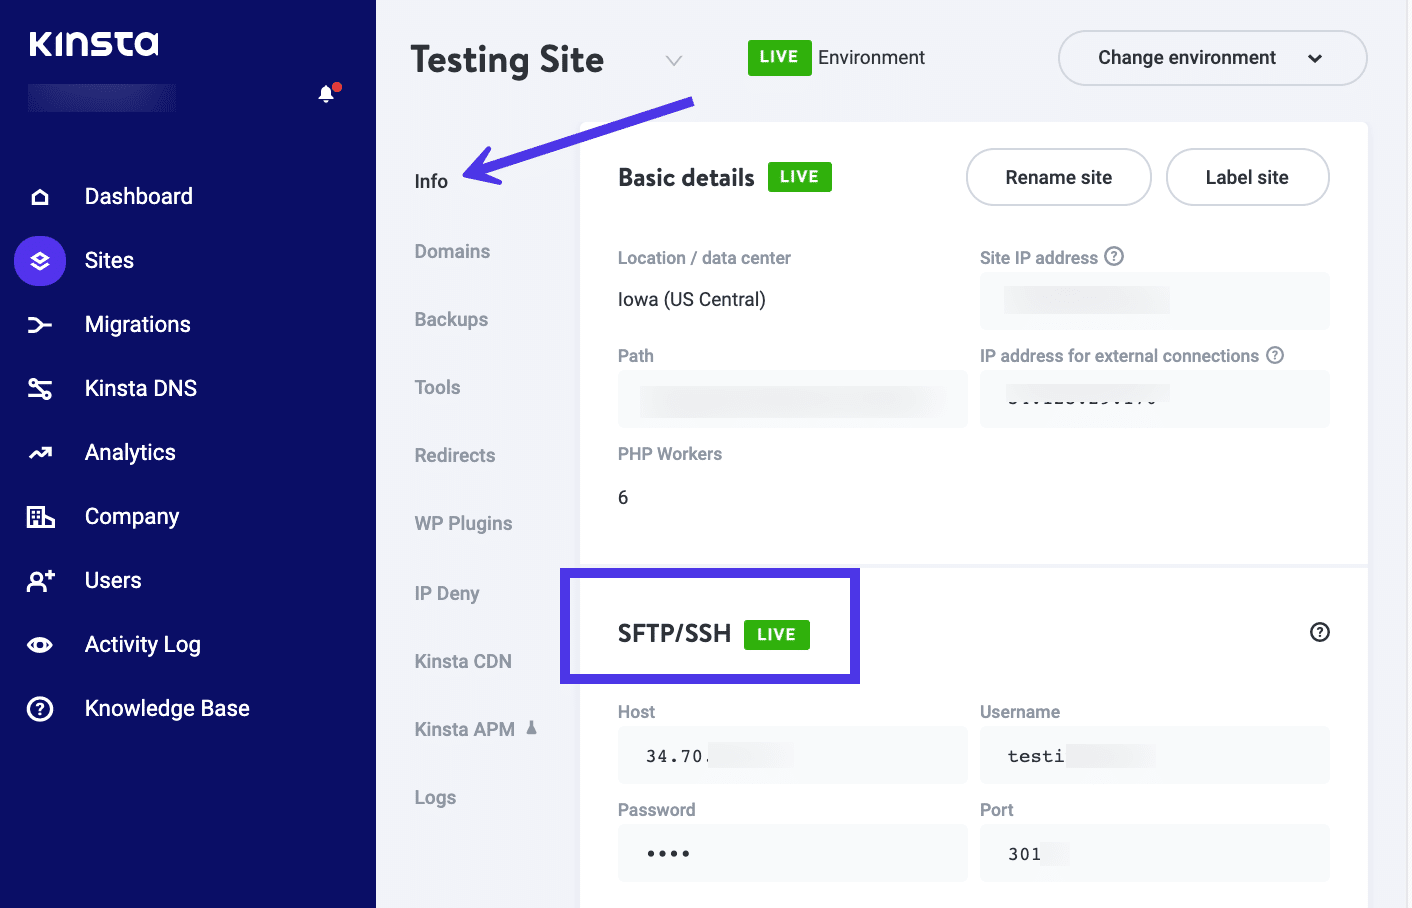
Kinsta supplies fields for Host, Username, Password, and Port. These are the very same fields we noticed within the FileZilla Quickconnect space, supplying you with every part you want at a look:
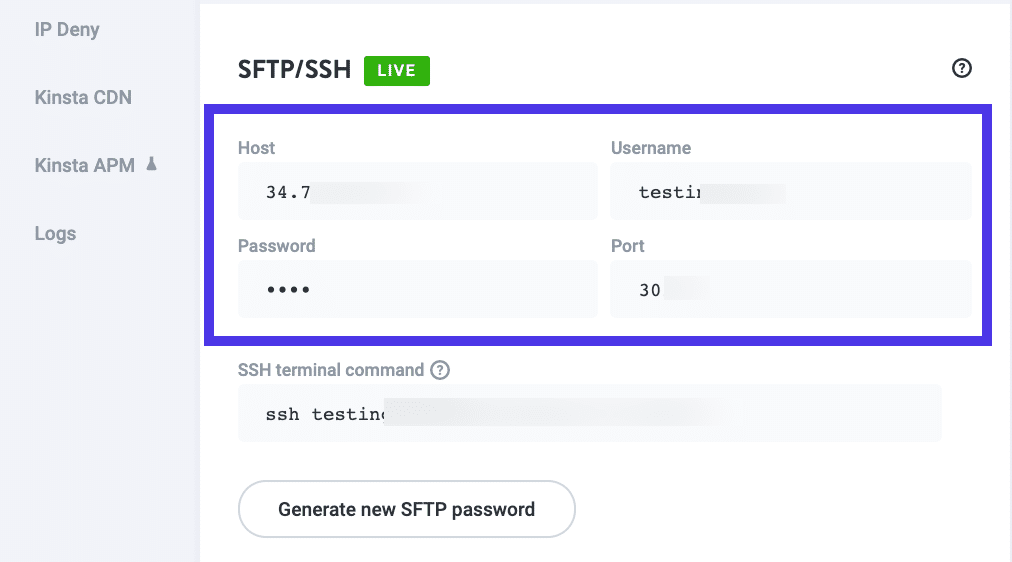
Copy every one over to its respective FileZilla discipline. Whenever you’re accomplished, click on on the Quickconnect button to begin the hyperlink between your native laptop information and the distant server information.
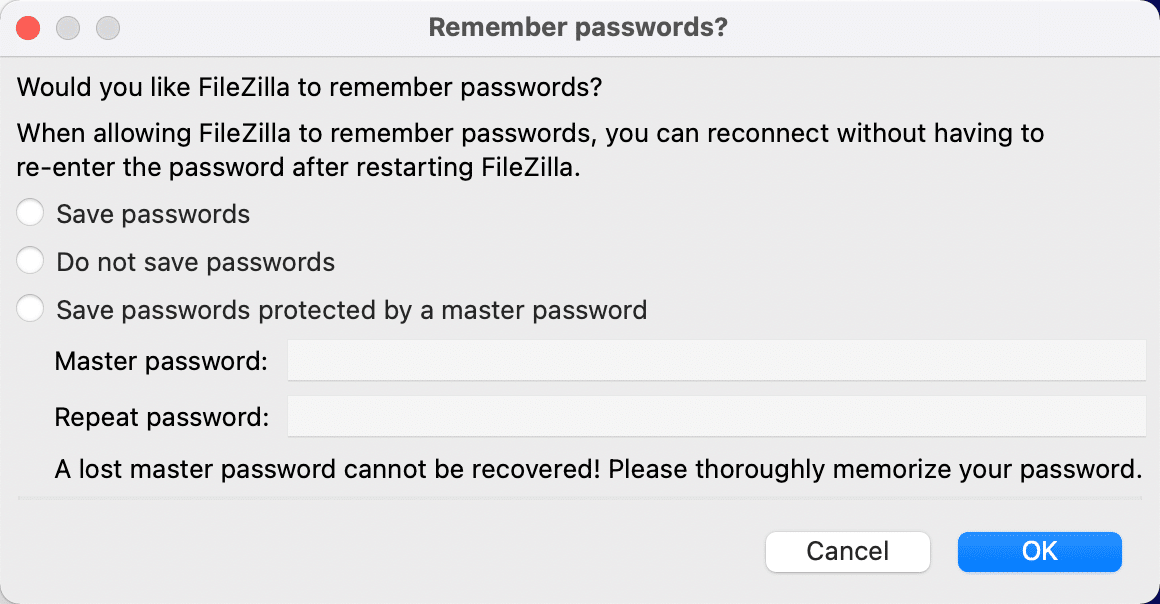
You may even see a message asking you when you’d like FileZilla to recollect passwords sooner or later. Nevertheless, saving these credentials instantly in FileZilla may very well be thought-about a safety danger, so as an alternative, we advocate utilizing a password supervisor to retailer these delicate particulars.
As a substitute, you will have the choice to create a Grasp Password in FileZilla that locks entry in opposition to saved passwords from intruders. However the catch is that you simply’d need to memorize or safely retailer your Grasp Password since you’ll be able to’t get better it later.
After that, you must see a Success notification within the Message Log. As well as, all Distant Website information ought to seem within the panel to the fitting of the Native Website information.
The Variations Between Protocols
FileZilla helps these protocols for transferring information:
- FTP (File Switch Protocol): One of many oldest switch protocols. It makes use of two channels to maneuver information, requiring you to make use of a number of port numbers. The 2 channels are known as the command and information channels. Neither of them is encrypted making it much less safe than different switch choices. Individuals additionally are inclined to have firewall points with FTP.
- FTPS (FTP over SSL/TLS): It is a protocol that got here into existence as a consequence of rising web safety points. Rules like PCI compliance and HIPAA finally acknowledged that many on-line information transfers should have encryption included. FTPS makes use of SSL (safe socket layer) and TLS (transport layer safety) to guard your information. The information trade is the very same as customary FTP (you will have two channels and two port numbers), however every part will get encrypted within the course of. Downsides embody the shortcoming to create key-based authentication for connections, and the truth that robust firewalls may cause issues along with your connections.
- SFTP (SSH File Switch Protocol): Many individuals confuse FTPS with SFTP as a result of they each safe information throughout transit. But, they’ve little in widespread moreover that. SFTP makes use of the Safe Shell protocol (SSH) and minimizes connections by narrowing it down to at least one connection as an alternative of two. This fashion, each information and instructions get moved in their very own particular packages on the identical connection. It’s additionally good as a result of just one port quantity is required for all communications, permitting for simpler transfers by way of a firewall. Lastly, SFTP encrypts transferred information utilizing a cipher and optionally available keys (you may make them public or personal).
- Storj: That is a wholly distinctive switch protocol utilizing a decentralized cloud community of machines to not solely encrypt your information however ship it off into separate blocks, eliminating the necessity to retailer information in centralized information facilities. Storj has solely just lately been launched as a protocol on FileZilla.
How To Use FileZilla Website Supervisor for SFTP or Different Protocols
The Quickconnect device in FileZilla ought to work simply positive for these snug utilizing FTP to switch information. Nevertheless, some hosts (together with Kinsta) use SFTP as its protocol to make sure all file transfers are encrypted and safe always.
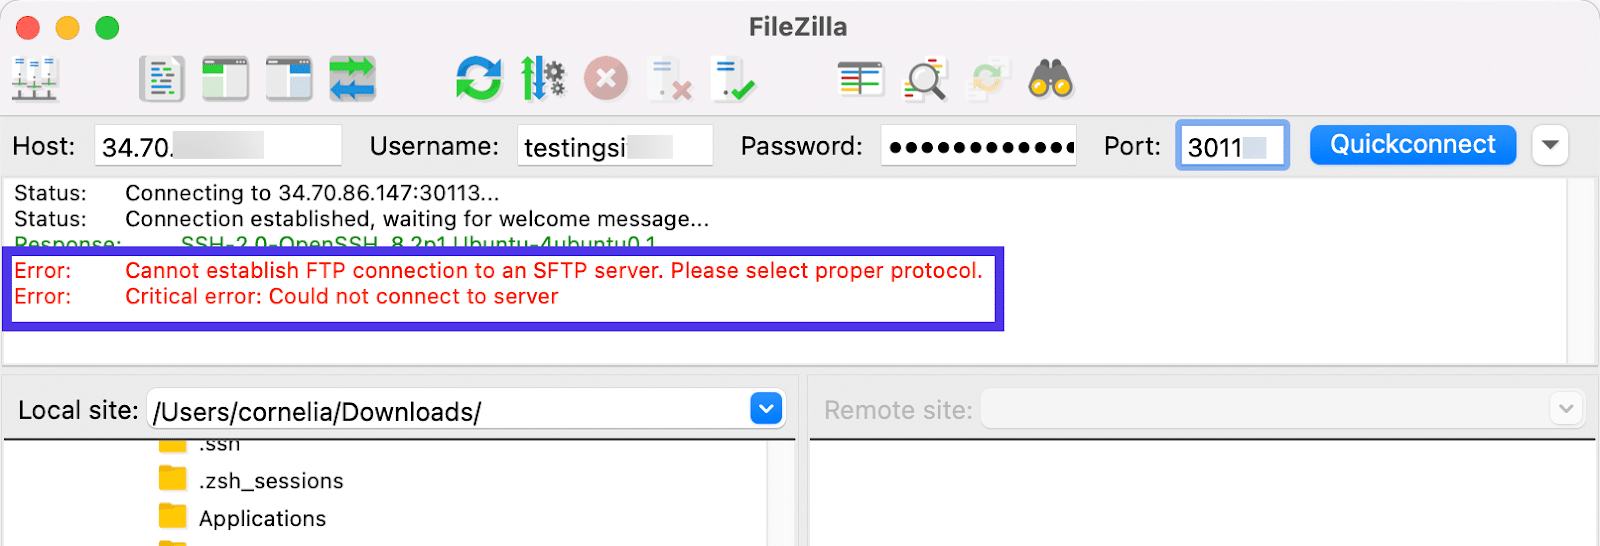
Resulting from this configuration, you might even see an error stating that the Quickconnect button didn’t work.
The errors often say one thing like “Can’t Set up FTP Connection” or “Important Error: May Not Connect with Server”.
How do you clear up this drawback?
It’s slightly easy so long as you already know which protocol is being utilized by your host. SFTP has turn out to be much more standard as a consequence of its safety measures, so all that’s required is to faucet into the Website Supervisor portion of FileZilla to specify that you simply need to use SFTP as an alternative of FTP.
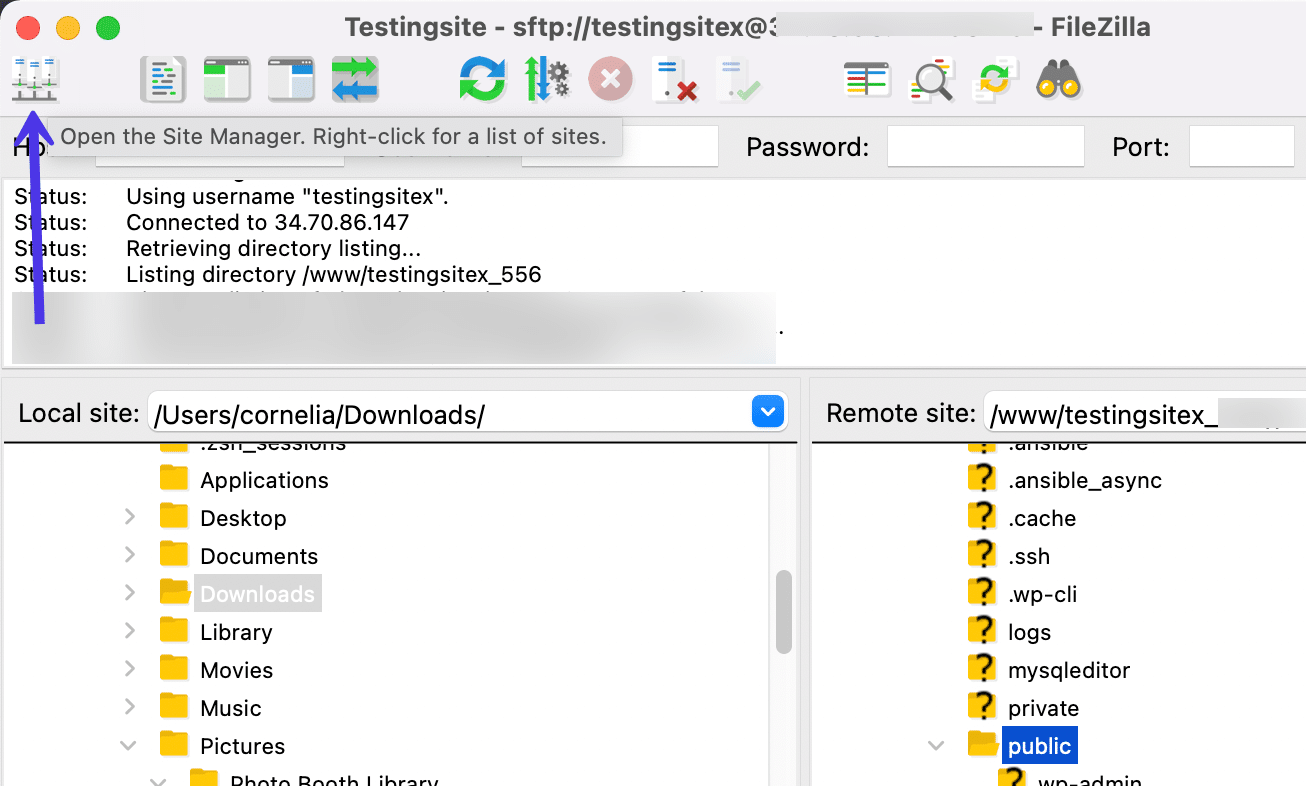
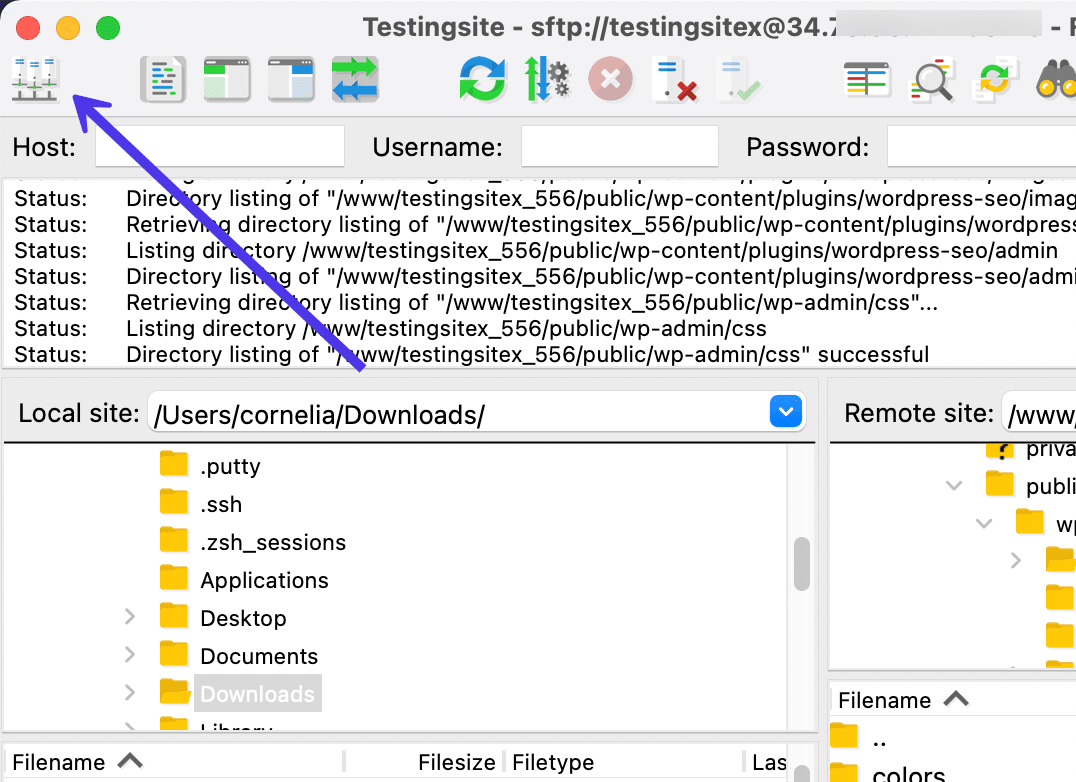
The Website Supervisor button permits you to configure your default protocol, deal with default directories, and specify superior switch settings. It’s positioned within the higher left-hand nook of the window. The icon appears to be like like a number of server machines linked collectively.
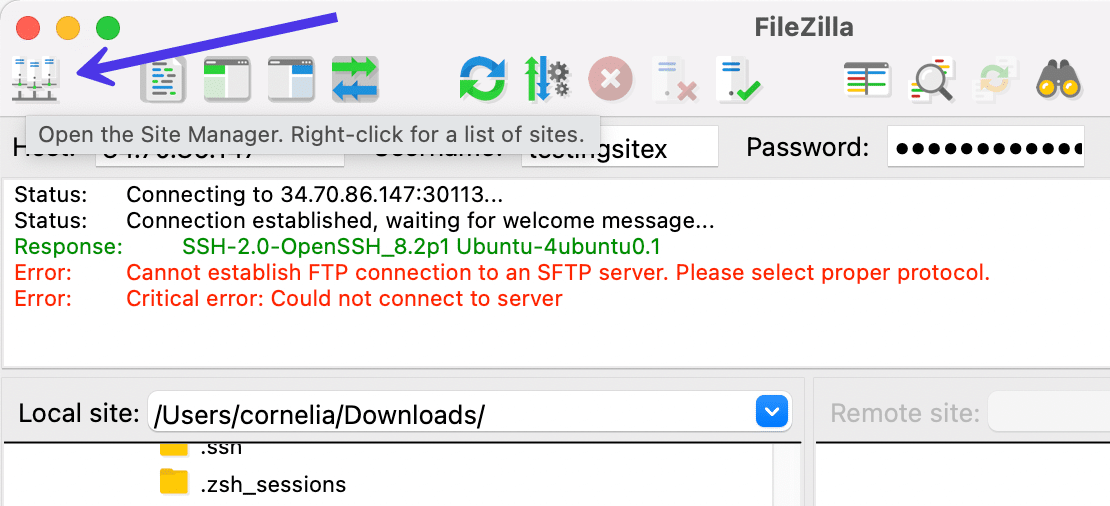
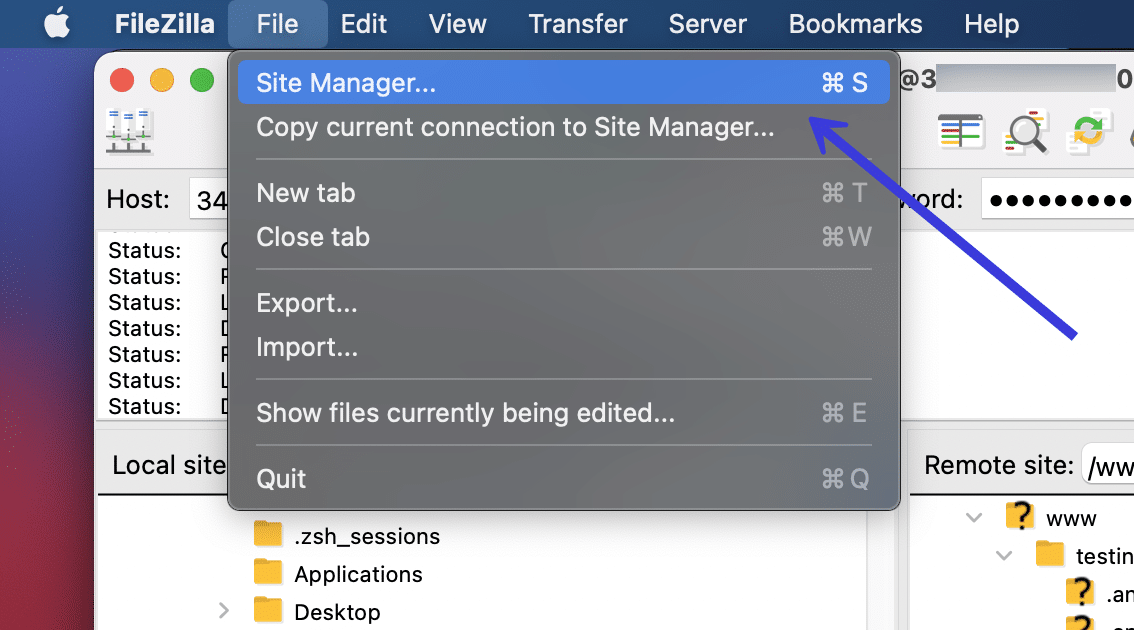
You may as well choose File > Website Supervisor in the primary FileZilla menu to carry this panel up.
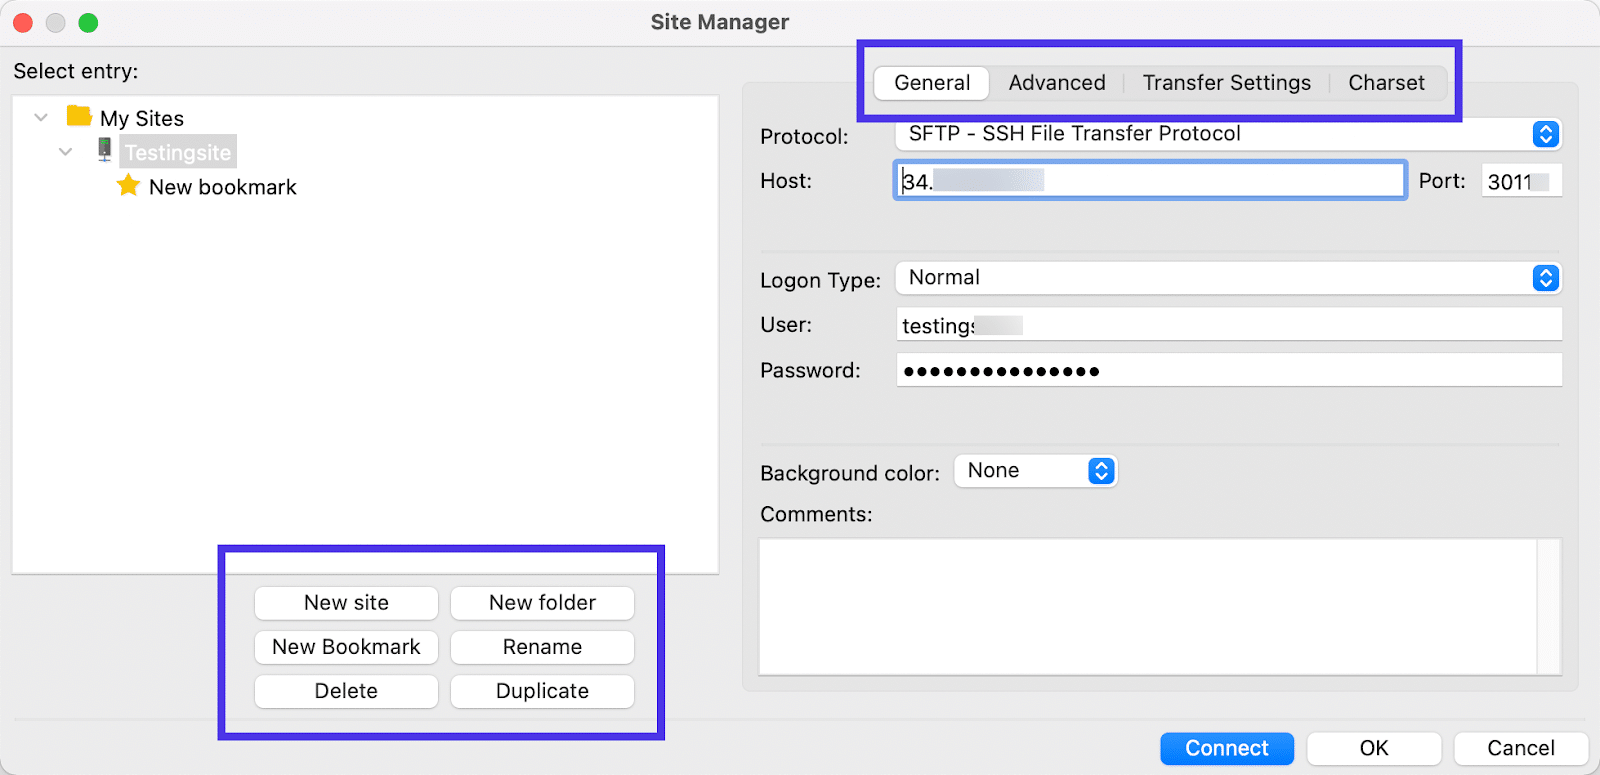
The Website Supervisor web page supplies tabs titled Basic, Superior, Switch Settings, and Charset. These seem grayed out when you don’t add a brand new website or folder to make the connection between your native laptop and the distant server.
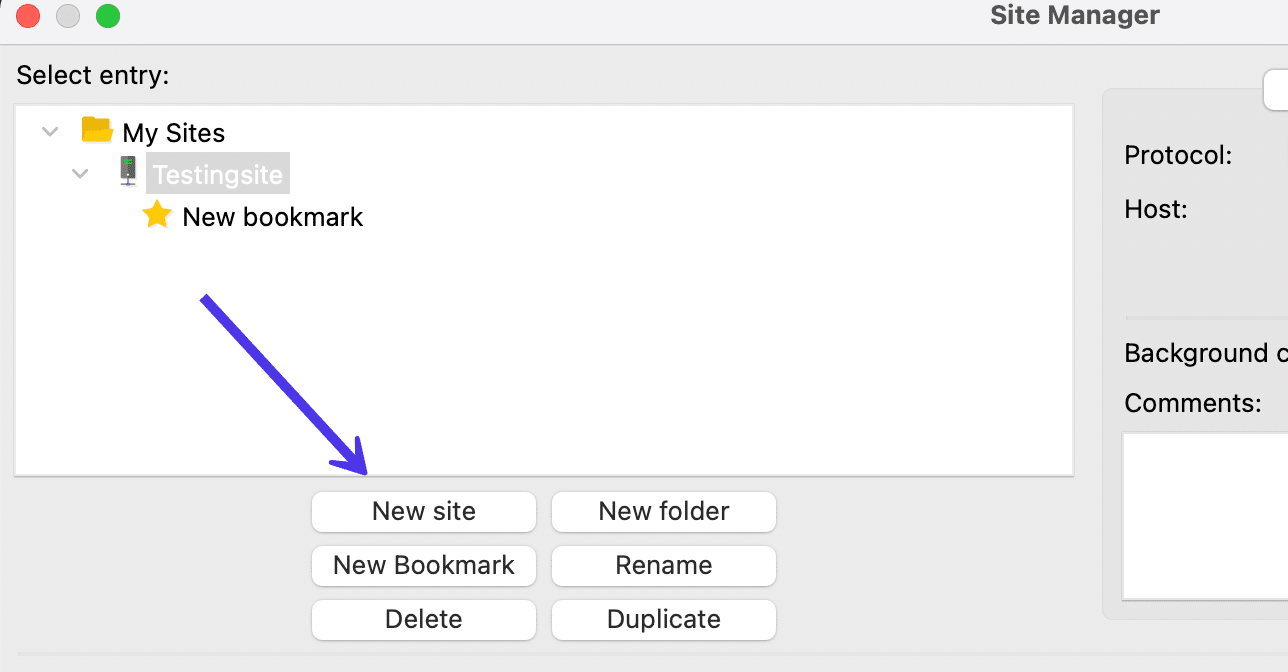
To unlock the Basic tab, choose the My Websites folder beneath the Choose Entry part, then click on on the New Website button. This generates a brand new website folder inside FileZilla.
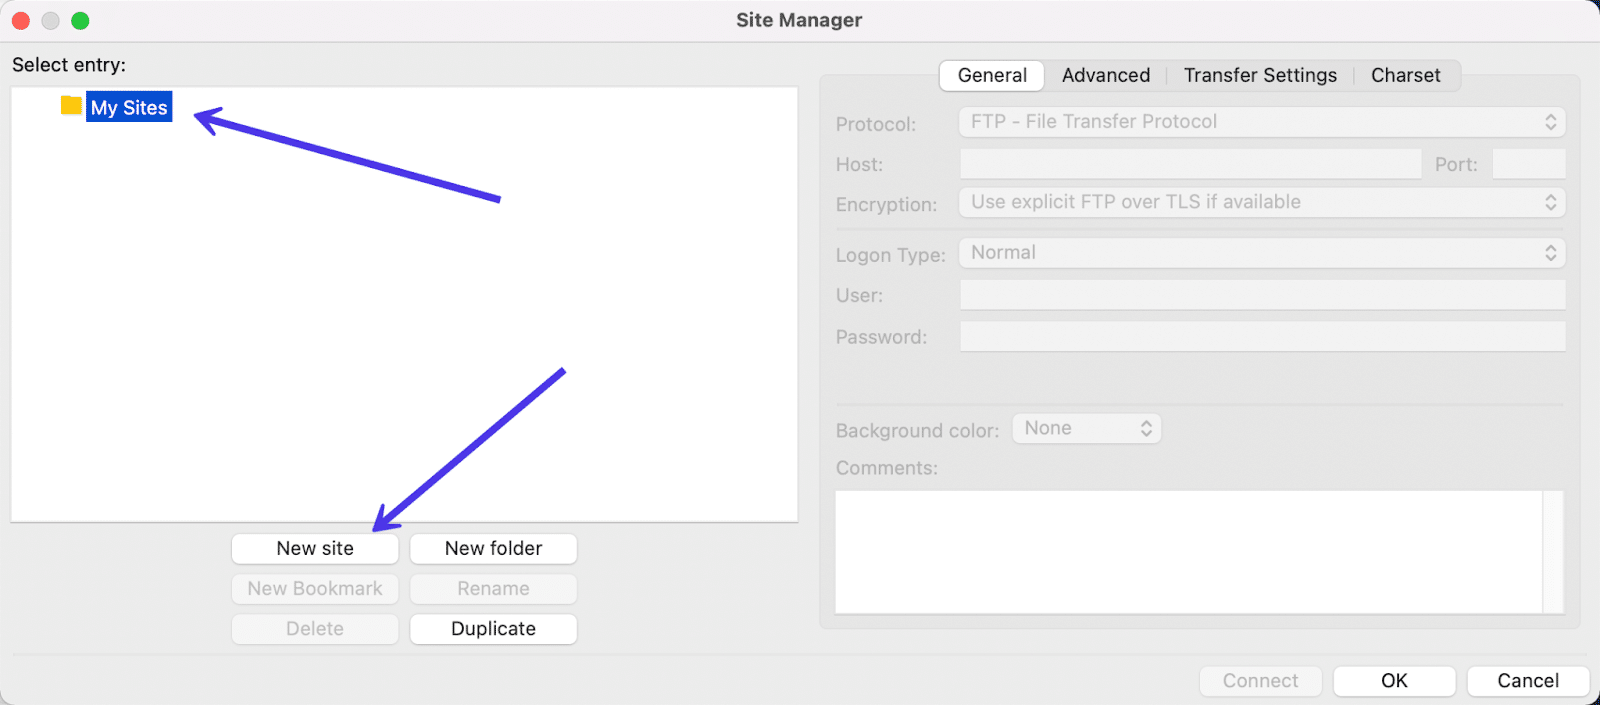
Identify the brand new website no matter you need (ideally one thing identifiable at a look, like the positioning’s title or area).
As soon as the brand new website is added, you acquire entry to the extra superior settings to the fitting, together with the Basic tab.
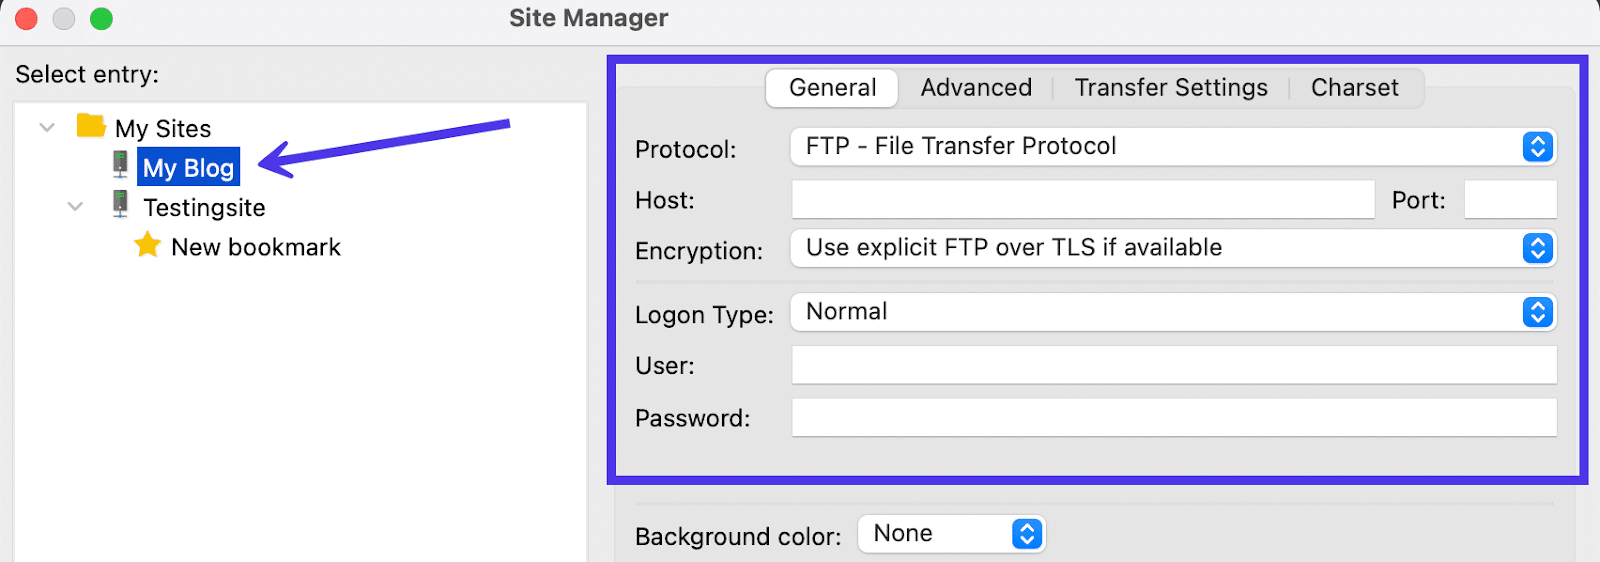
Choose this Basic tab to see the identical fields that we noticed from earlier than, corresponding to Host, Username, Port, and Password.
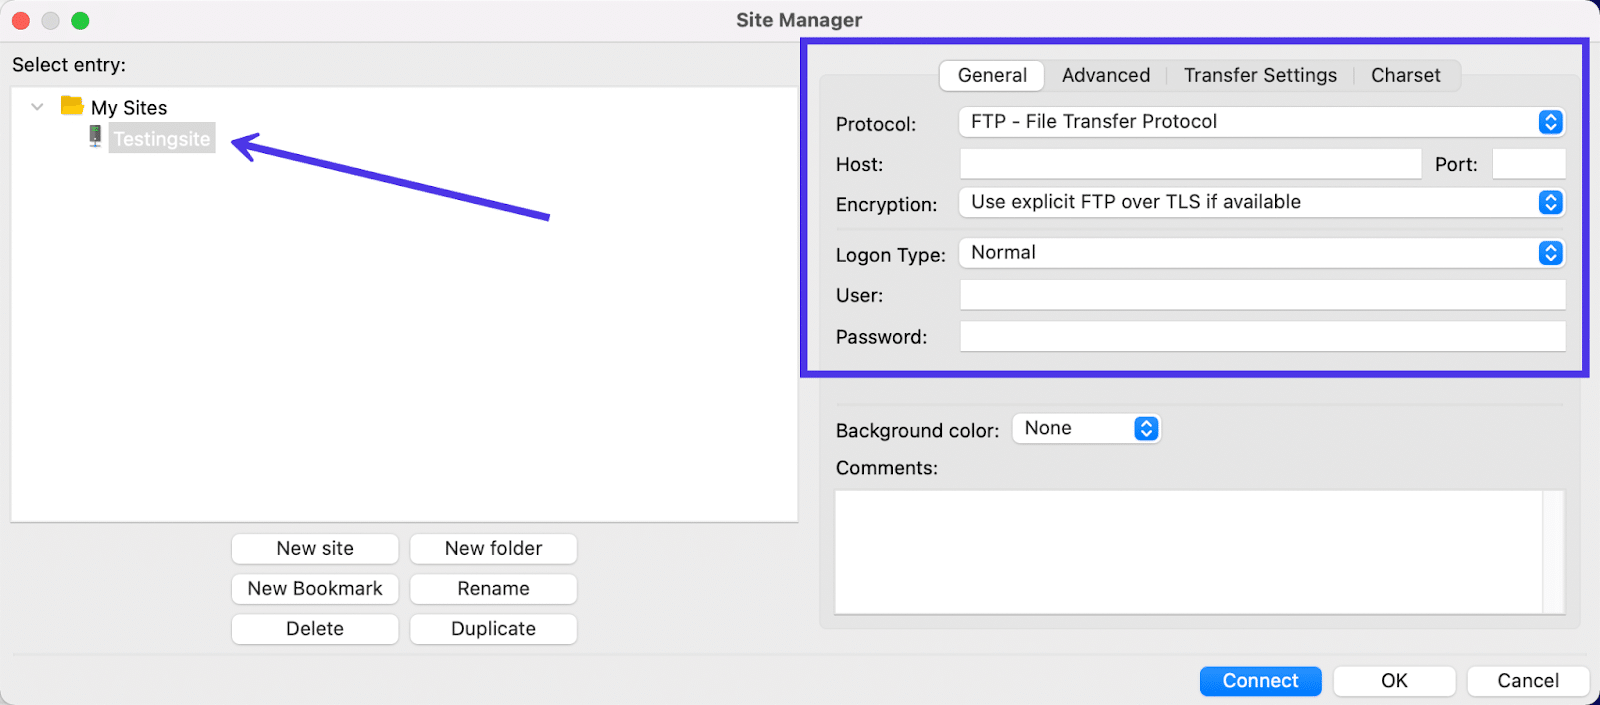
It’s completely potential to enter FTP credentials on this space as an alternative of the Quickconnect part. Nevertheless, in our case, we need to implement an SFTP connection as an alternative, since Kinsta works with SFTP.
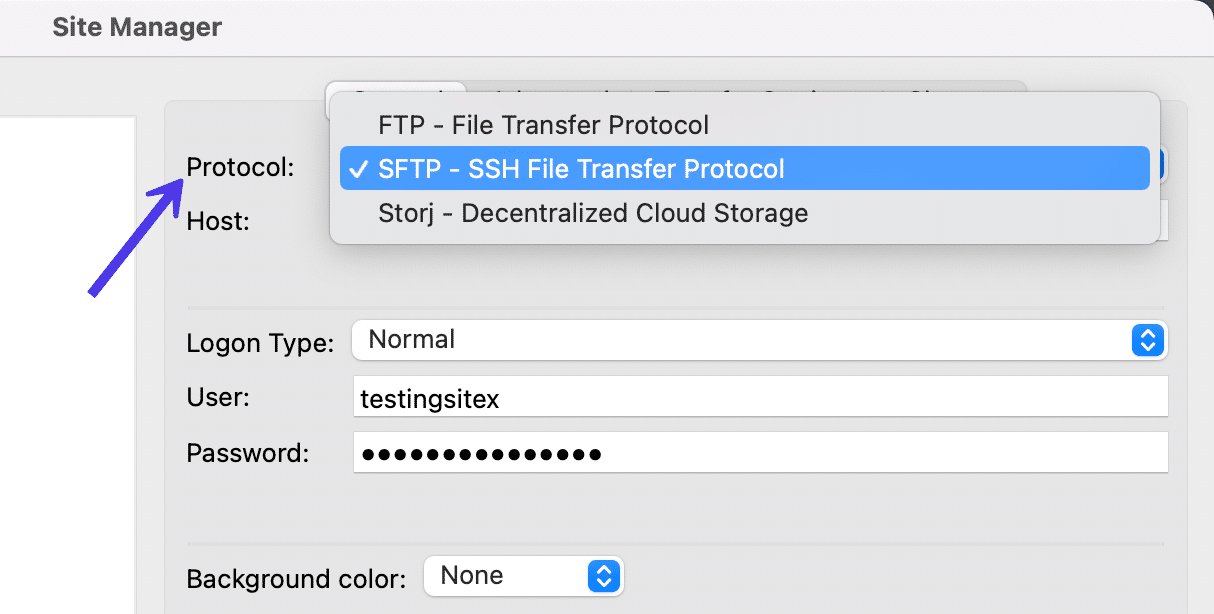
To take action, open the Protocol dropdown menu to disclose the checklist of protocols accessible for linking inside FileZilla, then mark the SFTP – SSH File Switch Protocol possibility because the one you need to use.
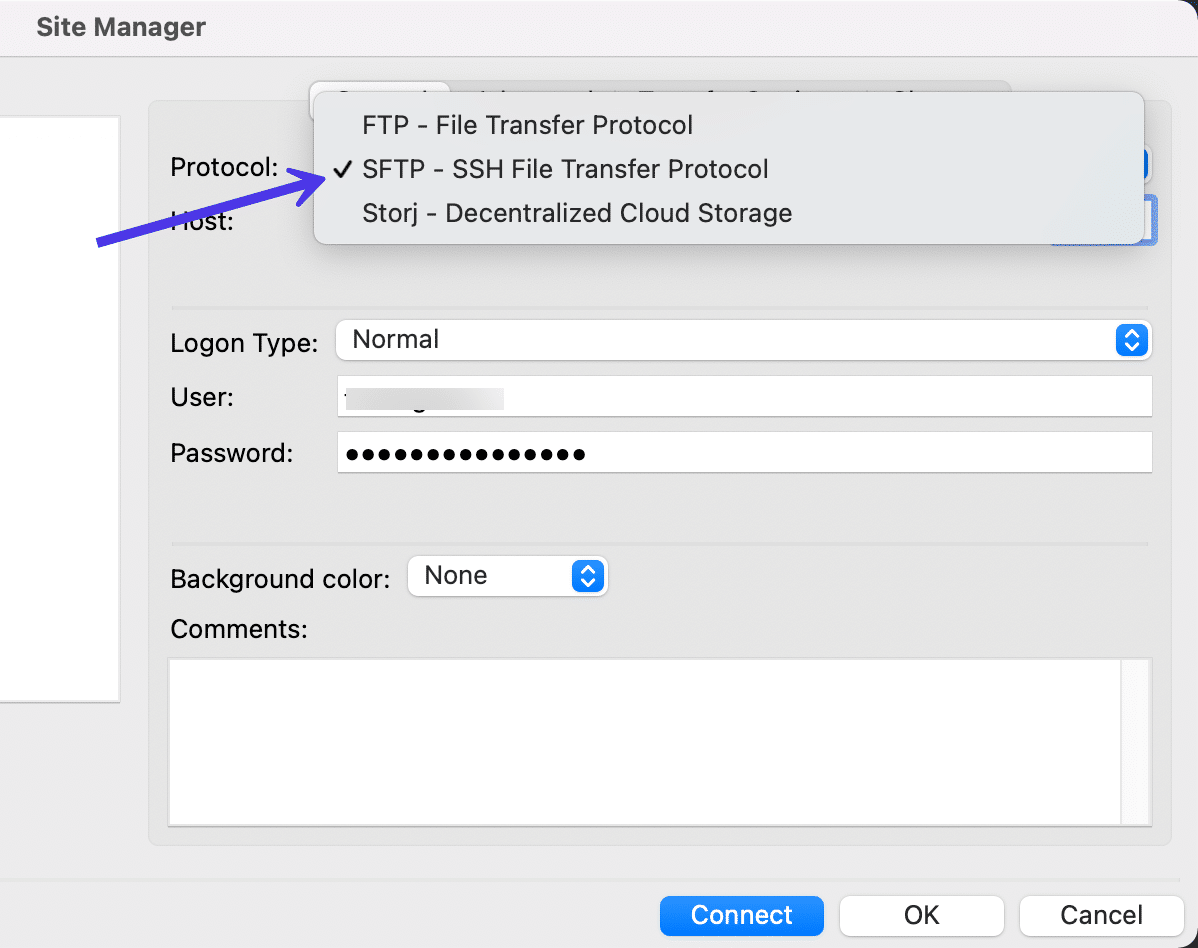
Now you will have the perfect setup for including the SFTP credentials and connecting to your Kinsta web site through FileZilla.
Click on on the Join button to proceed.
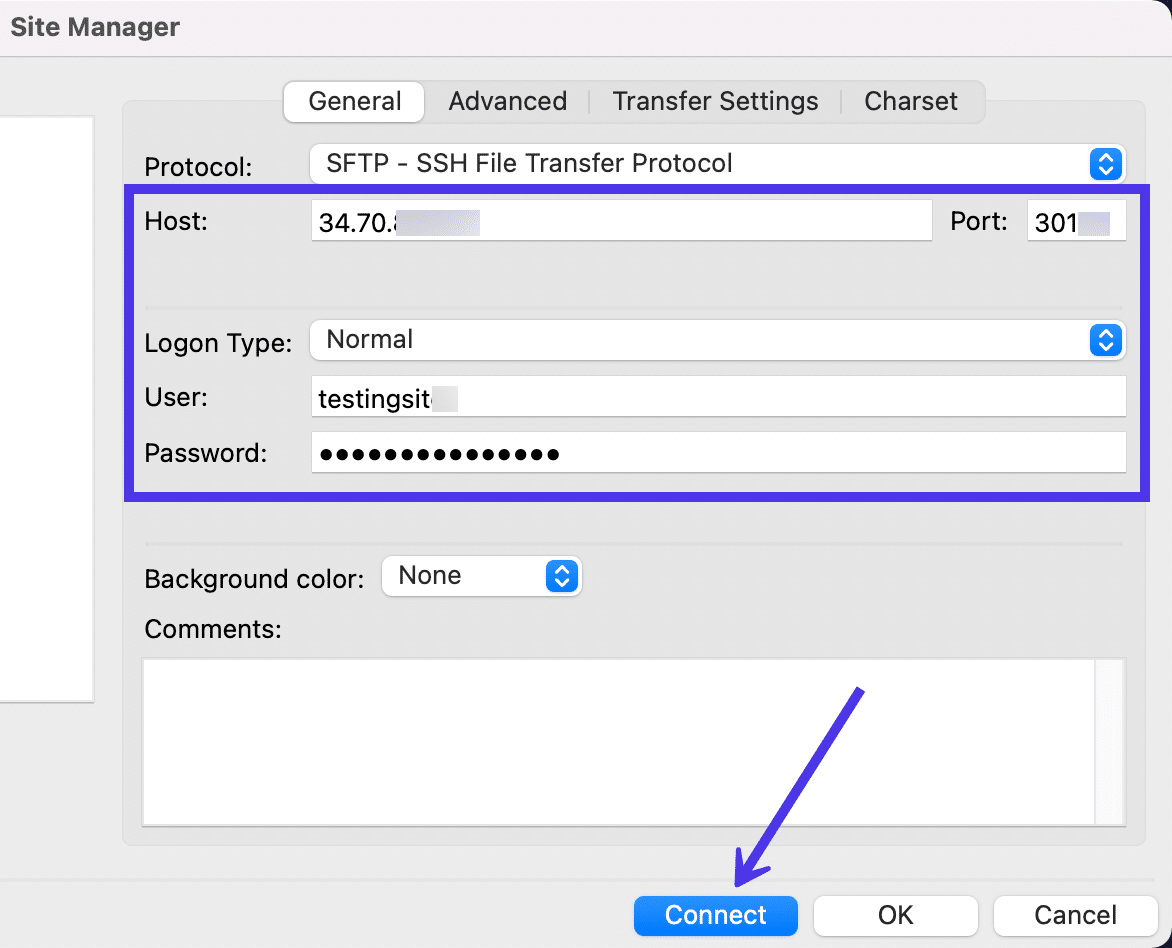
The method of connecting with the distant website ought to solely take a couple of seconds.
In some cases, you might get requested to belief a number if the server’s host secret’s unknown. Be happy to mark the checkbox to At all times Belief This Host when you’re assured you will have the fitting server credentials; this may stop the immediate from showing once more.
Click on OK.
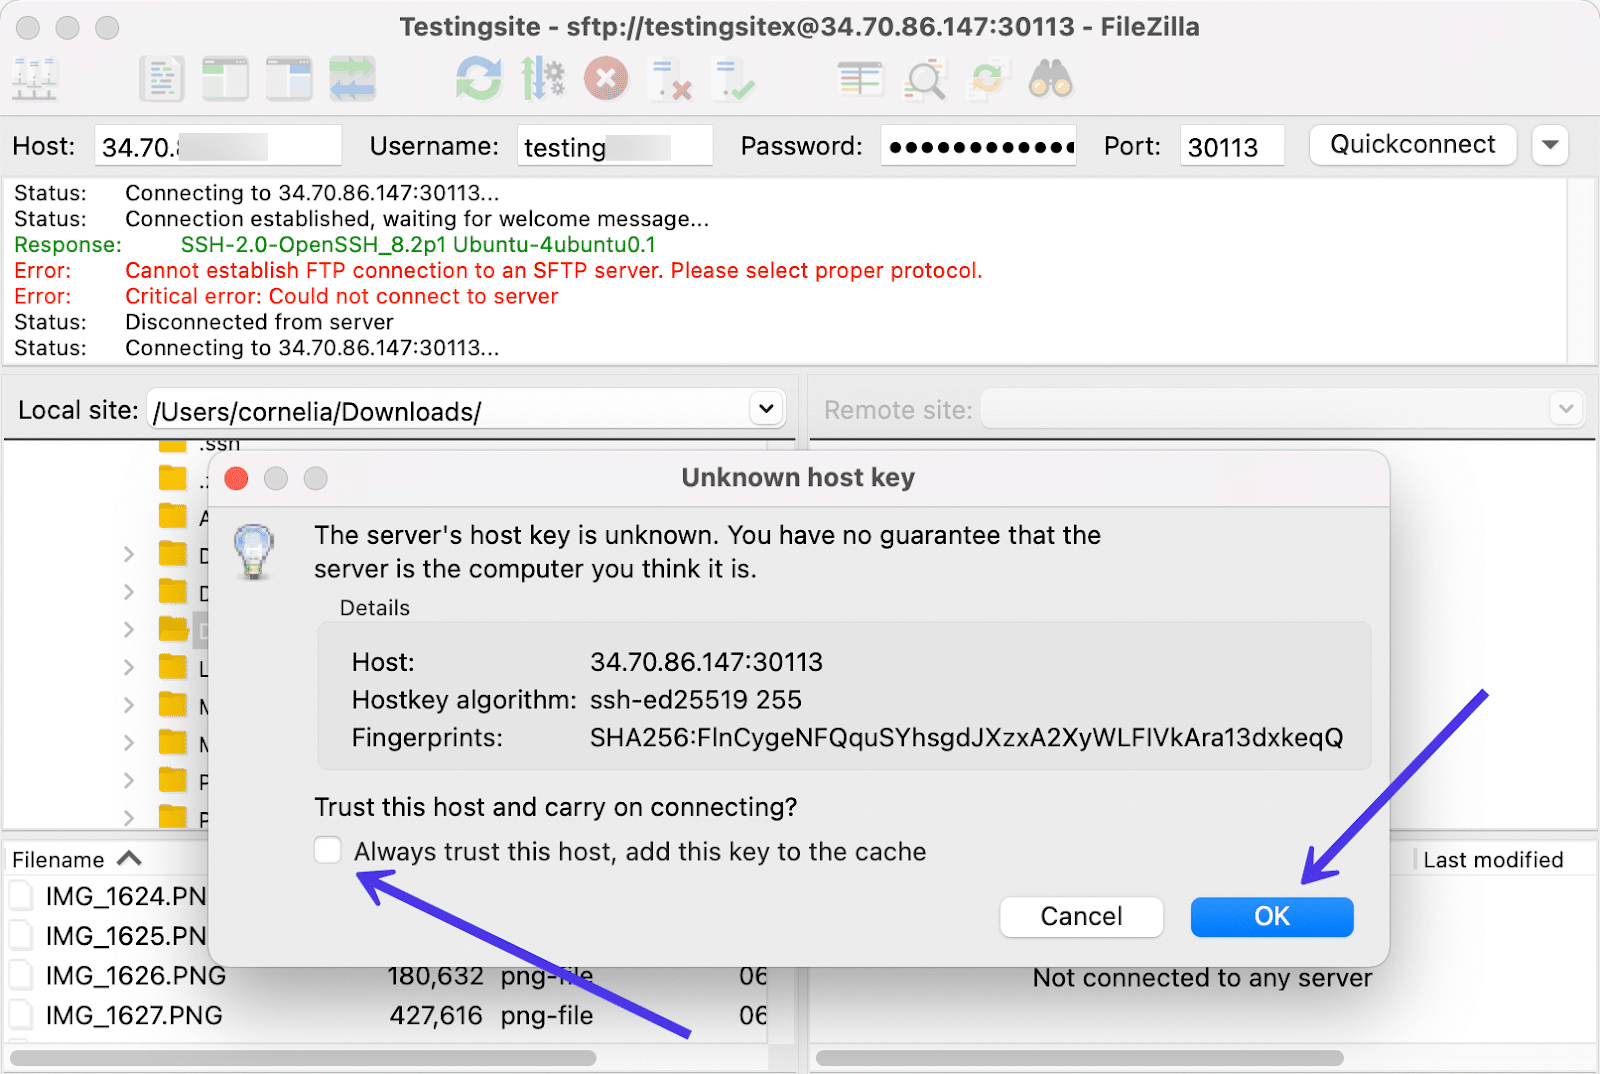
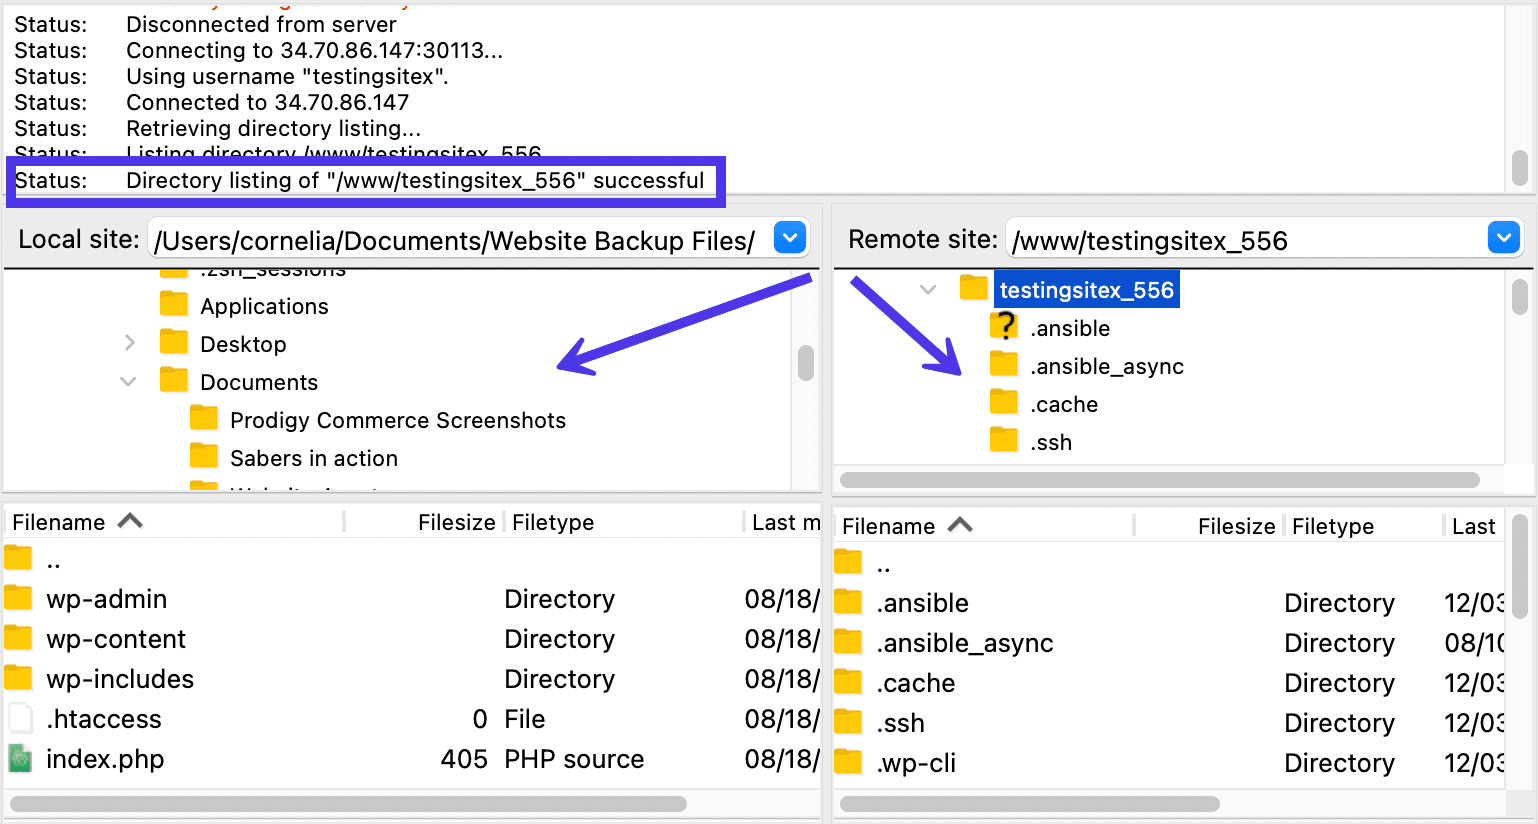
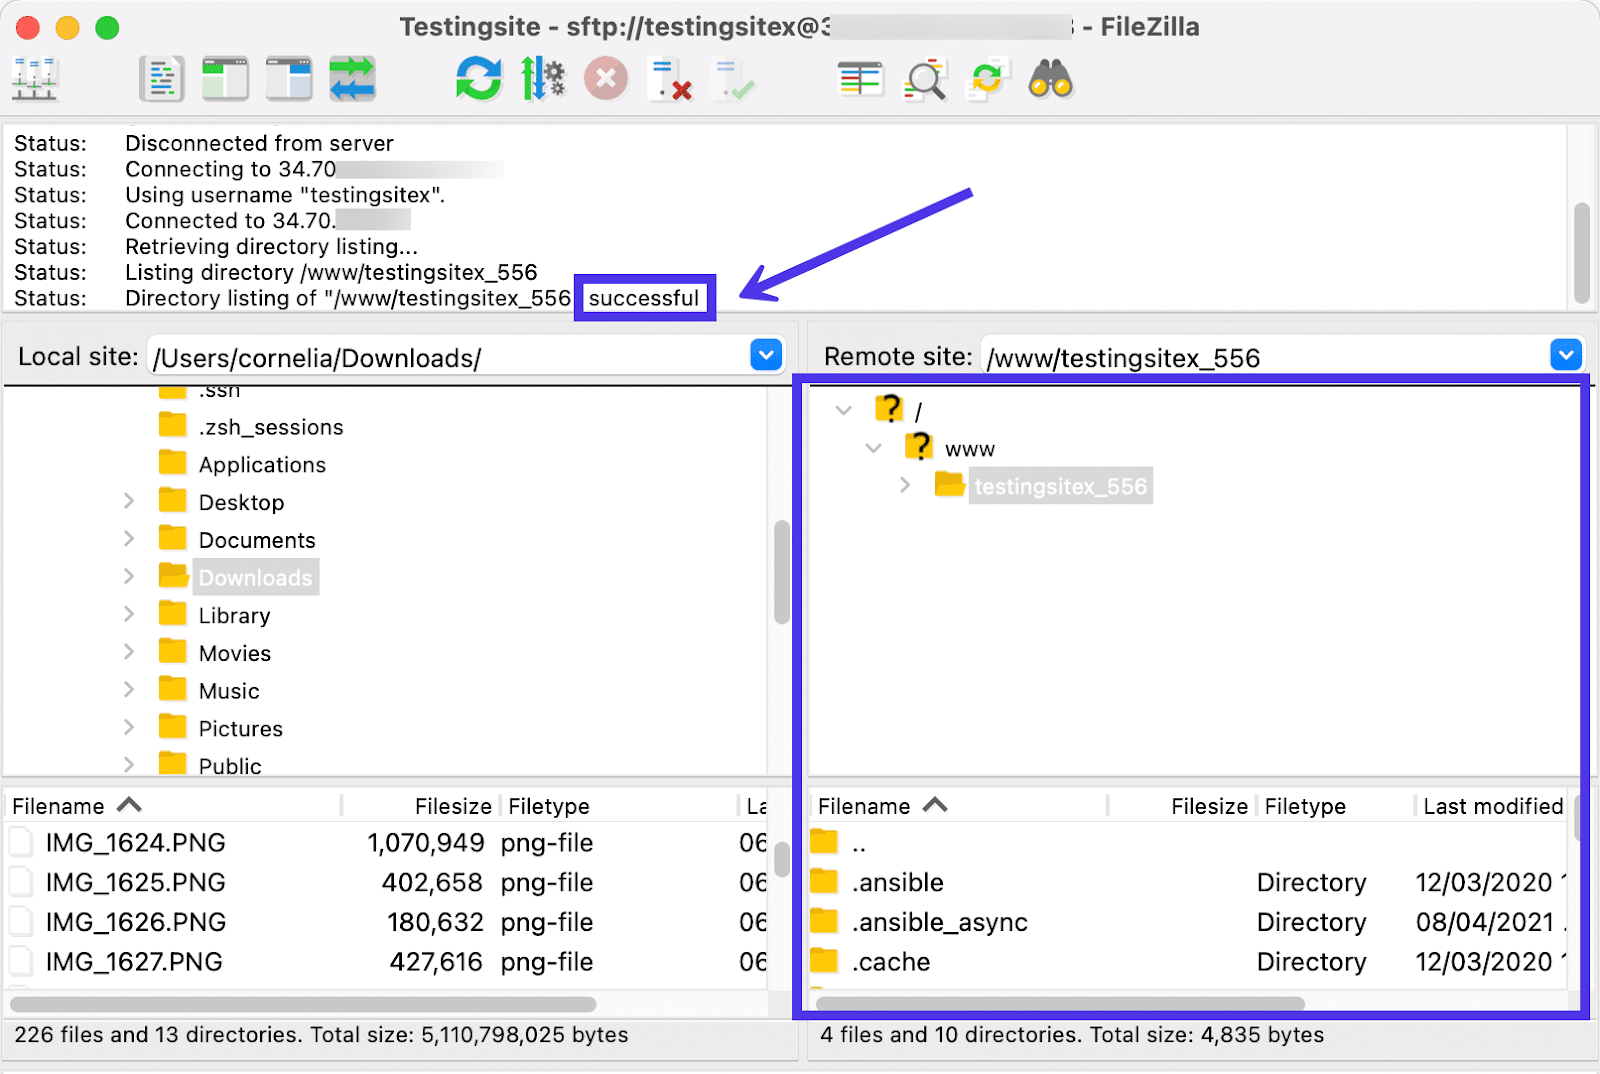
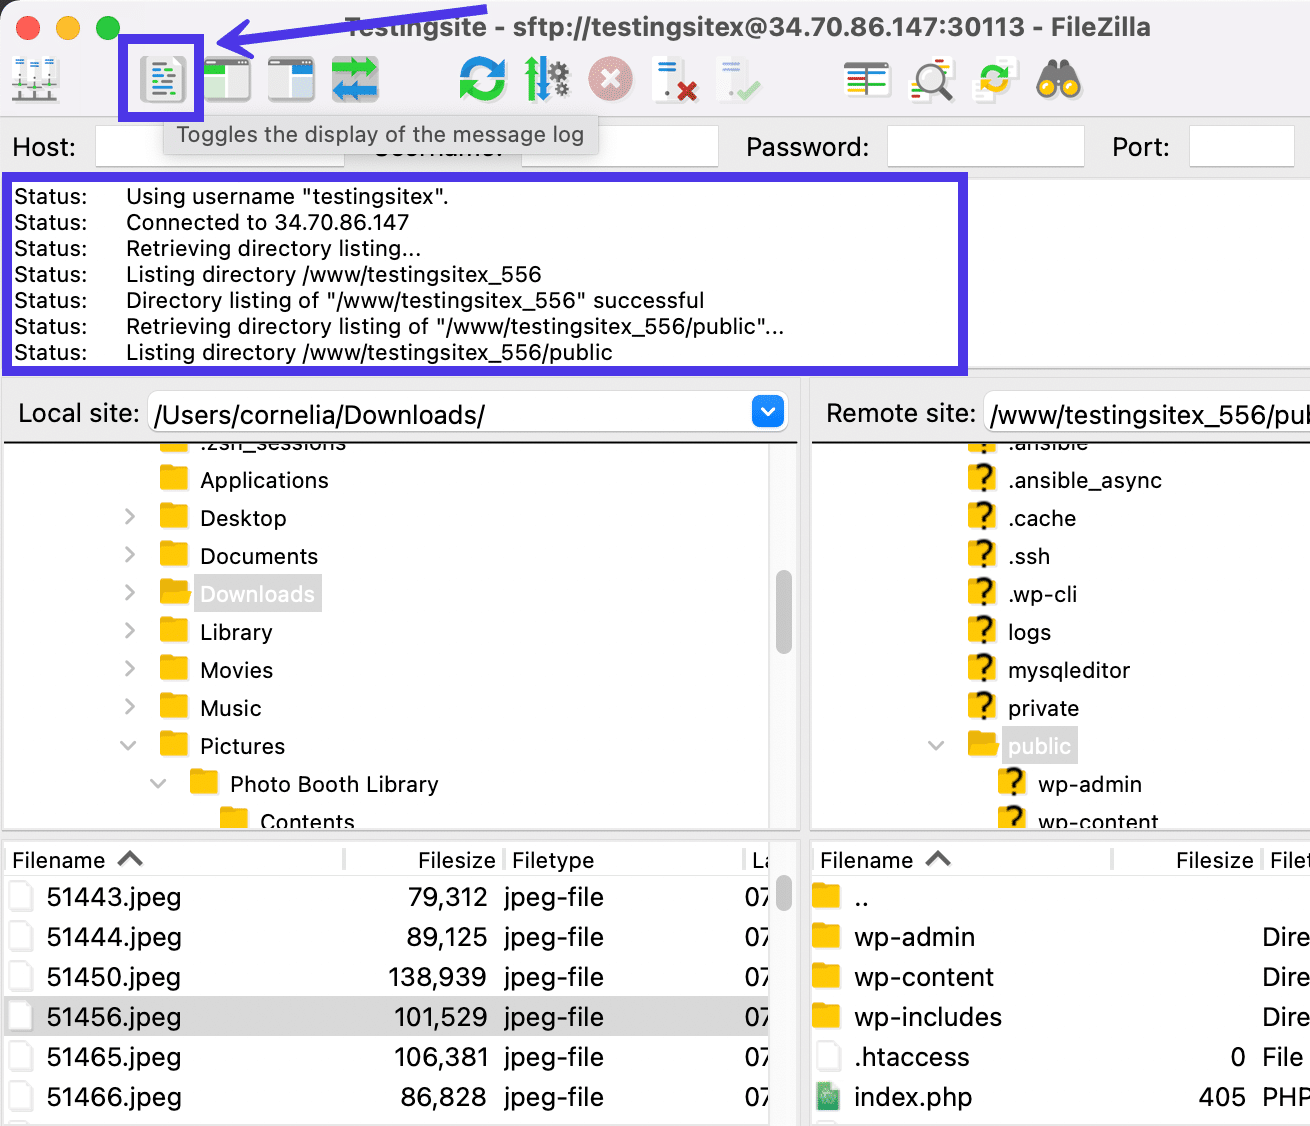
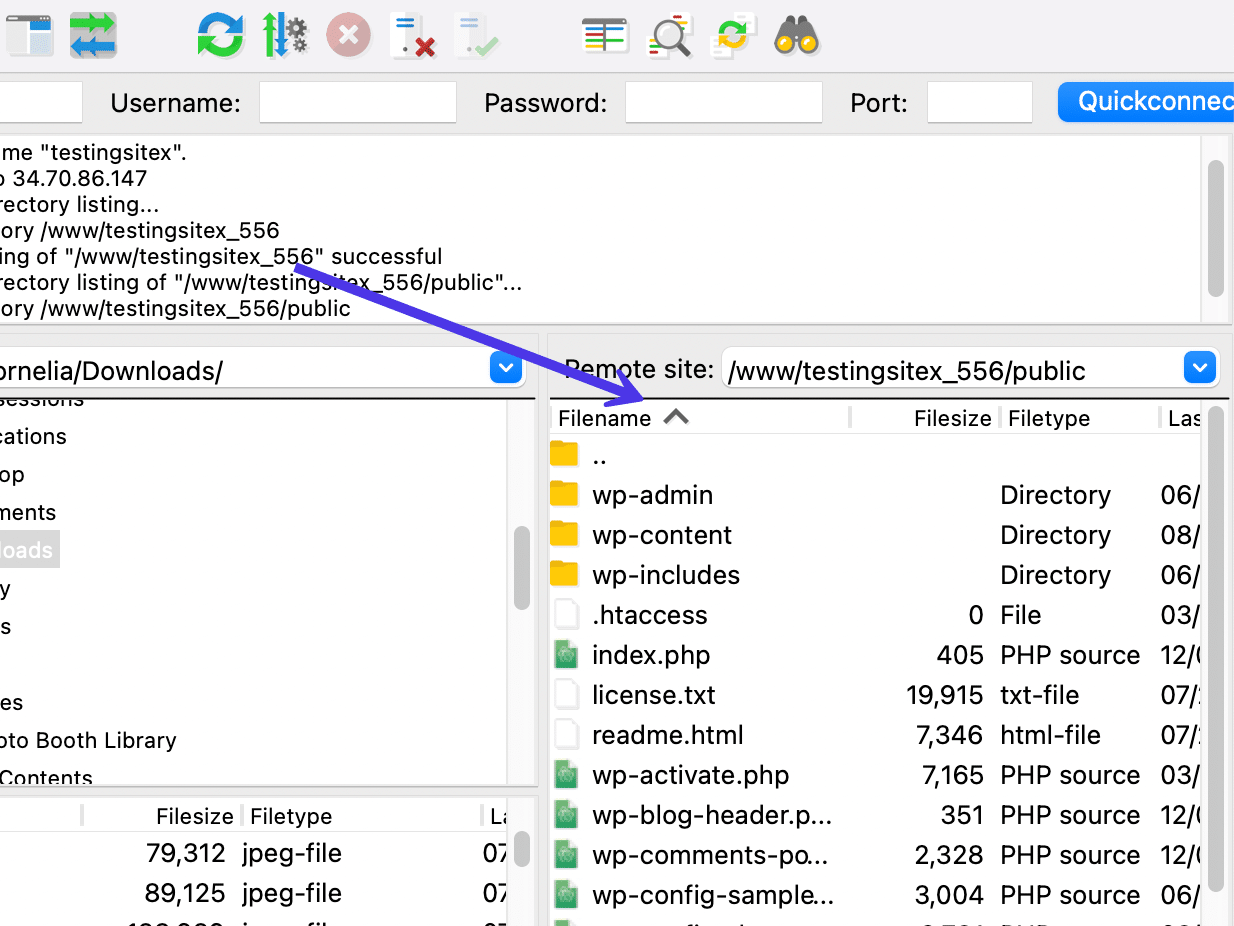
FileZilla will run a couple of standing updates, then inform you that the listing itemizing connection was profitable. Search for the Profitable textual content on the backside of the standing replace checklist.
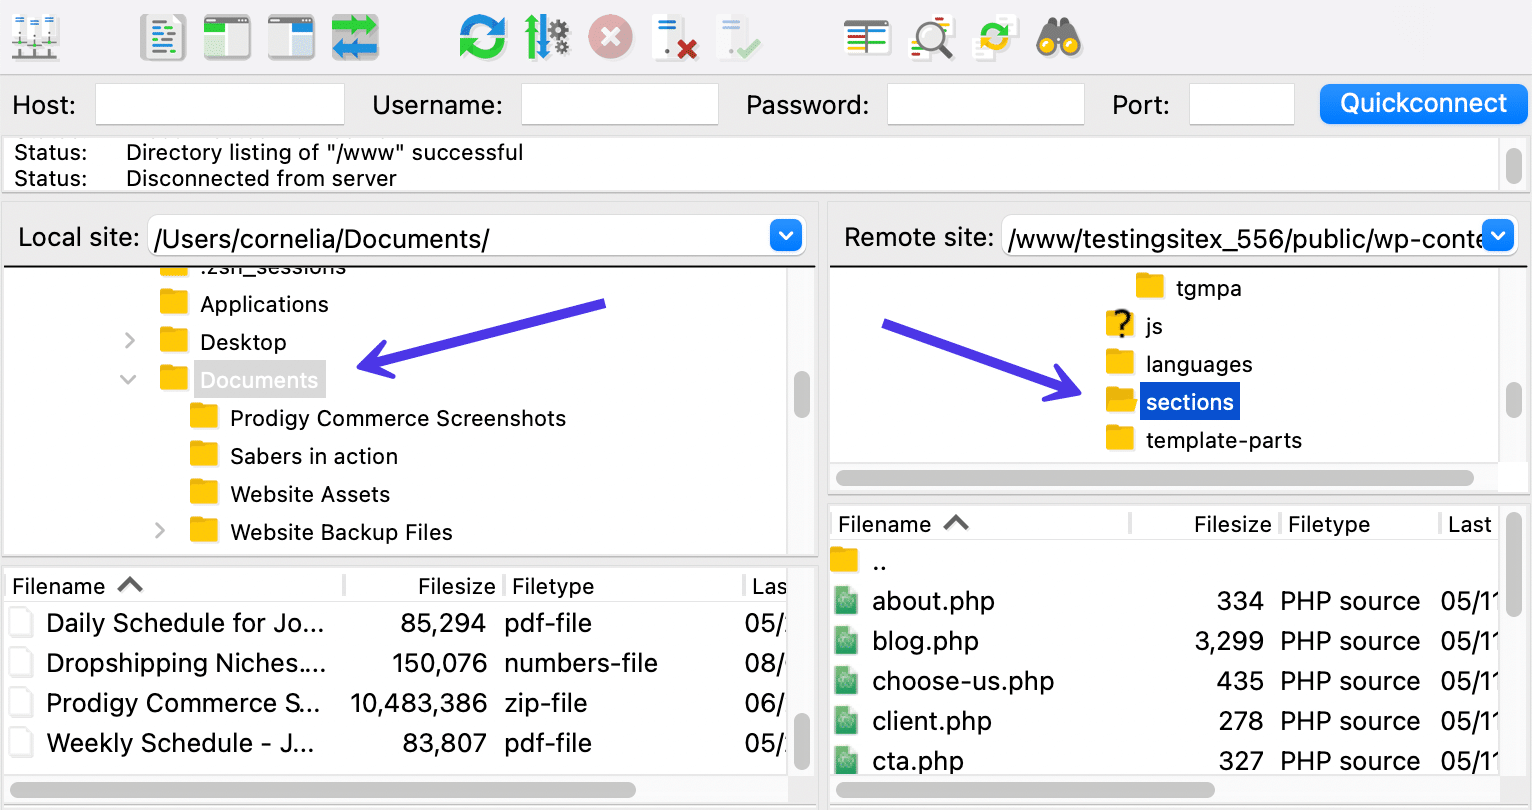
A profitable connection may even present the file listing out of your host server. On this instance, we’re utilizing a WordPress website hosted on Kinsta servers. The appropriate aspect of the FileZilla window now has the foundation listing proven, together with any information inside that listing when you click on on the positioning folder.
Should you’re having hassle finding the foundation listing, search for folders like /www or /thenameofyoursite to make sure you’re in the fitting place.
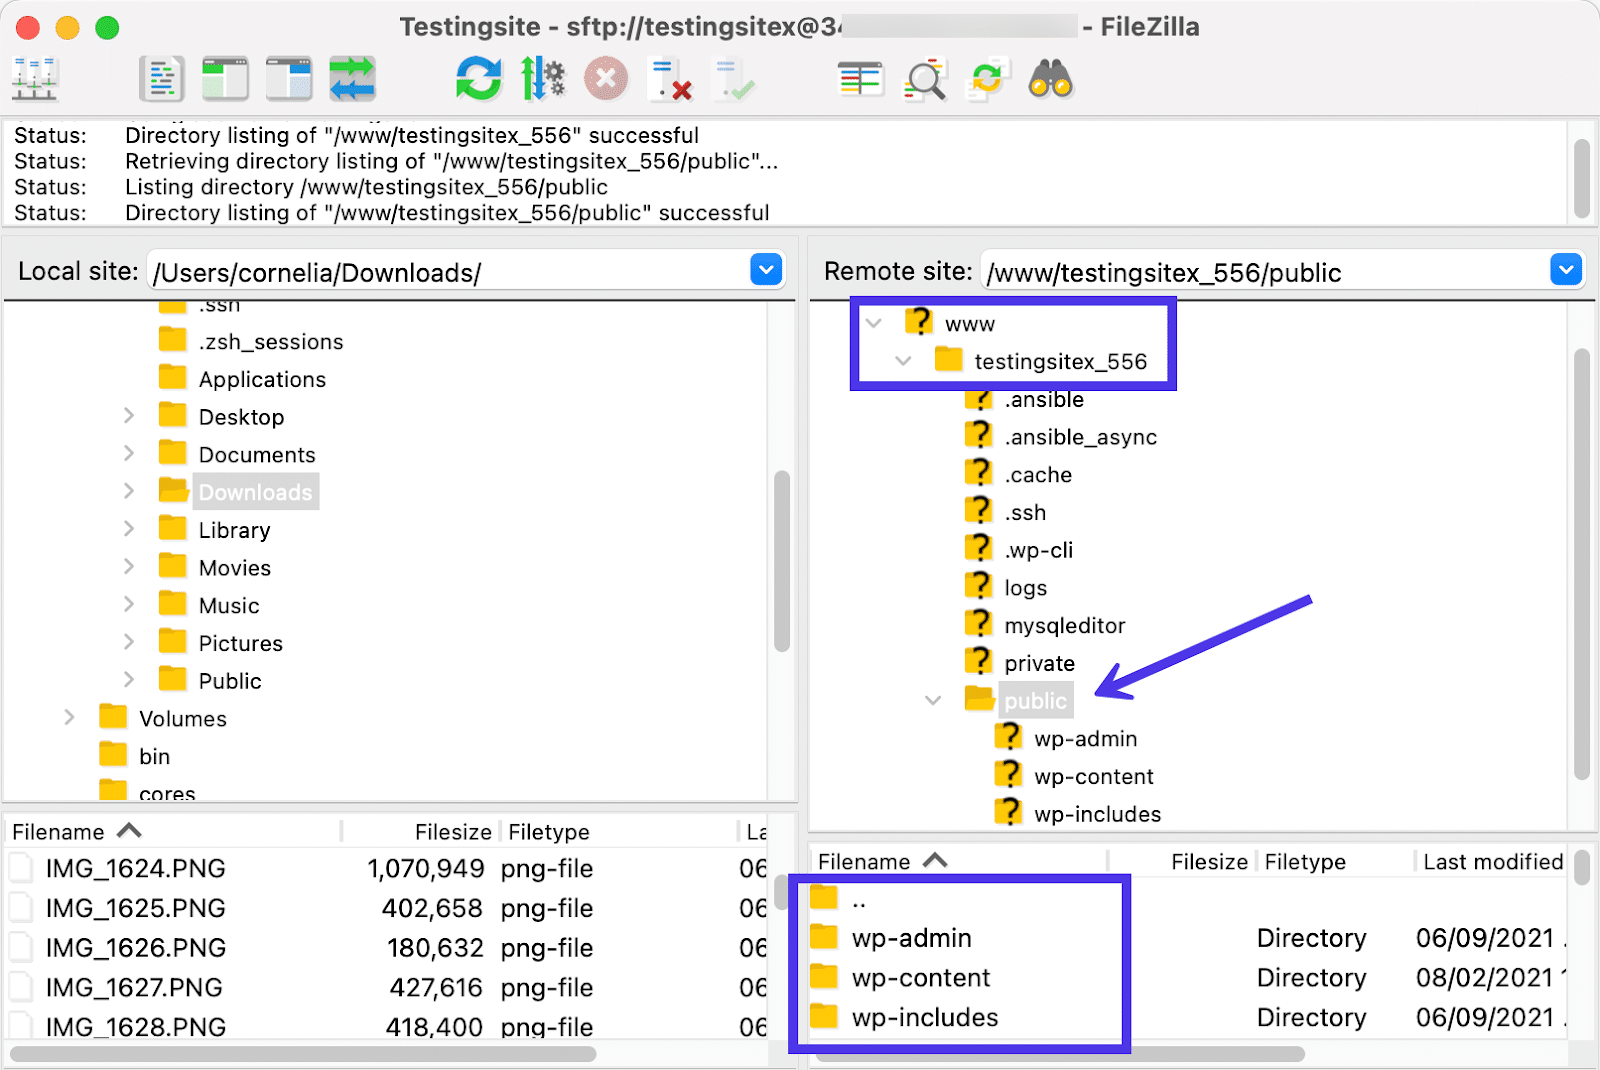
As talked about, this distant server holds the positioning contents for a WordPress website. So, you’ll be able to dig down into the foundation listing and click on on the /public folder.
As you’d anticipate from a WordPress web site, FileZilla exhibits folders like /wp-admin, /wp-content, and /wp-includes beneath the /public folder. These are a few of the main information for WordPress websites, so it’s clever to recollect the best way to discover them.
Congratulations — you’ve efficiently established an SFTP connection by way of FileZilla!
This makes it potential to maneuver, delete, copy, add, and obtain information from each your laptop and the distant host server. We’ll speak all about these duties within the sections under.
How To Navigate By means of the FileZilla Interface
FileZilla is thought for its easy, intuitive interface that doesn’t change typically. Often we’ll see new options, however the basic construction behind the FTP shopper, its principal interface, and the buttons scattered all through this system usually stay the identical.
On this part, we’ll clarify the aim of every ingredient you see inside FileZilla. As well as, we’ll speak about the best way to effectively transfer across the FileZilla interface for finishing the most typical duties.
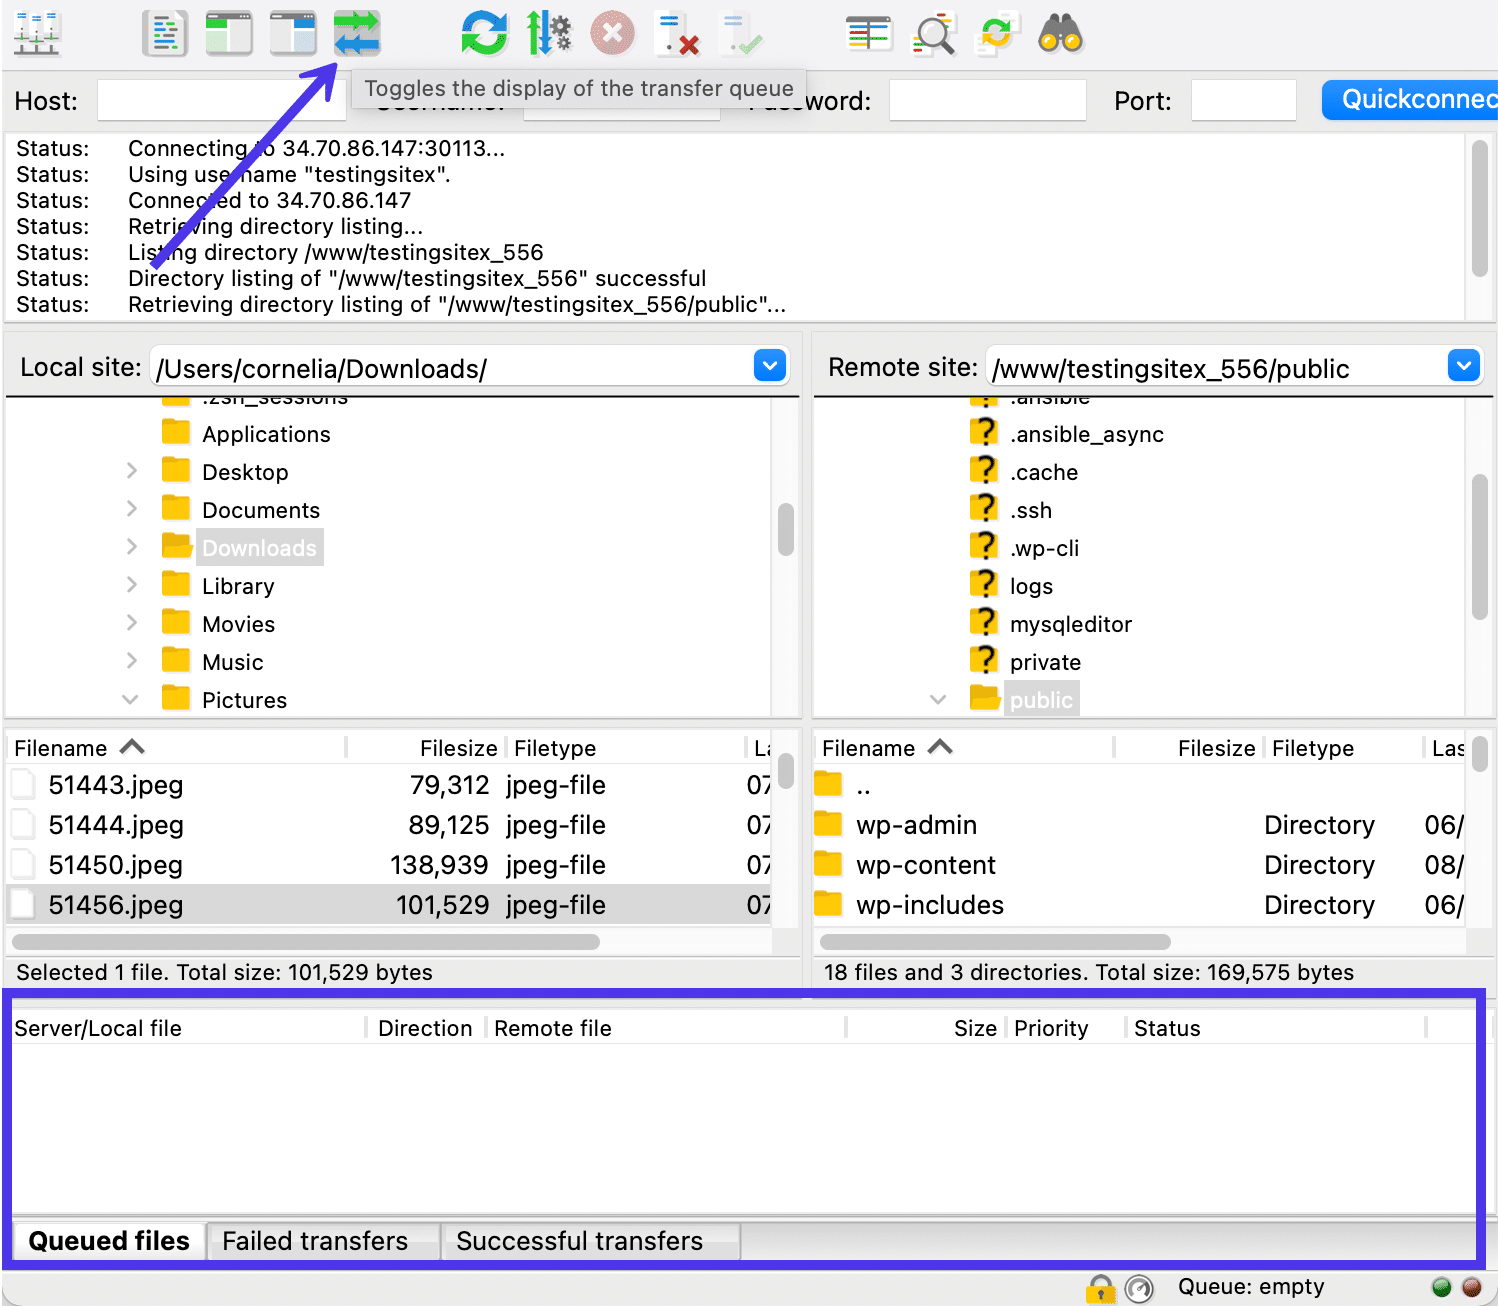
Beneath, you’ll discover a view of the primary FileZilla display. We’ve labeled every part and referenced the aim of these sections under.
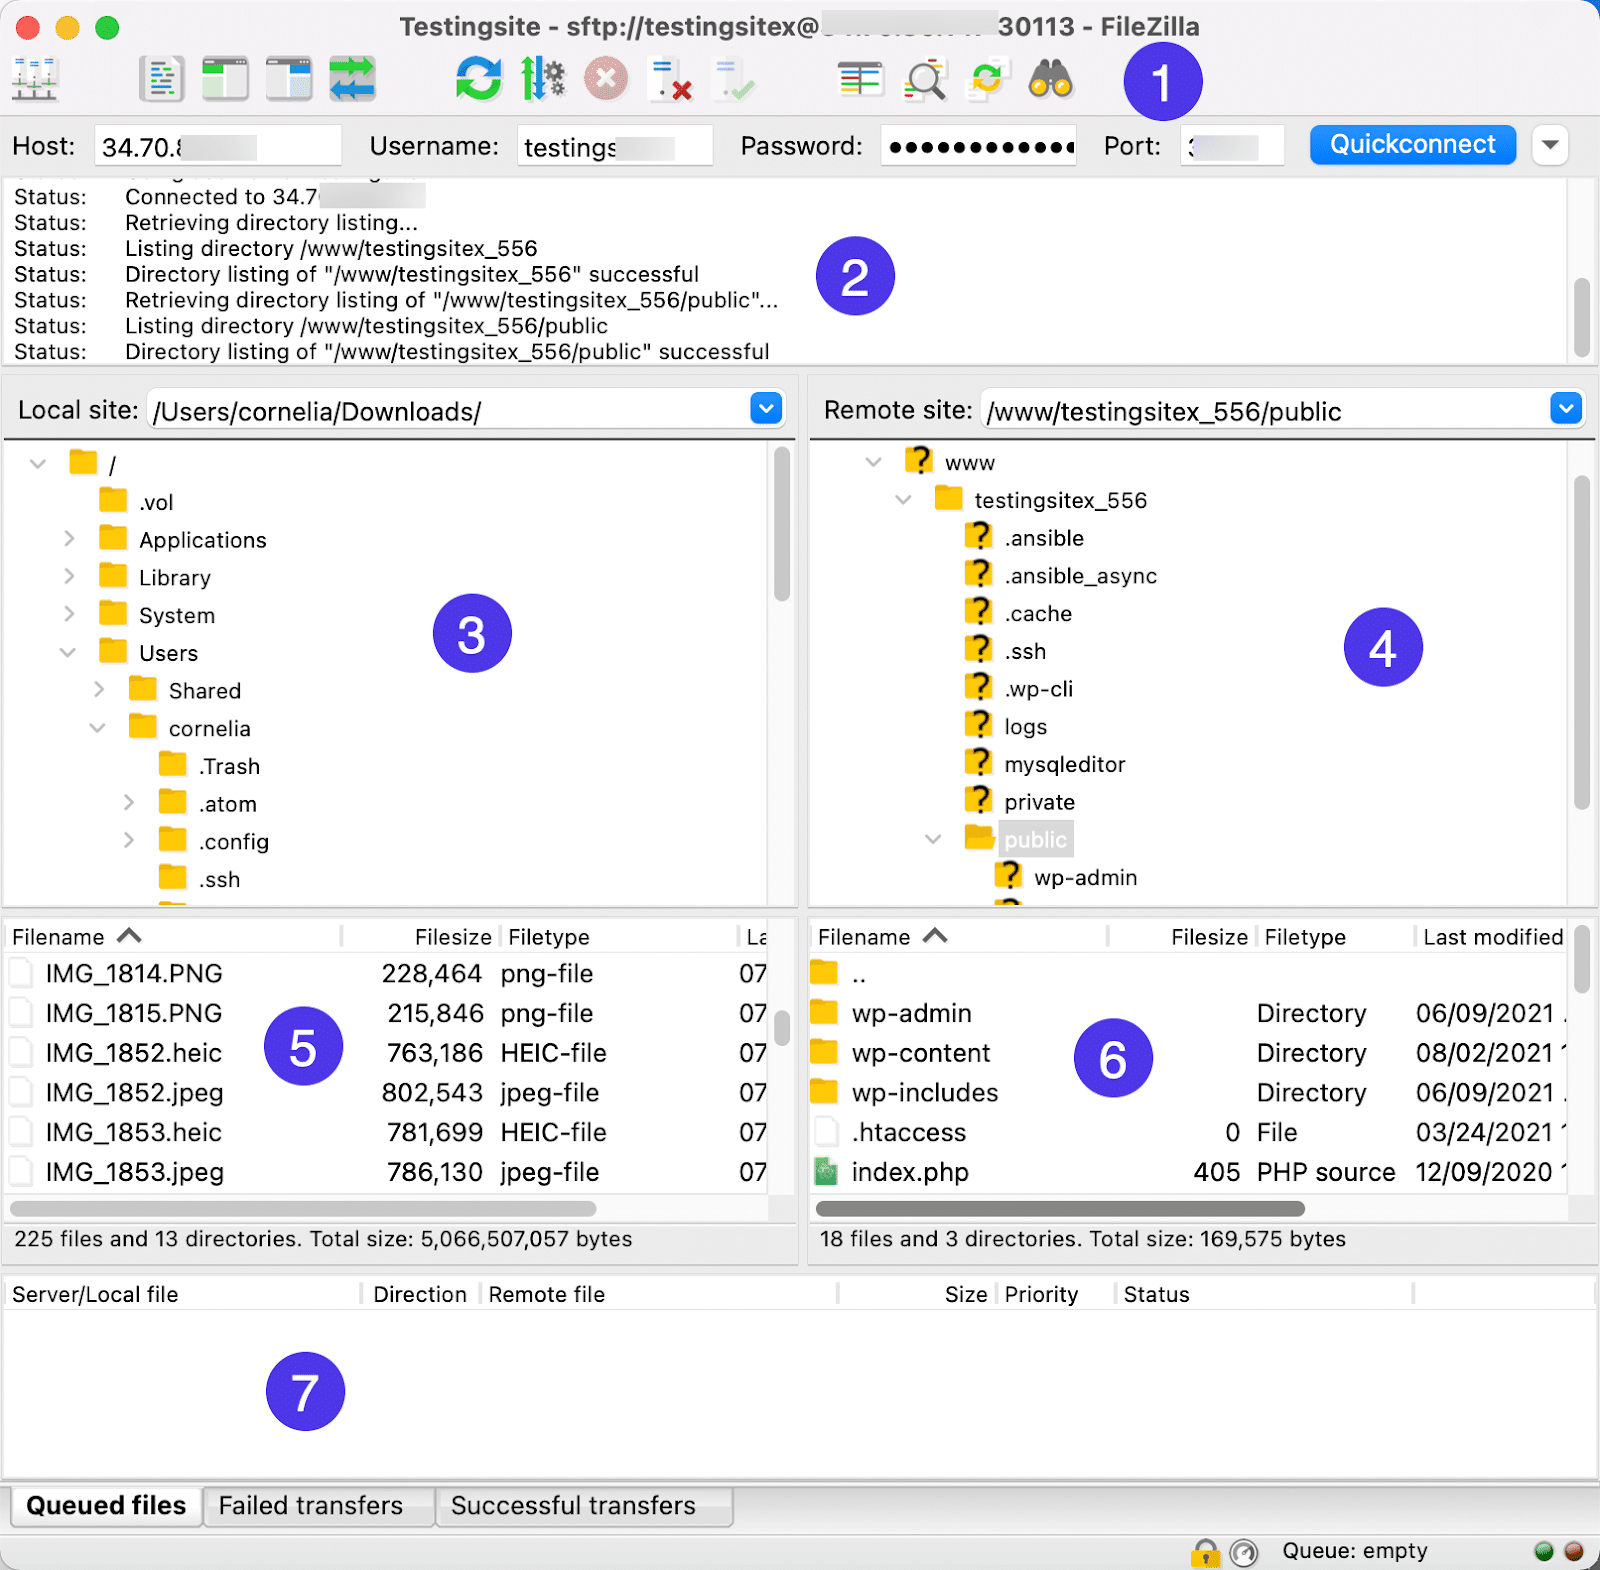
- Management Panel: The highest bar of the FileZilla window. That is the place you need to use the Quickconnect operate to quickly hyperlink up an area and distant listing utilizing host credentials. It additionally incorporates fast keys for finishing widespread duties. Ranging from the left, listed here are the names/capabilities of these buttons:
- Website Supervisor
- Toggle Show of the Message Log
- Toggle Show of Native Listing Tree
- Toggle Show of Distant Listing Tree
- Toggle Show of the Switch Queue
- Refresh the File and Folder Lists
- Toggle Processing of the Switch Queue
- Cancel the Present Operation
- Disconnect from the Presently Seen Server
- Reconnect to the Final Used Server
- Open the Listing Itemizing Filter Dialog
- Toggle Listing Comparability
- Toggle Synchronized Shopping
- Seek for Recordsdata Recursively
- Message Log: A feed of messages indicating the present standing of your FTP or SFTP connection. You may even see success messages right here, or messages for errors, disconnections, and listing particulars.
- Native Listing Tree: The hierarchy of information you at present have in your native machine. You possibly can open all of those information, transfer them round, or switch them to the distant website by dragging and dropping them to the fitting.
- Distant Listing Tree: The hierarchy of information in your distant server. Just like the native listing, you’re capable of modify these information with left or proper clicks and open up the information to view what’s inside.
- Native Listing Contents: An inventory of what’s contained in the file you at present have chosen within the Native Listing Tree. You’re additionally capable of modify information on this space.
- Distant Listing Contents: An inventory of the information contained in the folder you at present have chosen within the Distant Listing Tree. It’s additionally potential to switch information on this space.
- Switch Queue: An space that shows details about queued, failed, or profitable file transfers. Use the tabs on the backside to filter to solely a type of classes.
Most of those areas are interactive ultimately, which means you’ll be able to both left- or right-click on sections just like the Native Listing Contents, Message Log, or Switch Queue to carry up a further menu with much more choices.
Listing Bushes and Listing Contents
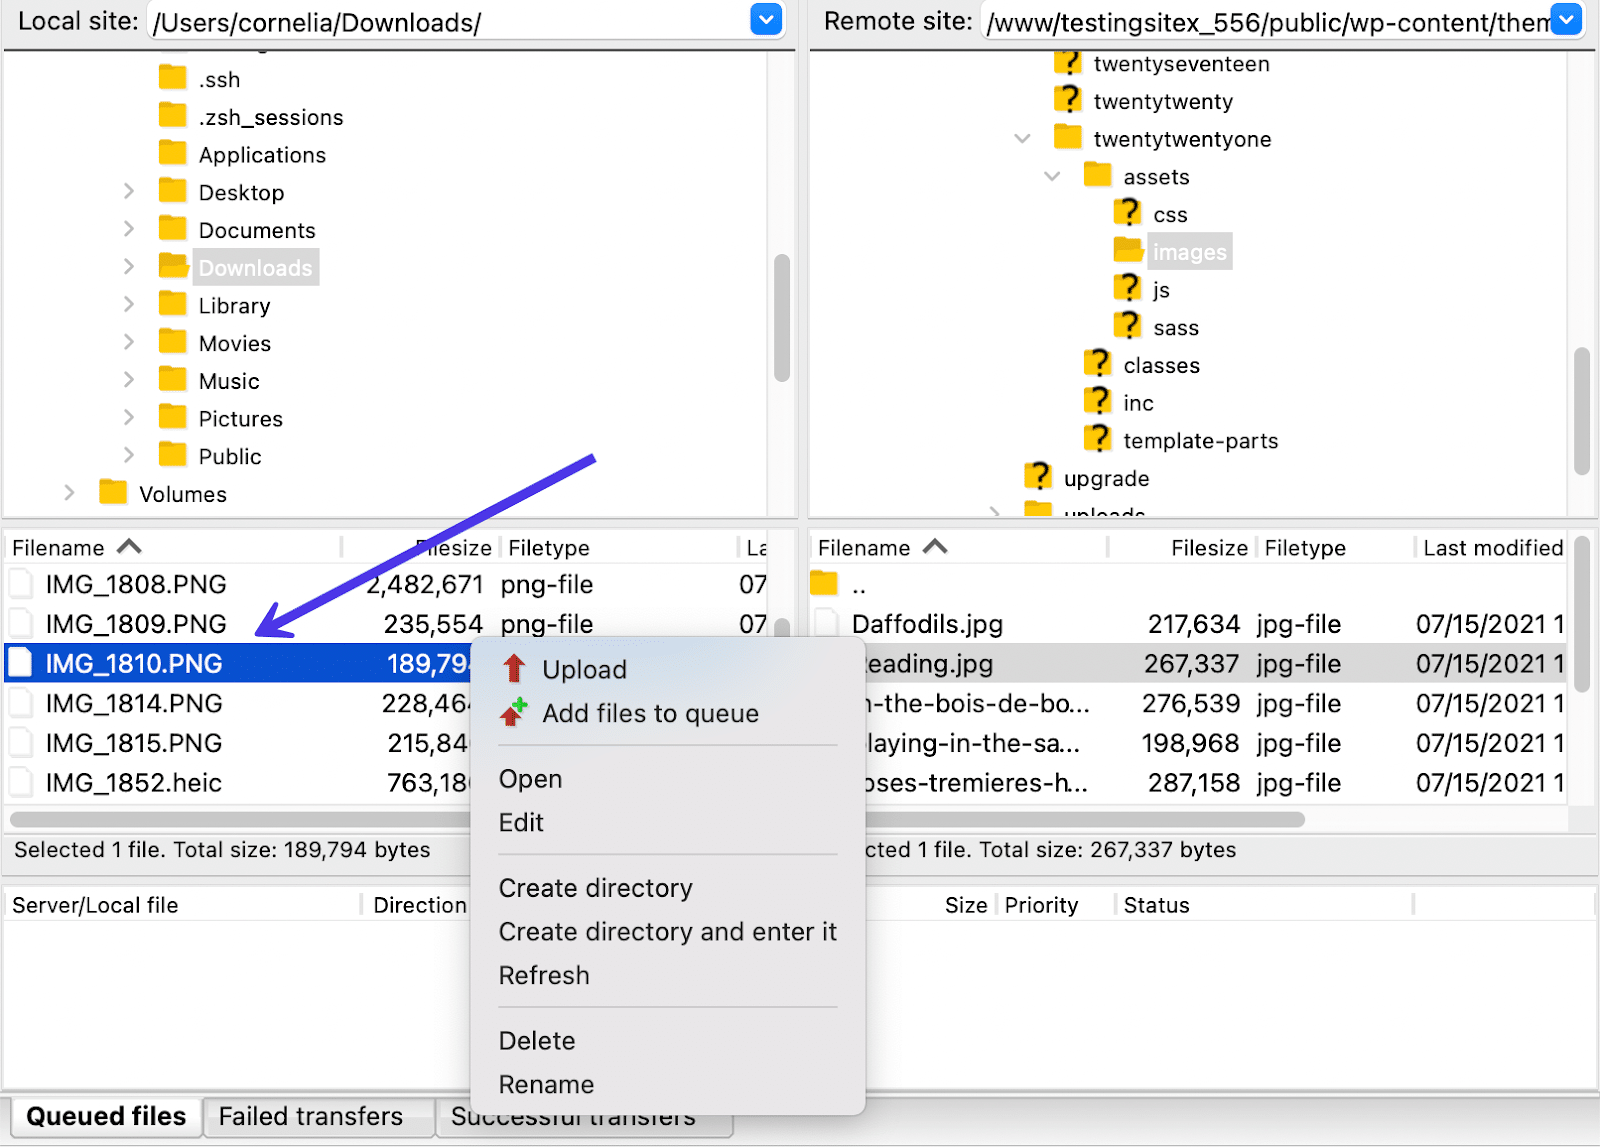
For example, FileZilla customers typically begin by working within the Listing Bushes or Listing Contents areas. Proper-clicking a file within the Native Listing Tree or Contents sections hundreds a menu with choices to finish the next:
- Add the file to the distant website
- Add information to queue
- Open the file for viewing in your laptop
- Edit the file in your laptop
- Create listing
- Create listing and enter It
- Refresh this file solely
- Delete the file from the present listing
- Rename the file
The appropriate-click choices differ primarily based on the realm you place your mouse. Should you transfer the mouse pointer to the Distant Content material module and right-click, you’re offered with a unique set of instructions for the file you’ve chosen. And that is sensible — customers are inclined to need various actions when coping with distant information in comparison with native information.
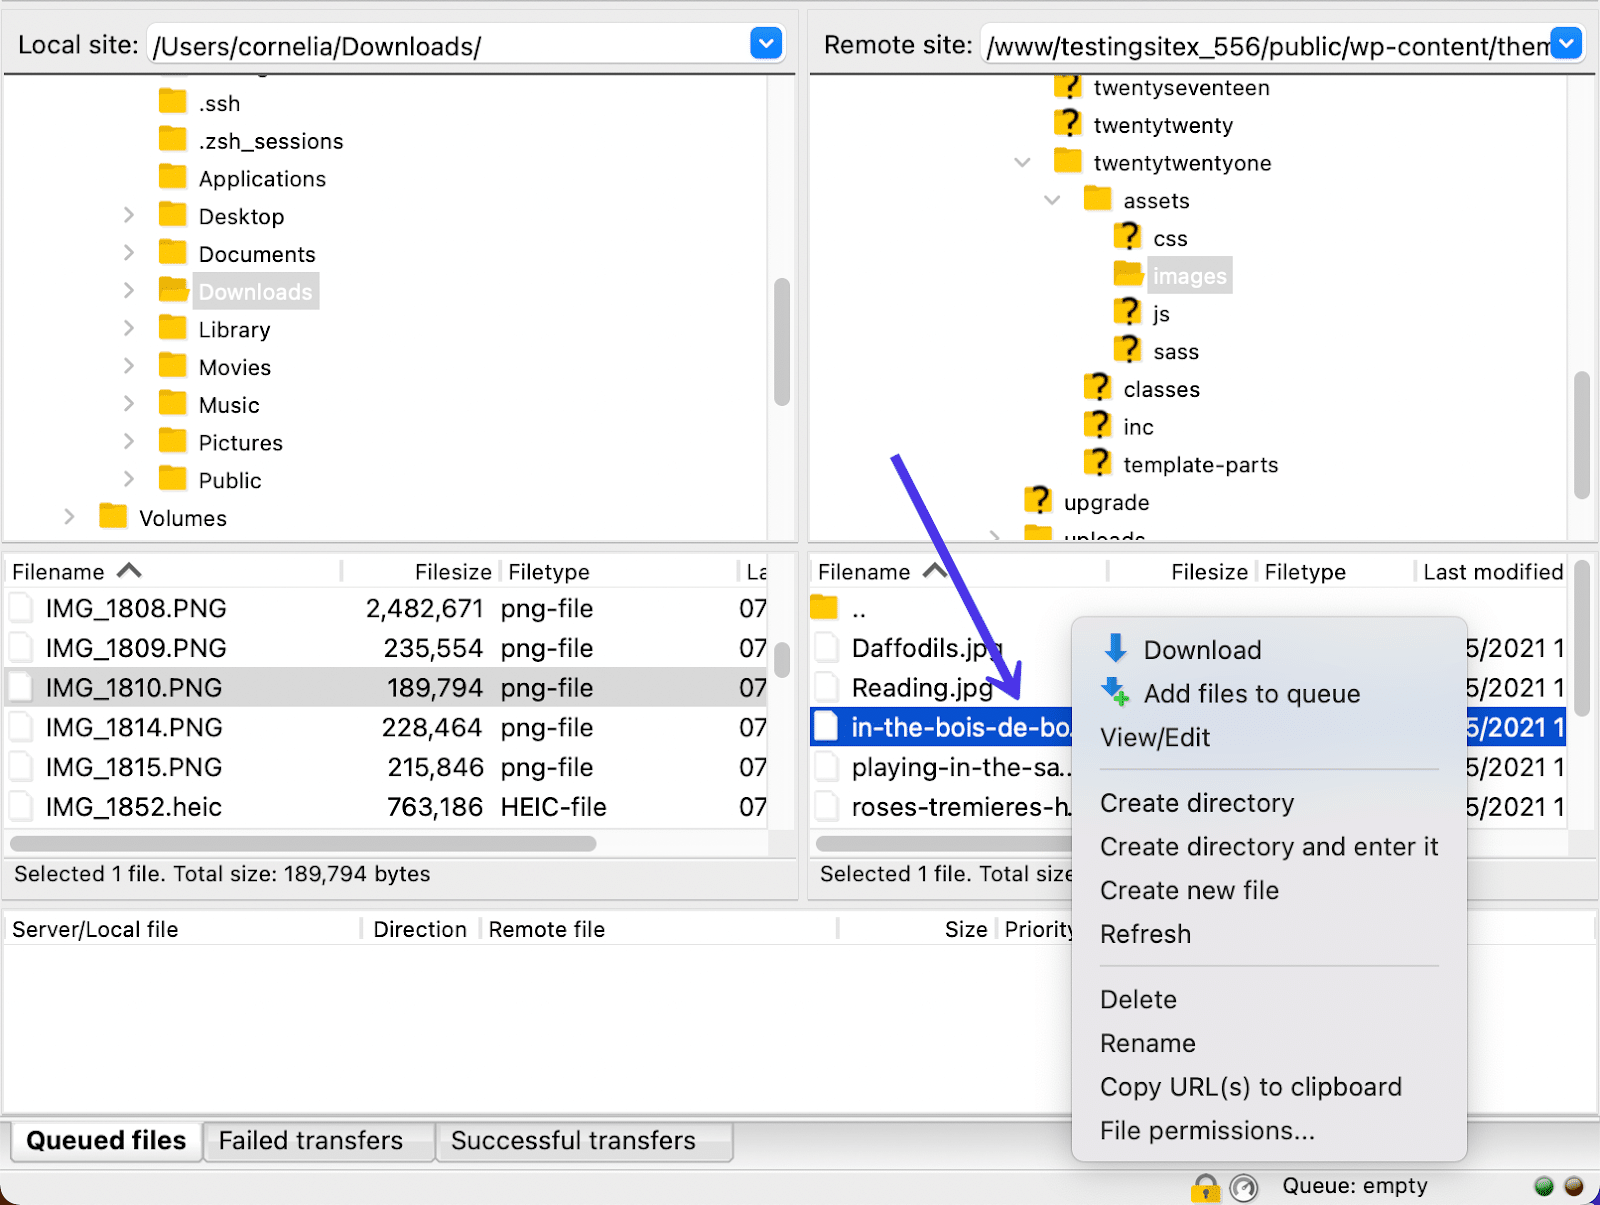
Subsequently, a right-click in that Distant Content material space leads to the next choices:
- Obtain the file from the distant server to your native machine
- Add information to queue
- View or edit the file you will have chosen
- Create listing from the chosen file
- Create listing and enter It
- Create a brand new file inside that folder you will have open in FileZilla
- Refresh the loaded information
- Delete the file you will have chosen within the distant listing
- Rename the file
- Copy the URLs to the clipboard
- View file permissions for the file you will have chosen
Alternatively, left-clicking permits you to increase a folder to view what’s inside or open it utterly to govern and handle its contents.
You may as well maintain down the left-click button in your mouse to tug a file to a different location inside the FileZilla interface.
For instance, the GIF under exhibits us holding and choosing a PNG file within the Native Listing Contents space and dragging it to position it within the Distant Listing Tree.
Within the above instance, we uploaded a PNG picture file to a WordPress theme’s /picture folder (the TwentyTwentyOne theme to be precise). This despatched the beforehand native file to the distant setting whereas additionally leaving a duplicate of the unique picture file within the native listing.
Native and Distant Listing Contents
You may as well transfer Native Listing Contents to the Distant Listing Contents or reverse the operations by transferring gadgets from the distant server to the native information.
After dragging and dropping a file, one in every of many actions may happen relying on the place you’re transferring the file. An area file moved to the distant server, as an example, will get uploaded to the listing you selected. Transferring a distant file to the native aspect downloads that file to your native machine.
Customizing the FileZilla Interface with Fast Keys
We talked in regards to the Management Panel fast keys within the earlier part, however now we’ll present you examples of the best way to use them for adjusting the structure of your FileZilla interface. This fashion, you’re capable of customise what’s proven within the window for a extra user-friendly expertise.
As a tip, the fast keys don’t have labels, however you’ll be able to mouse over every one to see a descriptive popup.
To start, the Website Supervisor button supplies a couple of settings to customise which directories seem always. Click on on the Website Supervisor icon to open it up.
We already know that it’s potential to attach websites and kind in SFTP credentials within the Website Supervisor. There are additionally settings to alter up the FileZilla interface and even to make bookmarks or new folders.
Find the menu space that features Basic, Superior, Switch Settings, and Charset tabs. Select the Superior tab to proceed.
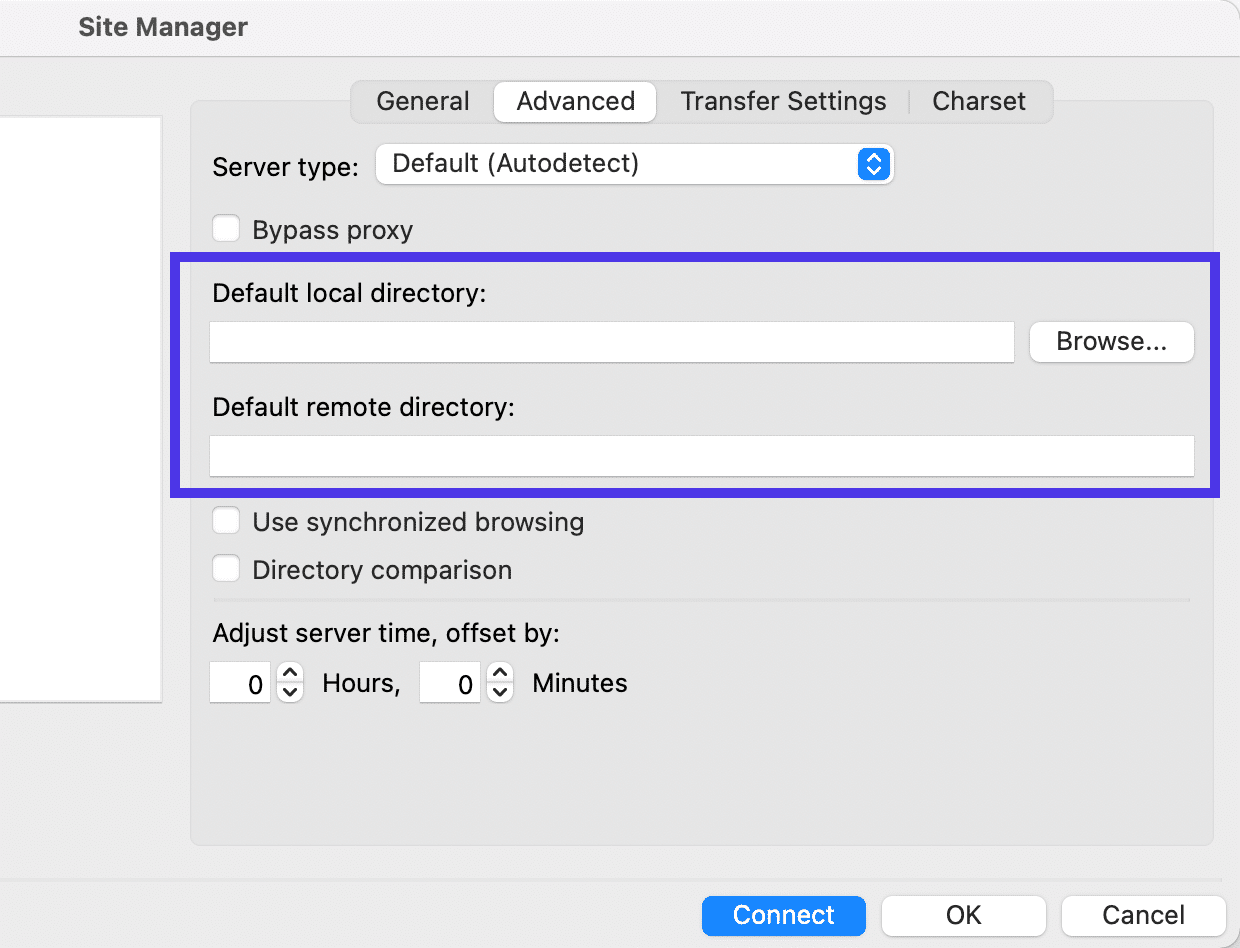
Change the Default Native and Distant Directories
Yow will discover two necessary customization settings on this part. The primary is for the Default Native Listing. The second is for the Default Distant Listing.
For each, you’ll be able to click on on the Browse buttons to discover a listing contained in the native or distant environments. This fashion, everytime you open up FileZilla with the identical credentials, it’s going to robotically show these directories from the beginning.
We’d counsel selecting the /public folder because the Default Distant Listing since that’s a preferred place to start engaged on a WordPress website.
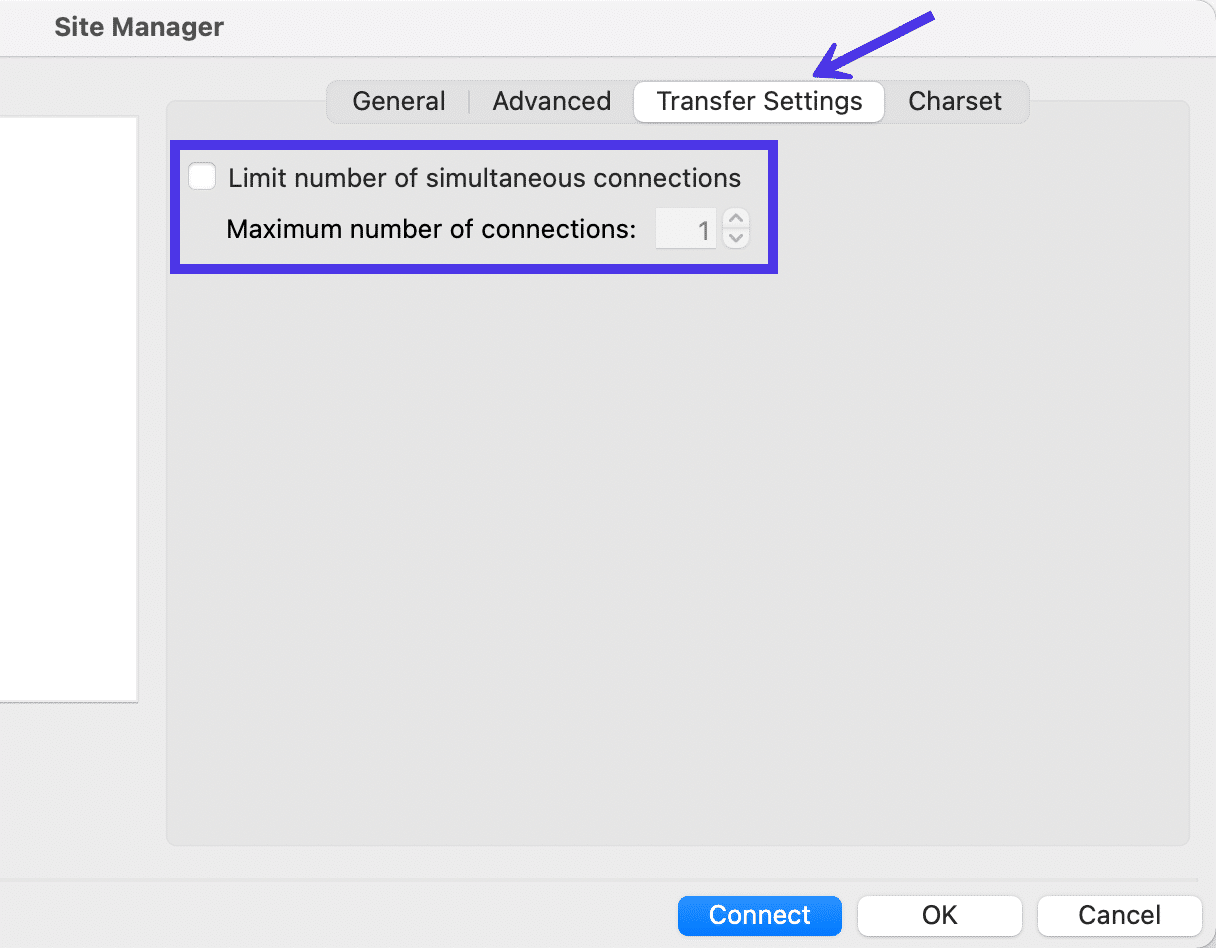
Switch Settings
Below the Switch Settings tab, you’ll see an choice to Restrict the Variety of Simultaneous Connections in FileZilla. In brief, FileZilla supplies a means to connect with a number of distant servers at one time. Should you’re not eager on permitting that, merely test the field and kind in a quantity for the Most Variety of Connections discipline.
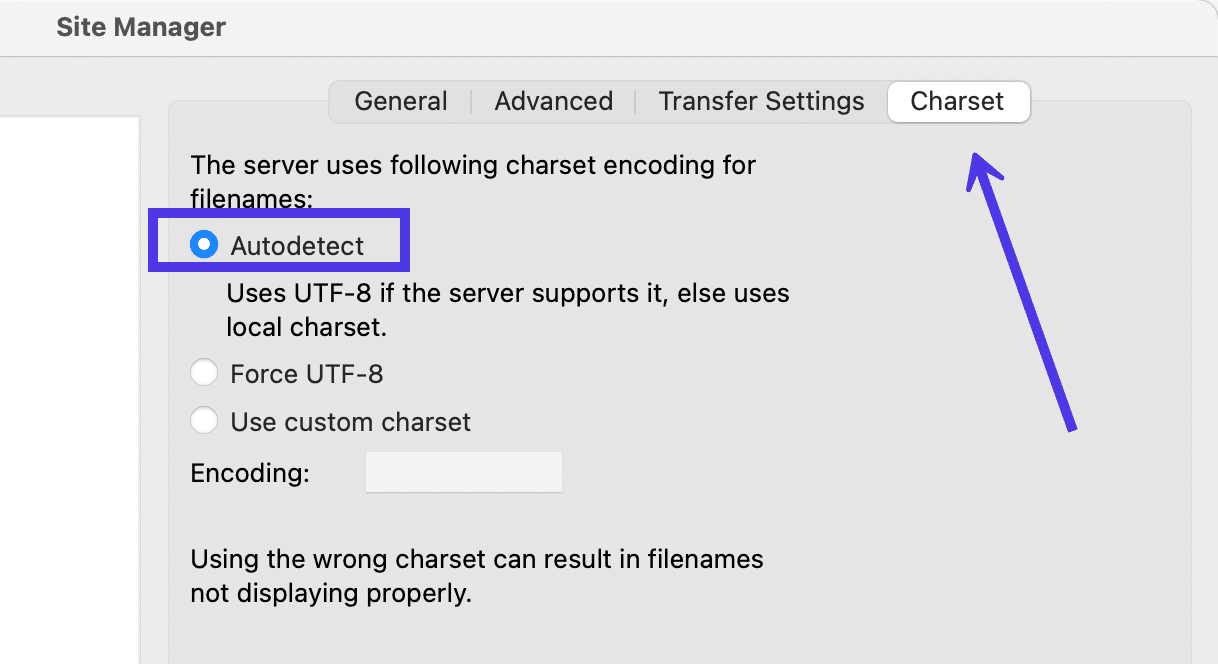
Charset
The final tab within the Website Supervisor is known as Charset. Though this doesn’t essentially management the interface of FileZilla, it ties into your workflow and ensures you’re detecting the fitting charset encoding for filenames.
You have got the choice to Pressure UTF-8 or make a Customized Charset, however we extremely advocate sticking to the Autodetect setting, seeing as how utilizing the mistaken charset may improperly current filenames in FileZilla.
Fast Key Buttons
Again on the primary window, FileZilla provides a number of fast key buttons for eradicating parts from view. This may also help you clear up the general structure and conceal sections of FileZilla you don’t use a lot.
Message Log Fast Key
The primary icon subsequent to the Website Supervisor button is to toggle the show of the Message Log. The Message Log (the part under the FTP Credential fields) exhibits the standing of your present connection.
Some might need to disguise these messages, for the reason that common consumer doesn’t must know that FileZilla is “Retrieving a Listing Itemizing” or “Utilizing a Username.” In spite of everything, we already know which username and listing we’re making an attempt to faucet into.
Clicking that button removes the Message Log from view, exhibiting nothing however the FTP Credential discipline and the Website Listing filters.
Remember the fact that though the Message Log might generally really feel like a ineffective mixture of quickly transferring codes and messages, it’s additionally the module that tells you if an error has occurred along with your connection. Subsequently, it’s a good suggestion to at the least go away the Message Log in view when you’re connecting through SFTP or FTP.
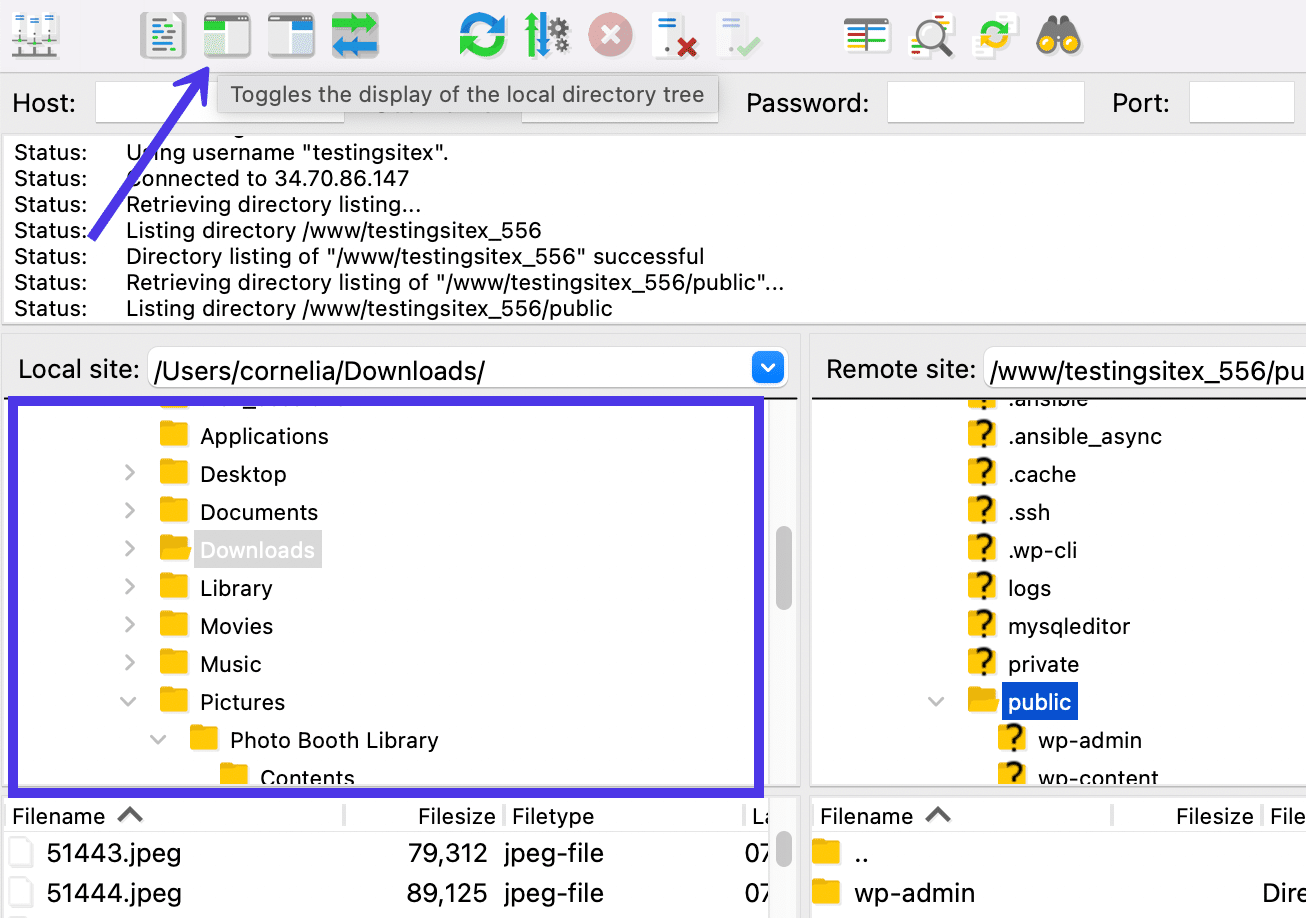
Native Listing Tree Fast Key
The third button from the left enables you to toggle the show of the Native Listing Tree in FileZilla. It will disguise or unhide the Listing Tree part that’s related to the native machine.
Some customers see the Native Listing Tree and Native Listing Contents sections as redundant. Though that’s not completely the case, it is sensible to briefly give the Native Contents space extra room for navigating particular information in your native machine.
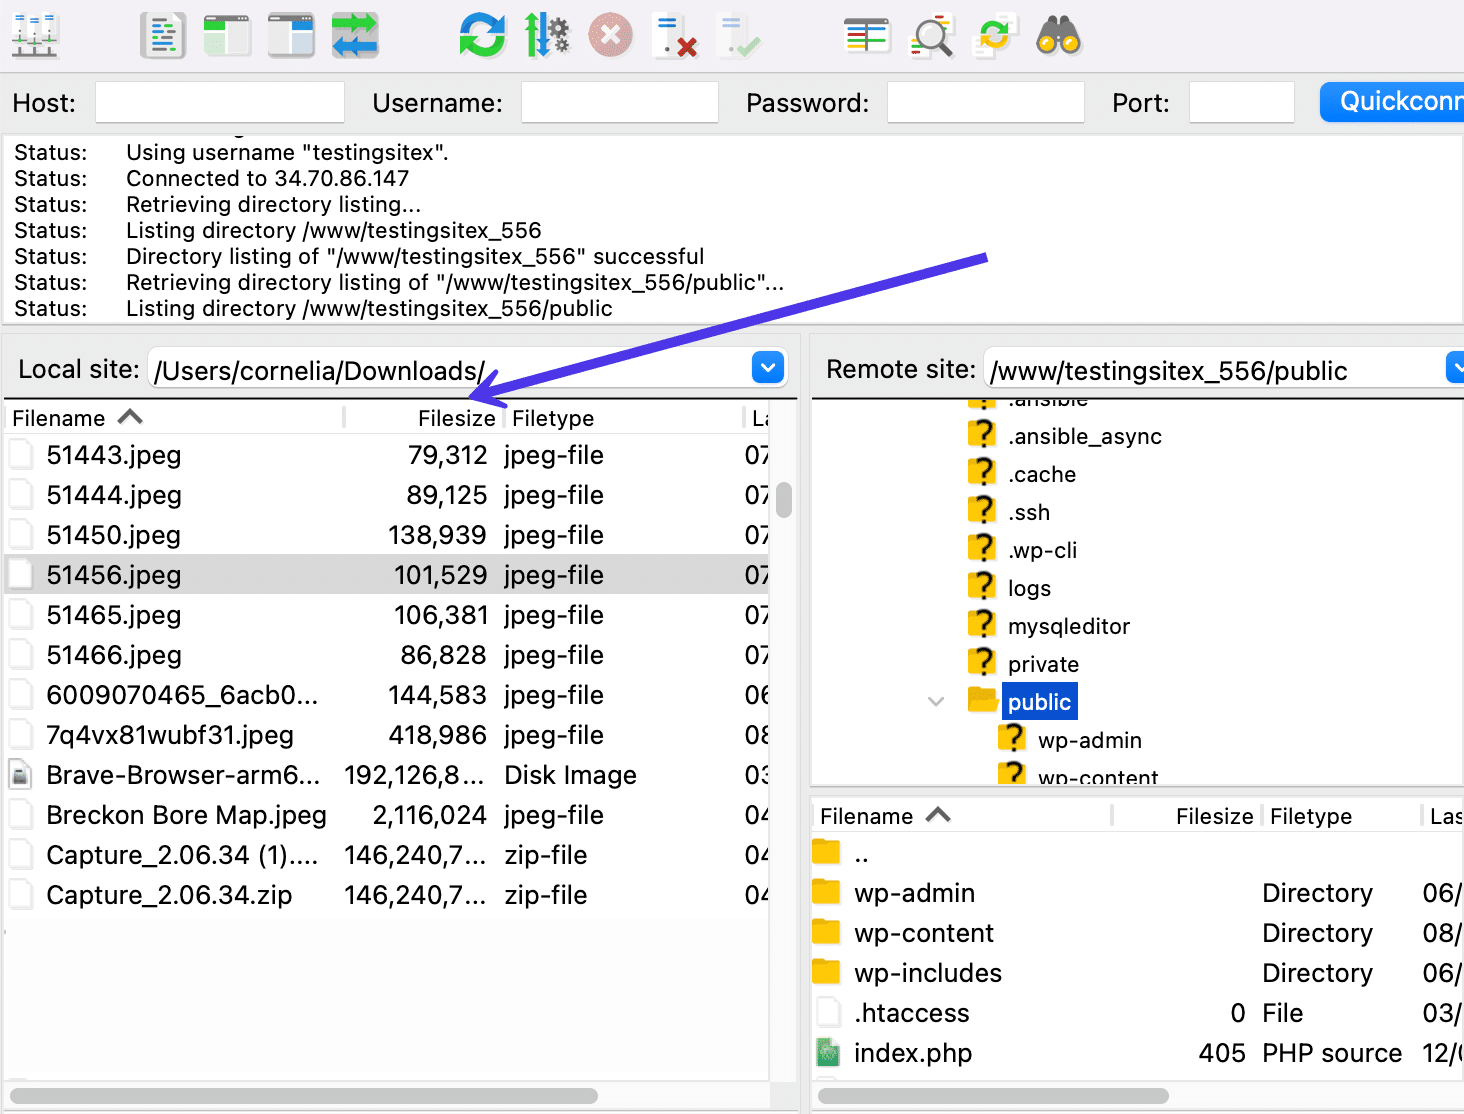
As talked about, a fast click on of that button eliminates the Native Listing Tree however leaves the Native Listing Contents with far extra space than it had earlier than. You’ll additionally discover that the Distant Website aspect hasn’t modified in any respect — each the Distant Listing Tree and Distant Listing Contents stay accessible so that you can add information to your server.
Distant Listing Tree Fast Key
And what when you’d like to finish an identical motion however with the interface on the Distant Listing aspect? Properly, the short button yet one more to the fitting works by toggling the show of the Distant Listing Tree.
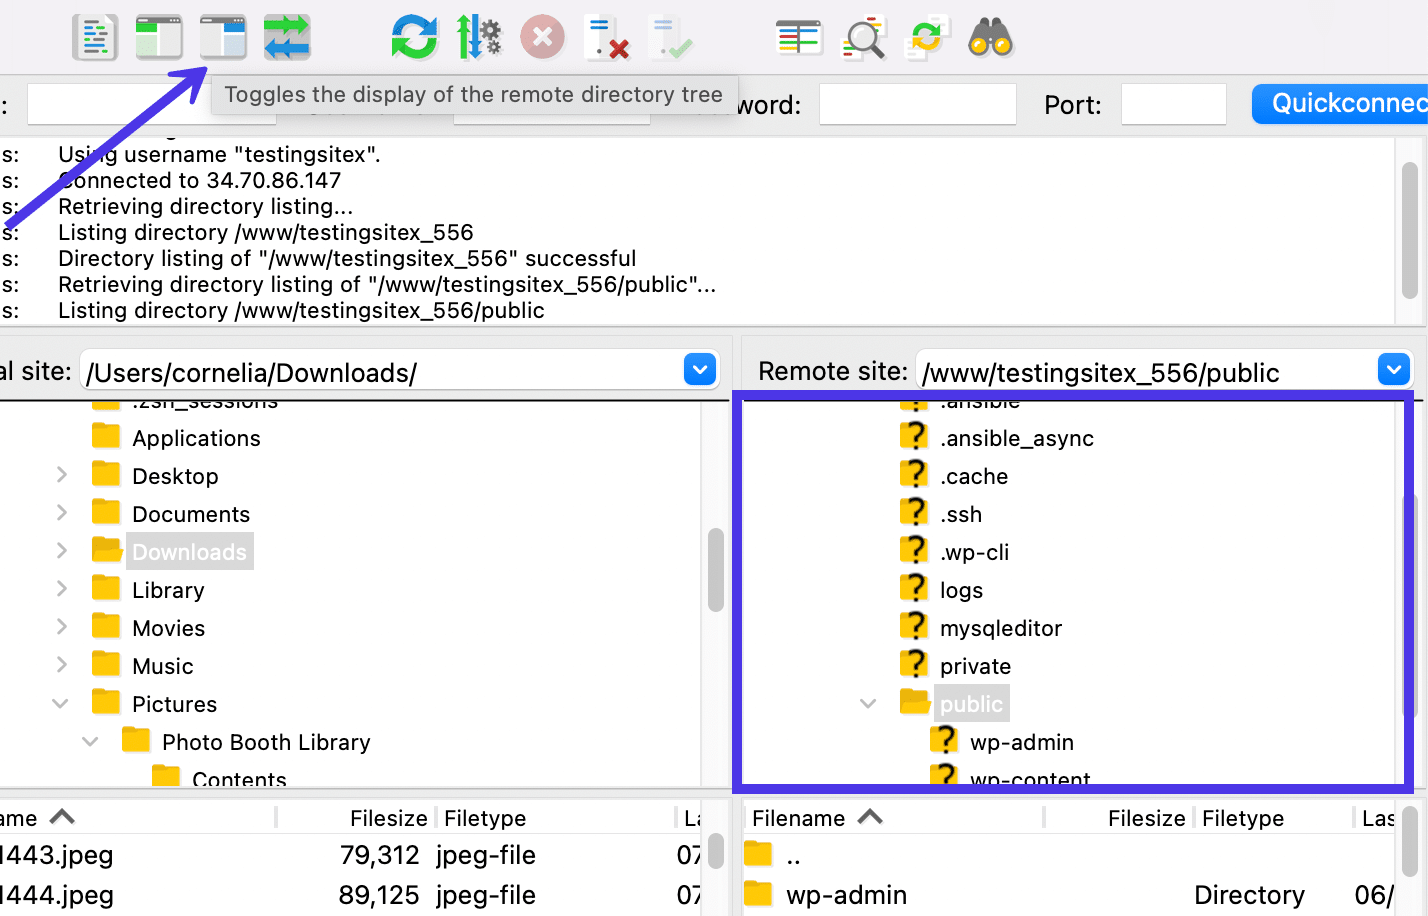
That is the listing tree on the fitting aspect of the display. Utilizing that button hides the tree and makes further house for the Distant Listing Contents.
On this state of affairs, the Distant Listing Tree goes away however every part on the left aspect (for the Native Listing) stays in place.
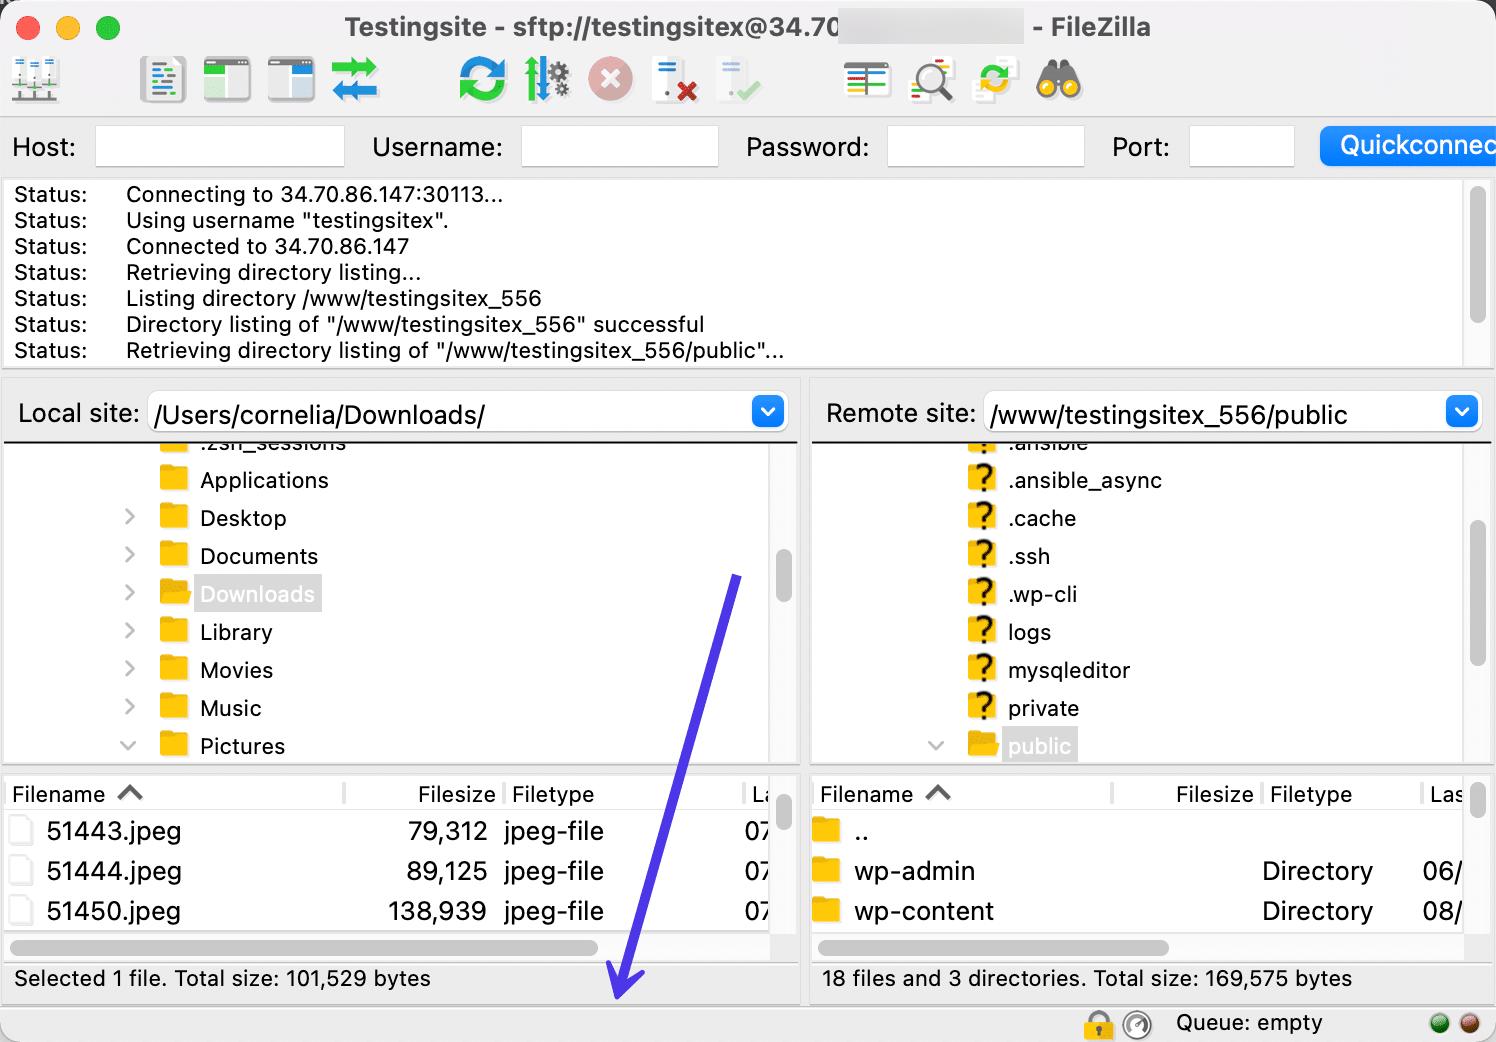
Switch Queue Fast Key
The fifth button from the left within the FileZilla Management Panel appears to be like like a number of blue and inexperienced arrows pointing in reverse instructions. Choosing this button toggles the show of the Switch Queue on the backside of the FileZilla interface.
Very like the Message Log, customers often see this part as extra of a background function that you simply don’t need to see each time you make a switch.
Having stated that, failed and queued transfers present up on this checklist, so it’s finest to test the Switch Queue when you suspect a file wasn’t downloaded or uploaded correctly, or if one thing is taking too lengthy to finish.
With a click on of the button, you’ll discover that the Switch Queue part disappears, making for a a lot smaller, cleaner window.
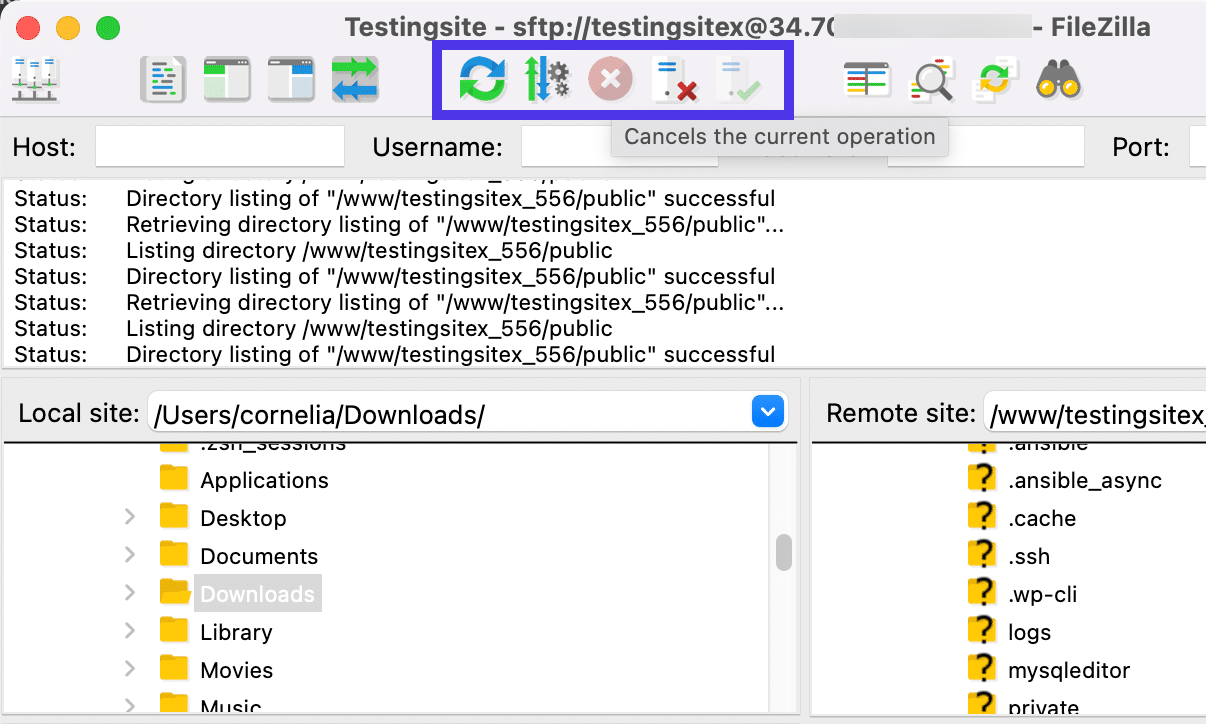
Further Switch Modification Fast Keys
The short keys in the course of the FileZilla Management Panel don’t have something to do with managing your FileZilla structure. Nevertheless, you must know that all of them work to switch transfers in progress or linked servers. For example, these buttons let you immediately cancel a present operation, disconnect from the present server, or robotically hook up with essentially the most just lately logged server.
Toggle Listing Comparability Fast Key
One other solution to customise FileZilla’s interface is by using the Toggle Listing Comparability button. The short key appears to be like like a magnifying glass over some pages or information.
Activating the button takes the 2 directories you will have open (one from the native aspect and one other from the distant aspect) and compares them so you’ll be able to see if they’ve the identical information.
For example, you would possibly must add a set of property to your server from an area machine. After the very fact, a wonderful solution to test if it labored is to run the Listing Comparability device. It stacks related or similar information subsequent to one another and supplies a inexperienced shade if it finds a reproduction.
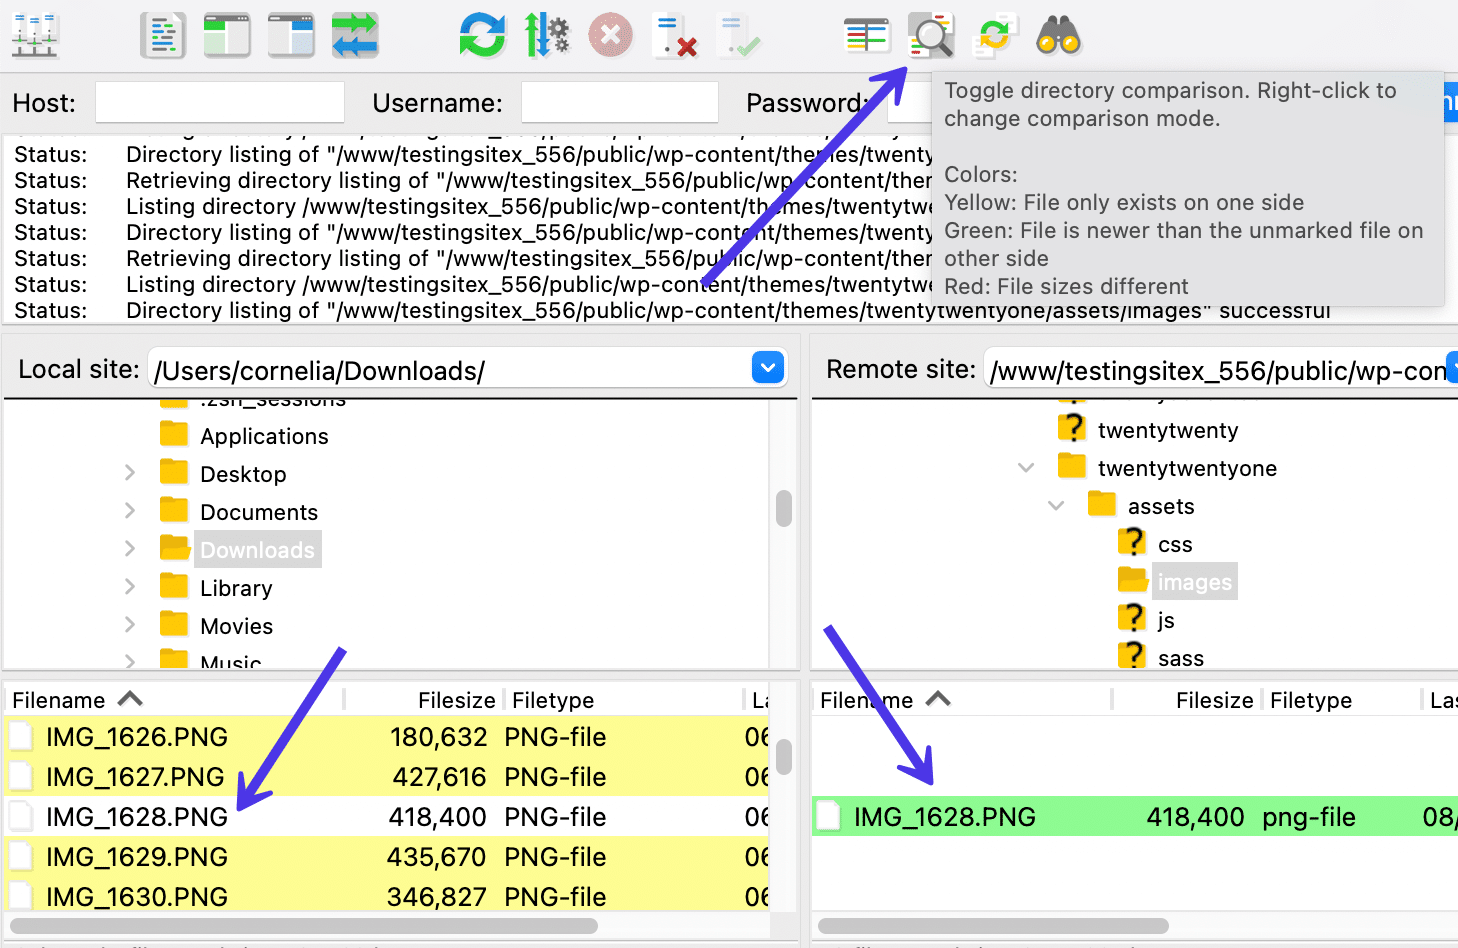
Within the above screenshot, our .png file add from earlier than is proven in each the native file and the distant listings. That’s precisely what we needed: similar copies of the file in each places.
How To Use FileZilla for Importing, Downloading, and Managing Recordsdata
We briefly talked about you could add, obtain, and handle distant and native information in FileZilla. On this part, we’ll go into the main points of every and stroll you thru the steps required to finish them the fitting means.
In brief, there are two methods to add, obtain, or handle a file in FileZilla: by right-clicking the file in query or by dragging and dropping it into a brand new location.
How To Use FileZilla to Obtain a File
In FileZilla, customers can obtain total directories or particular person information from the Distant Listing Tree or the Distant Listing Contents module; that is primarily every part on the fitting aspect of the display.
The left aspect, the place you management the Native Listing Tree and Native Listing Contents, doesn’t have a Obtain button, however slightly one to Add to the distant server.
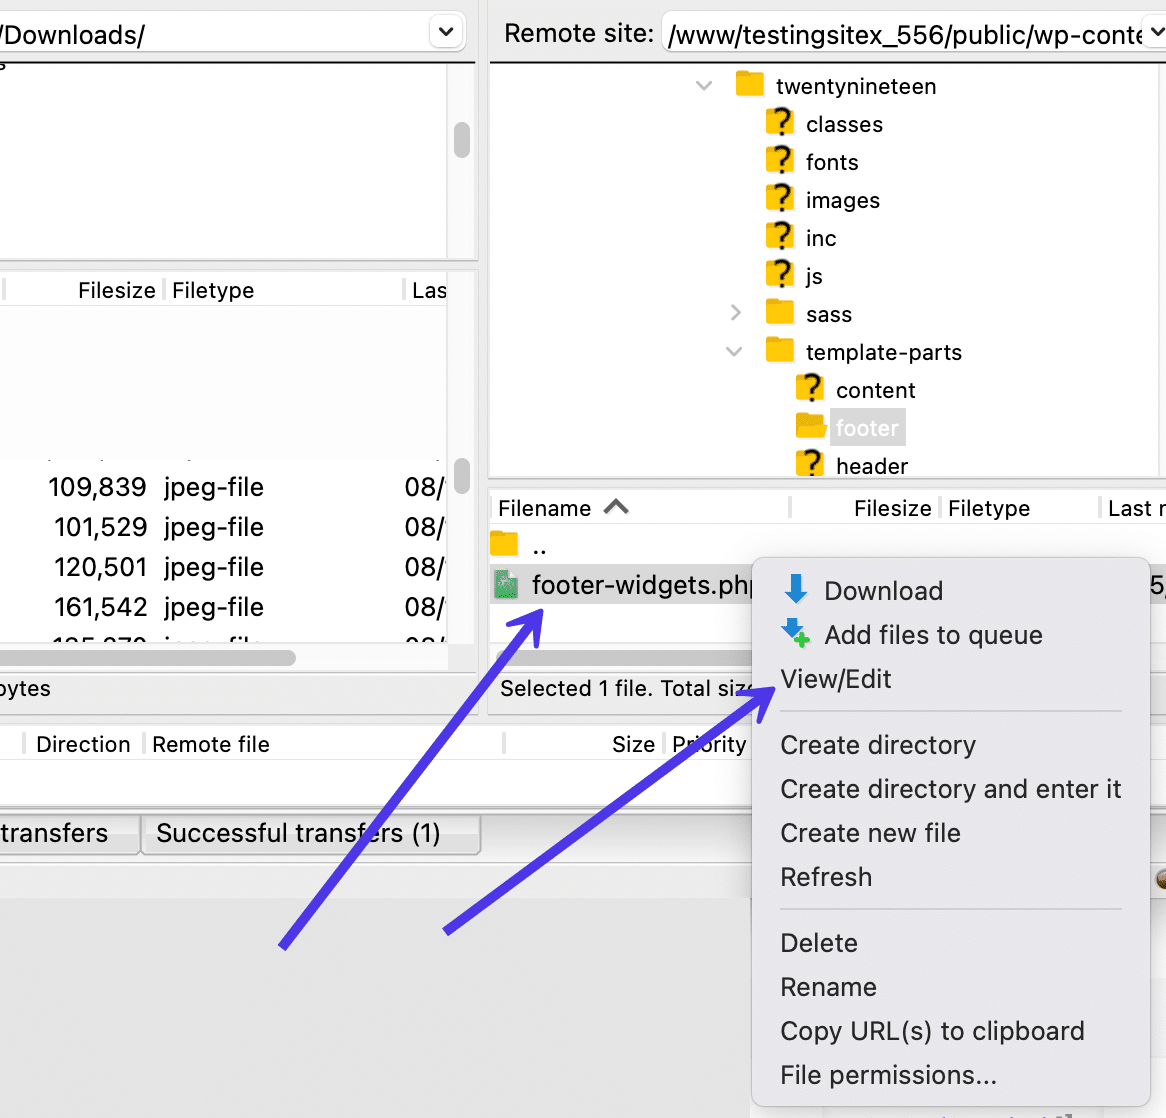
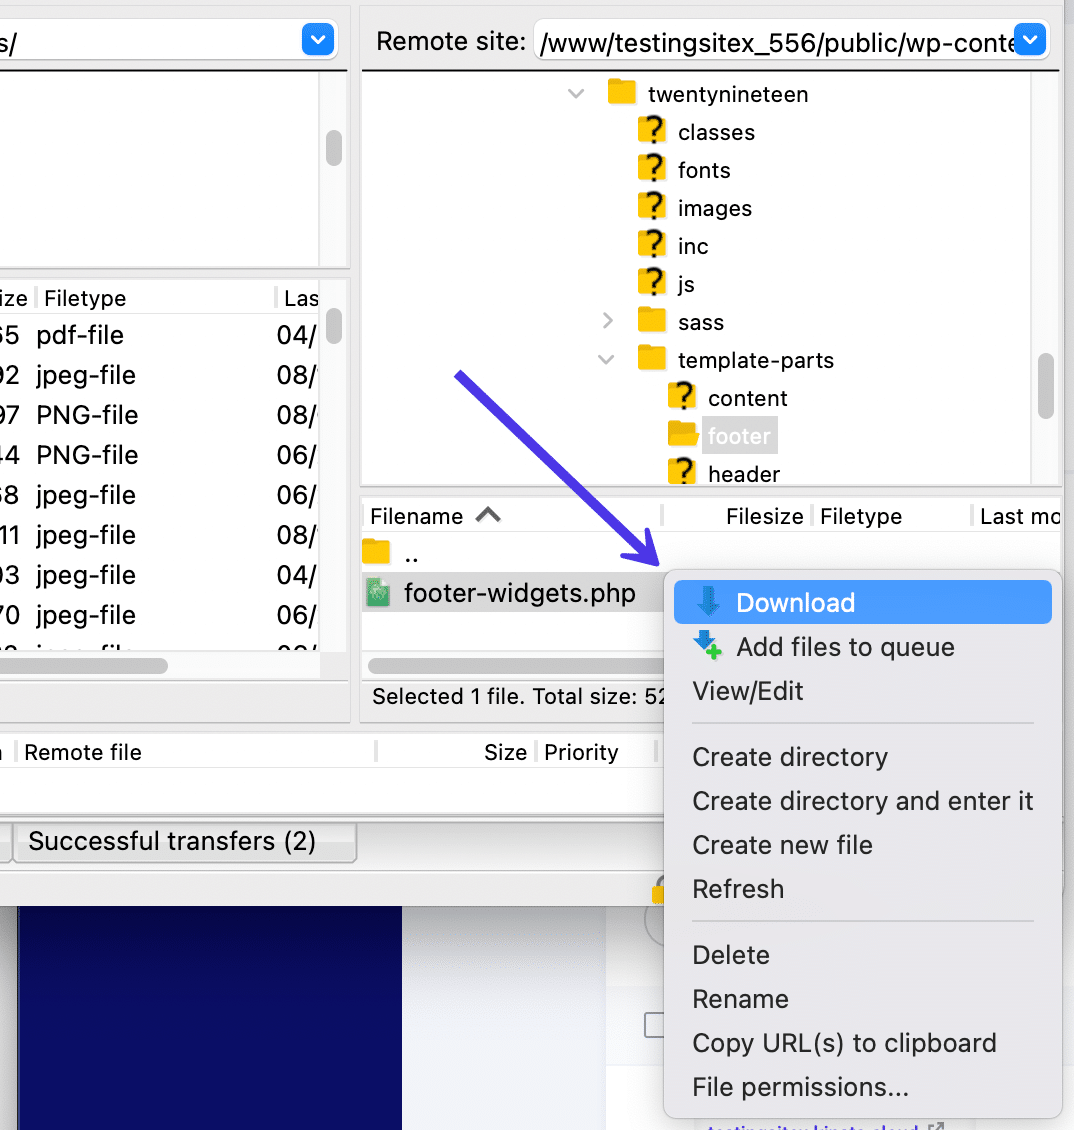
With a purpose to obtain a file, find a component on the distant server you’d prefer to obtain to your native setting. For example, we may open a theme file from a WordPress website and search for the /footer-widgets.php file beneath /template-parts/footer.
Your reasoning for downloading, viewing, or modifying this file might range. Some folks merely need to higher perceive what varieties of information are inside their websites. Different occasions, you might must obtain a file, edit its content material, and re-upload it again to the server. You additionally might discover that some information get corrupted or hacked. This might require you to obtain or view the file to examine it for potential points.
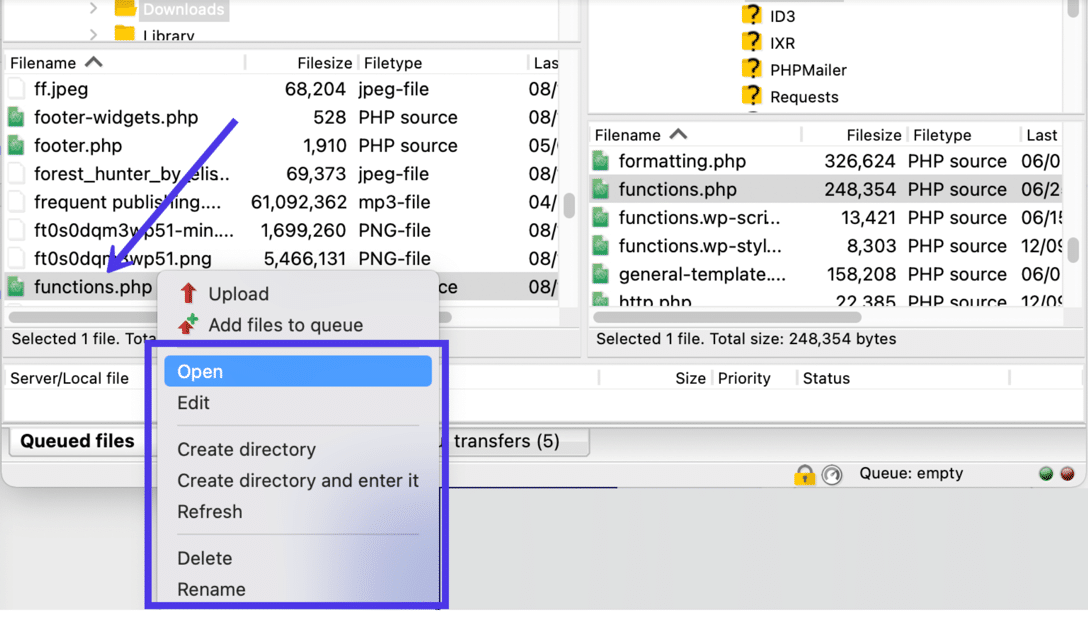
No matter your reasoning, it’s typically finest to start by right-clicking the file in query to view your file administration choices. Once more, we’re utilizing the /footer-widgets.php file on this instance.
Proper-click the file to open a dropdown menu. That is one of the simplest ways to handle any file in FileZilla, seeing as the way it supplies each potential solution to switch, edit, or handle the file.
The choices to select from on this menu embody:
- Obtain
- Add information to queue
- View/Edit
- Create listing
- Create listing and enter It
- Create new file
- Refresh
- Delete
- Rename
- Copy URL to clipboard
- File permissions
In some unspecified time in the future, you might need to view the file to make edits or just see what’s inside. In that case, click on on the View/Edit button.
Obtain File to a Native Website if Needed
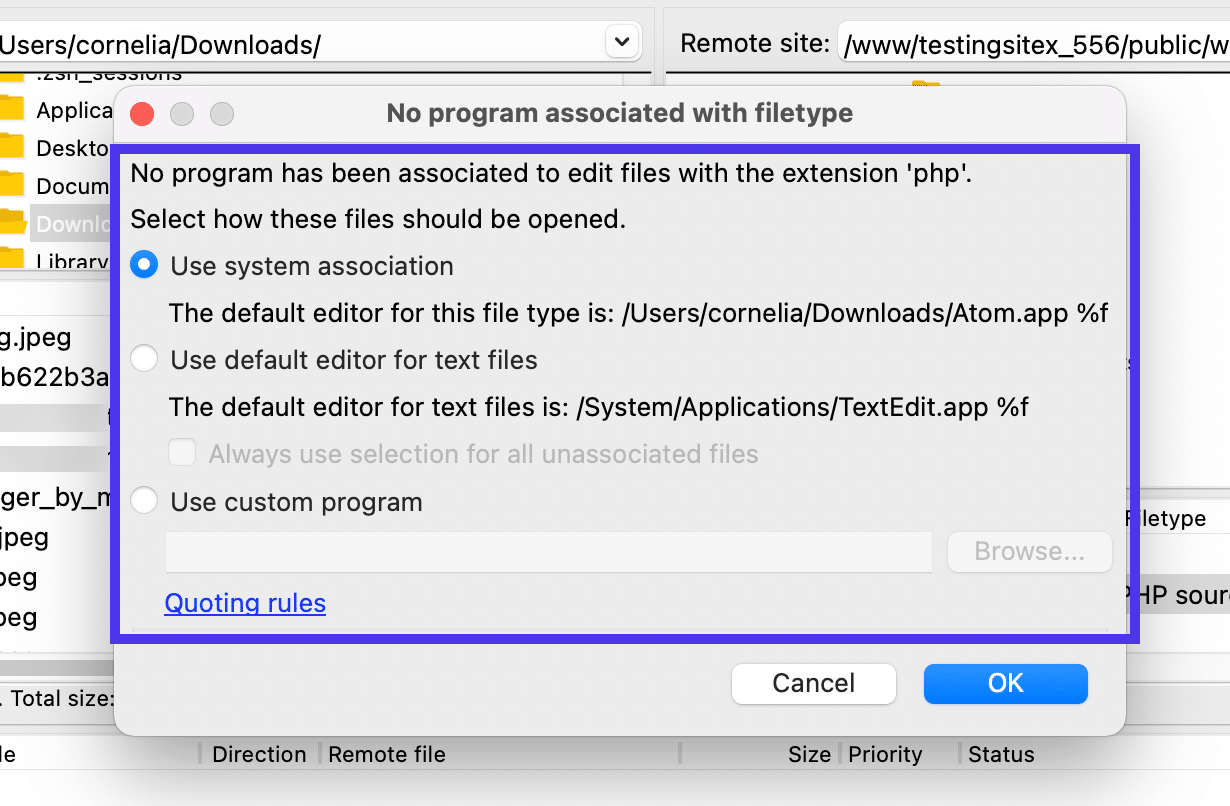
Generally it’s not potential to view or edit a file from a distant server relying in your file permissions and the placement from which you’re pulling the file. If that’s the case, you’ll be able to obtain it to your native website to view there.
Additionally, it’s potential you might want to set a default editor for the file kind in your laptop. We advocate on the lookout for your favourite textual content editor for issues like HTML and PHP information. You’ll have to think about suitable applications for the varieties of information getting used, like utilizing photograph software program for PNG or JPG information.
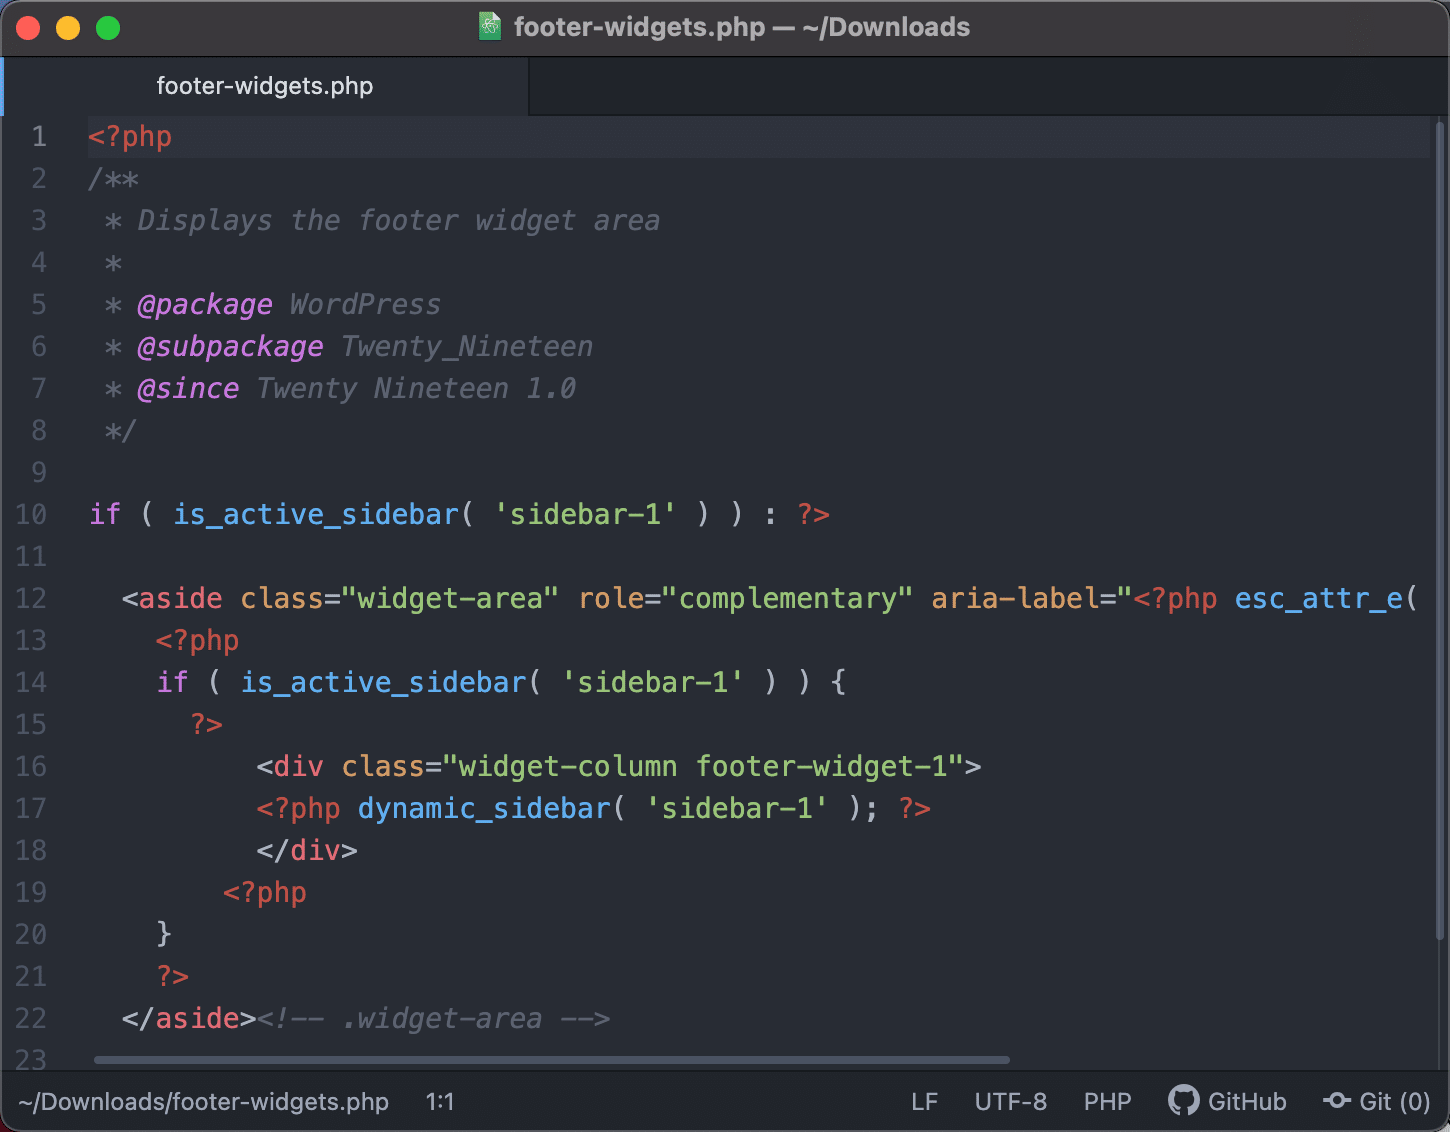
Now the file opens in this system you chose earlier. On this case, we’ve opened a footer-widgets.php file within the Atom textual content editor program, permitting us to view the file’s contents and make edits.
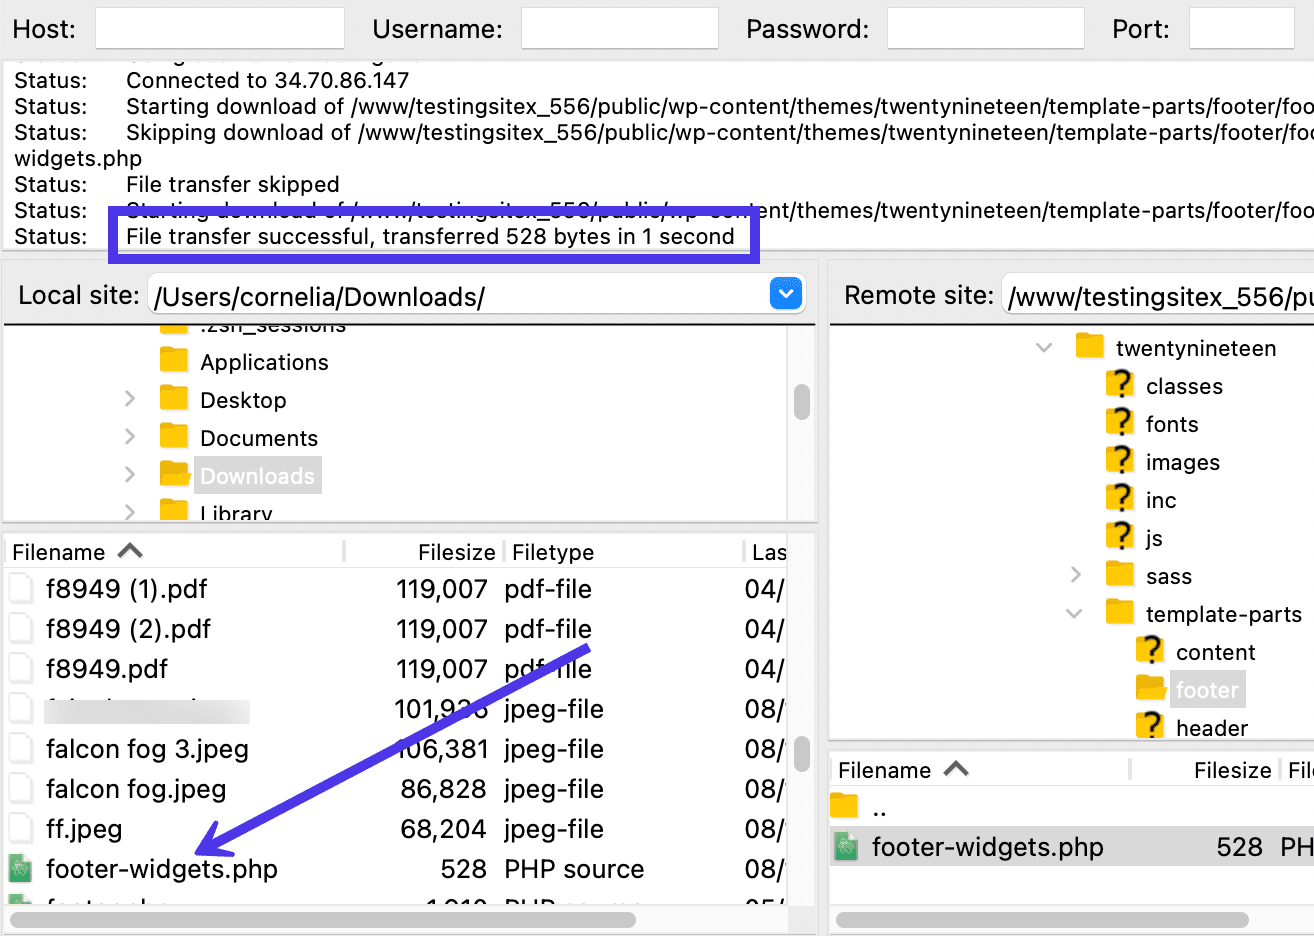
To obtain a file to the native website, right-click on the distant server file and select the Obtain possibility.
The Obtain performance takes a couple of seconds relying on the file measurement. The file finally leads to the file listing you will have linked and opened on the distant website aspect of FileZilla. It is best to now have the ability to entry it out of your laptop or by way of the FileZilla interface.
Bear in mind, it’s additionally potential to obtain a file from a distant website by dragging and dropping that merchandise from the fitting aspect of FileZilla to the left aspect. It really works the very same means as clicking the Obtain button. Simply be sure to drag the file to the folder you need to see it in in your native machine.
In case you have any questions on what occurred with the switch, look contained in the Message Log space. FileZilla presents messages like “File Switch Profitable” when the obtain works correctly. If it fails, you must see a “File Switch Unsuccessful” message. This often exhibits up in crimson textual content.
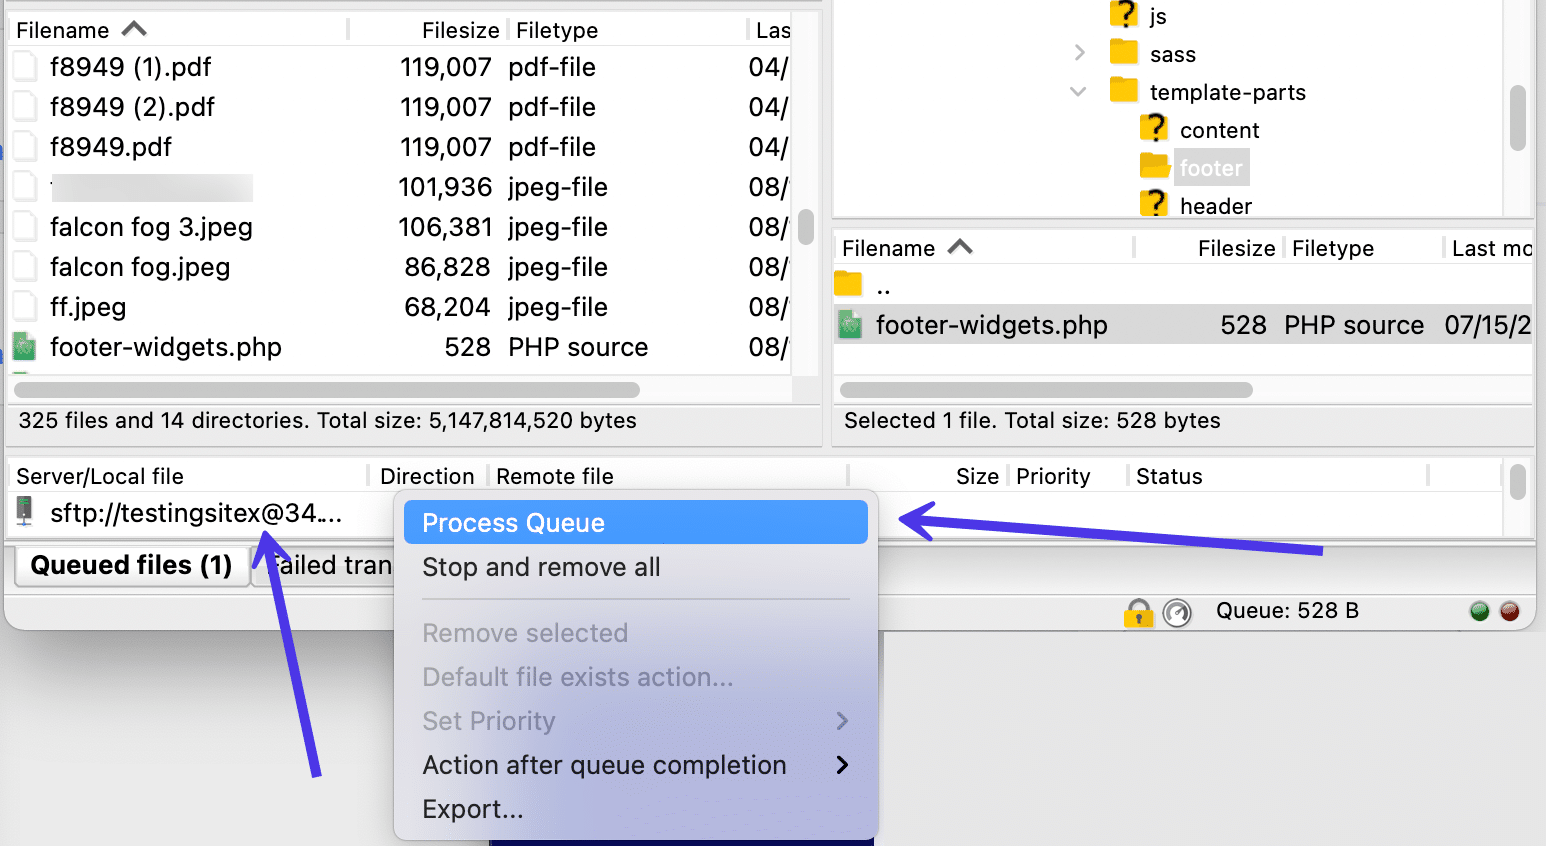
Add Recordsdata to the Queue
You’ll have additionally seen you could select to Add Recordsdata To Queue when right-clicking on a distant website file. Whenever you go for this technique, you’re telling FileZilla that you simply finally need to obtain the file to your native website however just a little bit later.
This lets you place a number of information within the queue from totally different places earlier than clicking on the Course of Queue button to obtain every part within the queue. Very like dragging and dropping, the Course of Queue button (when working with distant website information) completes a regular obtain to the native website.
Test File Permissions
One other solution to handle your information on the distant website is by checking the file permissions and modifying them for enhanced web site safety. In brief, file permissions inform your server who can Learn, Write, and Execute information.
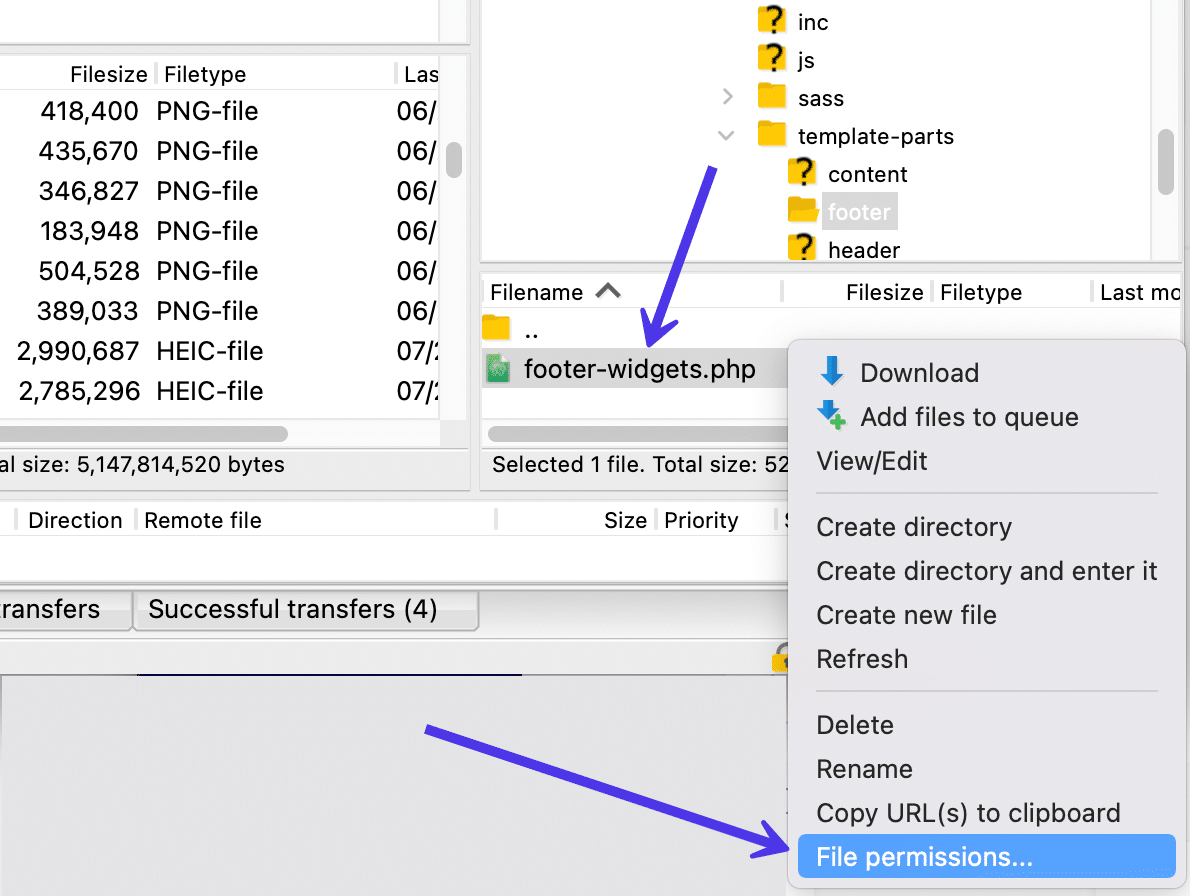
These permissions symbolize an necessary side of safety to think about. Making them too strict may break your website, however leaving them unchecked may open up safety points.

Managing Native Recordsdata
Now let’s take a look at the best way to open, add, and edit information located within the native website (often known as your laptop).
As we already know, the file listing and contents to the left aspect of the FileZilla interface are a direct duplicate of the file listing in your laptop. Subsequently, we will add any of those information, like pictures, HTML paperwork, or movies, to the distant website, all with out having to open up your content material administration system or internet hosting dashboard.
There are additionally a number of different methods to deal with native information in FileZilla.
It is best to at all times begin by citing the specified file within the File Listing Contents part of FileZilla. Then, right-click that particular person file or full listing to see a dropdown menu with a number of choices.
This dropdown is just a little totally different than what we noticed when right-clicking on a distant website file. Right here, we see:
- Add
- Add information To queue
- Open
- Edit
- Create listing
- Create listing and enter it
- Refresh
- Delete
- Rename
Most of these, like Delete and Rename, are self-explanatory. However there are a couple of that is probably not as clear.
Probably the most widespread methods to view and edit a file on the native website is by selecting the Open submenu merchandise.
It’s often a lot faster to open a file from the native aspect of FileZilla because you don’t need to specify a program wherein to make use of. As well as, all of those information are already in your laptop, so there shouldn’t be any troublesome file permissions.
When you click on the Open button, FileZilla seeks out the required program to make use of the file.
On this case, we opened a capabilities.php file within the Atom textual content editor. This fashion, we will view the contents of that file with out messing round with the code.
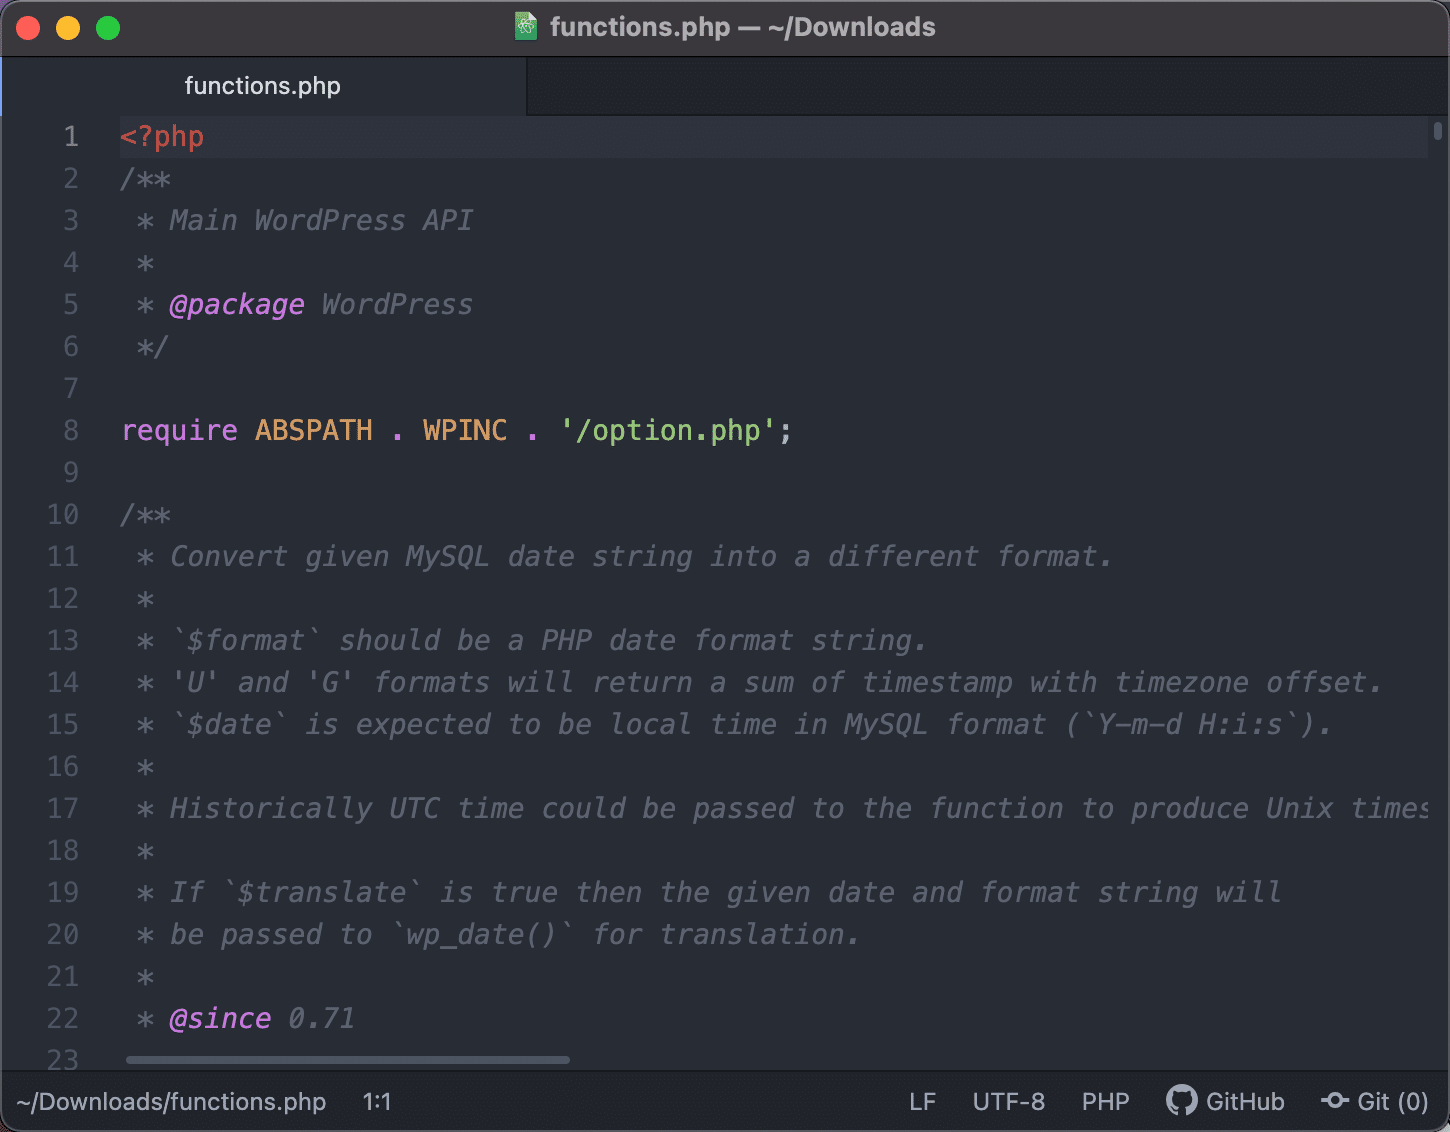
It’s additionally potential to pick the Edit menu merchandise when you’d slightly make modifications to the file and put it aside to FileZilla after you’re accomplished.
Add from Native to Distant
One of many principal causes to make use of FileZilla is for importing information from an area laptop to a distant server (like for a web site). Remaining in the identical native website part, you’ll be able to both select a full listing or particular person file, then right-click your option to view the menu as soon as once more.
To ship that file to the chosen distant listing on the fitting, click on on the Add button within the menu.
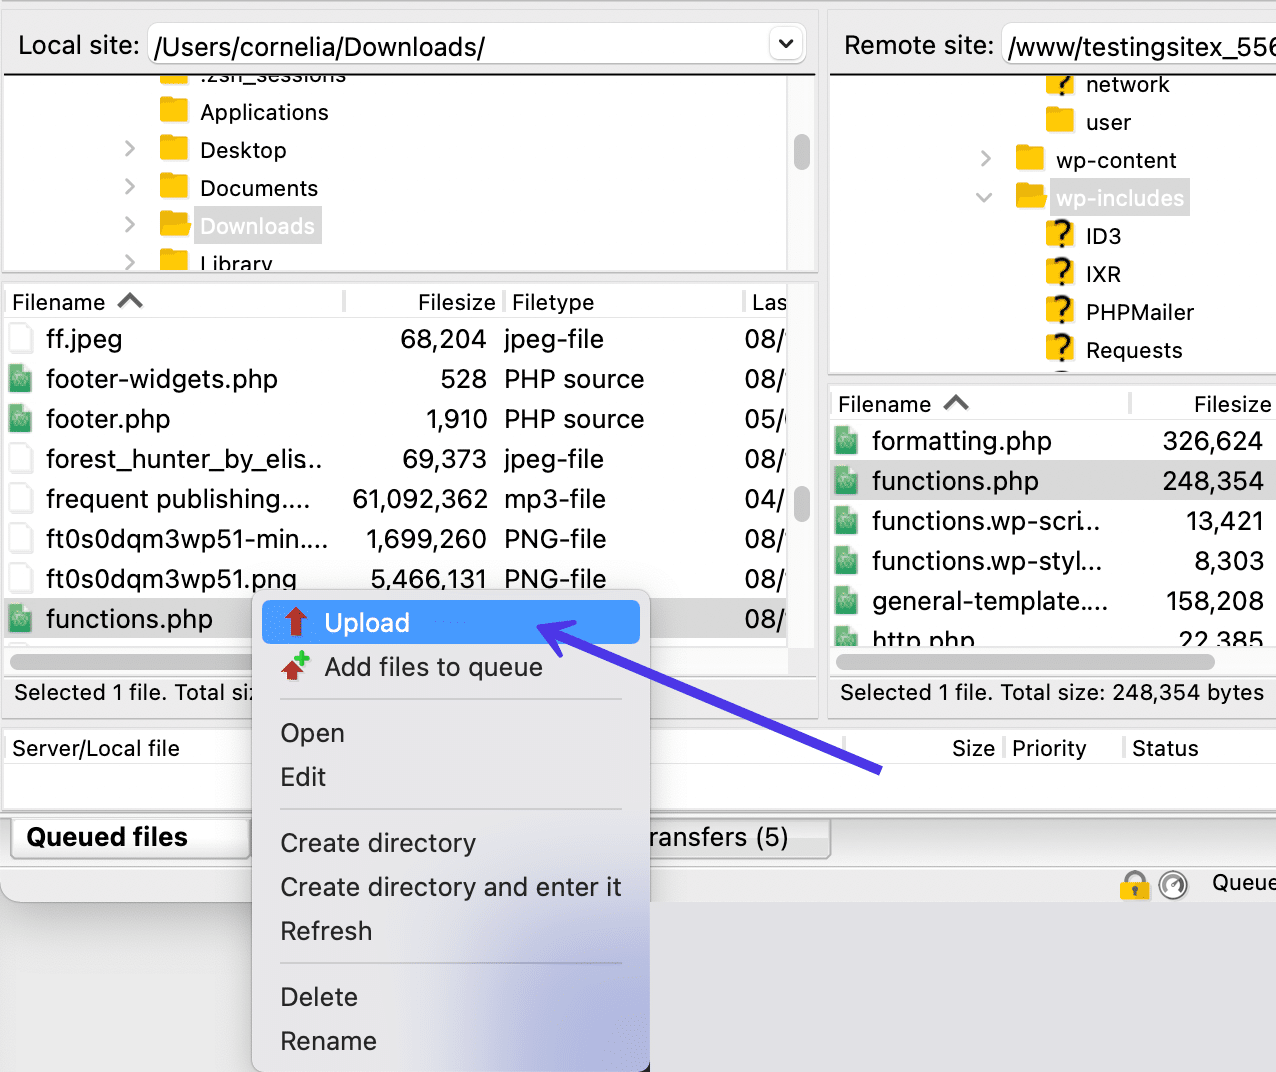
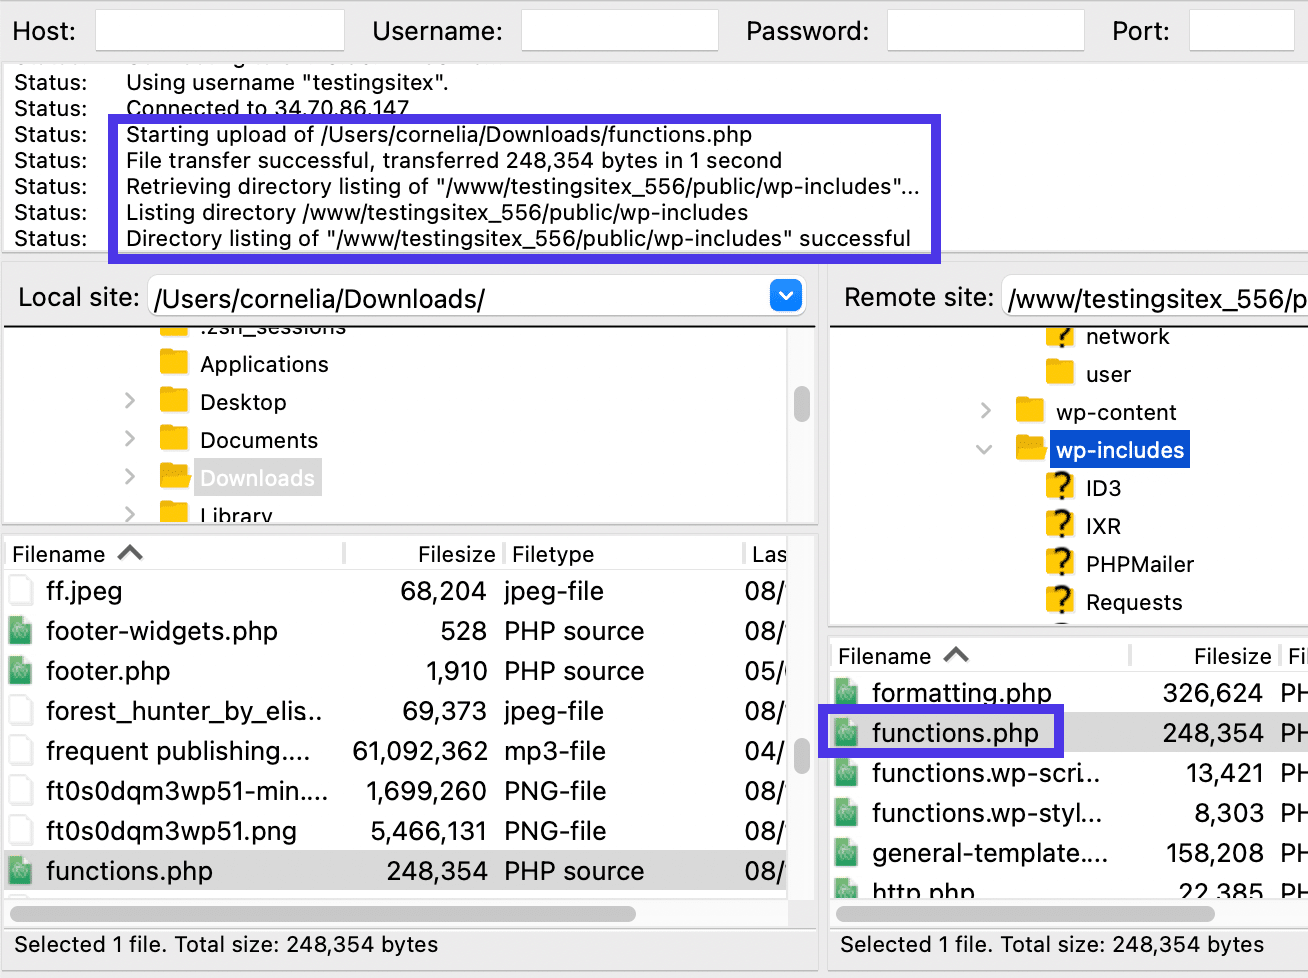
To offer you a real-world instance, you might discover that your website has crashed and you think one thing within the capabilities.php file brought about the issue. You clearly can’t entry the file from WordPress (for the reason that website is down), and it’s potential you’ll have hassle tapping into your host’s dashboard.
However you’ll be able to resolve this concern by importing a clear copy of the capabilities.php file to utterly change the corrupted one.
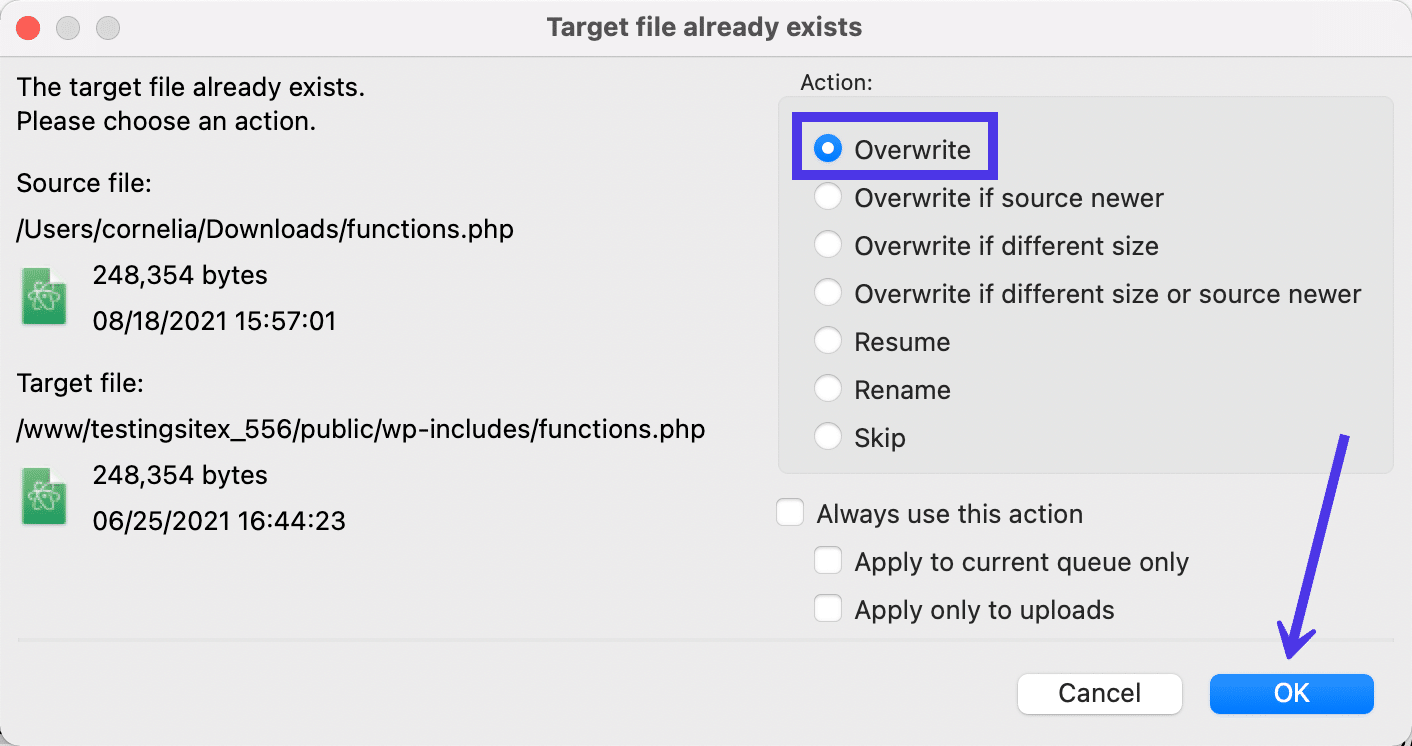
If the file is new, you received’t see any message to switch an current file. But on this case, we’re making an attempt to add a clear capabilities.php file and eliminate the outdated one.
Subsequently, FileZilla acknowledges the identical file names and asks when you’d prefer to overwrite the prevailing capabilities.php file on the distant server or do one thing else as an alternative, like rename the file or skip the method altogether.
For our instance, we’ll mark the Overwrite possibility beneath the Motion title.
Click on the OK button to proceed.
As with all transfers, the time wherein it takes depends upon the file sizes. Having stated that, FileZilla is thought for importing and downloading information at fast speeds, even bigger information.
Test the Switch Standing
To make sure your file was in actual fact uploaded, look to the Distant Listing Contents space and search it out within the file tree.
Should you can’t discover it, you’ll have been importing a file to switch a distant file with the identical title. You possibly can view the file and search for the brand new modifications, however coding paperwork are too difficult for that.
So, we advocate turning to the Message Log to learn the standing updates out of your add. It is best to see messages like “Beginning Add” and “File Switch Profitable” to point that the file was uploaded to the distant website. If issues occurred, you must see a failure message in crimson lettering.
Recordsdata Codecs Supported by FileZilla
FileZilla helps the switch of nearly any file kind it can save you in your laptop. Any file you will have in your native laptop, and any file kind you retailer in your distant server, can undergo a FileZilla switch with none issues. Whether or not or not you’re capable of open them later depends upon third-party applications.
FileZilla manages this all-accepting information switch system by using two main “information sorts”:
FileZilla often makes use of different information sorts like EBCDIC and Native, however these are exceedingly uncommon.
In brief, FileZilla takes no matter file you propose on transferring and makes use of an alternate switch mode by swapping out the information kind. It’s sort of like a conversion, exceptbut not precisely. As a substitute, FileZilla transfers your information as textual content or uncooked information by selecting an acceptable information kind that corresponds with the file kind you’re making an attempt to maneuver.
Though it sounds difficult, FileZilla is definitely solely making a call betweenfrom two information sorts, so the method takes however a second.
What’s moreFurthermore, you’re not required to resolve for your self: , seeing as how FileZilla has an Auto mode for selecting the switch kind that makes essentially the most sense. FileZilla comes with this setting because the default, however you’re at all times capable of change that by going to FileZilla > Settings > Transfers > FTP: File Sorts.
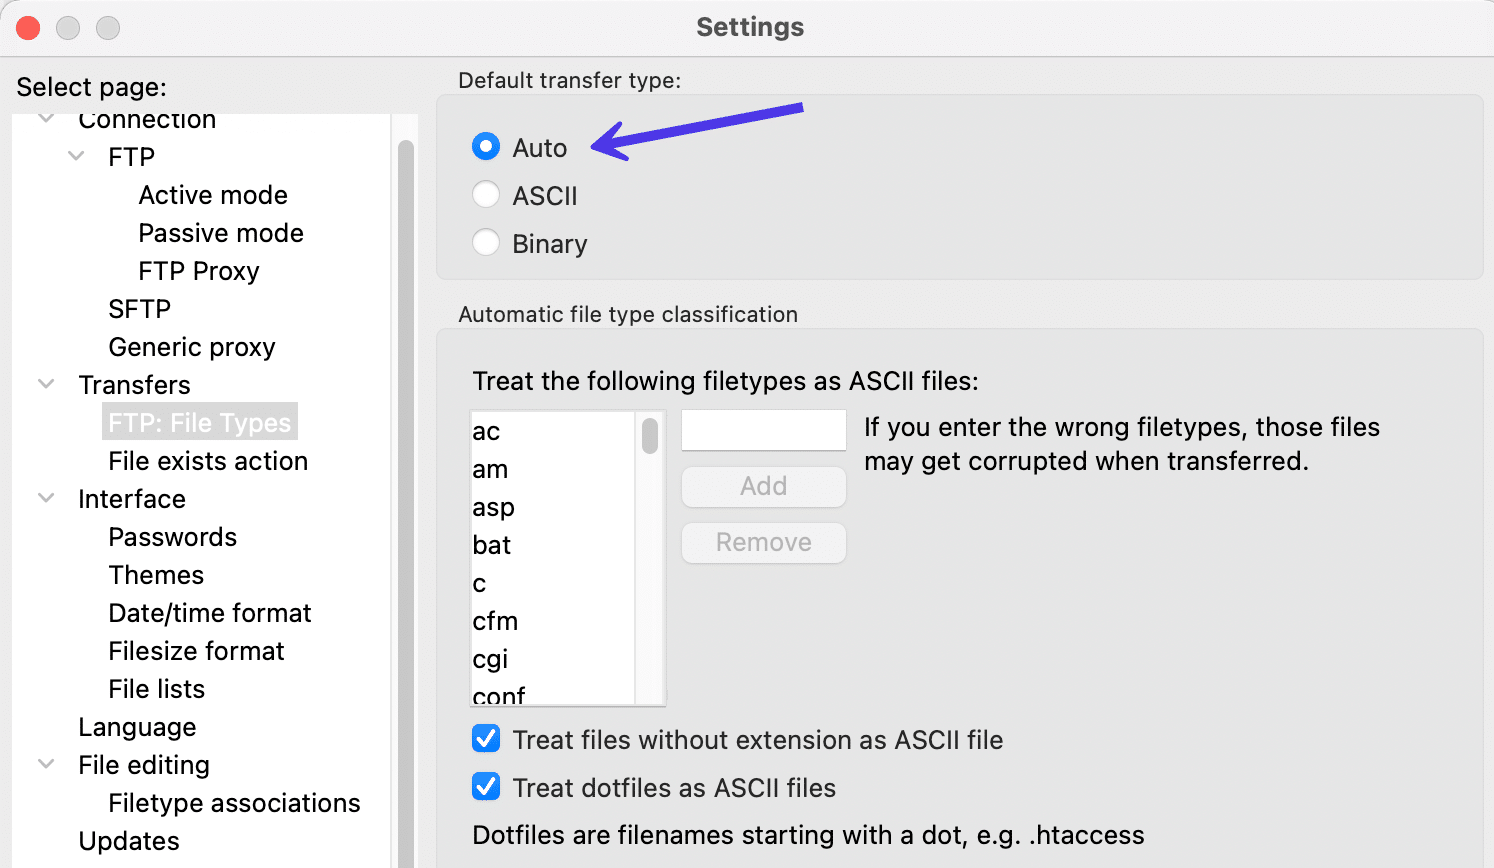
In Auto mode, FileZilla decides between the 2 commonest information sorts for importing or downloading your information. It doesn’t matter whether or not you’re importing or downloading, nevertheless it does matter what kind of file is being despatched inside the program.
ASCII takes your information and transfers them as textual content information codecs. Since all transfers are accomplished in textual content, it’s widespread to see this information kind used when transferring TXT, HTML, and PHP information.
Alternatively, binary is finest for extra complicated file sorts like JPG, MP3, and WAV information (or primarily any kind of media file) contemplating the binary information kind makes transfers through the use of uncooked information. In spite of everything, a video file being transformed to a textual content file wouldn’t make for a high quality consequence ultimately.
Total, you’ll be able to anticipate FileZilla to finish all file transfers with ease in Auto mode. The transfers are accomplished in textual content or uncooked information codecs; the chosen information format depends upon the file kind uploaded or downloaded.
How To Use FileZilla to Filter Recordsdata
Opening information from each your laptop and a distant server swells FileZilla with an ever-increasing checklist of choices to edit or switch. As you open extra folders, it could turn out to be considerably intimidating or complicated for even essentially the most skilled developer.
Positive, FileZilla can deal with 1000’s of information, however the human mind can get overwhelmed making an attempt to recollect precisely the place it positioned a picture or CSS file.
That’s the place filtering comes into play.
Filtering permits you to select particular file sorts to show on the FileZilla display. That means, you will have an opportunity to cover most information you’d by no means use, or hone in on particular directories that you simply need to entry extra regularly.
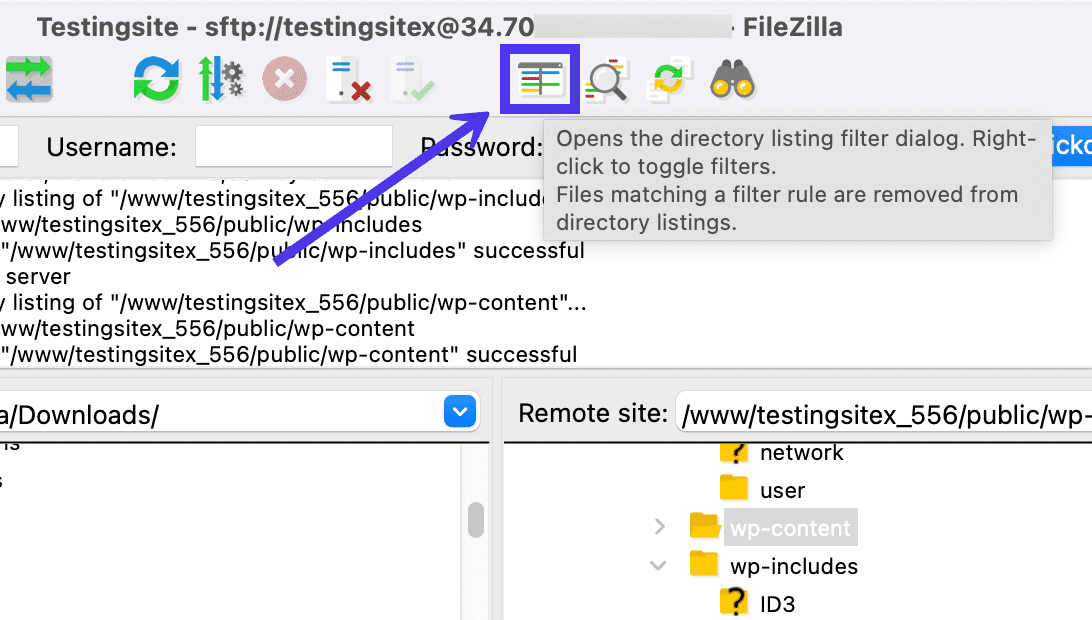
All filtering happens within the Listing Itemizing Filter Dialog space. It’s positioned beneath one of many fast keys mentioned earlier on this article. The short key icon appears to be like like two interface panels with inexperienced, crimson, and yellow traces throughout.
Click on on this button to proceed along with your filtering.
Listing Itemizing Filters
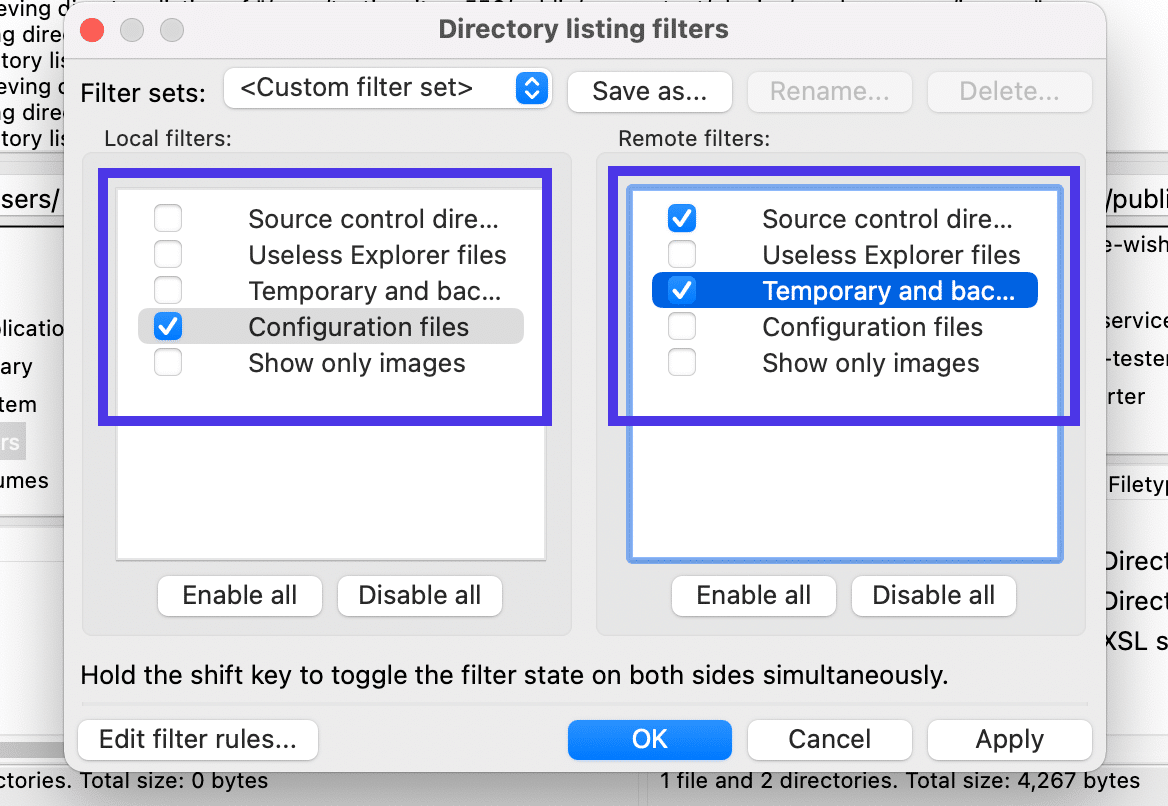
This reveals a web page known as Listing Itemizing Filters. Right here, you’re offered with two lists of filters: one for Native Filters and the opposite for Distant Filters. All sides has the identical filter sorts, however they work for his or her respective directories.
To offer you an concept of the way it works, we’ll mark the checkbox to Present Solely Photos on each the Native Filters and the Distant Filters. When accomplished making the choice, click on on the OK button to place the filters into impact.
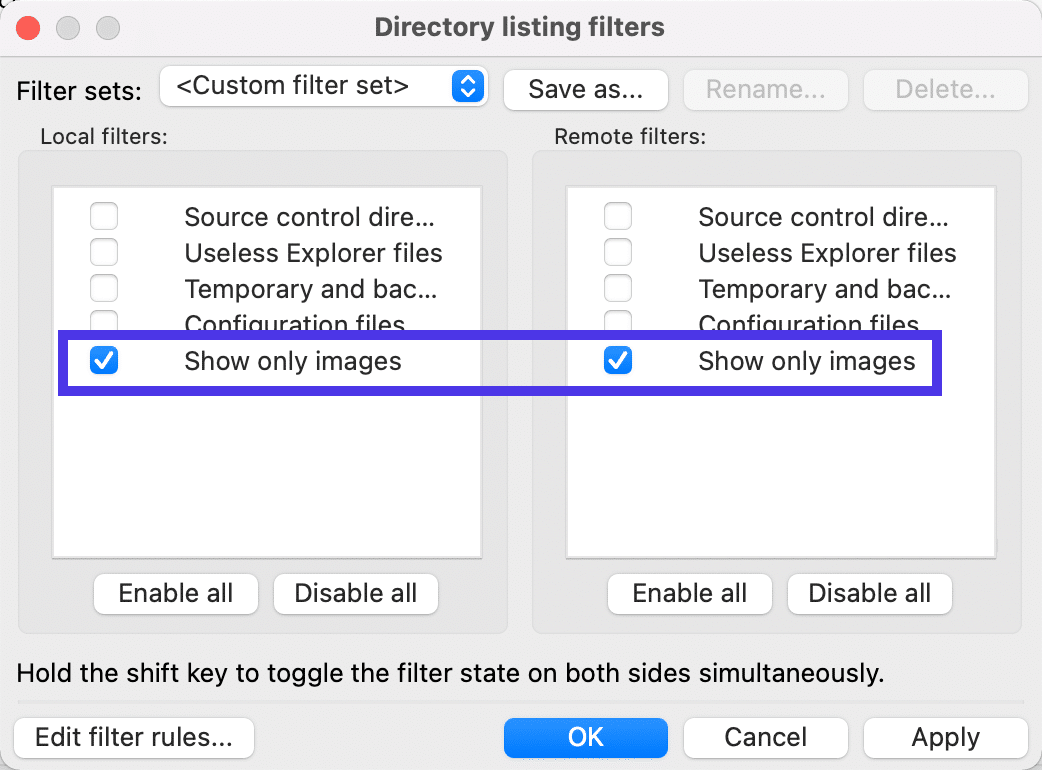
Because of this, FileZilla now solely exhibits picture information, whatever the listing you open.
Within the under screenshot, the Native Website part has an inventory of PNG and JPG information — and nothing else — within the native /downloads folder, due to our filters.
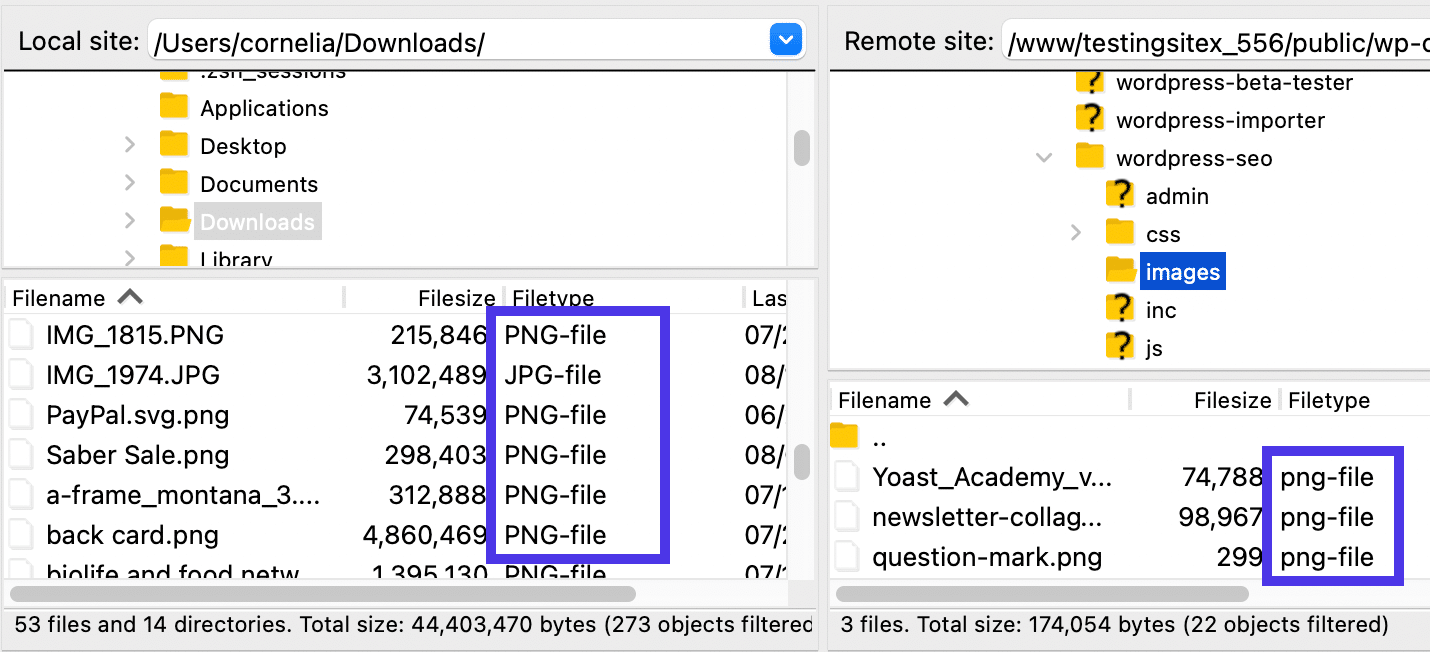
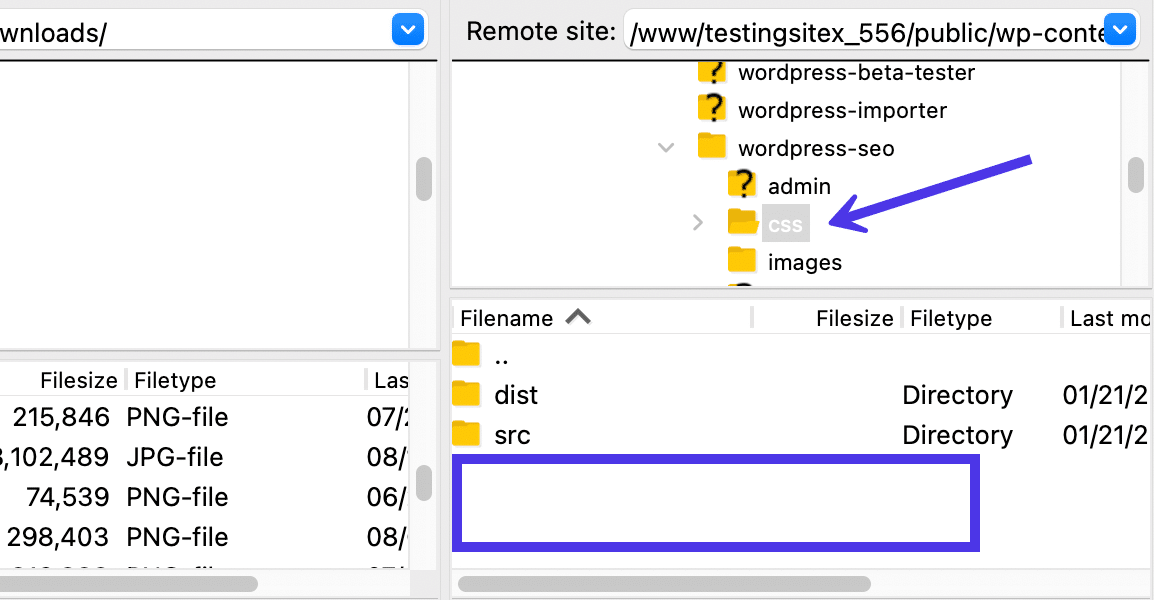
You’ll, nevertheless, have the ability to view the folders in these directories, even when they find yourself not exhibiting any contents themselves as a result of filter.
Further Filters
For extra filters, return to the Listing Itemizing Filters module. The principle default filters you’ll discover are:
- Supply management directories
- Ineffective explorer information
- Non permanent and backup information
- Configuration information
- Present solely pictures
Total, a few of these filters are to scrub up your interface and make for a less complicated looking out course of in FileZilla. That’s why they’ve the choice to take away issues like “momentary information” and “ineffective explorer information” within the defaults.
Nevertheless, some filters are for displaying the necessities over every part. That’s why we see defaults for “configuration information” and “pictures.”
One other side of filters to think about is the way you’re in a position so as to add Distant Filters and Native Filters independently. Be happy to filter to simply pictures on the Native Filters part whereas exhibiting issues like Supply Management Directories on the Distant Filters aspect.
At any time when making an attempt to activate a filter, click on on the OK button.
However what if the default filters aren’t sufficient to your personal wants?
In that case, click on on the Edit Filter Guidelines button to make them extra particular.

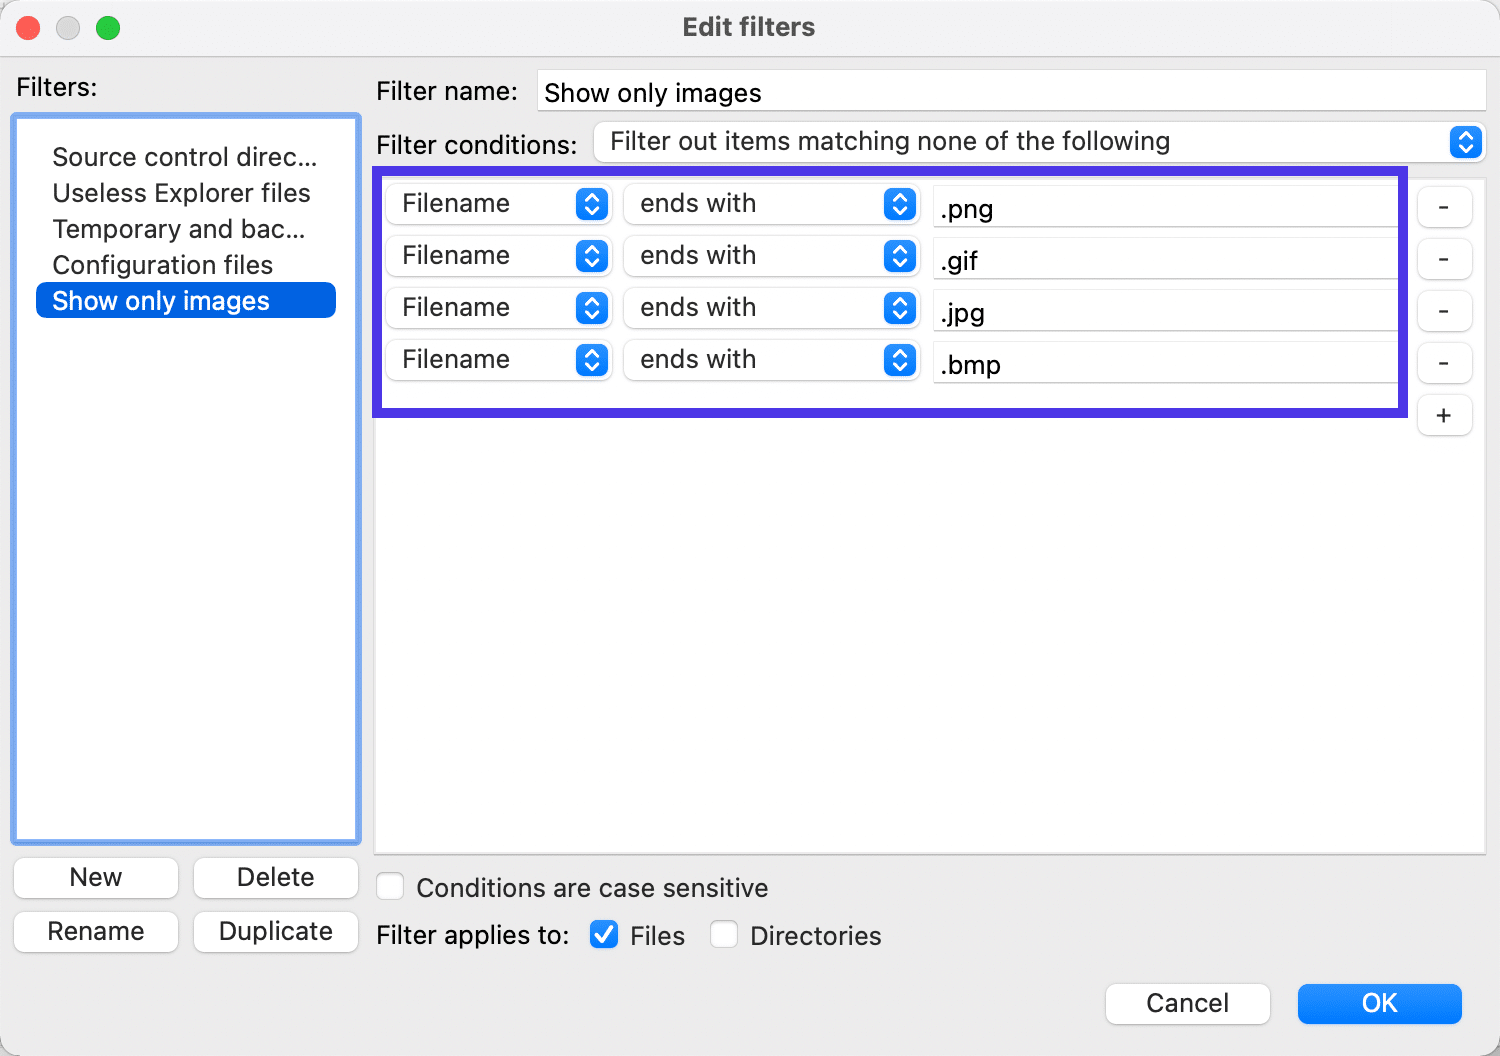
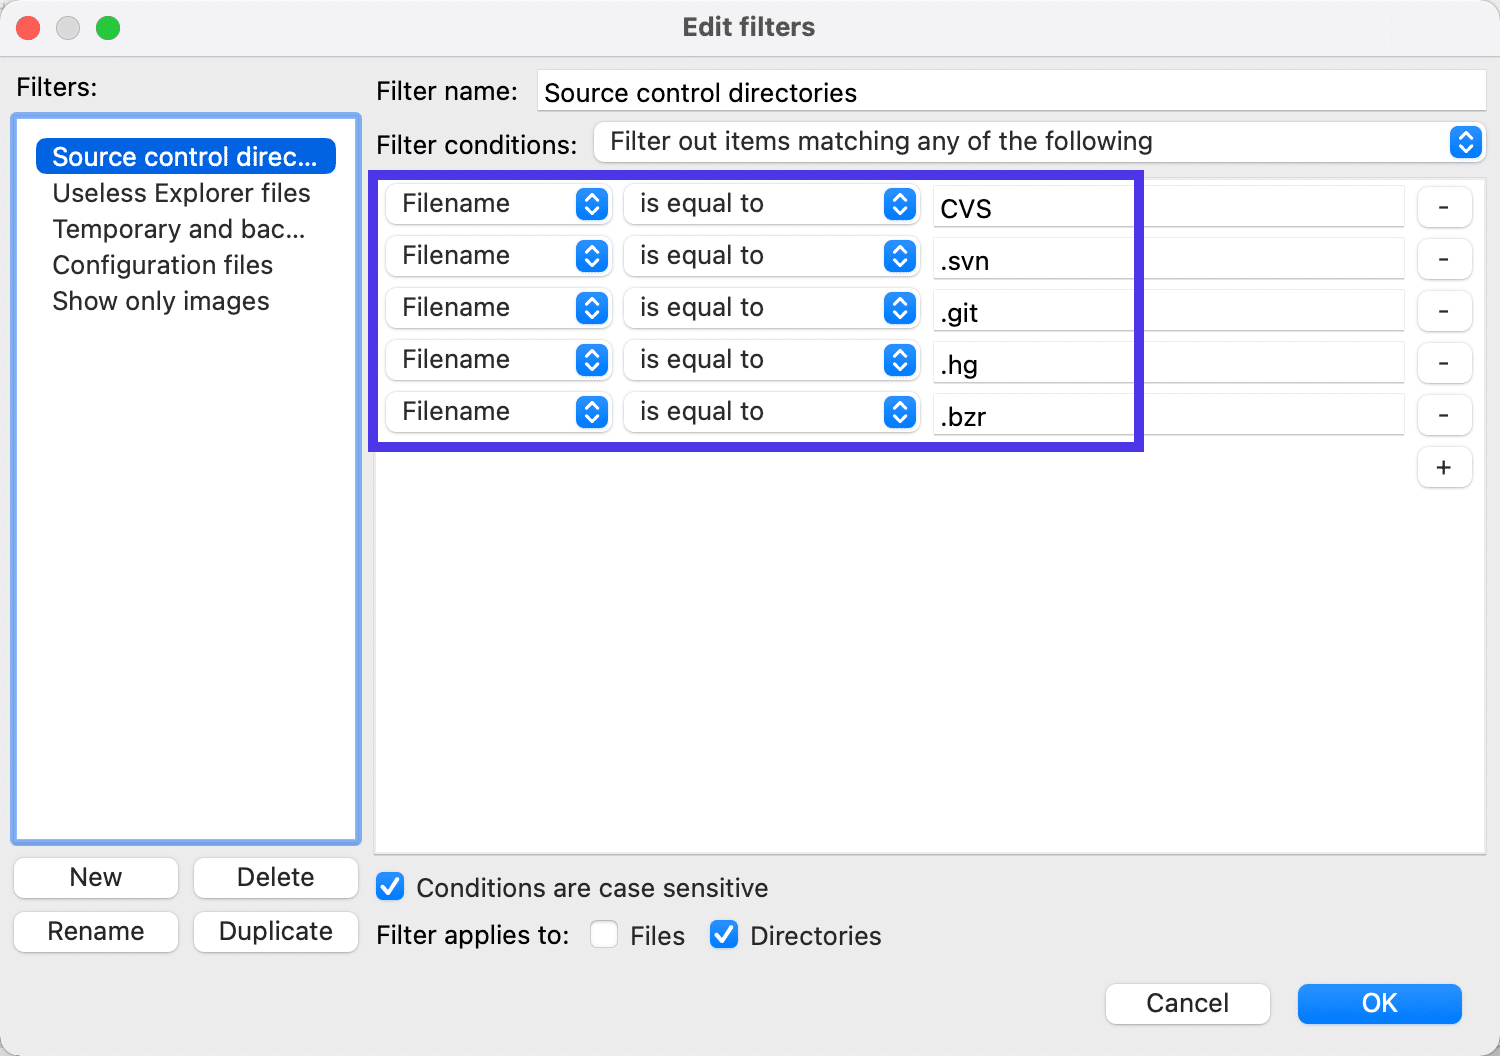
Edit Filters Window
The Edit Filters window supplies distinctive circumstances and guidelines for every of the default filters from earlier than. For example, you can go in there and filter out gadgets that don’t match filenames that finish with “.png”, “.gif”, or “.jpg”.
You may as well make the filters apply to information, directories, or each on the identical time.
As one other instance, you’ll be able to go to the Supply Management Directories filter and set filenames equal to issues like “.svn” and “.git” in order that solely these seem and the remainder of the information get filtered out from view, as within the under screenshot.
How To Add Bookmarks and A number of Websites in FileZilla
Filters make it simpler to maneuver round in FileZilla, however bookmarks additionally turn out to be useful for going on to a file listing that’s used frequently.
FileZilla’s bookmarks function works identical to browser bookmarks, besides as an alternative of saving a webpage, FileZilla saves a piece of your file listing.
So as to add and handle bookmarks, click on on the Website Supervisor fast key.
As soon as contained in the Website Supervisor window, you’ll discover a folder known as My Websites. That is the place all of your distant website connections get positioned whenever you create an FTP or SFTP hyperlink by way of FileZilla.
The Website Supervisor additionally supplies the fields to really make these connections along with your internet hosting credentials (as lined earlier on this article). It is best to see a web site title inside the My Websites folder when you’ve already linked through FTP or SFTP. In our instance, the title of our website is known as “Testingsite”.
The objective right here is so as to add a bookmark for that website, making it simpler to entry a selected listing or folder with out having to dig round for a number of minutes.
You may make bookmarks for every of the websites saved in FileZilla. Since we at present solely have one website linked within the Website Supervisor, choose that website in order that it’s highlighted.
Now, go to the underside of the window and select the New Bookmark button.
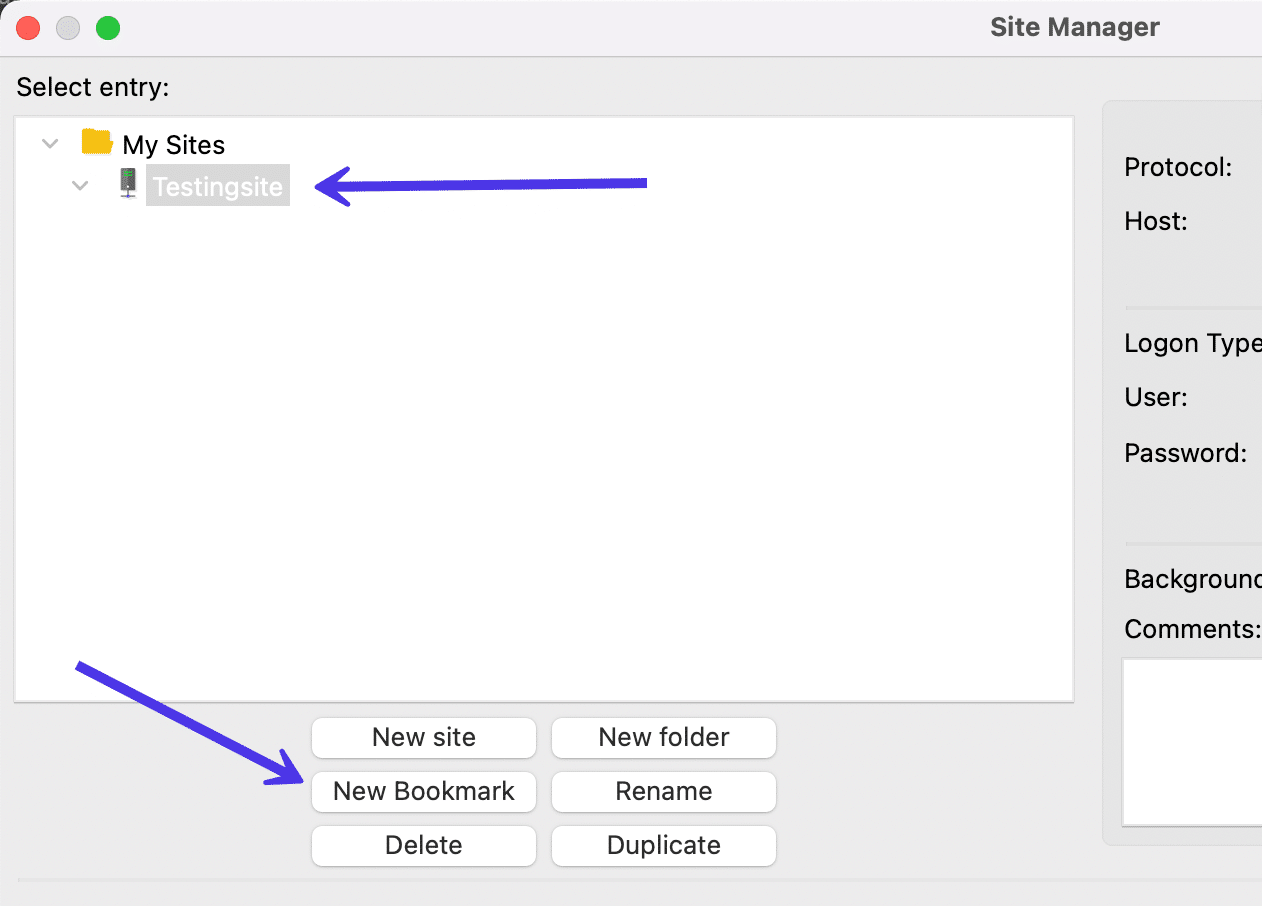
FileZilla provides a “New Bookmark” label with a star icon under the hierarchy of web sites in your My Websites folder. Be happy to rename the bookmark to your personal reference.
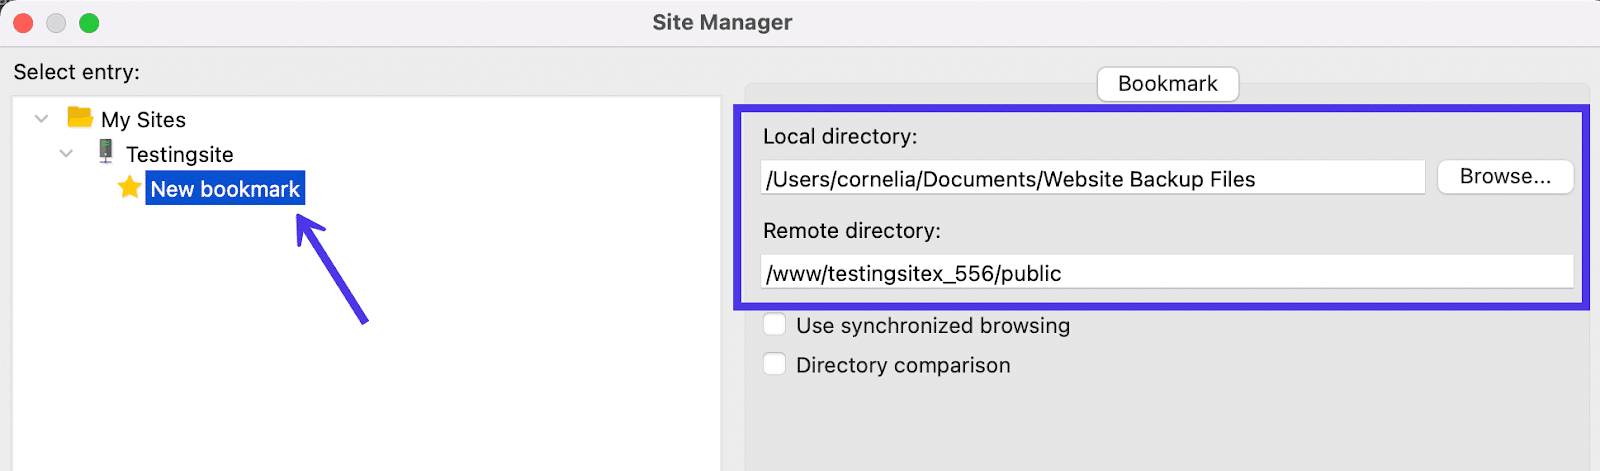
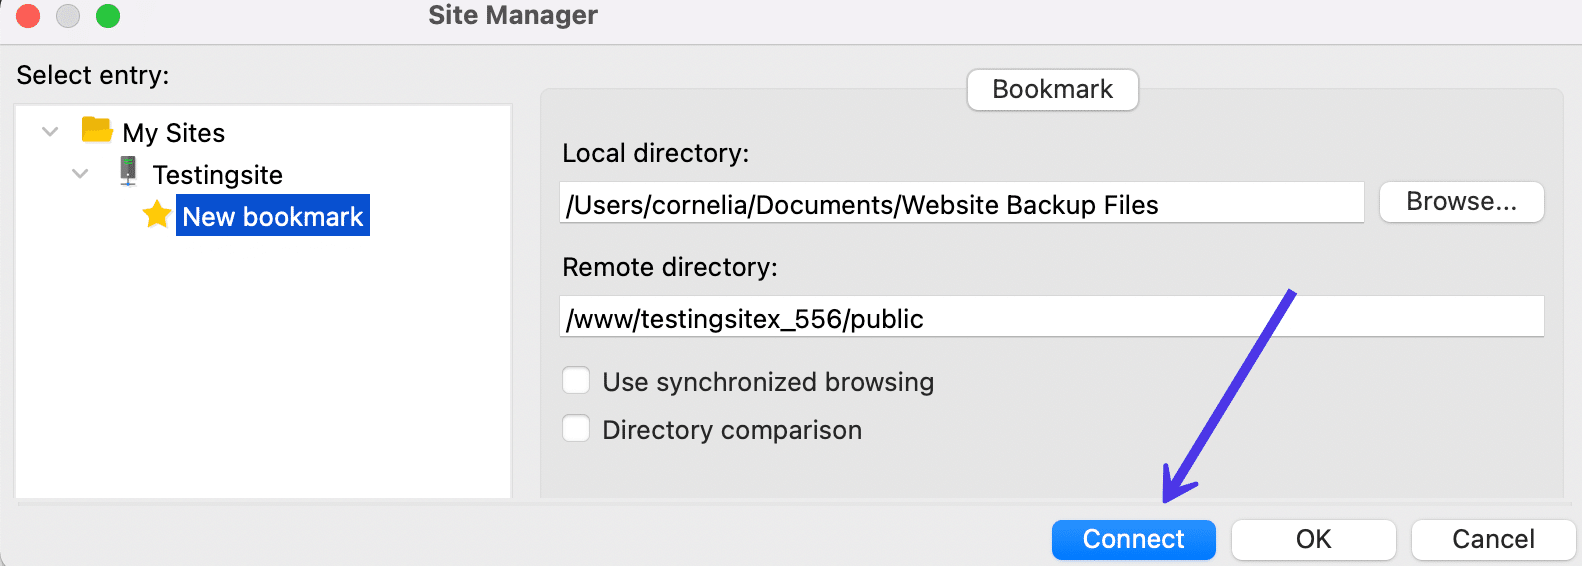
Transfer to the fitting aspect of the window to seek out the Native Listing and Distant Listing fields. These begin off empty for a bookmark, however you’re capable of browse for particular directories to get despatched to them everytime you go to the bookmark.
One purpose to log a bookmark is so that you simply at all times have instant entry to your web site’s backup information in your Native Listing. You may as well create a bookmark to the /public folder within the Distant Listing discipline. With this configuration, you’re prepped to add latest backup information to the fitting location in your web site server when one thing occurs like a corrupt file or a damaged web site.
To determine a bookmarked listing within the fields, you could both Browse for the fitting listing or paste it into the sphere.
The Native Listing discipline is the straightforward one. Merely click on on the Browse button, seek for the file you need to bookmark, and add it to FileZilla.
The Distant Listing discipline requires you to repeat and paste the specified listing or file construction, which you’ll find by going again to the primary FileZilla web page. They checklist your complete listing deal with beneath the Distant Website dropdown above the Distant Listing Tree.
Now that you simply’ve specified a Native and(or) Distant Listing, click on the OK button to put it aside for later in FileZilla.
So now that you simply’re arrange with some new bookmarks, how do you go about activating one for a fast reroute to the file of your alternative?
The bookmark will get saved in FileZilla. So so long as you retain that website energetic in this system, you proceed to have entry to the bookmark.
So, let’s say you open some random distant and native information. You possibly can see within the under screenshot that neither of these folders incorporates precisely what we had within the bookmark.
To make use of a bookmark, click on again on the Website Supervisor button within the higher left-hand nook, then choose the bookmark out of your My Websites folder.
Click on on the Join button to activate the bookmark and ship your self on to the information.
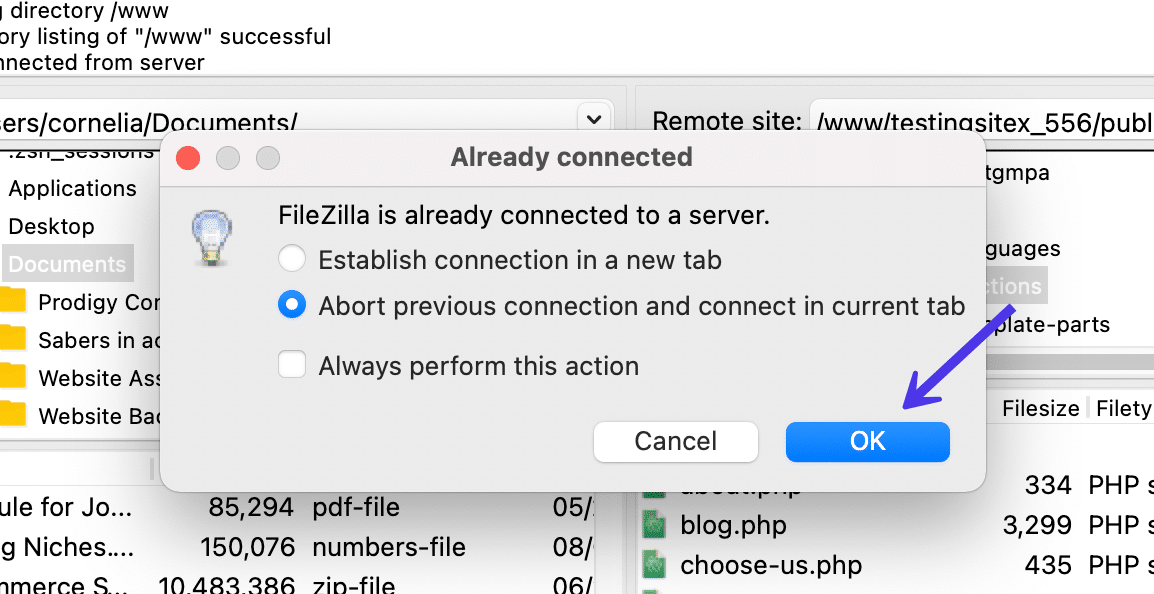
A warning often seems when you’re already linked to a server. You possibly can abort the connection or set up a brand new connection to a brand new server when you’d slightly hold a number of connections working.
On this case, we’ll use the Abort Earlier Connection possibility since we don’t care about what we have been engaged on earlier than. Nevertheless, it might serve you nicely to make use of the Set up Connection In A New Tab possibility when you’d slightly save your earlier location.
It’s additionally potential to test the At all times Carry out This Motion field when you’d slightly not see this popup sooner or later.
No matter your alternative, click on the OK button to proceed.
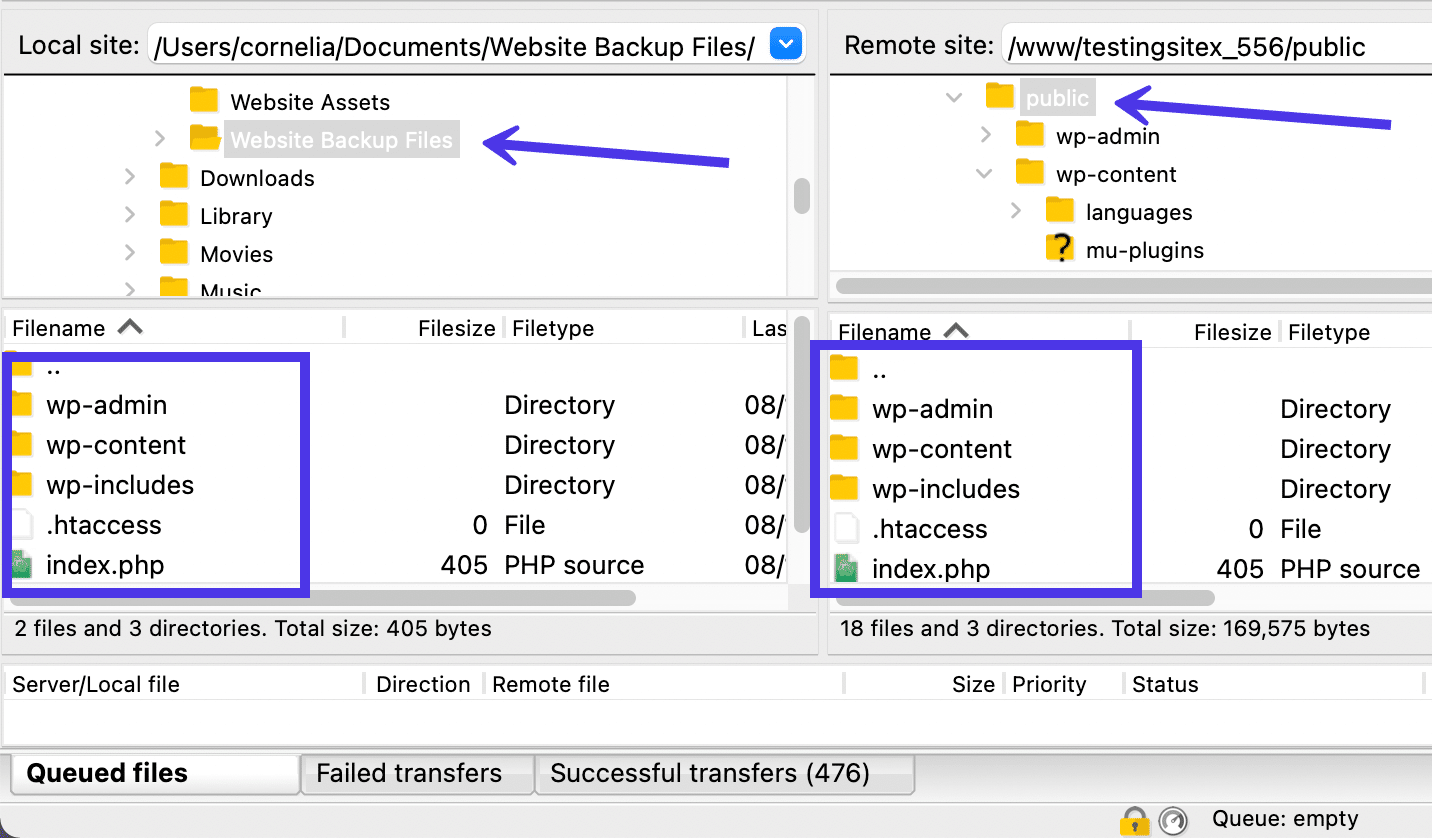
The bookmark then instantly opens the information specified within the Website Supervisor.
Inside an on the spot, you’re capable of entry one thing necessary on each the Native Website and the Distant Website. And as talked about, there’s no must make bookmarks for each when you don’t need them.
Our screenshot exhibits the comfort of such a bookmark, seeing as how we robotically acquire entry to a WordPress website backup with all of the necessary information like /wp-admin, /wp-content, and /wp-includes. The Distant Website part despatched us to the /public folder, which incorporates the folders you’d often have to switch if restoring a backup.
All that’s required now could be to add information from the Native Website to the Distant Website for an entire restoration of a backup. And when you’re fascinated about utilizing bookmarks for restoring backups, you also needs to contemplate fine-tuning your WordPress backup course of.
Bear in mind, that’s solely one of the explanations you would possibly contemplate turning on bookmarks in FileZilla.
Generally it’s simply good to have direct entry to generally used file directories. Different occasions you might want to find information in an emergency, or when it’s required to swap out banner pictures in a plugin. The choices are infinite.
To wrap this part up, we need to speak about the best way to add a number of websites in FileZilla, contemplating it’s accomplished in the identical place you handle bookmarks.
Including a brand new website means you’re connecting a number of web sites to concurrently run on FileZilla. Every website wants its personal SFTP or FTP internet hosting credentials, after which you’ll be able to hook up with and swap between websites.
Once more, select the Website Supervisor button within the higher proper nook of the primary FileZilla window. Subsequent, go to the My Websites folder and click on on the New Website button.
FileZilla robotically generates a brand new website inside that My Websites folder. You possibly can click on on the positioning to rename it to your personal reference.
Listed here are some necessary notes to recollect about new websites on FileZilla:
- You’re capable of make as many websites as you need on FileZilla. All of them get saved beneath that My Websites folder.
- You have got the flexibility to create distinctive bookmarks for every of the websites listed within the My Websites folder.
- It’s essential to join with distinctive FTP or SFTP host credentials with each new website. It’s no totally different than the strategies we lined earlier on this article. It’s essential to go to your host and duplicate over credentials just like the Host, Person, Port, and Password.
- Bear in mind to pick the fitting protocol otherwise you’ll get an error. Most respected hosts use SFTP because it’s safer.
How To Use FileZilla for Native, Distant, and Comparative File Looking out
One other answer for skipping by way of the litter inside FileZilla is to make use of the Search operate.
Though FileZilla’s Search device is usually a little sluggish, you’ll be able to kind in a key phrase that matches a file you’re in search of, then set the search question within the background to finish the search when you work along with your information.
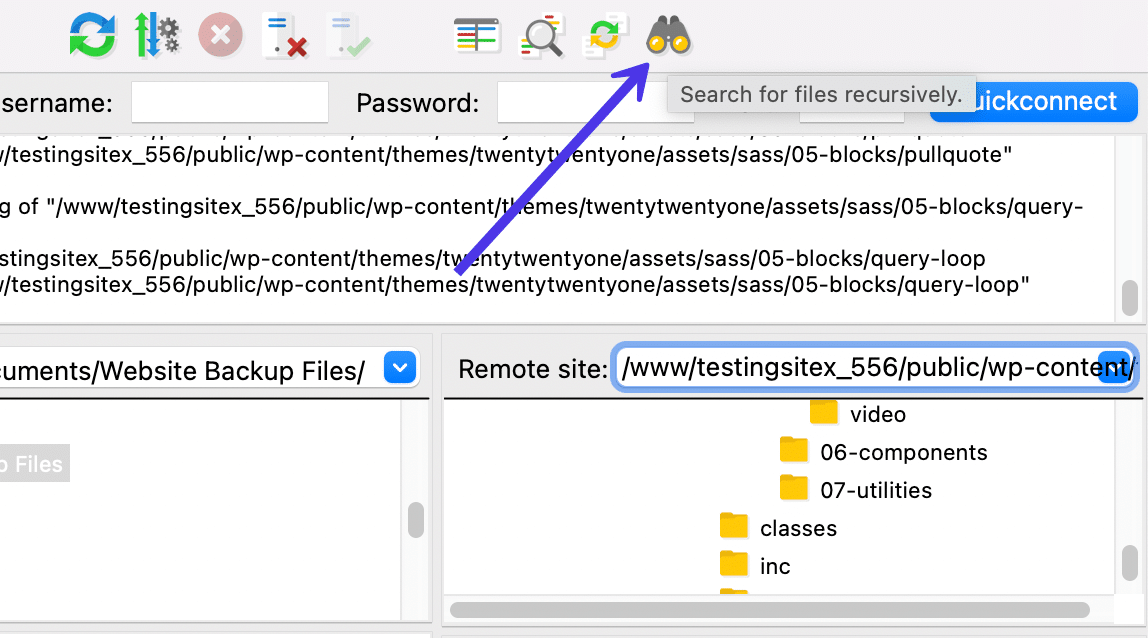
Begin by discovering the binoculars icon, positioned on the higher right-hand aspect of the primary FileZilla window. It’s the final fast key within the Management Panel.
This button is known as Seek for Recordsdata Recursively, and it permits you to full a variety of searches in distant and native websites, together with comparative searches for each.
Click on on the File Search (binoculars) button to start the search.
As you’ll be able to see, there are alternatives to finish a Native Search, Distant Search, and Comparative Search.
Native File Looking out
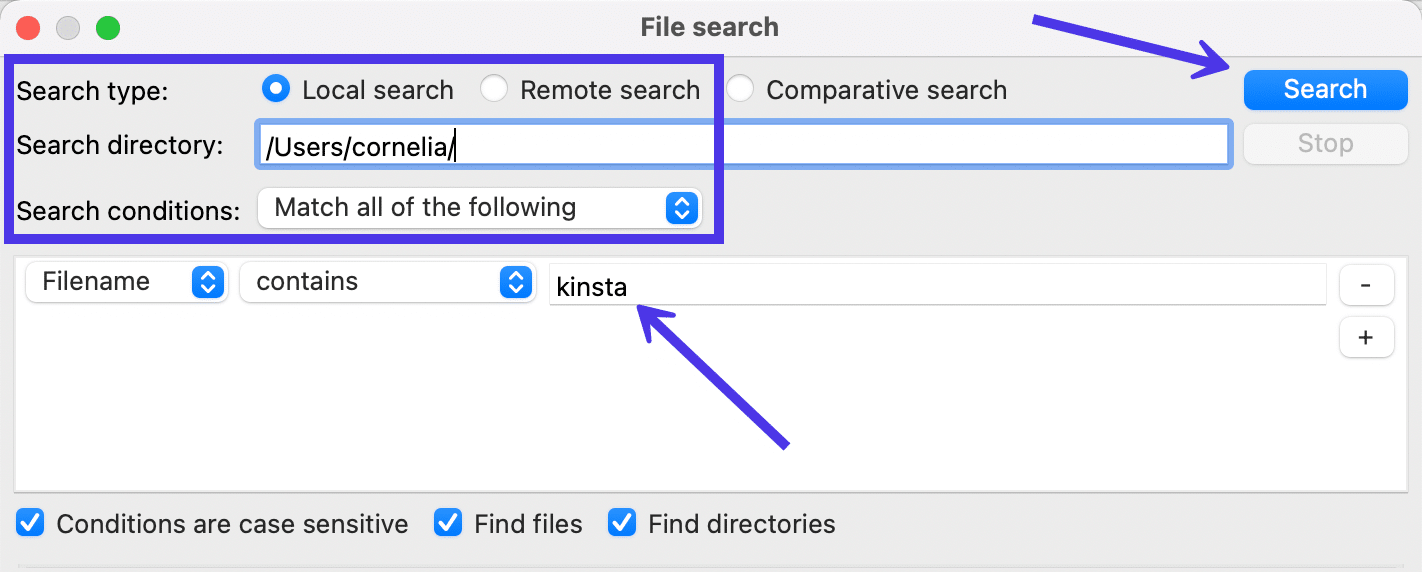
We’ll start with the Native Search, so choose that possibility and go to the Search Listing discipline to kind wherein listing in your laptop you’d like to look. This typically fills in by default primarily based on what you’ve been searching in FileZilla. It’s possible you’ll must broaden the search again to a basic consumer listing when you’d like to incorporate all your laptop information within the search.
Within the Search Situations discipline, choose Match All the Following.
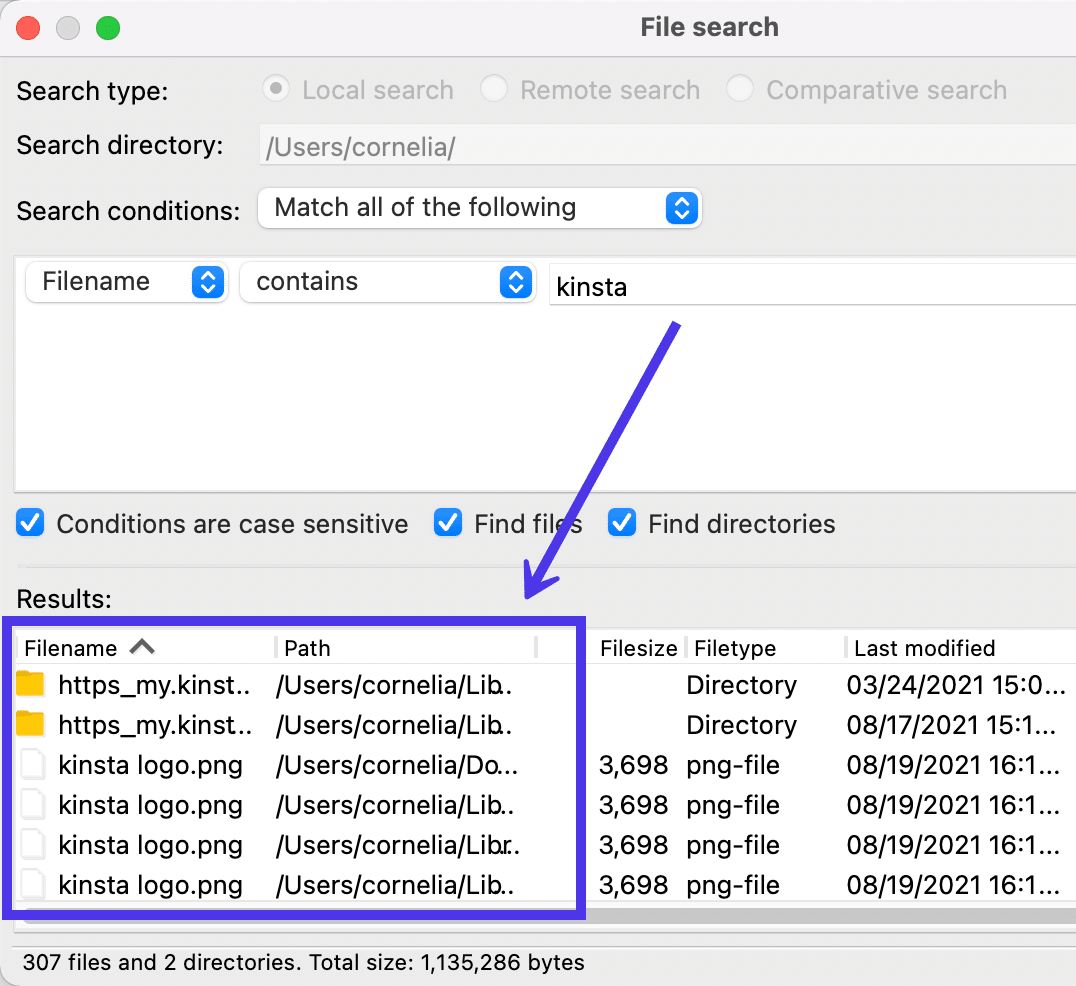
Then, go right down to the search parameters to kind in a key phrase that is likely to be included in a file you need to discover. This scans your total listing for filenames that include the key phrase. On this occasion, we’ll kind in “kinsta” as a key phrase to find a Kinsta emblem we’re on the lookout for.
Click on the Search button to run the method.
It ought to solely take a couple of seconds to disclose some outcomes, however queries on bigger directories might hold working within the background or take longer to provide any findings.
Transfer to the Outcomes panel to view what the Search device has produced. As anticipated, FileZilla discovered a number of cases of the Kinsta emblem saved in my /doc and /library folders.
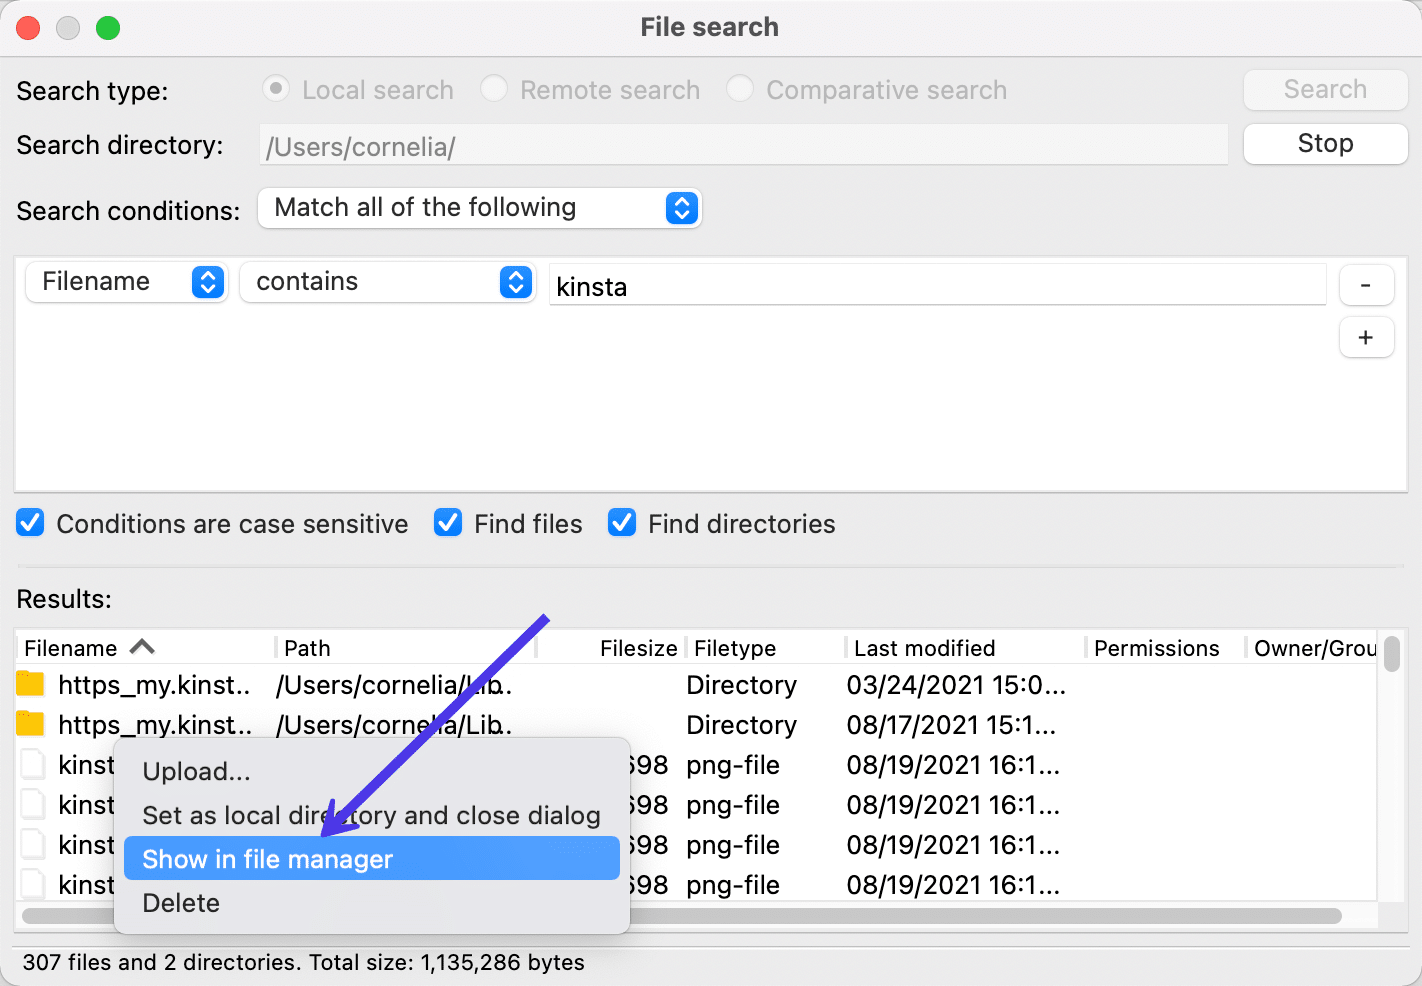
Be happy to right-click on one of many information to finish actions like exhibiting it in a file supervisor, importing to the distant server, or deleting the file altogether.
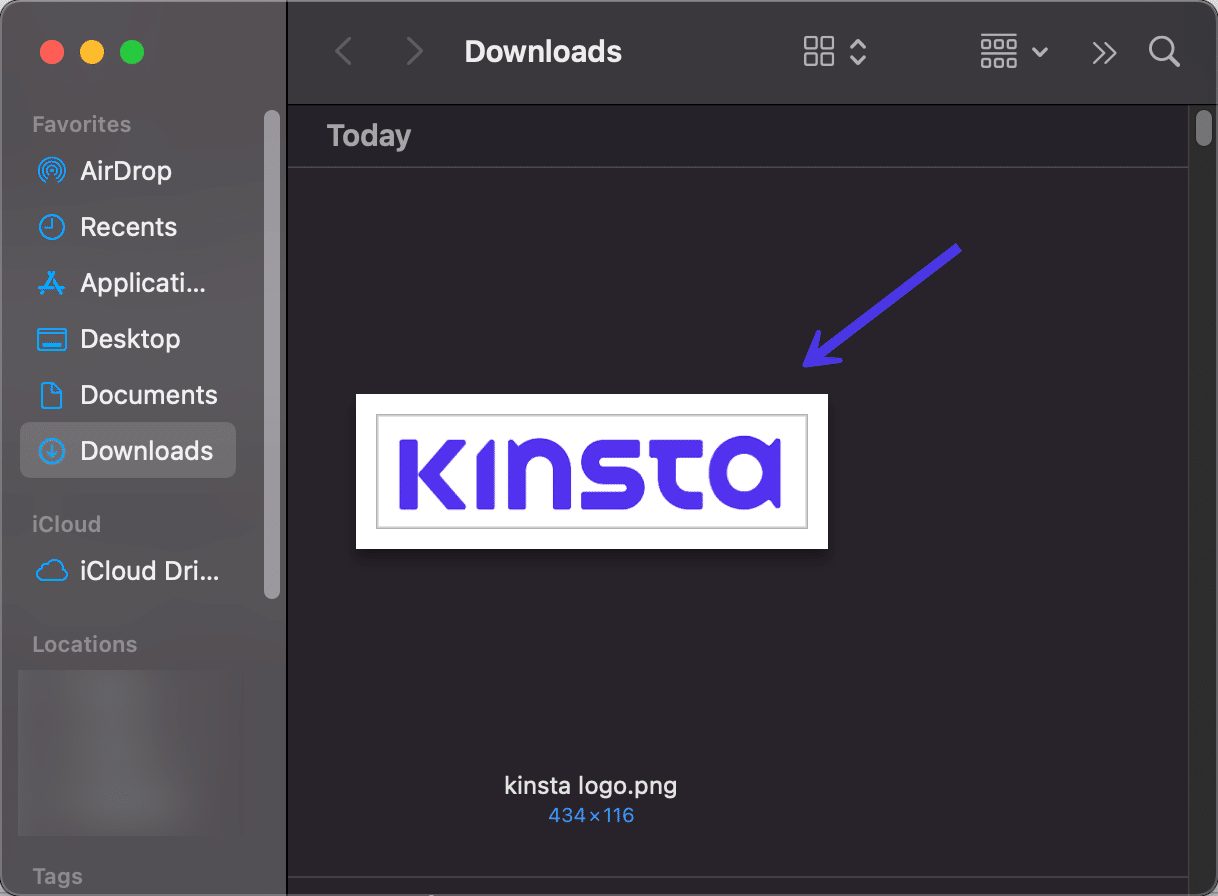
On this case, we’ll select the Present in File Supervisor hyperlink to open the picture on the pc.
And there it’s!
The File Search panel provides a large number of settings for getting extra particular along with your searches. For instance, you’ll be able to select to alter from Filename to one of many following:
Going with the Filesize possibility permits you to search out information which can be bigger or smaller than a selected measurement. The Date possibility enables you to kind in date ranges to find information that have been created throughout sure time intervals.

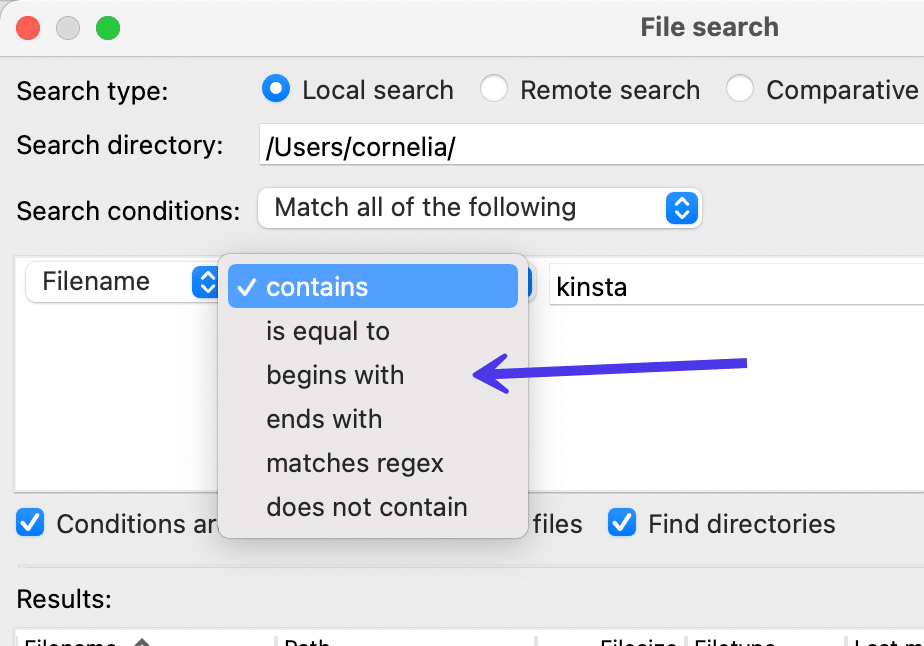
The Incorporates dropdown discipline has different decisions for broadening or tightening the scope of your search. Clicking on that dropdown reveals the next choices:
- Incorporates
- Is the same as
- Begins with
- Ends with
- Matches regex
- Doesn’t include
These are a few of your main search parameters seeing as how they specify what should be accomplished with the entry within the subsequent discipline. For example, you might need to solely discover Filenames that finish in PNG, eliminating all different non-PNG information.
You possibly can get extra particular with it as nicely, utilizing the Is Equal To choice to solely show information with a precise match to the key phrase you typed in earlier than.
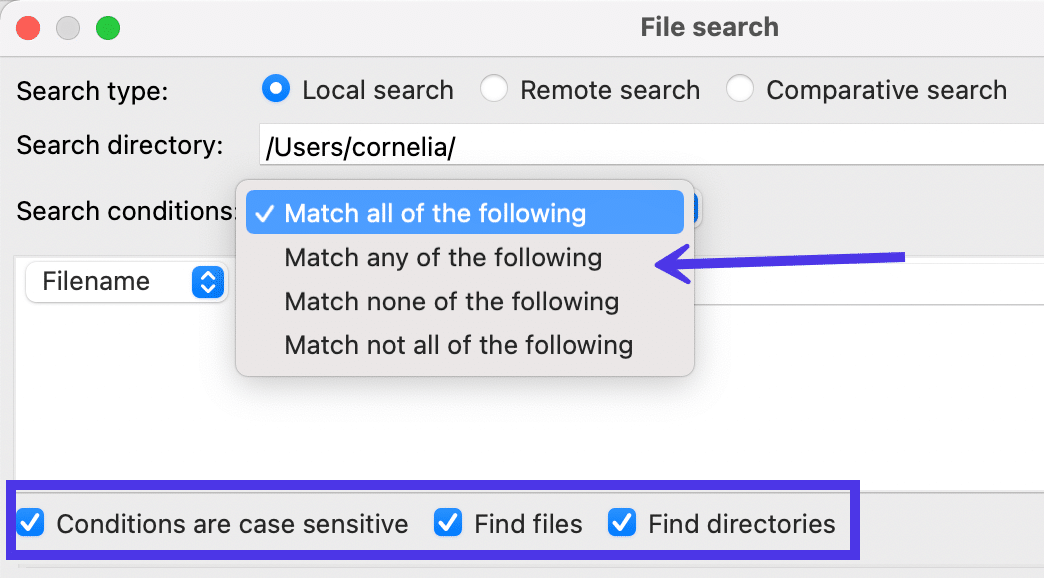
Lastly, FileZilla presents a Search Situations dropdown discipline with the next decisions:
- Match all the following
- Match any of the next
- Match not one of the following
- Match not all the following
These pertain to the truth that you’ll be able to embody a number of search circumstances within the field under. As such, utilizing the Match All the Following possibility requires the search to align with each search situation.
You’ll additionally discover a number of checkboxes on the backside of the window. Once more, these strengthen your search potentialities with extra particular necessities. For instance, you’ll be able to be sure that all Situations Are Case Delicate. It’s additionally potential to limit your search to information, directories, each, or neither.
Transferring on, the File Search part of FileZilla incorporates two different Search Sorts: one for a Distant Search and one other for a Comparative Search.
Distant File Looking out
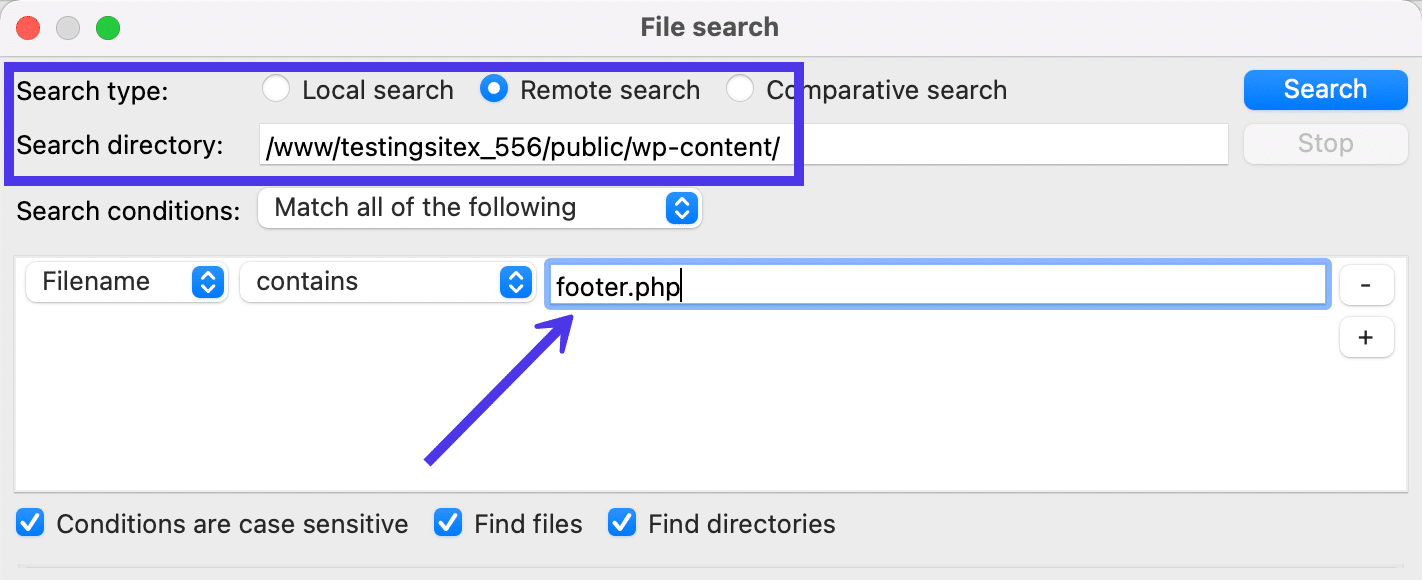
Select the Distant Search radio button to restrict your search to the information in your Distant Website.
As with the Native Search performance, the window asks you to fill within the Search Listing to your Distant Search. It’s essential to paste on this particular listing or kind it in your self.
The Search Situations and different search parameters are all the identical as we simply lined above. You possibly can nonetheless alter from Filename to Date or Incorporates to Does Not Comprise.
As well as, you’ll be able to kind in a search key phrase for the file or listing you’d like to seek out.
For this tutorial, we’ll punch in “footer.php”, because you typically need to find the footer.php file for adjusting a WordPress footer, or generally for including issues like HTML or CSS to a plugin or theme.
Click on the Search button to run the search.
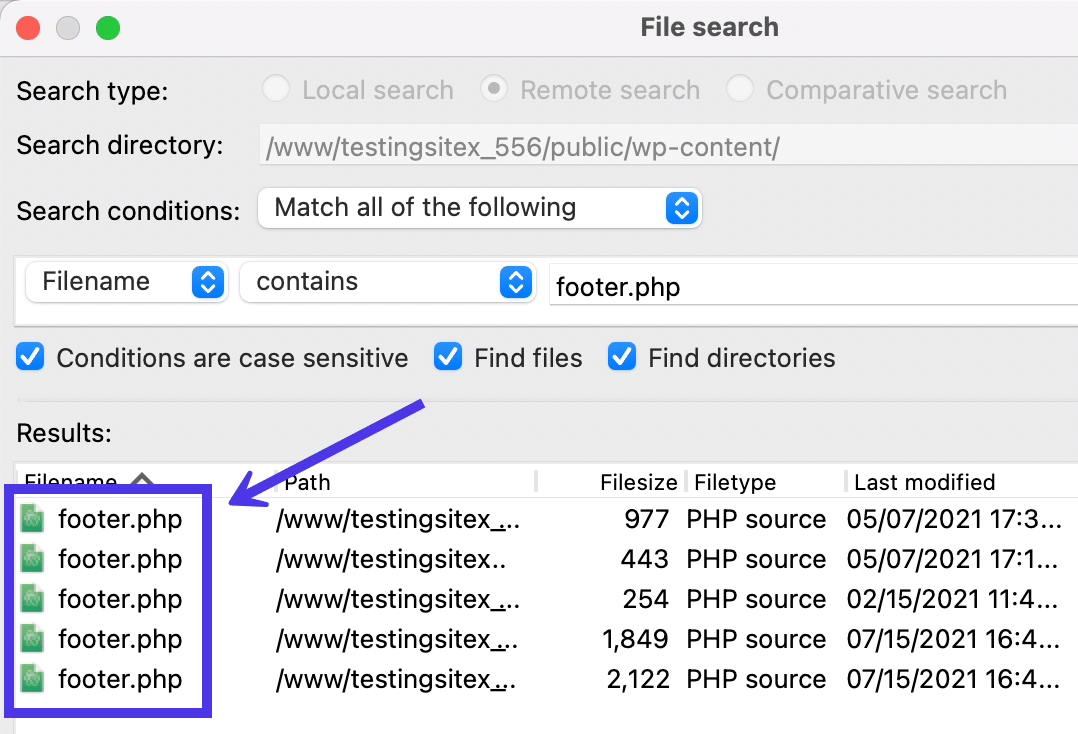
A number of footer.php information seem in our Search Outcomes part. Make sure you test the Path column to determine if it’s the precise file you need.
Really feel empowered to discover additional by clicking on the information, viewing them, or downloading them to your native website.
Comparative File Looking out
The final kind of looking out device on FileZilla is known as Comparative Search. This allows you to add a number of search circumstances and run these guidelines in each the native and distant directories. The outcomes get displayed aspect by aspect so that you can analyze the variations or uncover which one you really need to make use of for a venture.
For this one, you could select to look a Native Listing and a Search Listing (the distant listing). We’ll kind in “wp-content” for our key phrase to see if we’re capable of determine /wp-content information in each our native backup information and inside the website information.
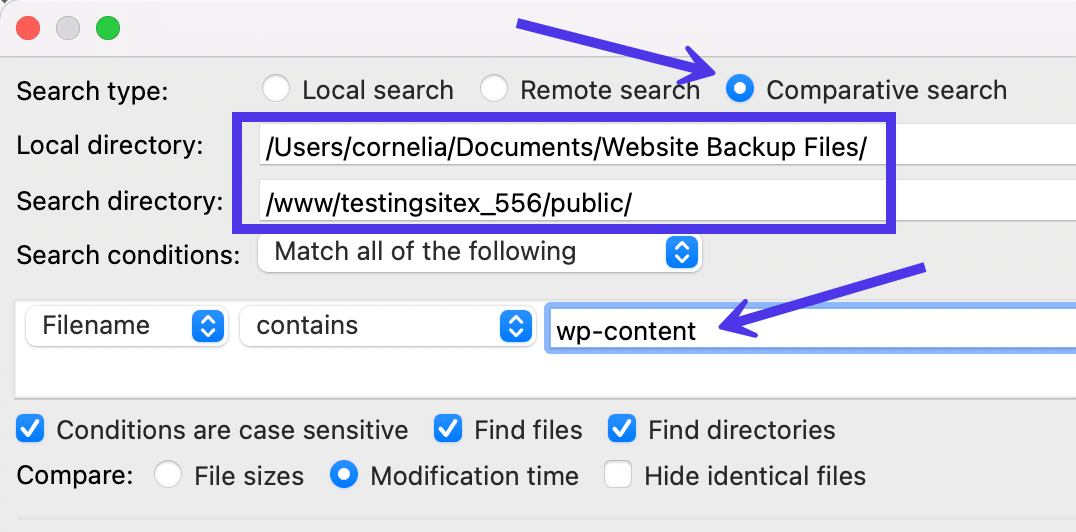
Click on on the Search button, then wait to see what comes up within the Native Outcomes and the Distant Outcomes.
There’s not a lot “evaluating” accomplished moreover exhibiting that each of the information exist or don’t exist in each environments. Apart from that, the comparative search additionally enables you to select these information for modifying, importing, or downloading.

How To Repair Connection Errors in FileZilla
Regardless of its robustness, errors can often pop up in FileZilla as a consequence of incorrect login credentials, issues with DNS info, or different points like sluggish or unreliable connections.
On this part, we’ll cowl all widespread errors proven in FileZilla and information you thru the steps to resolve them.
Deadly Error: Operation Timed Out
The “Operation Timed Out” error happens for quite a lot of causes. It appears to be like critical as a result of capitalized crimson “FATAL ERROR” message, however most of the time, there’s a fast repair.
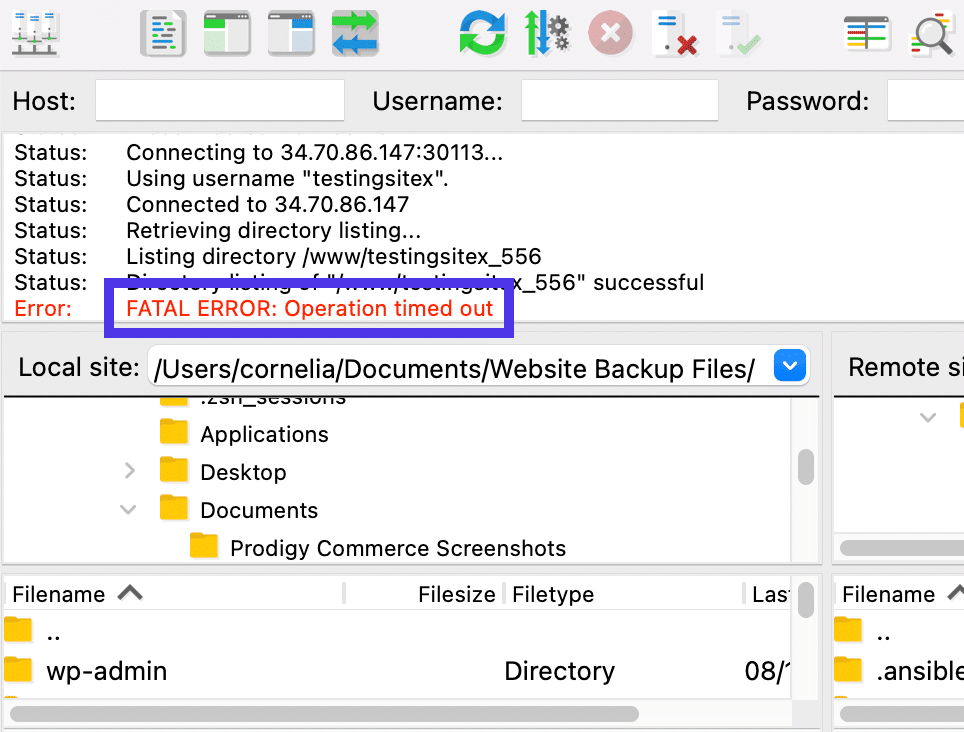
Initially, the operation timing out typically has nothing to do with you typing one thing mistaken. In truth, this error additionally seems whenever you haven’t used FileZilla shortly. Subsequently, the app merely disconnects the shopper from the server for safety functions.
In that case, return to the Website Supervisor to click on on the Join button as soon as extra. This could set up a brand new connection so long as the FTP credentials are nonetheless right from earlier than.
Bear in mind {that a} timed-out error may present up as a consequence of incorrect consumer credentials or an unreliable connection. Be sure you double-check the login credentials for accuracy.
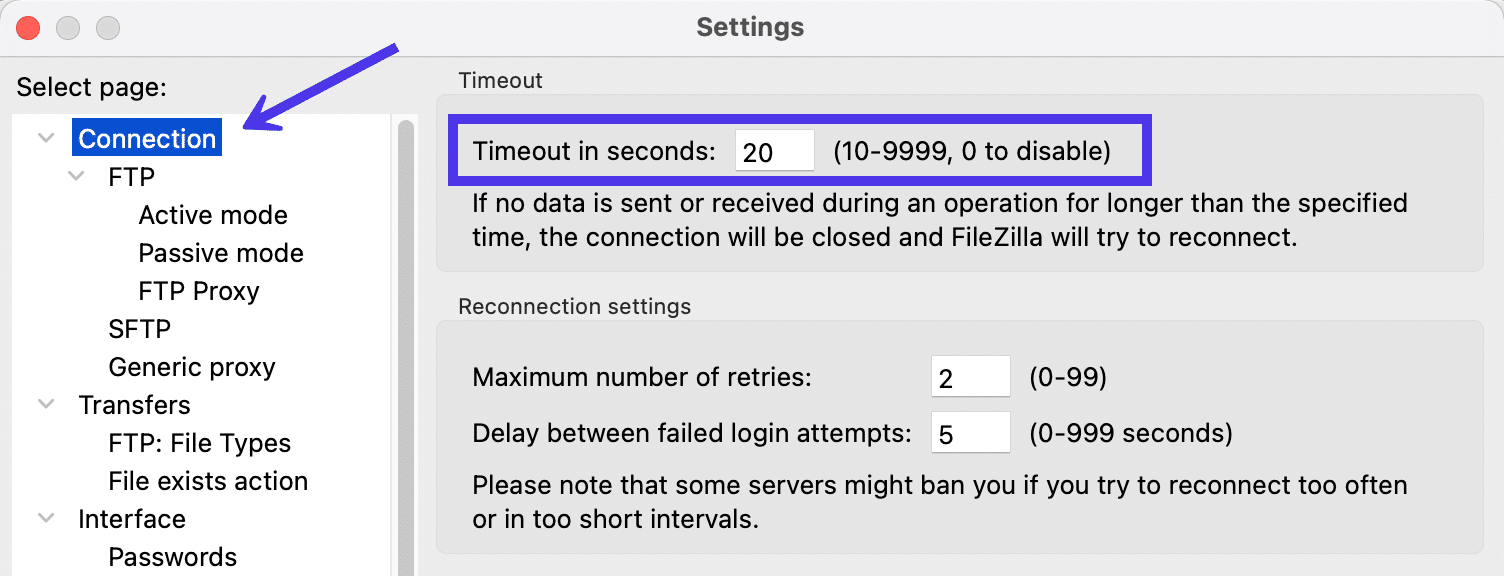
If that’s not the issue, it’s potential your web connection is shaky or your host server has some restrictions that restrict the connection pace. In these conditions, you could possibly lengthen the Timeout settings to present FileZilla extra time to ascertain a connection.
Full this course of by going to FileZilla > Settings.
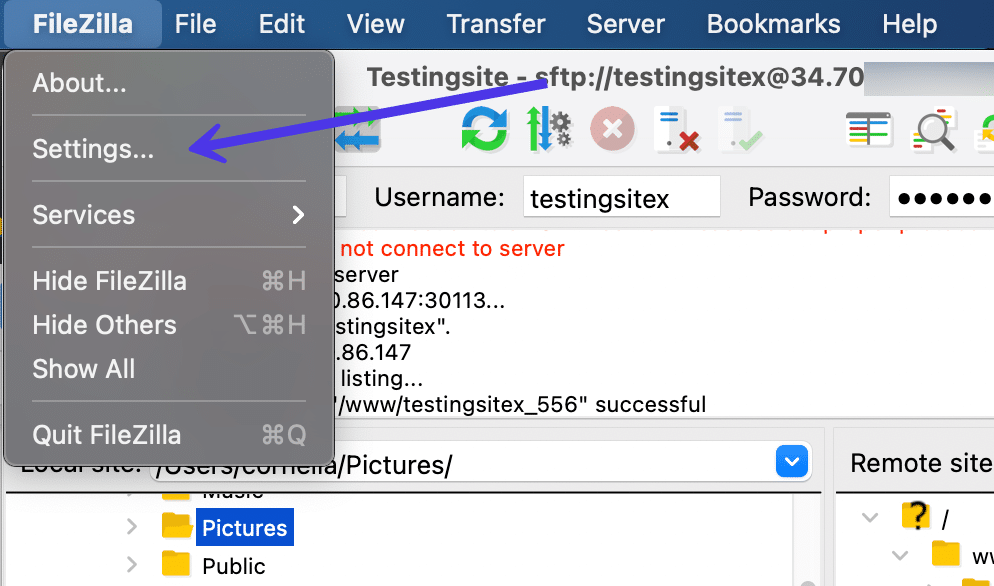
Within the new window, go to the Connection tab. Discover the Timeout in Seconds discipline to present FileZilla extra time to course of connections. You may as well alter the variety of retries to see if it’s going to assist.
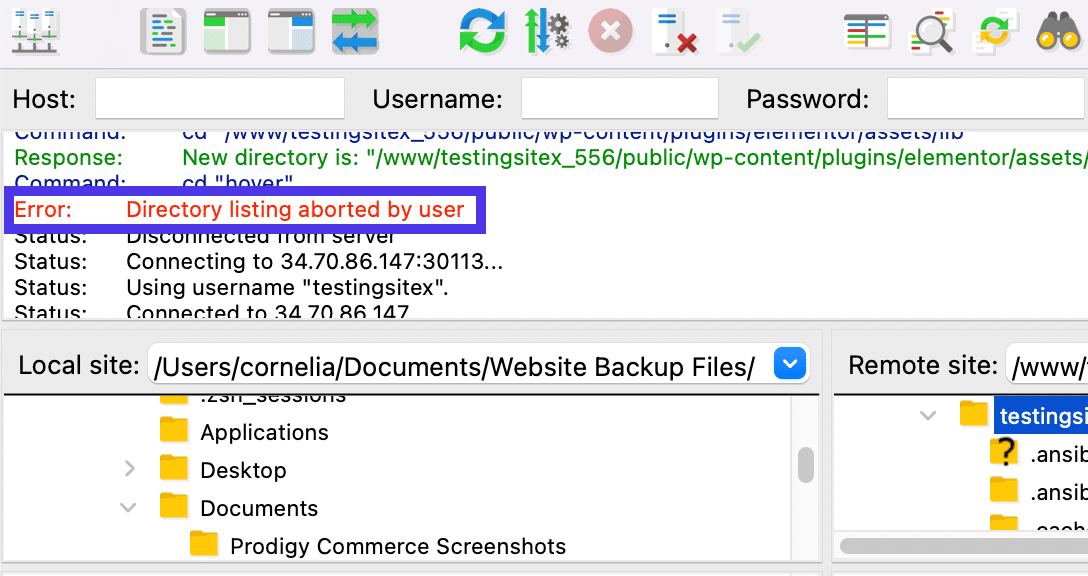
Error: Listing Itemizing Aborted By Person
One error from FileZilla says “Listing Itemizing Aborted By Person”.
Though this would possibly seem as a consequence of a timeout concern, it’s extra possible that you simply selected to abort a connection so as to reopen a previous connection or hyperlink to a brand new website. That is widespread whenever you attempt to navigate to a bookmark as nicely.
This one’s no large deal. You possibly can both proceed with the brand new connection you made, or you’ll be able to contemplate going again to the Website Supervisor to reconnect with the earlier website or connection.
Error: Can’t Set up FTP Connection To An SFTP Server: Please Choose Correct Protocol
FileZilla shows the “May Not Connect with Server” error as a broad solution to inform you that the connection failed. So, you might even see that for a plethora of causes.
Begin by trying round for extra particular errors to present you clues on the precise reason behind that “May Not Join To Server” error.
For example, the “Please Choose Correct Protocol” message signifies you’ve probably typed in the fitting credentials however with the mistaken protocol. That is widespread for many who attempt to join through SFTP by way of the Quickconnect module.
As we all know, the Quickconnect button, by default, solely permits for using customary FTP. Subsequently, you could go into the Website Supervisor to regulate to the fitting protocol utilized by the server or your internet hosting firm.
Error: Authentication Failed
The “Authentication Failed” error tells you that you simply’ve typed within the mistaken username or password to make the connection.

To resolve this concern, strive typing them in once more or copying and pasting them over to take care of accuracy.
Should you’re nonetheless having issues, contact the proprietor of the server, corresponding to your internet hosting firm, to clarify that your FTP login credentials aren’t working.
Numerous Host and Port Errors
Typing within the mistaken Host ID or Port leads to the identical error message. You obtain a “Connection Timed Out” message, then a “May Not Join To Server” error.
These are slightly generic and will imply a couple of issues, however you already know it’s a Host ID or Port concern when FileZilla ends the messaging with a Response and Command. It’s mainly saying “That is what we tried and it didn’t work. Perhaps you’ve entered the mistaken Host or Port.”
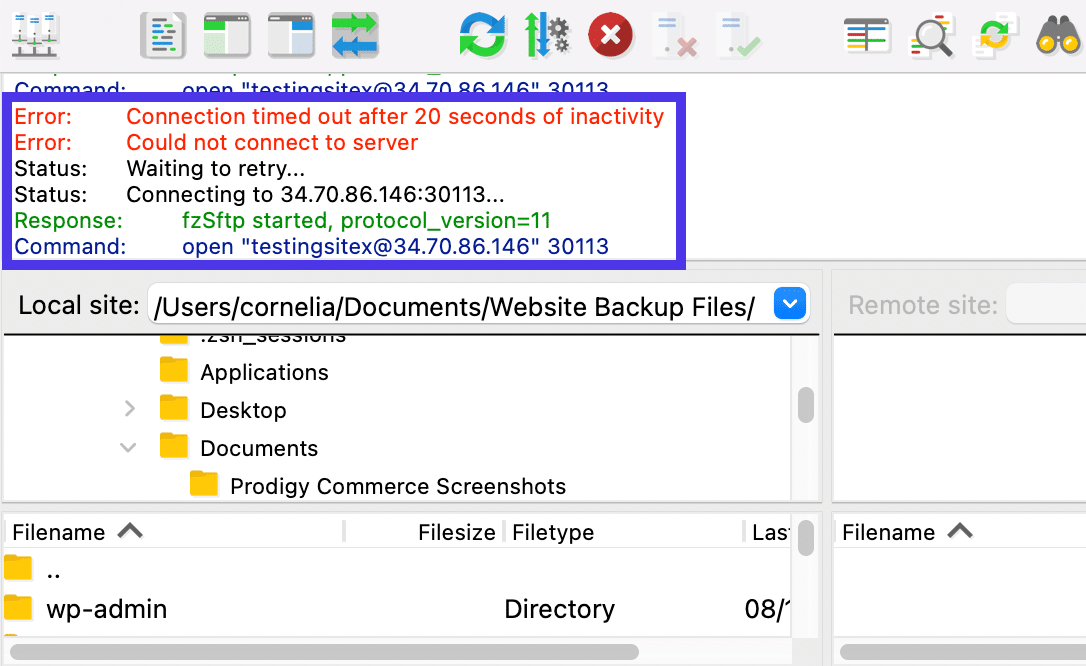
The answer for this one is straightforward: double-check that you simply punched each of these in proper. You would possibly copy and paste them over to take away the opportunity of human error. Lastly, contact your host when you’re nonetheless having issues.
Servers with Incorrect Configurations
Often, FileZilla might share an error about an “Idle Connection” or a “Timeout.” This typically means there’s an improperly configured server someplace between the connection of your native laptop and the distant website.
Should you personal the troublesome server, it’s your drawback to resolve. But most customers aren’t the server homeowners, so that you don’t have a lot management over this example.
You possibly can strive contacting the server proprietor to see in the event that they may also help out.
Or, you will have the choice to make an adjustment in FileZilla to briefly repair the issue.
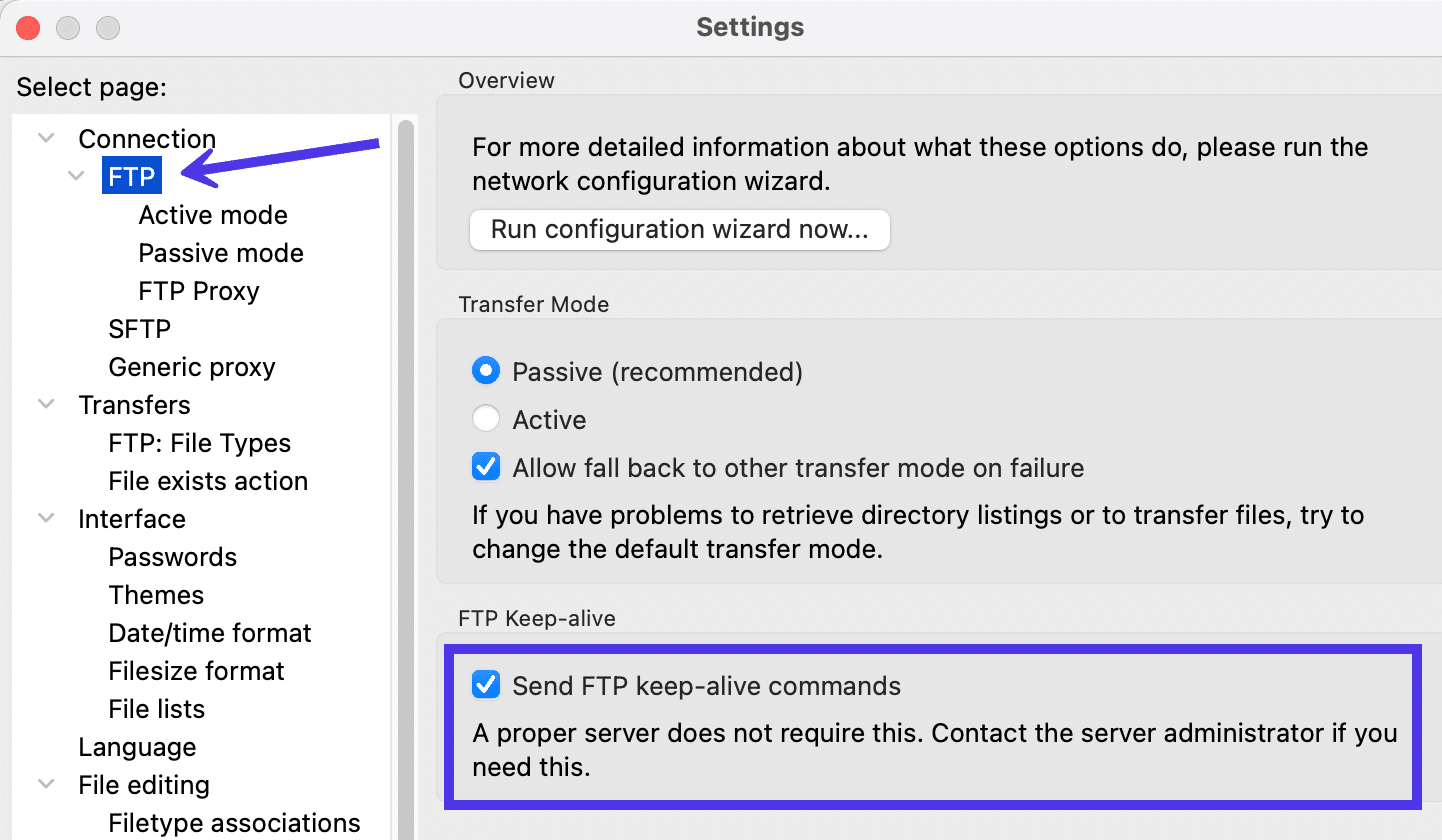
To offer it a strive, go to Edit > Settings in the primary menu.
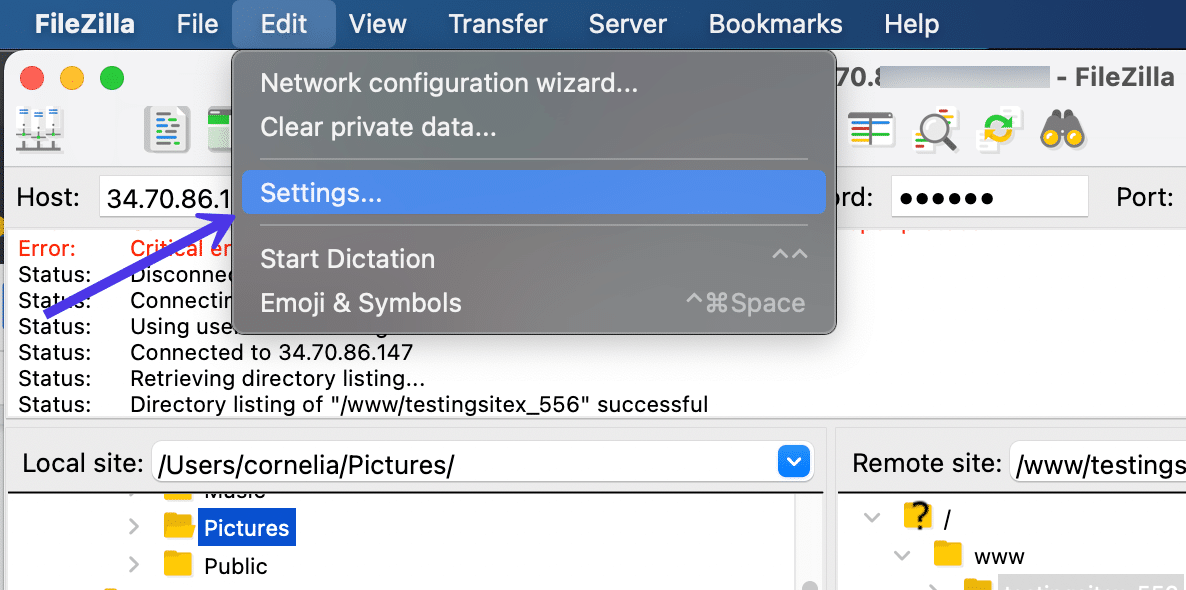
Click on Connection > FTP, then find the FTP Hold-alive part and mark the checkbox to Ship FTP Hold-alive Instructions.
As FileZilla itself mentions, you shouldn’t have to make use of this frequently. The problem right here is an improperly configured server, so it’s finest to contact the server admin to determine what’s happening.
Having stated that, we like this as an answer when you don’t have time to attend for the admin.
FileZilla Consumer vs FileZilla Server
A standard query about FileZilla often emerges earlier than customers even obtain the software program. The explanation for it’s because the FileZilla web site presents two Obtain buttons: one for the FileZilla Consumer and one other for the FileZilla Server.
What’s the distinction between the 2?
FileZilla states that you must “Choose the shopper if you wish to switch information. Get the server if you wish to make information accessible for others.”
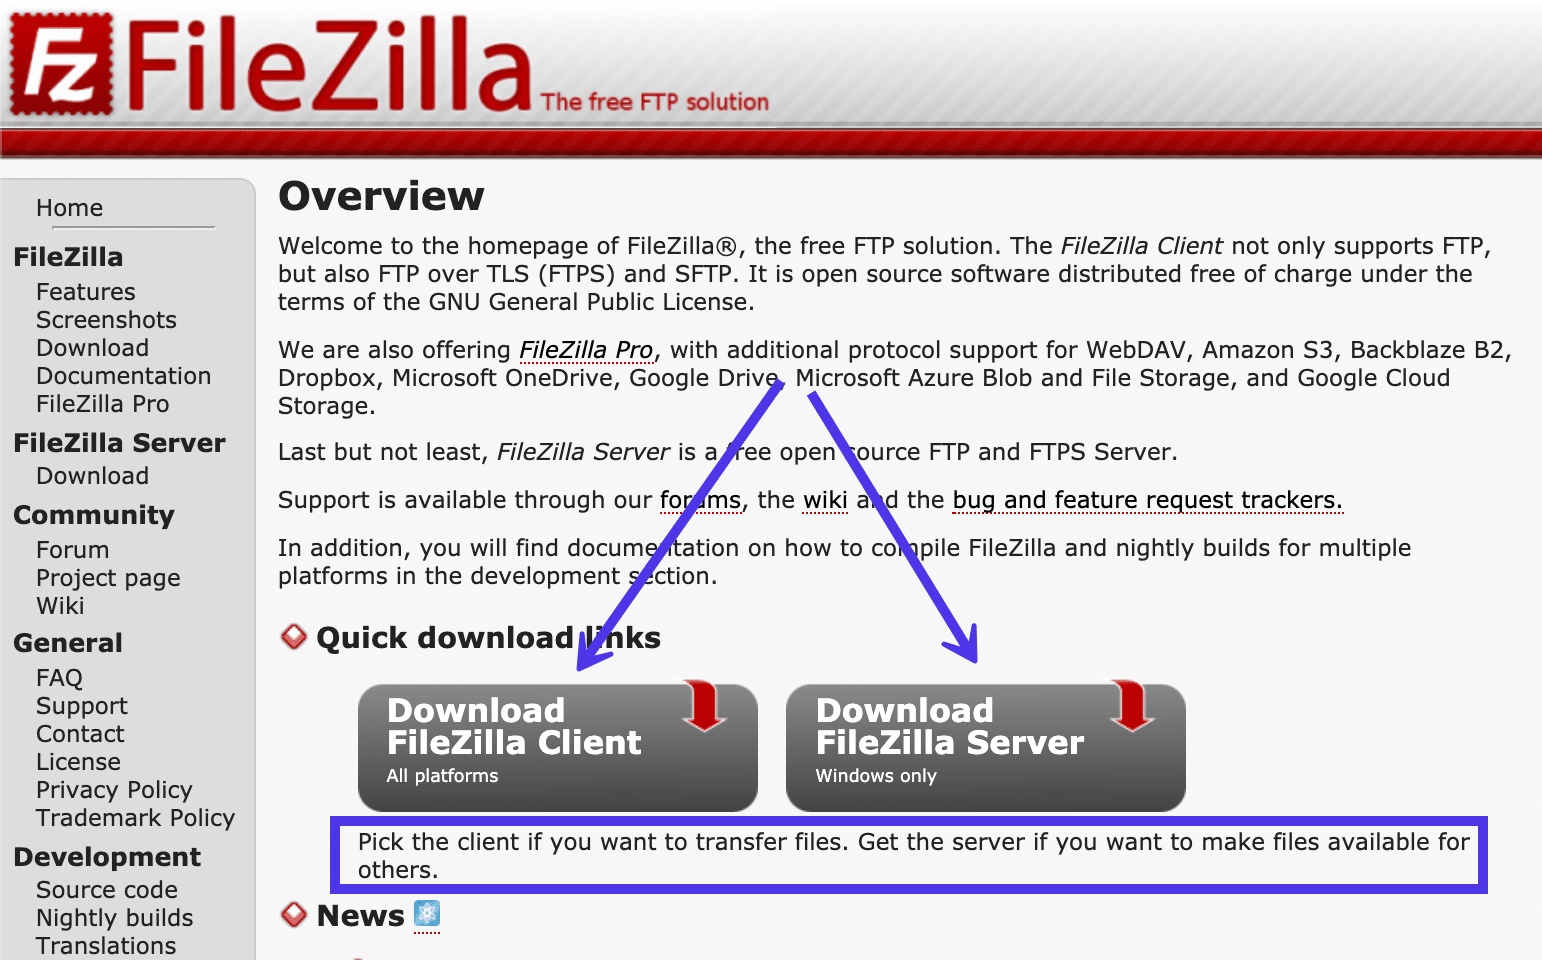
That’s a bit obscure, so let’s take a look at the 2 extra carefully.
FileZilla Consumer
- The FileZilla Consumer permits customers to add and obtain information to/from an FTP server. You make a connection between a server and your native machine (the shopper) so as to transfer information backwards and forwards.
- A number of FileZilla Purchasers can hyperlink as much as a FileZilla Server so as to retrieve information from the Server. You may as well use a Consumer to attach with a distant FTP server like one which’s internet hosting your web site.
- You possibly can set up the FileZilla Consumer on Home windows, Linux, and Mac machines.
- The Consumer initiates all transfers. As well as, the Consumer can hook up with an infinite variety of FTP Servers.
FileZilla Server
The FileZilla Server provides a couple of further options you would possibly need to make use of:
- The FileZilla Server supplies a means so that you can host a set of information in your native laptop.
- It serves as a centralized location for FTP Consumer customers to retrieve information from that laptop at any time. They’ll additionally ship information to the Server.
- The FileZilla Server solely works on Home windows computer systems.
- The Server is unable to provoke transfers. It serves as a storage device, working in tandem with FileZilla Purchasers which provoke the transfers. You possibly can’t join one Server to a different Server. It solely permits inward connections from Purchasers.
Total, the connection between a FileZilla Consumer and FileZilla Server works much like a cloud storage app like Dropbox or Google Drive. Nevertheless, the modes of entry, safety measures, and general value of every are completely totally different.
Probably the most obvious distinction is how file transfers by way of FTP require a Consumer and Server, like those from FileZilla. Cloud storage solely wants an internet browser or an software to entry cloud information.
Free FileZilla vs FileZilla Professional
FileZilla’s free model has a lot of the options you’ll ever want. That’s one of many causes it’s so standard.
Nevertheless, there’s a paid, upgraded model as nicely, known as FileZilla Professional.
This Professional model of the FTP shopper requires a small fee, nevertheless it provides a number of superior options that will turn out to be useful for superior customers.
Let’s check out how the 2 variations stack up subsequent to one another.
FileZilla (Free)
The common model of the FileZilla Consumer is geared toward all customers who want FTP capabilities, together with private {and professional} customers. The function checklist is a prolonged one, and most customers should not have any drawback getting what they want from the free model.
Right here’s what to anticipate:
- Assist for a number of switch protocols like FTPS, FTP, and SFTP
- Cross-platform utilization with variations for Mac OS X, Linux, and Home windows
- Distant file search to find information with guidelines and parameters
- Bookmarks that allow you to go on to sections in your file listing as an alternative of getting to dig round for them each time
- Assist for a number of languages
- Transferring of enormous information at fast speeds
- A listing searching configuration that compares directories from two websites
- Distant file modifying so that you simply don’t need to re-upload a doc when it wants edits
- Filtering instruments for narrowing down a search primarily based on filename, file measurement, or different parameters
- A drag and drop interface to maneuver information from one website to a different. The dragging and dropping permits you to add or obtain information with the clicking of a button.
- A Quickconnect button for immediately making an FTP reference to the fitting credentials
- A Website Supervisor module that helps you make safer connections, add a number of websites, and deal with issues like bookmarks
- Choices to configure the speeds at which your information get transferred
- A tabbed consumer interface with fast keys to reorganize and conceal sure modules for a extra user-friendly expertise
FileZilla Professional
As talked about, the free FileZilla Consumer is sensible for many customers. Nevertheless, there could also be one or two options within the Professional model that would make your workflow simpler.
FileZilla Professional primarily caters to skilled customers by including assist for cloud storage choices. We really feel these are additionally useful for non-professional customers when you’re focused on cloud transfers.
The whole lot from the free model of FileZilla comes included with FileZilla Professional. On prime of that, you’ll additionally obtain assist for the next cloud storage companies and protocols:
- Amazon S3
- The Backblaze B2 service
- Dropbox
- OneDrive from Microsoft
- The File Storage Service from Microsoft Azure
- The Blob Storage Service from Microsoft Azure
- Google Cloud Storage
- Google Drive
- OpenStack Swift Storage
- Field
- WebDAV
- Any Third-party suppliers that use Amazon S3
There’s additionally a downloadable model known as FileZilla Professional + CLI for utilizing the Command Line Interface and working batch transfers. This could turn out to be useful for these used to working by way of CLI instructions, like builders and engineers.
Whether or not you are a newbie or an skilled FileZilla consumer, this information will allow you to degree up your expertise 
Abstract
It solely takes a couple of moments to learn to use FileZilla, however there are many further useful options that may assist take your file switch administration to the subsequent degree. Whereas not as fashionable as a few of different FTP purchasers available on the market at present, FileZilla makes up for that with its reliability, speeds, and wide selection of options for transferring information, making bookmarks, and modifying your information.
Now it’s your flip: Have you ever ever used FileZilla? What do you want and dislike about it? Tell us within the feedback part!
Save time, prices and maximize website efficiency with:
- On the spot assist from WordPress internet hosting specialists, 24/7.
- Cloudflare Enterprise integration.
- World viewers attain with 34 information facilities worldwide.
- Optimization with our built-in Utility Efficiency Monitoring.
All of that and far more, in a single plan with no long-term contracts, assisted migrations, and a 30-day-money-back-guarantee. Take a look at our plans or speak to gross sales to seek out the plan that’s best for you.
